TESTO 885 Instruction Manual
Thermal imager
Hide thumbs
Also See for 885:
- Instruction manual (78 pages) ,
- Brief instructions (8 pages) ,
- Instruction manual (68 pages)
Table of Contents
Advertisement
Quick Links
Download this manual
See also:
Instruction Manual
Advertisement
Table of Contents

Related Manuals for TESTO 885


Summary of Contents for TESTO 885
- Page 1 885 · Thermal imager Instruction manual...
-
Page 3: Table Of Contents
1 Contents Pos : 1 /TD /Übersc hriften/1. Inhalt @ 0\mod_1177587817070_79.doc x @ 1243 @ 1 @ 1 Contents Contents ....................3 Safety and the environment ..............5 2.1. About this document ................ 5 2.2. Ensure safety................... 6 2.3. Protecting the environment .............. 7 Specifications .................. - Page 4 6.2.3. Image gallery ....................47 6.2.4. Wizards ......................49 6.2.5. Configuration ....................56 6.2.6. Audio (only testo 885-2) ................... 64 6.3. Measuring ..................65 Maintaining the product ............... 67 Tips and assistance ................68 8.1. Questions and answers ..............68 8.2.
-
Page 5: Safety And The Environment
2 Safety and the environment Pos : 3 /TD /Übersc hriften/2. Sic herheit und U mwelt @ 0\mod_1173774719351_79.doc x @ 292 @ 1 @ 1 Safety and the environment Pos : 4 /TD /Übersc hriften/2.1 Zu di esem Dokument @ 0\mod_1173775252351_79.doc x @ 346 @ 2 @ 1 2.1. -
Page 6: Ensure Safety
Pos : 18 /TD/Sic her heit und U mwelt/Sicherheit g ewährleis ten/tes to 885/Detektor @ 9\mod_1311251407168_79.doc x @ 85589 @ @ 1 During operation, the imager must not be pointed at the sun or other intensive sources of radiation (e.g. -
Page 7: Protecting The Environment
> At the end of its useful life, send the product to the separate collection for electric and electronic devices (observe local regulations) or return the product to Testo for disposal. Pos : 25 /TD/--- Seitenwec hs el --- @ 0\mod_1173774430601_0.doc x @ 283 @ @ 1... -
Page 8: Specifications
Pos : 27 /TD/Ü berschriften/3.1 Ver wendung @ 0\mod_1176211016437_79.doc x @ 695 @ 2 @ 1 3.1. Pos : 28 /TD/Leistungs bes chr eibung/Verwendung/testo 8xx/tes to 885 @ 9\mod_1304509916776_79.doc x @ 79636 @ 5 @ 1 The testo 885 is a handy and robust thermal imager. It enables you to carry out contactless determination and display of the temperature distribution on surfaces. -
Page 9: Technical Data
Pos : 29 /TD/Ü berschriften/3.2 T ec hnisc he D aten @ 0\mod_1176211088437_79.doc x @ 704 @ 2 @ 1 3.2. Technical data Pos : 30 /TD/Leistungs bes chr eibung/T ec hnische D aten/WBKs/tes to 885, 890/885 Bil dleistung Infrar ot @ 9\mod_1304510882919_79.doc x @ 79670 @ 5 @ 1 Infrared image output Feature... - Page 10 Video stream Max. 25 Hz within EU, max. 9 Hz outside EU Colour palettes Pos : 33 /TD/Leistungs bes chr eibung/T ec hnische D aten/WBKs/tes to 885, 890/885 Mes sung @ 9\mod_1304512049845_79.doc x @ 79769 @ 5 @ 1 Measurement Feature...
- Page 11 Super-telephoto lens: 1.6 mm at 2 m (6.5 ft.) distance Pos : 34 /TD/Leistungs bes chr eibung/T ec hnische D aten/WBKs/tes to 885, 890/885, 890 M ess ungfunkti onen @ 9\mod_1311931466014_79.doc x @ 86843 @ 5 @ 1 Measurement Feature...
- Page 12 3 Specifications Pos : 35 /TD/Leistungs bes chr eibung/T ec hnische D aten/WBKs/tes to 885, 890/885 Kamer aauss tattung @ 9\mod_1304513082185_79.doc x @ 79835 @ 5 @ 1 Imager equipment Feature Values Digital imager Standard lens 30° x 23° Telephoto lens Optional: 11°...
- Page 13 Mains unit output 5 V / 4 A voltage Pos : 38 /TD/Leistungs bes chr eibung/T ec hnische D aten/WBKs/tes to 885, 890/885, 890 U mgebungs bedi ngung en @ 9\mod_1311933455412_79.doc x @ 86909 @ 5 @ 1 Ambient conditions Feature...
- Page 14 3 Specifications Pos : 39 /TD/Leistungs bes chr eibung/T ec hnische D aten/WBKs/tes to 885, 890/885 Physi kalisc he Kenndaten @ 9\mod_1304513613482_79.doc x @ 79901 @ 5 @ 1 Physical features Feature Values Weight 1570 g (including battery) Dimensions (L x W x 253 x 132 x 111 mm (0.83 x 0.44 x 0.37")
- Page 15 3 Specifications Guidelines, warranty Feature Values EU Directive 2014/30/EC Warranty 2 years, warranty conditions: see www.testo.com/warranty Pos : 42 /TD/--- Seitenwec hs el --- @ 0\mod_1173774430601_0.doc x @ 283 @ @ 1...
-
Page 16: Product Description
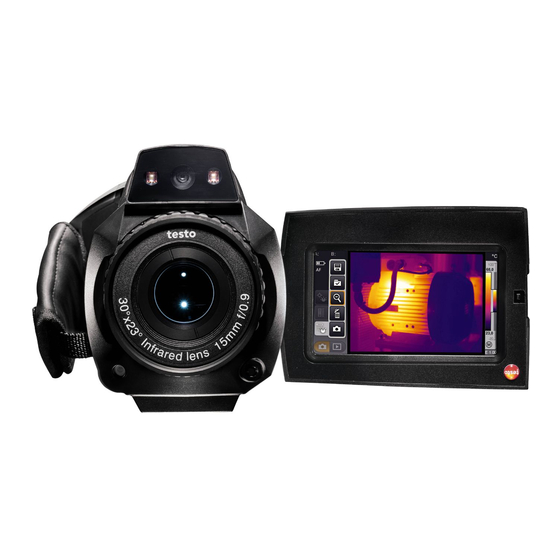
Pos : 44 /TD/Ü berschriften/4.1 Ü bersic ht @ 0\mod_1176379946003_79.doc x @ 733 @ 2 @ 1 4.1. Overview Pos : 45 /TD/Produktbes chr eibung/Ü bersicht/testo 8xx/testo 885, 890 @ 9\mod_1304515275913_79.doc x @ 79934 @ 33 @ 1 4.1.1. Product components 1 Digital imager lens for taking visual images and two power -LEDs for illuminating the image. -
Page 17: Button Functions
4 Product description Focusing ring for adjusting the focus manually. CAUTION Auto mechanism may be damaged! > Only turn focusing ring when auto-focus is deactivated ( 7 Rotatable handle with adjustable hand strap and fastening loop for the lens cover. 8 Battery compartment (bottom of imager). -
Page 18: Display Interface
4 Product description 12 Display, can be flipped out 90° and rotated 270°. When the imager is switched on, the display remains active even when folded in. It is advisable to use the power-save options to prolong the battery life, see Power-save options, page 61. - Page 19 4 Product description Display Description Set emissivity. 3 Imager mode selection bar: button for recording mode, button for image gallery mode. 4 Menu bar: the menu bar comprises 3 tabs including buttons for selecting functions: Further information is available under Menu bar/tabs, page 33. 5 Status displays: Display Description...
-
Page 20: Operating Concept
Only testo 885-2: Bluetooth interface activated. Only testo 885-2: headset connected. USB connection established. Pos : 46 /TD/Produktbes chr eibung/Grundlegende Eigensc haften/WBKs/tes to 885/Bedienkonz ept T ouch/Joystic k @ 9\mod_1305272341960_79.doc x @ 80234 @ 3555 @ 1 4.1.3. Operating concept The imager can be operated in two different ways. -
Page 21: Basic Properties
(e.g. when the battery is changed). Pos : 49 /TD/Produktbes chr eibung/Grundlegende Eigensc haften/WBKs/tes to 885/885, 890: Datei for mate und D ateinamen @ 9\mod_1311258646347_79.doc x @ 85695 @ 3 @ 1... -
Page 22: File Formats And File Names
BMT format (recorded using the sequence capturing assistant). yyyyyy: • 6-digit consecutive number. zzz: • for all images (Testo-specific file extension) • for all videos (Testo-specific file extension). Pos : 50 /TD/--- Seitenwec hs el --- @ 0\mod_1173774430601_0.doc x @ 283 @ @ 1... -
Page 23: First Steps
Pos : 52 /TD/Ü berschriften/5.1 Inbetriebnahme @ 0\mod_1185342823812_79.doc x @ 1885 @ 2 @ 1 5.1. Commissioning Pos : 53 /TD/Erste Schritte/WBKs/tes to 885/Inbetri ebnahme/885, 890: Akku kontaktier en @ 9\mod_1304519890176_79.doc x @ 79970 @ 3 @ 1 5.1.1. Connecting the rechargeable battery 1. - Page 24 5 First steps 2. Touch to change the unit. The activated unit is shown on the top right of the display. 3. Touch to confirm the entry. Set time/date dialogue box is opened. 4. Touch the top button to open the Time input screen.
-
Page 25: Initial Charging Of The Rechargeable Battery
> Hold down to close the imager. Pos : 55 /TD/Erste Schritte/WBKs/tes to 885/Inbetri ebnahme/885, 890: Akku-Erstaufladung @ 9\mod_1304672991362_79.doc x @ 80043 @ 3 @ 1 5.1.3. Initial charging of the rechargeable battery The imager is delivered with a partially charged battery. -
Page 26: Getting To Know The Product
Pos : 56 /TD/Ü berschriften/5.3 Produkt kennenl ernen @ 0\mod_1185342901015_79.doc x @ 1894 @ 2 @ 1 5.2. Getting to know the product Pos : 57 /TD/Erste Schritte/WBKs/tes to 885/Pr odukt kennen l ernen/885, 890: Drehbar er Handgriff/H andsc hlaufe @ 9\mod_1309334087308_79.doc x @ 81113 @ 333 @ 1 5.2.1. Adjusting the hand strap >... -
Page 27: Attaching The Lens Cover To The Hand Strap
5 First steps 5.2.2. Attaching the lens cover to the hand strap > Guide the clip on the lens cover (1) through the loop on the handle (2). 5.2.3. Rotating the handle The handle can be rotated up to 180° in 10 positions. 1. -
Page 28: Attaching A Shoulder Strap
Pos : 58 /TD/Erste Schritte/WBKs/tes to 885/Pr odukt kennen l ernen/885, 890: Schultergurt / Objekti vköc her @ 9\mod_1312361883710_79.doc x @ 89759 @ 33 @ 1 5.2.4. -
Page 29: Inserting The Memory Card
> To remove the memory card: press the memory card to release the lock. Pos : 60 /TD/Erste Schritte/WBKs/tes to 885/Pr odukt kennen l ernen/885, 890: IR- Schutzglas montier en / demontier en @ 9\mod_1313574818687_79.doc x @ 91443 @ 355 @ 1 5.2.7. -
Page 30: Changing The Lens
3. Push the lens into the mount as far as it will go and turn it clockwise until it clicks into place. Pos : 62 /TD/Erste Schritte/WBKs/tes to 885/Pr odukt kennen l ernen/885, 890: Kamera ei n-/aussc halten @ 9\mod_1305287423369_79.doc x @ 80332 @ 3 @ 1 5.2.9. -
Page 31: Manually Focusing The Image
0.5 m (1.64 ft) super-telephoto lens 2 m (6.5 ft) Pos : 64 /TD/Erste Schritte/WBKs/tes to 885/Pr odukt kennen l ernen/885, 890: Bild mit Autofokus sc harf stellen @ 9\mod_1305528366247_79.doc x @ 80403 @ 3 @ 1 5.2.11. -
Page 32: Recording (Freezing/Saving) An Image
5 First steps 5.2.12. Recording (freezing/saving) an image 1. Press the [Trigger button]. The image is frozen (still). If you want to save the image, touch to select where you want to save it to, see Image gallery, page 47. 2. -
Page 33: Using The Product
6.1. Menu bar/tabs Pos : 69 /TD/Produkt ver wenden/885, 890: Menüband / Register karten @ 9\mod_1311340688852_79.doc x @ 85965 @ 33355 @ 1 Functions are called up via the menu bar. The menu bar comprises 3 tabs. Different functions are available depending on which tab is selected. -
Page 34: Main Menu Tab
See also Isotherm, page Only testo 885-2: Humidity Open Humidity input screen. To set the parameters and activate/deactivate the function See also Humidity (only testo 885-2) , page 40. Emissivity Emissivity Open input screen. To set the parameters. See also Emissivity, page 42. - Page 35 Folder Open Folder input screen. To select where to save images. Function only available when the image is frozen. Only testo 885-2 when connected to Audio a headset: open Audio input screen, see see Audio (only testo 885-2), page 64.
-
Page 36: Menu Functions
Pos : 70 /TD/Ü berschriften/6.2 M enü-Funktionen @ 0\mod_1186390880578_79.doc x @ 2125 @ 2 @ 1 6.2. Menu functions Pos : 71 /TD/Produkt ver wenden/WBKs/testo 885/885, 890: Mess funktionen @ 9\mod_1305534550459_79.doc x @ 80536 @ 3555555555555 @ 1 6.2.1. Measurement... - Page 37 6 Using the product Pixel mark | Hotspot Hotspot mark (crosshairs with maximum measurement value displayed) can be shown. Task Actions/description Show/hide hotspot mark. > > Measurement Pixel mark | Hotspot. Pixel mark | Coldspot The coldspot mark (crosshairs with minimum measurement value displayed) can be shown.
- Page 38 6 Using the product Task Actions/description > To exit: Press joystick again and activate Quit moving in the context menu. > Double-touch the crosshairs and Hide crosshairs. Hide touch in the context menu. Joystick operation: 1. Select crosshairs and press joystick twice.
- Page 39 6 Using the product Alarm The alarm function shows all image points with measurement values that exceed the upper alarm mark or fall below the lower alarm mark in a single colour (alarm colour). To set the alarm colours, see Colour selection, page 46. Task Actions/description Open...
- Page 40 > upper/lower limits. Apply entries. > Humidity (only testo 885-2) The ambient temperature and humidity values entered manually or measured by the optional radio humidity probe are used to calculate the relative surface moisture for each pixel. The values can be shown as a humidity image. The special colour palette...
- Page 41 If the imager is connected to an optional radio humidity probe (only testo 885-2), the ambient temperature and humidity are transferred automatically. For connection to a radio humidity probe, Further information is available under Radio (only testo 885-2), page 59.. Task Actions/description...
- Page 42 6 Using the product Solar To detect and document failures in photovoltaic systems, the solar function can be selected. The sun's radiation intensity measured (with an external instrument) can be entered for documentation purposes. This value is saved with the IR- image. If this function is activated, the entered value for the radiation intensity is displayed (top left).
- Page 43 6 Using the product Material (material temperature) Emissivity Aluminium, bright rolled (170°C) 0.04 Cotton (20°C) 0.77 Concrete (25°C) 0.93 Ice, smooth (0°C) 0.97 Iron, emery ground (20°C) 0.24 Iron with casting skin (20°C) 0.80 Iron with rolling skin (20°C) 0.77 Gypsum (20°C) 0.90 Glass (90°C)
- Page 44 6 Using the product Reflected temperature information: Using this offset factor, the reflection is calculated out based on the low emissivity, and the accuracy of the temperature measurement with infrared instruments is improved. In most cases, the reflected temperature is identical to the ambient air temperature. Only when objects with strong emissions and much higher temperatures (such as ovens or machines) are in proximity to the object being measured should the radiation temperature of theses heat sources...
-
Page 45: Display Options
> upper/lower limits. Apply entries. > Pos : 72 /TD/Produkt ver wenden/WBKs/testo 885/885, 890: Anz eigeopti onen @ 9\mod_1312226847502_79.doc x @ 87843 @ 3555 @ 1 6.2.2. Display options Palette You can choose from 10 existing colour palettes for the IR image display. - Page 46 Set required colour for > Isotherm, Top Alarm Bottom Alarm. > Activate colour to be used by touching it. Apply entries. > Pos : 73 /TD/Produkt ver wenden/WBKs/testo 885/885, 890: Bildergal erie @ 9\mod_1305550127543_79.doc x @ 80602 @ 35555 @ 1...
-
Page 47: Image Gallery
The saved image can be viewed and analysed in the image gallery. Folders can be created for saving new images to. Only testo 885-2: it is possible to listen to and also subsequently record or edit a voice commentary. Images with a voice... - Page 48 The single image view must be opened: see above. Task Actions/description Open main menu to > activate functions. Delete image. > > Confirm deletion: Record/edit voice > commentary (only testo 885-2). Further Information: See Audio (only testo 885-2), page 64..
-
Page 49: Wizards
> : close sub-level zoom. Pos : 74 /TD/Produkt ver wenden/WBKs/testo 885/885, 890: Assis tenten (Übersc hrift) @ 10\mod_1319206049537_79.doc x @ 96283 @ 3 @ 1 6.2.4. Wizards Pos : 75 /TD/Produkt ver wenden/WBKs/testo 885/Assis tenten: Seq uenzs peicherung @ 14\mod_1375430925171_79.doc x @ 174746 @ 5 @ 1... - Page 50 VMT files (full radiometric video): video file in which image data, measuring values and image marks are saved, file name starts with SQ. Saved files can be played back in testo IRSoft and subsequently analysed over time by adding or changing image marks.
- Page 51 6 Using the product Task Actions/description temperature deviation within the range selection), Range: Min. temperature < (automatic start following lower temperature deviation within the range selection). • Interval: Time (time between the taking of two images), Manual (when the shutter button is pressed). •...
- Page 52 > Pos : 76 /TD/Produkt ver wenden/WBKs/testo 885/885, 890: Assis tenten: Panorama-Bild, M ess orter kennung @ 9\mod_1312228055416_79.doc x @ 87876 @ 55 @ 1 Image stitching The image stitching wizard can be used to produce a large panoramic image from up to 3x 3 single images.
- Page 53 6 Using the product Task Actions/description Call up function. > Wizards Image stitching. 1. Record single image 1 (top left): Record single images. [Trigger button]. 2. Rotate the camera to the right until the image is cleanly joined to the semi-transparent image strip of individual image 1.
- Page 54 6 Using the product Task Actions/description Display single image overview and select single image to delete/replace it. The single image overview is displayed. For a realistic display of the panoramic image, a projection on a semi-circular surface is required. As the image is displayed on one plane, it is distorted around the edges.
- Page 55 Enter measuring site marker is inside the position frame. marker. 2. After recognition of the marker ID: confirm transfer of measuring site data. Pos : 77 /TD/Produkt ver wenden/WBKs/testo 885/885, 890: Konfiguration @ 9\mod_1305550427230_79.doc x @ 80635 @ 35555555555555 @ 1...
-
Page 56: Configuration
6 Using the product 6.2.5. Configuration Country settings Instrument language and temperature unit can be set. Task Actions/description Open Country settings > Configuration input screen. Country settings. > Highlight the language to be used Set the language of the by touching on it. program interface. - Page 57 Activate function (only with subsequent order): You will receive an envelope with an access code (identification code), which you should enter on the website www.testo.com/upgrade. When all necessary data has been entered, an activation code is generated and can be used to activate the function via the IRSoft PC software.
- Page 58 ( > To disable, repeat these steps. Bluetooth (only testo 885-2) This function is not available in all countries. Via the Bluetooth radio interface, a link to a Bluetooth headset can be established for voice recording. Follow the instruction manual for the Bluetooth headset.
- Page 59 ( Apply entries. > Radio (only testo 885-2) This function is not available in all countries. A radio humidity probe can be logged onto the instrument. Every radio probe has a probe identification number (RFID). This is...
- Page 60 6 Using the product Task Actions/description Activate/deactivate radio Active. and establish connection A search is carried out for radio to a radio humidity probe. probes and available radio probes are displayed. 2. Highlight the radio probe to be used by touching it ( >...
- Page 61 6 Using the product Optics The lenses adjusted to the instrument are shown. Only the lenses that are shown may be used. Lens activation is automatic (not in USA). Protection glass option can be used to set whether protection glass is fitted. Ensure the correct setting to prevent corruption of the measurement results.
- Page 62 6 Using the product Task Actions/description Activate/deactivate Active. automatic switch-off function LCD off Imager off and set the switch-off time. > To deactivate, touch the button again. Apply entries. > Set time/date Time and date can be set. The time and date format are set automatically based on the selected instrument language.
- Page 63 The instrument settings can be reset to the factory settings. Please note: time/date, country settings and counter are not reset. Task Actions/description Execute function. Configuration Factory settings. 2. Confirm reset: Pos : 78 /TD/Produkt ver wenden/WBKs/testo 885/885, 890: Audi o @ 9\mod_1312228273418_79.doc x @ 87909 @ 3 @ 1...
-
Page 64: Audio (Only Testo 885-2)
6 Using the product 6.2.6. Audio (only testo 885-2) To use the function, a headset must be connected (top interface terminal) or the link to a Bluetooth headset must be established. This function is only available with the view of a frozen or saved image. -
Page 65: Measuring
Pos : 79 /TD/Ü berschriften/6.3 M ess ung en durchführen @ 0\mod_1184584650078_79.doc x @ 1872 @ 2 @ 1 6.3. Measuring Pos : 80 /TD/Produkt ver wenden/WBKs/testo 885/885, 890: Mess ungen @ 9\mod_1305637030964_79.doc x @ 80673 @ 55 @ 1 Important framework conditions Please observe the following framework conditions in order to obtain significant measurement results. - Page 66 6 Using the product When humidity is high or the imager is a considerable distance from the object to be measured, atmospheric correction increases measurement accuracy, see Atmospheric correction, page 41. When auto-scaling is activated, the colour scale is continuously adjusted to the min.-/max.- values of the current measurement image.
-
Page 67: Maintaining The Product
The imager starts automatically. 5. Close the battery compartment cover. Pos : 84 /TD/Produkt i nstand halten/WBKs/885, 890: Dis play rei nigen @ 9\mod_1314021649026_79.doc x @ 93478 @ 5 @ 1 Cleaning the display > Clean the display when dirty with a cleaning cloth (e.g. -
Page 68: Tips And Assistance
Pos : 89 /TD/Ü berschriften/8.1 Fr agen und Antworten @ 0\mod_1177402017078_79.doc x @ 1093 @ 2 @ 1 8.1. Questions and answers Pos : 90 /TD/Ti pps und Hilfe/Fr agen und Antworten/WBKs/testo 885, 890 @ 9\mod_1312294422204_79.doc x @ 88381 @ @ 1 Question Possible causes / solution... -
Page 69: Accessories And Spare Parts
8 Tips and assistance 8.2. Accessories and spare parts Pos : 92 /TD/Ti pps und Hilfe/Z ubehör und Ers atz teil e/WBKs/testo 885, 890 @ 9\mod_1312294557050_79.doc x @ 88414 @ @ 1 Description Article no. Lens protection glass 0554 0289... - Page 70 0970 8850 en 05 V01.60 en-GB...
Need help?
Do you have a question about the 885 and is the answer not in the manual?
Questions and answers