Table of Contents
Advertisement
Quick Links
Download this manual
See also:
Instruction Manual
Advertisement
Table of Contents

Subscribe to Our Youtube Channel
Related Manuals for TESTO 870


Summary of Contents for TESTO 870
- Page 1 How to Operate the Testo 870 thermal imager...
-
Page 2: Table Of Contents
Content 7.7.3 Save JPEG 1. Technical data testo 870-1 & 870-2 7.7.4 Power-save options 2. Technical overview (Fixed focus) 7.7.5 Language configuration 3. Interface/internal memory 7.7.6 Configuration of the temperature unit 4. Inserting the battery 7.7.7 Setting time/ date 5. Operation of the testo 870 (Keys) 7.7.8 Reset image counter... -
Page 3: Technical Overview (Fixed Focus)
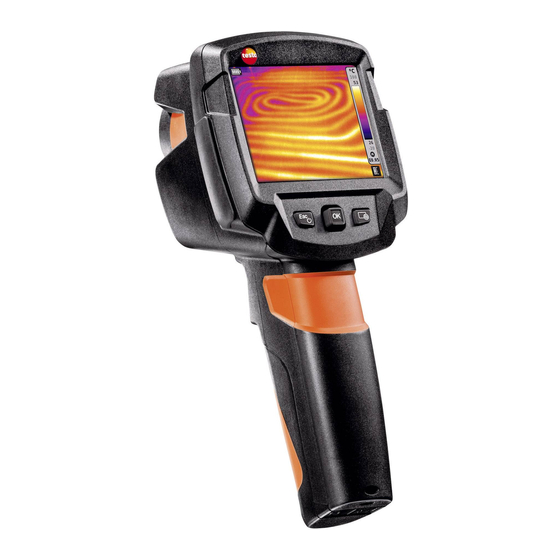
Technical overview Element Function Display Shows infrared and real images (only testo 870-2), menu and functions Interface terminal Contains Micro-USB-Interface for power supply and connection to the computer Key Power/ESC To turn camera on/ out To abort actions in the menu... -
Page 4: Interface/Internal Memory
>2.000 thermal images. Images can be accessed via a USB connection. Mini USB-Interface: Another new aspect, of the testo 870, is that the battery is charged via the USB cable. The imager can be charged with any USB connection. The camera has to be switched off, if charging it via PC. -
Page 5: Inserting The Battery
1. Remove the battery cover by sliding it down 2. Put the battery in the opening 3. Push the battery up until it clicks into place – „click“ 4. Put the battery cover on and push it up www.testo.com, 5/27... - Page 6 All menus and commands can the key has to be held menu. be accessed by utilizing this for approximately 3 joystick seconds. • Depress to make selections • ESC operation this enables the go back one menu level www.testo.com, 6/27...
-
Page 7: Assigning Speed Dial Key
Assigning speed dial key Pushing the 1 button Joystick to the right… … select desired function and confirm with OK (Depress) Below the scale, a symbol indicates the reserved function of the speed key www.testo.com, 7/27... -
Page 8: Image Gallery
The file name of the open thermal image is shown in the top left of the display. Open thermal images from the image gallery. Open images can be analyzed with any imager function (such as measurement functions, scale, etc.), as in the live mode. www.testo.com, 8/27... -
Page 9: Measurement Functions
“Measurement“ “Hot-Cold-Spot Recognition“ can be turned on at any time. The testo 870 has only one wide measurement range of -4 to 536 °F to -20 …+280 °C. Setting the correct range is unnecessary. www.testo.com, 9/27... - Page 10 Image type (only testo 870-2) In order to display an image you can choose between a thermal image and a visual image. Confirm with click During an image recording, the thermal image and the real image are automatically saved together.
-
Page 11: Scale Setting
Selecting the menu item “Scale“, you can choose between automatic or manual scaling. Set temperature values within the manual scaling. Confirm selection by pushing OK. www.testo.com, 11/27... -
Page 12: Emissivity & Rtc Setting
The “Emissivity“ can either be selected in an user-defined way or from preset emission rates of different materials via the 1 button joystick. Press OK for the confirmation of the selection. The “reflected temperature“ (RTC) is also set in the menu item emissivity www.testo.com, 12/27... -
Page 13: Selection Of The Colour Palette
Joystick. Move the joystick up/ down in order to change the palette. Also it is possible to select the desired palette by choosing the dialog box “Palette”. Choose between four color palettes: Iron Rainbow HC Cold-Hot Grey www.testo.com, 13/27... -
Page 14: Testo Superresolution
Testo SuperResolution If the menu item SuperResolution is colored grey, the optional upgrade has not yet been installed on the instrument. If the menu item SuperResolution is selectable, but not yet labelled by a tick, the function is installed, though not yet activated. - Page 15 Testo SuperResolution When you have purchased as upgrade option from your Testo dealer, You receive an access code (identification code) to execute your upgrade from the testo website. www.testo.com, 15/27...
- Page 16 (deconvulsion). The result is 4x more pixels, 60% better temperature data and a visibly better sharpness and quality in your thermal image. testo 870 – Thermal image with SuperResolution, testo 870 – Thermal image with 160 x 120 pixel (like 320 x 240 pixel) With SuperResolution- Technology www.testo.com,...
-
Page 17: Fullscreen Mode
Pressing any key, the temperature scale reappears for a short period of time. The temperature scale is always saved as part of any thermal image in both also full radiometric and JPEG thermal image. www.testo.com, 17/27... -
Page 18: Save Jpeg
JPEG format. That way, they can be directly transferred to any PC or program, without uploading in IRSoft and saving them as JPEG If measurement functions, such as Hot- and Coldspot, are active during saving, they are saved in the JPEG. www.testo.com, 18/27... -
Page 19: Power-Save Options
Power-save options The “Power-save options“ can be set with the menu item “Configuration“. The joystick helps to determine the LCD backlight by selecting between normal, dark and bright. Confirm the selection by OK www.testo.com, 19/27... -
Page 20: Language Configuration
Language configuration The “language” can be set with the menu item “Configuration“ Confirm the selection with OK. www.testo.com, 20/27... -
Page 21: Configuration Of The Temperature Unit
Configuration of the temperature unit The “Temperature unit“ can be set with the menu item “Configuration“. Confirm the selection with OK www.testo.com, 21/27... -
Page 22: Setting Time/ Date
Setting time/ date „Time “ and „Date“ can be set with the menu item „Configuration“. Confirm the settings with www.testo.com, 22/27... -
Page 23: Reset Image Counter
Reset image counter The function “Reset counter“ allows to renumber stored images from the beginning. Confirm the resetting of the frame counter with OK Attention: Stored images with the same number in the internal memory will be overwritten. www.testo.com, 23/27... -
Page 24: Format
Format By selecting “Format“, all stored images in the camera will be deleted and the internal memory will be formatted. Confirm the formatting with www.testo.com, 24/27... -
Page 25: Factory Settings
Factory settings The menu item “Factory Settings“ resets all imager settings back to the original state when it was first taken out of the box Confirm resetting of the factory settings with OK. www.testo.com, 25/27... - Page 26 Open images on the PC • Install the PC software testo IRSoft, using the CD which is included in delivery, or from the download area on on the testo website • Start the software • Switch on the camera •...
Need help?
Do you have a question about the 870 and is the answer not in the manual?
Questions and answers