Table of Contents
Advertisement
Quick Links
Advertisement
Table of Contents

Subscribe to Our Youtube Channel
Related Manuals for TESTO 880


Summary of Contents for TESTO 880
- Page 1 880 · Thermal imager Instruction manual...
-
Page 3: Table Of Contents
1 Contents Contents Contents .....................3 Safety and the environment ..............4 2.1. About this document ..............4 2.2. Ensure safety ................5 2.3. Protecting the environment ............6 Specifications..................7 3.1. Use ....................7 3.2. Technical data................8 Product description .................12 4.1. Overview..................12 4.2. Basic properties ...............13 First steps..................15 5.1. -
Page 4: Safety And The Environment
2 Safety and the environment Safety and the environment 2.1. About this document > Please read this documentation through carefully and familiarize yourself with the product before putting it to use. Pay particular attention to the safety instructions and warning advice in order to prevent injuries and damage to the products. -
Page 5: Ensure Safety
> Do not operate the instrument if there are signs of damage at the housing, mains unit or feed lines. During operation, testo 880 may not be pointed at the sun or other high-radiation sources (e.g. objects with temperatures higher than 500 °C). This can lead to serious damage to the detector. -
Page 6: Protecting The Environment
> Dispose of faulty rechargeable batteries/spent batteries in accordance with the valid legal specifications. > At the end of its useful life, send the product to the separate collection for electric and electronic devices (observe local regulations) or return the product to Testo for disposal. -
Page 7: Specifications
3 Specifications Specifications 3.1. The testo 880 is a handy and robust thermal imager. It opens the door to contactless determination and illustration of the temperature distribution on surfaces for you. Typical areas of application are: • Building inspection (heating, ventilation and air conditioning... -
Page 8: Technical Data
3 Specifications The testo 880 with 33 Hz in particular can only be exported to countries outside of the European Union with an export permit from the authorities. Please observe the national regulations for export control when exporting. 3.2. Technical data... - Page 9 Telephoto lens: 4 mm at 1 m On-time 40 sec Humidity and air testo 880-3: 0 - 100 % RH, -20 - 70 °Ctd temperature (-4 - 158 °Ftd), -20 - 70 °C (-4 - 158 °F) measurement with air temperature...
- Page 10 Scope of delivery: 1 GB (approx. 800 - Memory capacity 1000 images) Lens Characteristic Values Standard lens 32° x 24° Telephoto lens 12° x 9°, testo 880-2, -3 only: optional Laser measuring spot marking Characteristic Values Classification of the 635 nm, Class 2 laser Voltage supply Characteristic...
- Page 11 Housing ABS, die-cast zinc PC software Characteristic Values System Operating system Windows XP Service requirements Pack 2 or Windows Vista USB 2.0 interface Standards, tests, warranty Characteristic Values EU Directive 2004/108/EC Warranty 2 years, warranty conditions: See web page www.testo.com/warranty...
-
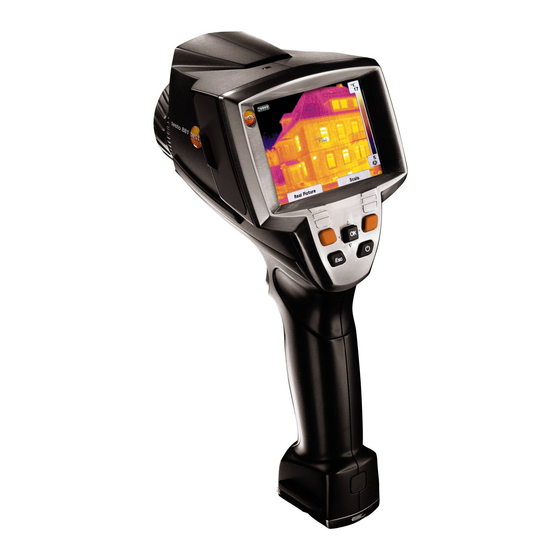
Page 12: Product Description
4 Product description Product description 4.1. Overview Product components 1 Display. 2 Control keys: Functions Switch the imager on/off. [OK] Joystick • Press [OK]: Open menu, confirm selection/setting. • Move [OK] up/down/right/left Joystick function: Select functions, navigate [Esc] Cancel action. Left/right ["xy"] Call up a function. -
Page 13: Basic Properties
10 Infrared camera lens: For recording thermography images. Exchangeable lens (only testo 880-2, -3). Rotating ring Manual focusing: For manual focusing. testo 880-3: Only use rotating ring with autofocus switched off to prevent damage to the auto mechanism. Lens lock ring [Autofocus... - Page 14 4 Product description Charging the battery is also possible using a desktop charging station (accessory). The instrument is equipped with a buffer battery (type CR 1632) to maintain the system data during an interruption in the power supply (e.g. when the battery is changed). File formats and file names The images are saved according to the following pattern: XX_YYYYY.ZZZ...
-
Page 15: First Steps
5 First steps First steps 5.1. Commissioning Connect rechargeable battery The thermal imager is delivered with a rechargeable battery that is inserted in the rechargeable battery slot but not connected. > Push the battery all the way into the rechargeable battery slot until this is flush with the bottom of the handle. - Page 16 5 First steps Initial charging of rechargeable battery The thermal imager is delivered with a partially charged battery. Completely charge the battery before use. > Connect the country-specific adapter required for the existing mains to the mains unit. 1. Open the cover on the left side of the thermal imager (1). 2.
-
Page 17: Getting To Know The Product
> To remove the memory card: Press on the memory card to release the lock. Insert radio module (accessories, testo 880-3 only) Using a radio module (accessory) the instrument can be connected with a radio humidity probe. The radio module must be connected before switching on the instrument in order for the instrument to be identified. - Page 18 30. If this option is set incorrectly, the stated measuring accuracy is not guaranteed. Mount tripod adapter Using the included tripod adapter, the testo 880 can be fastened to the testo tripod (accessory) or to a commercially available standard tripod. With the tripod adapter mounted, the battery cannot be changed! 1.
- Page 19 This can be recognized by means of a "click". The image is frozen briefly when this occurs. > To switch off: Press The display goes out and the imager is switched off. Focus image using autofocus (testo 880-3 only) > testo 880-3: Slide [Autofocus switch] towards the display (position: ).
- Page 20 • Infrared image is shown: Infrared image is saved. • Real image is shown (testo 880-1/-3 only): Real image is saved. • Infrared/real image is shown (testo 880-1/-3 only): Infrared image is saved, real image is saved in the same file as an attachment to the infrared image.
- Page 21 Joystick up/down to select the desired function. Function Description Image type Change display mode: Infrared image, (testo 880-1/-3 only) real image or infrared/real image. Laser Switch on laser for homing in on the measuring surface (hold button down). Light (testo 880-3...
- Page 22 5 First steps • Press [OK] to select the function. • Press [ESC] to cancel the process and change to Measuring Mode. Depending on the selected menu item, press [OK] perform a setting or open a submenu/dialogue, see Menu functions page 23.
-
Page 23: Using The Product
6 Using the product Using the product 6.1. Menu functions 6.1.1. Measuring functions 1-point measurement 1-point measurement is the standard measuring function. If this is activated ( ), all available options can be selected via the quick select buttons. > [OK] Measurement [OK]... - Page 24 [OK] Measurement [OK] Humidity | [OK]. If a radio humidity probe is logged on (testo 880-3 only): The measuring function is opened. No further entries are required. If no radio humidity probe is logged on: The Humidity dialogue is opened. The values for the ambient humidity and temperature can be entered.
-
Page 25: Image Gallery
6 Using the product 4. Move Joystick up/down to set the desired value. Move Joystick right/left to change between the numbers. 5. Confirm the entry with [OK]. 6. Confirm the settings with Apply. Measuring range The measuring range can be set to adapt to the respective area of application. -
Page 26: Scale
6 Using the product 3. In single image: Press [OK] to open selected preview image. Press Gallery to return to the image overview. Delete image 1. In single image: Select image (orange border) or select and open image. 2. Press Delete to delete the selected or open image. -
Page 27: Display
6 Using the product 2. Move Joystick left/right to select the desired option: Auto- scaling ( ), min. value ( ), temperature range ( ) or max. value ( ) The selected option has an orange border ( ). 3. With the selection of min. value, temperature range or max. value: Move Joystick up/down to change the value(s). - Page 28 6 Using the product that the surface temperature can be easily measured using infrared. Because of their low or non-uniform emissivity, bright metals and metal oxides are only somewhat suited for infrared measurement. You must anticipate highly inaccurate measurements. A remedy for this is coatings that increase the emissivity, e.g.
- Page 29 6 Using the product Material (material temperature) Emissivity Steel, oxidised (200 °C) 0.79 Clay, burnt (70 °C) 0.91 Transformer paint (70 °C) 0.94 Brick, mortar, plaster (20 °C) 0.93 Reflected temperature Using this offset factor, the reflection is calculated out due to the low emissivity and the accuracy of the temperature measurement with infrared instruments is improved.
-
Page 30: Palette
6 Using the product The selected option has an orange border ( ). 4. Confirm the selection with [OK]. The selected number is highlighted orange ( ). 5. Move Joystick up/down to set the desired value. Move Joystick right/left to change between the numbers. 6. - Page 31 6 Using the product Country settings… Instrument language and temperature unit can be set. [OK] Configuration… | [OK].| Country settings… | [OK]. Country settings dialogue is opened. 2. Move Joystick up/down to select the desired option. The selected option has an orange border ( ). 3.
- Page 32 (accessories), see Insert radio module (accessories, testo 880-3 only) page 17. Every radio probe has a probe identification number (RFID). This consists of the three-digit RFID number on the probe and...
- Page 33 6 Using the product 2. Press [OK] to activate ( ) or deactivate ( ) the radio link. 3. Move Joystick to the right to jump to the list of found radio probes. 4. Move Joystick up/down to select a probe. The selected probe is highlighted orange ( ).
-
Page 34: Measuring
Please observe the following framework conditions in order to obtain significant measurement results. Humidity measurement (testo 880-2/-3 only): • Gently wave the radio humidity probe (testo 880-3 only) or separate air humidity measuring instrument about to shorten the equalization period. Avoid sources of interference (e.g. breathed air). - Page 35 6 Using the product Select the storage location (folder): 1. While an image is frozen (fixed image): Press the left [Folder] quick select button. Folder dialogue is opened. To create a new folder, see Create new folder page 26. 2. Select the desired folder with the joystick and open with [OK].
-
Page 36: Maintaining The Product
7 Maintaining the product Maintaining the product Changing the battery To prevent losing the instrument settings: Only change the rechargeable battery when a buffer battery is inserted in the instrument or the mains unit is connected. 1. Press lock release button. The rechargeable battery is released and sticks out a little from the rechargeable battery slot. - Page 37 7 Maintaining the product Caution! Incorrectly inserted batteries can lead to damage of the product. > When inserting the batteries, observe the polarity (label on the battery holder). 4. Insert battery holder into the battery slot.
-
Page 38: Tips And Assistance
8 Tips and assistance Tips and assistance 8.1. Questions and answers Question Possible causes/solution Message Backup battery 1. Confirm the message with empty or not present [OK]. shown. 2. Change buffer battery, see Change buffer battery page 36. Error No memory card Memory card defective or not inserted! is shown. -
Page 39: Accessories And Spare Parts
> Check possible causes, see Radio… (testo 880-3 only) page 32. If we could not answer your question, please contact your dealer or Testo Customer Service. For contact data, see back of this document or web page www.testo.com/service-contact 8.2. Accessories and spare parts Description Article no. - Page 40 • Calibration points at 0 °C, 100 °C, 0520 0490 200 °C in measuring range 0 °C to 350 °C For further accessories and spare parts, please refer to the product catalogues and brochures or look up our website: www.testo.com...
- Page 44 0970 8800 en 02 V01.14 en-GB...
Need help?
Do you have a question about the 880 and is the answer not in the manual?
Questions and answers