Table of Contents
Advertisement
Advertisement
Table of Contents

Related Manuals for Hyundai GD-01


Summary of Contents for Hyundai GD-01
-
Page 1: Instruction Manual
INSTRUCTION MANUAL GD-01 MP3/USB/AUX/BLUETOOTH/iPod CD PLAYER WITH AM/FM RADIO... -
Page 2: Table Of Contents
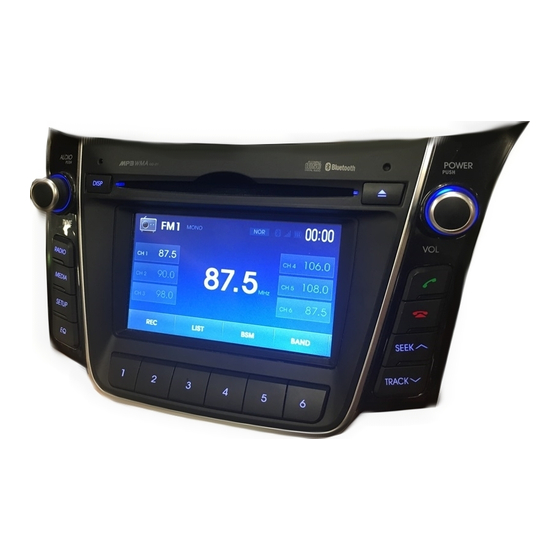
Contents Important Note: Before operating the unit, please read this manual thoroughly and retain it for future reference. Please refer to the main vehicle user manual section ‘Features of Your Vehicle’ for general information regarding radio reception and care and use of the vehicle mounted antenna, and care and use of media (CDs, USB etc.). - Page 3 Front Panel Controls POWER / VOL AUDIO / TUNE (Power ON / OFF / Volume) (Audio settings / Tuning / Other) RADIO Button MEDIA Button EQ Button(Equalizer) SETUP Button Off Hook Button On Hook Button Automatical Up Tuning Automatical Down Tuning Track Up &...
-
Page 4: General Controls
2) Press button to change the radio wave band. The sequence of selection is below: FM1 → FM2 → FM3 → AM Press the RADIO button to switch the HYUNDAI Bluetooth radio off. MEDIA Button Press button to change to the next available mode. The complete mode sequence for selection is shown below: CD →... - Page 5 General SETUP Button Press button to set system features and options. For more information, refer to section 11. Equalizer Setting (EQ Button) An equalizer curve for different music types may be selected (CLASSIC, POP, ROCK, and JAZZ). Press button repeatedly until the desired equalizer effect icon is displayed on the top of the display.
- Page 6 General DISC Eject This button will eject the disc and the radio will return to the previous mode. Note: If the eject function does not operate due to an internal error press and hold button more than 2 seconds. Warning LED This LED lamp blinks every 1 second when the ignition is turned OFF to act as a deterrent against theft.
- Page 7 General 1.1 Move to Media Menu screen 1) Press the mode icon to select Media Menu screen when the current mode is operating. [ Media Menu ] 2) Press the desired mode icon to select the mode. 3) If the desired mode is not selected within 3 seconds, the previous screen will automatically be restored.
- Page 8 General 1.3 Changing the File Name 1) As described in 4) above, pressing the RENAME icon will display the following screen. 2) Use the keypad to change the file name. Refer to the table below for more information on icons displayed within the keypad screen. Icon Description Used to insert a capital letter...
-
Page 9: Steering Wheel Controls
Tuner → CD → USB/iPod → AUX → My Music → BT Audio Press the MODE button for more than 1 second to switch the HYUNDAI Bluetooth radio off. Note: Only those mode sources connected will be displayed and available for selection when using the steering wheel MODE button. -
Page 10: Am/Fm Tuner
AM/FM Tuner AM/FM Tuner 3.1 AM/FM Tuner Screen Icon Description Displays the FM1, FM3, FM3, and AM modes Displays the currently playing frequency Displays preset frequencies Records currently playing broadcast Shows preset list Saves frequencies with superior reception to preset buttons Converts frequency bandwidth in order of FM1 ->... - Page 11 AM/FM Tuner TUNE Button To manually tune to a radio station, turn knob left or right to increase or decrease the radio frequency. ∧ ∨ , Up/Down Tuning Buttons ( To search for the next available radio station, momentarily press button or button Preset Buttons These buttons operate in two ways when Tuner mode is active:...
-
Page 12: Cd-Da Player
CD–DA Player 4. CD-DA Player 4.1 Playing Music Using CD-DA 1) Insert the CD-DA disc located disc slot. The radio will display Loading. 2) The radio will display Reading and the begin playback of music after loading complete. 3) If another mode is selected, CD-DA player may be resumed by pressing button on the radio or by pressing the MODE button on the steering wheel. - Page 13 CD-DA Player Track Up / Cue This button is used to select track up. When this button is pressed, playback of the next ∧ track is started. Each time the ( ) button is pressed, the track number to be played is ∧...
-
Page 14: Cd-Mp3/Wma Player
CD-MP3/WMA Player 5. CD-MP3/WMA Player 5.1 Playing Music Using CD-DA 1) Insert the CD-DA disc located disc slot. The radio will display Loading. 2) The radio will display Reading on the screen and the begin playing music once loading is complete. - Page 15 CD-MP3/WMA Player 5.3 Copying Files 1) Press the COPY icon to copy the currently playing file. 2) Once copying starts, the currently playing file is stopped and the COPY icon will blink on the screen. 3) Press the CANCEL icon to cancel copying and re-start the current file. 4) Once copying is complete, the COPY icon disappears and the paused file will re-start.
- Page 16 CD-MP3/WMA Player 5.5 Track Scan SCAN icon when press will play the first 10 seconds of each file on the disc. SCAN will appear on the display. When the desired file is reached, press the icon again to cancel the function. The set will then play the selected file.
-
Page 17: Usb Player
6. USB Player MP3 and WMA music files located on a memory device connected using the USB socket may be played by the HYUNDAI Bluetooth radio. Refer to section 5 (CD-MP3/WMA Player) for controlling the playback of MP3 / WMA files. The same method of control is used when MP3 / WMA files are stored on either a CD or USB device. - Page 18 USB Player 6.2 USB Player Screen Icon Description Current file /Total files Displays the play time for the current file Displays current file information (Title, Artist, Album Name) Copies the currently playing file Displays file list within the USB device Scans the beginning parts of files in sequential order (approx 10 seconds per file) Repeats the current file...
- Page 19 USB Player 6.3 Copying Files 1) Press the COPY icon to copy the currently playing file. 2) Once copying starts, the currently playing file is stopped and the COPY icon will blink on the screen. 3) Press the CANCEL icon to cancel copying and re-start the current file. 4) Once copying is complete, the COPY icon disappears and the paused file will re-start.
-
Page 20: Ipod Player
iPod Player 7. iPod Player 7.1 Playing Music Using iPod via USB. 1) Connect the iPod to the USB socket located inside the centre console using the cable supplied with iPod (see previous page). 2) The radio will display Reading and the begin playback of music. 3) If another mode is selected, iPod player may be resumed by pressing button on the radio or by pressing the MODE button on the steering wheel. - Page 21 iPod Player File Up / Cue This button is used to select file up. When this button is pressed, playback of the next file is ∧ started. Each time the ( ) button is pressed, the file number to be played is increased. ∧...
-
Page 22: Aux Input
AUX Input 8. AUX Input 8.1 AUX Connector It is possible to connect your portable media player to the car audio system for playback of the audio tracks via the car speakers. To get the best results when connecting the portable media to the car audio system, follow these steps: 1) Use the supplied 3.5 mm stereo plug to 3.5 mm stereo plug cable to connect the media player headphone socket to the AUX socket located inside the centre console. -
Page 23: My Music
My Music 9. My Music 9.1 My Music Screen Icon Description Current file / Total files Displays the play time for the current file Displays the file name Deletes the current file Displays file list within My Music Scans the beginning parts of files in sequential order (approx 10 seconds per file) Repeats the current file Plays files within the disc in random order... - Page 24 My Music 9.4 Deleting Files 1) When a file is playing, you can delete the current file by pressing the DELETE icon. 2) As shown below, the file name is shown and you are asked whether you wish to delete the file.
- Page 25 My Music 8) Press the DEL icon to delete the selected files. 9) Press the EDIT icon to change the name of the selected file. However, this feature will operate only when there is one file selected. For more information on using the EDIT feature, refer to section 1.3.3.
-
Page 26: Bluetooth Audio Player
(AVRCP). If your Bluetooth mobile phone or music player supports this profile then it is possible to advance to the next track or replay previous tracks on using the buttons on the front of the HYUNDAI Bluetooth radio or steering wheel remote controls (if fitted) on your vehicle. 1) Press button , to select BT Audio mode. - Page 27 Bluetooth Audio Player 10.2 BT Audio Screen Icon Description Plays the previous audio. Plays the paused audio. Pauses the audio. Plays the next audio. Records the current audio. 10.3 Recording Press the REC icon to start recording the current audio. For more information on the recording feature, refer to section 1.3.2.
- Page 28 Bluetooth music player. 1) Ensure both the mobile phone and music player have been paired to the HYUNDAI music player and that they operate correctly. 2) Ensure both mobile phone and music player are both set to automatically connect to the HYUNDAI Bluetooth radio.
-
Page 29: Memo
Memo 11. Memo This feature is used to record voice memos through the device MIC. 11.1 Recording Memos Press the REC icon to record user memos. For more information, refer to section 1.3.3. Note: Memo mode cannot be selected with the MODE button on the Steering remote controller. -
Page 30: Bluetooth
Bluetooth mobile phone or Bluetooth music player and the HYUNDAI Bluetooth car radio. The HYUNDAI Bluetooth car radio features a hands-free system so that you may talk on the telephone without taking your eyes off the road or your hands off the wheel. A microphone built into the front of the radio receives your voice and the calling party can be heard through the car speakers. - Page 31 Bluetooth 12.1 Bluetooth Indicators Shown on the Radio Display ► Bluetooth Indicator The Bluetooth logo above is displayed steady on the radio screen when a Bluetooth device is connected. If the indicator is not displayed, then no Bluetooth device is connected or the connection is not of satisfactory quality.
- Page 32 Bluetooth 12.2 Bluetooth Screen Icon Description Displays the network name / device name of connected mobile phone Displays the KEYPAD screen Displays BLUETOOTH SETTING. Displays recent call lists Displays stored contacts. Connects call to previously saved emergency number...
- Page 33 Pairing Active – Enter Code 0000 into Device. 6) Now, set your Bluetooth device to search for and pair with the HYUNDAI Bluetooth radio. A guide for setting your Bluetooth device to search and pair with the radio is provided in section 12.3.2.
- Page 34 Bluetooth device for the accurate and correct procedure. b. A device must first be paired to the HYUNDAI Bluetooth radio before it can be connected, i.e. if a device has been paired, it must then be connected before the hands free and/or audio playback features can be used.
- Page 35 “B/T audio – device name” will also be displayed. Notes When Selecting a Paired Device: 1) The name of the Bluetooth device is sent by the device and stored in the HYUNDAI Bluetooth radio memory. In most Bluetooth devices, the name can be changed by the user.
- Page 36 3) To reject the call, press the button or the Decline button on the screen. 4) When making an outgoing call, enter numbers by using the keypad within the HYUNDAI Bluetooth radio or Bluetooth mobile phone and press the OFF HOOK button.
- Page 37 4) After finding the number you want to call from the call list, press the CALL icon to connect the call. 5) The phrase “Calling” will be displayed on the HYUNDAI Bluetooth radio screen and the call is converted to Handsfree mode.
- Page 38 4) The selected setting is displayed in orange and is applied immediately upon selection. 12.5.3 Setting Calling Voice/Ringer Volume Level The level of the calling voice/ringer volume heard through the HYUNDAI Bluetooth radio and car speakers is adjusted using this setting.
- Page 39 Names with a maximum length of up to 16 characters and phone numbers with a maximum length of up to 20 digits can be displayed. HYUNDAI Bluetooth radio automatically downloads contacts from the Bluetooth mobile phone once a Bluetooth phone is connected.
-
Page 40: Setting
Setting 13. Setting 13.1 General Settings 13.1.1 Viewing Audio Information You can check the model name, version and memory use state. The memory use state is displayed as in use / total capacity. 1) Press the button to display the Setup screen. 2) Press 1. - Page 41 Setting 13.2.2.2 Balance, Fader Setting 1) Press the button to display the Setup screen. 2) Press 2. Sound. 3) Press 2. Audio. 4) Press the BAL/FAD icon. 5) Press the , , , icons to set the front/rear/left/right speaker volumes. 6) Press the CENTER icon to change the Balance, Fader values to 0.
- Page 42 Setting 13.4 Time Setting This setting is used to set the time displayed within the Hyundai Bluetooth Radio. 1) Press the button to display the Setup screen. 2) Press 4. Time. 3) The 12Hour icon displays 1 day as 12 hours while the 24 Hour icon displays 1 day in 24 hours.
-
Page 43: Firmware Upgrade
4) If the firmware upgrade is successful, Completed appears on the display. 5) If the GUI file is saved in the USB storage device, then the GUI upgrade will automatically commence after system upgrade is complete. 6) Once upgrade is complete, Hyundai Bluetooth radio will automatically reboot. - Page 44 1. To upgrade the firmware, the firmware file and at least one MP3 file must exist within the USB storage device. 2. Before conducting the upgrade, first check the version of your Hyundai Bluetooth radio and conduct upgrades only when necessary.
-
Page 45: Handling Compact Discs
Handling Compact Discs 1) Dirt, dust and scratches on the disc surface and warped discs can cause loss of sound or skipping during playback. Additionally, deterioration of sound quality may also result. Please observe these guidelines to take care of your compact discs: *Fingerprints, dust and dirt should be carefully wiped from the disc playing surface (side with no printing) with a soft cloth. -
Page 46: Product And Warranty Service
In the event your MP3/WMA CD Player is faulty, please take your HYUNDAI vehicle to your nearest HYUNDAI dealer for their diagnostic inspection of your MP3/WMA CD Player. -
Page 47: Mp3/Wma Information
MP3/WMA Information The HYUNDAI Bluetooth radio is able to play MP3 and WMA music files from a compact disc or USB memory device. MP3 is an abbreviation of Motion Picture Experts Group (MPEG) Audio layer 3. MP3 audio format files are typically only 1/10th the size of conventional CD DA audio files. Most MP3 files are created on a personal computer using special software. -
Page 48: Warnings And Precautions
Warnings and Precautions 1) WARNING This equipment has been tested and found to comply with the limits for a Class B digital device, pursuant to Part 15 of the FCC Rules. These limits are designed to provide reasonable protection against harmful interference in a residential installation. This equipment generates, uses, and can radiate radio frequency energy and, if not installed and used in accordance with the instructions, may cause harmful interference to radio communications. -
Page 49: Specifications
Specifications Output Power - - - - - - - - - - - - - - - - - - - - - - - - - 180 watts (4 x 45 Watts) Tuning Range - - - - - - - - - - - - - - - - - - - - - - - - - AM: 522 ~ 1,620 KHz. - Page 50 P/N : 6350200026...