Table of Contents
Advertisement
Quick Links
Download this manual
See also:
Administrator's Manual
Advertisement
Table of Contents

Related Manuals for Printronix M4L


Summary of Contents for Printronix M4L
- Page 1 ® M4L Mobile Printer Administrator’s Manual ...
- Page 3 Printronix, Inc. disassemble the Software. or by Printronix, Inc. If you fail to comply with the terms of this You agree to keep confidential and use your best License and such failure is not corrected within thirty (30) days efforts to prevent and protect the contents of the after notice.
-
Page 4: Trademark Acknowledgements
Printronix shall not be held responsible for errors contained herein or any omissions from this material or for any damages, whether direct or indirect, incidental or consequential, in connection with the furnishing, distribution, performance, or use of this material. -
Page 5: Table Of Contents
Table of Contents Product Introduction ..........................7 Printer Features ..........................8 Standard Features .......................... 8 General Specifications ........................9 Print Specifications ........................10 Media Specifications ........................10 LCD Display ..........................13 Installing the Belt Clip and Battery ....................15 ... - Page 6 Wireless LAN ............................ 39 Bluetooth ............................39 Date Time ............................39 Display .............................. 40 File Manager ............................. 40 Diagnostics ............................41 Print Config ............................41 Dump Mode ............................41 Battery ............................... 41 ...
-
Page 7: Product Introduction
The M4L is a comfortable, light-weight printer capable of working with any mobile receipt printing application where you need quick, simple receipts on demand. Our M4L is designed for a rough life, inside the IP54-rated environmental case to resist dust and water and with its rubber over- mold design prepared to take up to a five foot fall and keep printing. -
Page 8: Printer Features
Printer Features Standard Features Your M4L offers the following standard features: Standard Feature Direct thermal printing Black Mark reflective sensor (center position, black mark in back side) Gap transmissive sensor (Fixed, center of offset 2.75 mm to right from center) 203 Print Density... -
Page 9: General Specifications
Code page Codepage 950 (Traditional ISO-8859-1: Latin-1 (Western Codepage 437 (English-US) Chinese European) Codepage 936 (Simplified ISO-8859-2: Latin-2 (Central Codepage 737 (Greek) Chinese) European) ISO-8859-3: Latin-3 (South Codepage 850 (Latin-1) Codepage 932 (Japanese) European) ISO-8859-4: Latin-4 (North Codepage 852 (Latin-2) Codepage 949 (Korean) European) Codepage 857 (Turkish) -
Page 10: Print Specifications
Print Specifications Print Specifications Printhead resolution 203 dots/inch (8 dots/mm) (dots per inch/mm) Printing method Direct thermal Dot size 0.125 x 0.125 mm (width x length) (1 mm = 8 dots) Print speed Max. 4 ips (100 mm/sec) (inches per second) 2,3 ips for Peel-Off mode Max. -
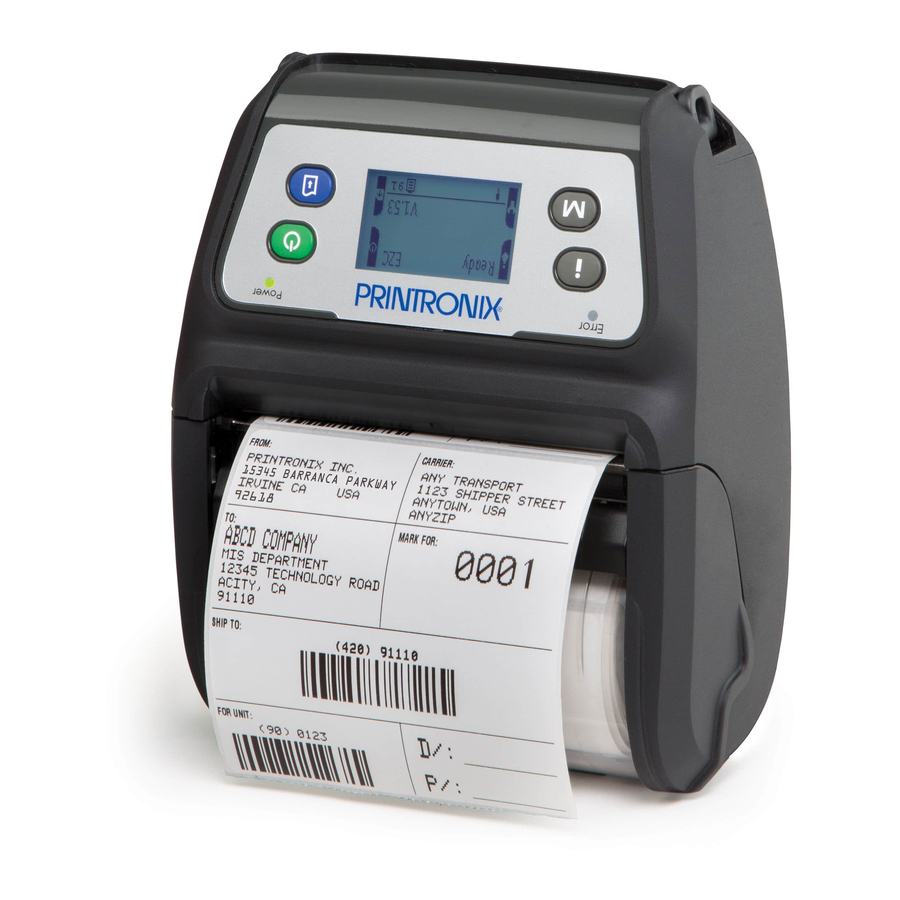
Page 11: Printer Overview
Printer Overview 1. LCD Display 2. Feed Key 3. - Page 12 1. Belt Clip 2. Li-ion Battery 3. Battery Open Clasp 4. External Label Entrance Slot 5. Hanger for Shoulder Strap (2) 6. USB Interface 7. Micro SD Card Socket 8. Power Jack (used for Charger) Note: Recommended Micro SD card specification SD card Approved SD card SD card spec...
-
Page 13: Lcd Display
LCD Display Keys Function − Display the printer information − Key for setting LCD configuration menu − Enter the printer configuration menu − Key for setting LCD configuration menu − Press and hold for 2-3 seconds to turn on the printer − Press and hold for 2-3 seconds to turn off the printer − Key for setting LCD configuration menu ... - Page 14 14 ...
-
Page 15: Printer Setup
Printer Setup Installing the Belt Clip and Battery Insert the Belt Clip first Insert the left side to install the battery on the underside of the printer, and then push the right side of the battery down until the clasp locks down in place. Battery Safety Warning: DO NOT throw the battery in fire. -
Page 16: Loading The Media
The battery is fully charged when the Power LED Indicator turns from amber to green Loading the Media Open the printer media cover by pressing down on the media cover release latch. Pull the media holders apart far enough to fit the width of the label roll you are installing Place the roll, printing side face-out, between the media holders and insert hubs into the core. -
Page 17: Loading Media In Peel-Off Mode
Loading Media in Peel-Off Mode Load Media as defined in Loading the Media section on previous page Remove 1 ~ 2 die cut labels from the liner Press down on both sides of the media cover to ensure it is closed correctly. Route the liner under the label peel cover as shown ... - Page 18 Pull the liner tightly Push the label peel cover toward the front of the printer until it covers the plate roller Press down on the label peel cover to lock it in place Note: Calibrate the gap/black mark sensor when changing media using the Configuration Utility – Printer Function –...
-
Page 19: Loading Fan-Fold/External Media
Loading Fan-fold/External Media Open the printer media cover by pressing down on the media cover release latch. Pull the media holders apart far enough to fit the width of the Fan-fold media you are installing Push down each media holder lock lever to secure the media holders in place Route the media, printing side out, through the bottom external label slot Press down on both sides of the media cover to make sure it is closed correctly Note: Calibrate the gap/black mark sensor when changing media using the Configuration Utility –... -
Page 20: Connecting The Printer
Connecting the Printer The printer must establish communication with a host terminal which sends the data to be printed. There are three ways to connect the M4L series: By an USB cable between the printer and its host terminal ... -
Page 21: Power-On Utilities
Power-On Utilities There are three power-on utilities to set up and test printer hardware. These utilities are activated by pressing the FEED key then turning on the printer power key simultaneously and releasing the FEED key when the desired utility function displays on the LCD panel to initiate that utility. -
Page 22: Media Sensor Calibration
Media Sensor Calibration IMPORTANT – Before doing Media Sensor Calibration, verify the last selected Media Sensor type still matches the media installed in the printer (Gap, Black Mark or Continuous). You can check this by doing a Get in the Configuration Utility or by doing an Auto Calibrate using the LCD Sensor setup on in Section 6. -
Page 23: Self Test
Self Test Printer will print the Configuration Page after media sensor calibration. Self-test printout can be used to verify printer configurations and available memory space. The printhead test pattern can verify if any printhead heater elements (dots) are damaged. Note: The Self-test printout requires 4”... -
Page 24: Dump Mode
Dump Mode Printer will enter dump mode after printing Configuration Page. In dump mode, all characters will be printed in 2 columns as shown. The left side characters are received from your system and right side data are the corresponding hexadecimal value of the characters. It allows users or engineers to verify and debug the program. -
Page 25: Start The Configuration Utility
Configuration Utility PRINTRONIX’s Configuration Utility is an integrated tool incorporating features that enable you to explore a printer’s settings/status; change a printer’s settings; download graphics, fonts and firmware; create a printer bitmap font; and send additional commands to a printer. With the aid of this powerful tool, you can review printer status and setting in an instant, which makes it much easier to troubleshoot problems and other issues. - Page 26 Connect the printer and computer with a USB cable. Note: The printer connects with the computer via USB to USB cable or USB to RS-232 cable (option). Select the printer interface connected with bar code printer USB to USB cable USB to RS-232 cable The default interface setting is USB interface.
-
Page 27: Performing A Calibrate Sensor By Configuration Utility
Gap or Black Mark positioned at the Tear Bar. NOTE: No media will advance if Media Sensor type = Continuous. Press the M4L Control Panel Feed key - the printer should advance one label and stop with the Gap or Mark at the Tear Bar. -
Page 28: Calibrate Sensor - Manual Setup
Example: Label Reading 388 Gap Reading 950 Press the M4L Control Panel Feed key - the printer should advance one label and stop with the Gap or Mark at the Tear Bar. IMPORTANT - When a new media type is used for the first time, it is recommended that after a Manual Setup Calibrate, you remove the media and close the media cover to verify that the printer will detect an actual paper out and display a “No Paper”... -
Page 29: Configuration Utility Zpl2 Emulation Menu
Configuration Utility ZPL2 Emulation Menu Darkness Range = 0 to 30 Default = 16 Print Speed Range = 1 to 4 ips Default = 2 ips Tear Off Range = -120 to 120 dots Default = 0 - dot value, label TOF stops below Tear Bar. + dot value, label TOF stops above Tear Bar. -
Page 30: Cpcl Emulation
LINE PRINT MODE, they need to manually switch to CPCL before printing. It can be done by using Configuration Utility ‘Active Emulation’ or by selecting CPCL from the M4L front panel. When the printer is running CPCL LINE PRINT emulation, you will have to either select ‘Exit Line Mode’... -
Page 31: Setting Bluetooth By Configuration Utility
Setting Bluetooth by Configuration Utility Connect the printer and computer with a USB cable. Note: The printer connects with the computer via USB to USB cable or USB to RS-232 cable (option). Turn the printer power on using the Power key Open Configuration Utility and set interface (default setting is USB) USB to USB cable USB to RS-232 cable... -
Page 32: Setting Wifi By Configuration Utility
Setting WiFi by Configuration Utility Connect the printer and computer with a USB cable. Note: The printer connects with the computer via USB to USB cable or USB to RS-232 cable (option). Turn the printer power on using the Power key Open Configuration Utility and set interface (default setting is USB) USB to USB cable USB to RS-232 cable... -
Page 33: Using The Lcd To Set The Printer
LCD Menu Function The M4L has an LCD panel to further enhance its capabilities to meet the demands of a wide range of printing solutions. This includes an LCD control panel, 4 keys and 2 LED status indicators. - Page 34 Example: To change the Speed setting, follow the steps below: Press “M” key to enter the Main menu. Press the Feed key to enter the “Manual Setup” item. Press the Feed key to enter the “Print Setup” item. Press the Feed key to select the “General”...
-
Page 35: Using The Lcd To Set The Printer
Using the LCD to Set the Printer There are 6 categories for the main menu. You can easily set the settings of the printer without connecting it to a computer. Please refer to the following sections for more details. Print Setup for General ... -
Page 36: Print Setup For Zpl2
Print Setup for Zpl2 Item Description Default Use this item to setup printing darkness. The available setting is from 0 to 30, and the Darkness step is 1. You may need to adjust your darkness based on selected media. Print Speed Use this item to setup print speed. -
Page 37: Sensor
Sensor Item Description Default This item is used to set the media sensor type and calibrate the Auto Calibration selected sensor. Printer will feed 2 to 3 gap labels to calibrate the sensor sensitivity automatically. In case “Auto Calibration” cannot apply to the media, please use “Manual Setup”... -
Page 38: Serial Comm
Serial Comm. Item Description Default Baud Rate This item is used to set the RS-232 baud rate. 9600 Parity This item is used to set the RS-232 parity. None Data Bits This item is used to set the RS-232 Data Bits. Stop Bit(s) This item is used to set the RS-232 Stop Bits. -
Page 39: Wireless Lan
Wireless LAN Item Description Default This item is used to set the operating mode of wireless local area networks to connect devices to the networks. Operating Mode Infrastructure Note: Infrastructure mode requires the use of an access point for this communication to take place. -
Page 40: Display
Display Item Description Default Contrast This item is used to set the contrast for the display. Backlight This item is used to set the backlight time for the display. 10 Seconds File Manager This feature is used to check the printer available memory and file list. Item Description Use this menu to show available memory space and run... -
Page 41: Diagnostics
Diagnostics Print Config This feature is used to print current printer configuration to the label. On the configuration printout, there is a print head test pattern, which is useful for checking if there is any dot damage on the printhead heater elements. -
Page 42: Display Languages
This feature is used to check the printer temperature, resistance and bad dots for the printhead. Display Languages This option is used to setup languages on LCD display Emulation Zpl2 Main Menu Emulation CPCL This option is used to select the emulation Service This feature is used to restore printer settings to defaults. -
Page 43: Trouble Shooting
The following guide lists the most common problems that may be encountered when operating this bar code printer. If the printer still does not function after all suggested solutions have been invoked, please contact the Printronix Customer Support Center for assistance. Problem... -
Page 44: Recovery Procedure
Problem Possible Cause Recovery Procedure Delete unused files in the memory. The max. number of DRAM is 256 files. Can’t downloading the file The max. user addressable memory space of to memory (FLASH / The selected memory space is full. DRAM is 2048KB. - Page 45 Problem Possible Cause Recovery Procedure Roll media ‐ Place locking levers in unlocked (full up) position. NOTE: Locking levers should only be used for fanfold media. Media holders don’t slide Media holder locking lever(s) were accidently open to allow removal or moved to the lock position. installation of roll media. NOTE: If fanfold media is never used, locking levers can be removed from the media holders by removing 2 Phillips head screws. Media will not advance when Verify left side of media cover is completely Left side of media cover is not completely print job is sent or when the closed. NOTE: Cover open switch is located under closed. Form Feed key is pressed. right side of cover. Tear Mode ‐ Media does not Peel‐Cover incorrectly placed in forward Slide the Peel Cover toward the back of the printer tear properly against the tear position and is interfering with Tear‐Off. when Tear mode is used. bar. NOTE: Unless a successful Calibrate Sensor is Calibrate Sensor via Configuration Utility or performed, the printer may be able to detect TOF Power‐On Utility was never performed. but not able to detect an actual paper out (no paper) condition. Calibrate Sensor was performed, but Paper In Configuration Utility, if Threshold Detection = Height and Gap values were never entered ...
- Page 46 46 ...
- Page 47 Maintenance This section discusses how to maintain your printer. 1. Use one of following materials to clean the printer. Cotton swab or authorized Printronix Thermal Printhead Cleaning Pen (203502-002) Lint-free cloth Vacuum / Blower brush ...
- Page 48 48 ...
-
Page 49: Contact Information
Contact Information Contact Information Printronix Customer Support Center IMPORTANT Please have the following information available prior to calling the Printronix Customer Support Center: Model number Serial number (located on the back of the printer) ... -
Page 50: Corporate Offices
Phone: (65) 6542 0110 Fax: (65) 6546 1588 Printronix Commercial (Shanghai) Co. Ltd 22F, Eton Building East No.555, Pudong Av. Shanghai City, 200120, P R China Phone: (86) 400 886 5598 Fax: (86-21) 5138 0564 Visit the Printronix web site at www.printronix.com 50 ... - Page 51 Web sites. The materials at those Web sites are not part of the materials for this Printronix product and use of those Web sites is at your own risk.
- Page 52 Printronix encourages owners of information technology (IT) equipment to responsibly recycle their equipment when it is no longer needed. Printronix offers a variety of programs and services to assist equipment owners in recycling their IT products. Information on these product recycling offerings can be found on Printronix’s Internet site at...
-
Page 53: Communication Statements
Communication Statements FEDERAL COMMUNICATIONS COMMISSION (FCC) STATEMENT This equipment has been tested and found to comply with the limits for a Class B digital device, pursuant to part 15 of the FCC Rules. These limits are designed to provide reasonable protection against harmful interference in a residential installation. - Page 54 In solch einem Fall ist der Abstand bzw. die Abschirmung zu der industriellen Störquelle zu vergrößern. Anmerkung: Um die Einhaltung des EMVG sicherzustellen sind die Geräte, wie in den Printronix Handbüchern angegeben, zu installieren und zu betreiben. Konformitätsklassen: CE: EN 55022/24, IEC 61000-3-3, IEC 61000-3-2, EN 300328, EN 301489 EN 60950-1 durchgeführt von TÜV SÜD...
- Page 55 Batterie-Sicherheitshinweis: Batterie nicht in offenes Feuer werfen. Batterie nicht kurzschließen. Batterie nicht zerlegen. Batterie nicht über den Hausmüll entsorgen. Auf fachgerechte Entsorgung achten (Kennzeichnung durch durchgestrichene Mülltonne). Achtung! Explosionsgefahr bei unsachgemäßem Austausch der Batterie. Ersatz nur durch Original- oder vom Hersteller empfohlenen Typ.
-
Page 56: Software License Agreement
Software License Agreement Your printer contains, among other software, application software, but not limited to the Ethernut Operating System (the “Ethernut Software”) as embedded software. The terms of this Agreement apply to the Ethernut Operating System, and all other embedded software supplied with the printer. - Page 57 * 2. Redistributions in binary form must reproduce the above copyright * notice, this list of conditions and the following disclaimer in the * documentation and/or other materials provided with the distribution. * 3. Neither the name of the University nor the names of its contributors * may be used to endorse or promote products derived from this software * without specific prior written permission.
- Page 58 58 ...
- Page 59 Index Media Specifications, 10 B P Battery, 41 Bluetooth, 39 Power‐On Utilities, 21 Print Config, 41 Print Specifications, 10 C Printer Defaults, 24 Printer Initialization, 22 Cable Communications, 20 Printer Setup for EPL2, 36 Charging the Battery, 15 Printhead, 41 Connecting the Printer, 20 S D Self Test, 23 Date Time, 39 Self Test and Dump Mode, 22 Display, 40 Sensor, 37 Display Languages, 42 Serial Comm., 38 Dump Mode, 24, 41 Service, 42 Setting Bluetooth by Configuration Utility, 31 F Standard Features, 8 Start the Configuration Utility, 25 ...
- Page 60 ...
Need help?
Do you have a question about the M4L and is the answer not in the manual?
Questions and answers