Table of Contents
Advertisement
USERS GUIDE
RF Electronic Programmable Room Thermostat, 7 day
LOGIC+ Combi
LOGIC Combi
LOGIC Combi E
LOGIC Combi ES
When replacing any part on this appliance, use only spare parts that you can be
assured conform to the safety and performance specification that we require.
Do not use reconditioned or copy parts that have not been clearly authorised by Ideal.
Advertisement
Table of Contents

Subscribe to Our Youtube Channel
Related Manuals for IDEAL LOGIC+ Combi


Summary of Contents for IDEAL LOGIC+ Combi
-
Page 1: Users Guide
When replacing any part on this appliance, use only spare parts that you can be assured conform to the safety and performance specification that we require. Do not use reconditioned or copy parts that have not been clearly authorised by Ideal. - Page 2 The national regulations and respective safety instructions are to be observed. Interferences and changes to the device will lead to cancellation of the warranty.
-
Page 3: Table Of Contents
Setting the Time and Date ........6 Setting the Program..........7,8 Setting the Room Temperature .......9 Setting to Run in Automatic Mode ......10 The Ideal Logic Combi RF Programmable Room Setting to be Continuously On ......10 Thermostat features the following: Setting to be Continuously Off ......10 • Summer/Winter Time (GMT/BST) automatically updated... -
Page 4: Controls
RF ELECTRONIC PROgRammabLE ROOm ThERmOSTaT, 7 day +/- keys Indication of programmed Control Knob TUES THUR for program selection Display HOURS Next Day Indication of programmed on time Copy Key Reset Button OK Key Note. If a battery symbol is blinking, the display is blinking or the display is blank then replace batteries. -
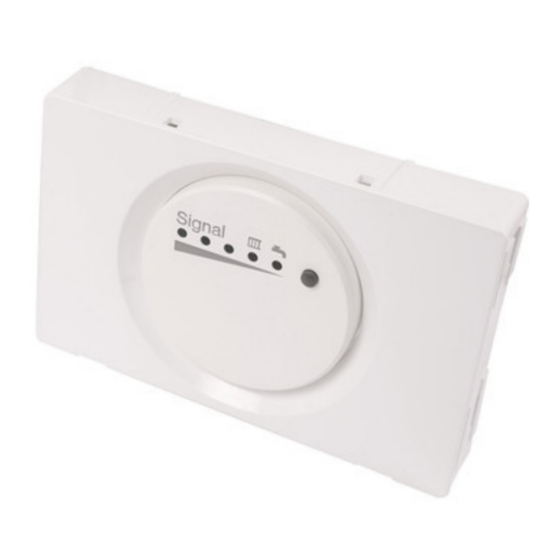
Page 5: Receiver Unit
RECEIvER UNIT (bOILER mOUNTEd) S ig n a l During normal operation light (A) is on for Hot water Operation. During normal operation light (B) is on for Central Heating Operation. If the Reset Button is pressed on the room thermostat the signal lights on the receiver unit will light. If less than 4 lights are on either the room thermostat is too far from the boiler or the batteries in the room thermostat need replacing. -
Page 6: Setting The Time And Date
SETTINg ThE TImE aNd daTE Note. Summer/Winter time automatically updated. Turn the Control Knob to the “TIME/DATE” position Press the keys to change the Hours to the current time and to enter press the Press the keys to change the Minutes to the current time and to enter press the Press the keys to change the... -
Page 7: Setting The Program
SETTINg ThE PROgRam Turn the Control Knob to the “PROGRAM” position Press the keys to change the Hours figure for Monday’s 1st On Time and to enter press the Press the keys to change the Minutes figure for Monday’s 1st On Time and to enter press the Press the keys to change the... - Page 8 Press the keys to change the Minutes figure for Monday’s 2nd On Time and to enter press the Press the keys to change the Hours figure for Monday’s 2nd Off Time and to enter press the Press the keys to change the Minutes figure for Monday’s 2nd Off Time...
-
Page 9: Setting The Room Temperature
SETTINg ThE ROOm TEmPERaTURE Turn the Control Knob to the “SET TEMPERATURE” position Press the keys to change the Temperature and to enter press the Turn the Control Knob back to the required mode of operation: “RUN”, “CONT ON” or “CONT OFF”... -
Page 10: Setting To Run In Automatic Mode
SETTINg ThE RF PROgRammabLE ROOm ThERmOSTaT TO RUN IN aUTOmaTIC mOdE (using the programmed on and off times) Turn the Control Knob to the ‘RUN’ position SETTINg ThE RF PROgRammabLE ROOm ThERmOSTaT TO bE CONTINUOUSLy ON Turn the Control Knob to the ‘CONT ON’... -
Page 11: Setting + Hours
SETTINg hOURS Note. Use of the ‘+ Hours’ function will ensure the boiler operates continuously for up to 5 hours. If used during an off period, the boiler will then operate for up to 5 hours. If used during an on period less than 5 hours prior to an off period, it can extend the on time. Turn the Control Knob to the “+ HOURS” position Press the keys to set the required + Hours time and to enter press the key. Setting the time to 0 will disable this function. Turn the Control Knob to the required operating condition: RUN or CONT OFF... -
Page 12: Advanced Features
advaNCEd FEaTURES A. HOLIDAY MODE Ensure the knob is in the “RUN” position then press the key for more than 3 seconds Press the keys to change the Year to the year the holiday will start and to enter press the Press the keys to change the Month... - Page 13 advaNCEd FEaTURES B. TIMED PRE-HEAT When Domestic Hot Water preheat is switched on the boiler control the boiler will preheat from the beginning of the first timed on central heating period of the day to the end of the last timed on central heating period of the day, so as to provide more efficient water delivery.
- Page 14 advaNCEd FEaTURES C. OPTIMIsATIOn This feature provides for greater comfort and economy of operation. The boiler will be switched on earlier than the programmed heating on time. This provides for the room temperature to be achieved at the programmed heating on time, rather than some time afterwards. The boiler will automatically only use the minimum energy required in order to achieve the desired room temperature.
- Page 15 advaNCEd FEaTURES D. EngLIsH LAnguAgE ERROR DEsCRIPTIOn Boiler fault codes are identified on the display in plain English, they are also supported with a suggested corrective action to aid diagnostics. bOILER ERROR COdE ERROR dISPLay CORRECTIvE aCTIONS L1 - OVERHEAT LOCKOUT 1.
- Page 16 advaNCEd FEaTURES F1 - LOW WATER PRESSURE 1. FILL SYSTEM TO 1.0 BAR 2. BLEED RADIATORS F2 - FLAME LOSS 1. CHECK OTHER GAS APPLIANCES WORK F3 - FAN FAULT 1. CONTACT INSTALLER F4 - FLOW THERMISTOR FAULT 1. CONTACT INSTALLER F5 - RETURN THERMISTOR FAULT 1.
- Page 17 advaNCEd FEaTURES OPEnTHERM The unit uses the OpenTherm protocol to control the boiler flow temperature set point in central heating operation. This means that the boiler will run in its most efficient manner and offer significant savings in energy over standard room thermostats.
-
Page 18: Battery Replacement
baTTERy REPLaCEmENT The unit required 2 x AA 1.5V Batteries. Batteries should operate for approximately 18 months. Only good quality 1.5v alkaline batteries should be used. dO NOT use re- chargeable batteries as they only have a terminal voltage of 1.2v nom. To replace batteries remove battery panel on the front of the room thermostat to gain access. - Page 20 April 2013 UIN 204796 A08 Ideal Stelrad group pursues a policy of continuing improvement in the design and performance of its products. The right is therefore reserved to vary specification without notice. Ideal boilers Ltd., P.O. Box 103, National Ave, Kingston Upon Hull, HU5 4JN.
Need help?
Do you have a question about the LOGIC+ Combi and is the answer not in the manual?
Questions and answers