Table of Contents
Advertisement
Advertisement
Table of Contents

Related Manuals for Novatel Sprint mifi 4082


Summary of Contents for Novatel Sprint mifi 4082
-
Page 2: User Guide
User Guide ® MiFi 3G/4G Mobile Hotspot by Novatel Wireless Browser Interface www.sprint.com ©2011 Sprint. SPRINT and the logo are registered trademarks of Sprint. Other marks are the property of their respective owners. -
Page 4: Table Of Contents
Table of Contents Tip: Looking for something? If you don’t see it in the headings listed here, try the Index on page 67. Introduction........i Your Device. - Page 5 Section 2: Interface Settings....11 2E. System Menu ......43 The System Menu .
-
Page 6: Introduction
3G/4G Mobile User Guide interface that allows you to configure your device as Hotspot by Novatel Wireless. This device offers more well as access its many features. freedom than ever before. No wires, no cables, no software — configure it through your Web browser. -
Page 7: Section 1: Your Device's Browser Interface
Section 1 Your Device’s Browser Interface... -
Page 8: Interface Basics
Opening the Browser Interface 1A. Interface Basics Initial Connection and Setup Important: Set the wireless network adapter power options to The Browser Interface (page 2) maximize your device’s performance. Opening the Browser Interface (page 2) Click and type in the Start Power Options... -
Page 9: Led States
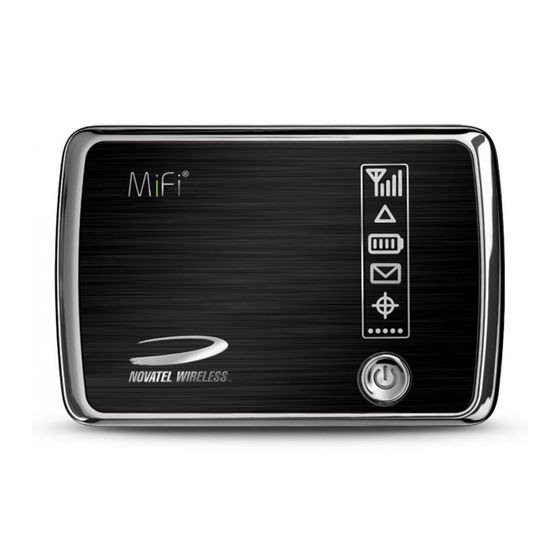
LED States The MiFi device LED provides valuable information about the state of the device and its connection. Power/Connection LED Power LED Color Status Description Connection — No Power Device is powered off Light Connected to Device is powered on; no 3G or 4G service is available (out of Amber Flashing: power... - Page 10 Use your normal Wi-Fi manager on your computer The status panel display is located on the right side of to locate the wireless network. MiFi 4082 the front of the MiFi device. When the device is powered on, the icons display current device status Tip: The steps to connect to a Wi-Fi network vary depending information.
- Page 11 Tip: Important: You can use either of these addresses to connect: • http://mifi.mlp • Be sure to record both the administrative password and the network key that you create using the initial • http://192.168.1.1 setup wizard. • If you cancel the wizard, your network will be left The MiFi Setup Wizard will start.
- Page 12 This is the password you will use to enter the browser interface in the future. Click to accept and save your setup. Finish The connection will close and the Wi-Fi device will restart. Select I accept this agreement to approve the GPS Note: When you reconnect, the network name (SSID) will be Privacy Consent Agreement and click...
-
Page 13: Login To The Browser Interface
Login to the Browser Interface The Landing Page Click Login on the upper right corner of the screen. The landing page is the first screen you see after logging in to the browser interface. It is the main point of entry for all your work in the browser interface. The landing page is where guests can see and interact with widgets (“mini-applications”... -
Page 14: The Navigation Bar
The Navigation Bar Settings Menu Bar The navigation bar is at the top of the landing page in The Settings section contains a menu bar to help you the browser interface. The navigation buttons change configure your device. Except for the MiFi according to the page you visit. -
Page 15: Mifi Administration Screen
MiFi Administration Screen Internet Connection Summary The MiFi Administration screen is divided into two sections: Internet Connection Summary Wi-Fi Summary The Internet connection summary section displays: Click the small square next to a section title to expand — the duration of the current Time Connected ... - Page 16 Wi-Fi Summary The Wi-Fi Summary section displays: — the profile currently in use. Profile Network Name (SSID) — the network name (also known as the SSID). — the security method in use. Security — the number of users currently Connected Devices ...
-
Page 17: Section 2: Interface Settings
Section 2 Interface Settings... -
Page 18: Applications Menu
The Applications Menu 2A. Applications Menu The Applications menu is divided into two sections: — use to view the status of your microSD File Sharing card and enable file sharing. The Applications Menu (page 12) — use to configure the landing MiFi home settings ... -
Page 19: File Sharing
File Sharing The File Sharing Screen screen is divided into two sections: File Sharing Click File Sharing in the Applications menu to check the total space and available space on your microSD microSD Card Status card and to enable file sharing. Configuration ... -
Page 20: The Mifi Home Settings Screen
Configuration MiFi Home Settings Click in the Applications menu to MiFi home settings select landing page and widget configuration options. The Configuration section displays the following: – check to allow guests to Enable File Sharing share information. – shows the name of the shared folder. Share Name ... - Page 21 Landing Page Configuration Widget Configuration The Landing Page Configuration section displays the following: The Widget Configuration section displays the – Get Widget Data in advance when the MiFi is on following: allows you to set conditions under which widget data –...
-
Page 22: Wi-Fi Menu
The Wi-Fi Menu 2B. Wi-Fi Menu The Wi-Fi menu is divided into three sections: — use to view network profile information and Status see who is connected to the device. You can also The Wi-Fi Menu (page 16) retrieve your network key from this screen. -
Page 23: Wi-Fi Status
Status The Wi-Fi Status screen is divided into two sections: Wi-Fi Network Click Status in the Wi-Fi menu to view your network Wi-Fi Connected Devices profile information and to view the profile of clients connected to your device. Wi-Fi Network The Wi-Fi Status Screen The Wi-Fi Network section displays the following:... - Page 24 — shows the type of encryption for the Wi-Fi Connected Devices Encryption security type in use. — passcode or password used to Network Key access the network. The required format varies by type of security. Tip: Some Wi-Fi clients become confused if the security is changed and the network name is not.
-
Page 25: Mac Filter
MAC Filter The MAC Filter Screen The MAC Filter screen is divided into two sections: Click MAC Filter in the Wi-Fi menu to limit access to your device to only those devices with a specified MAC Enable MAC Filter address (a unique code assigned to hardware such as Trusted Client List ... - Page 26 Trusted Client List On a Windows machine, you can find the MAC address by running “ipconfig /all” from the Command Prompt window. The MAC address is referred to as the physical address. ( Select Start > All Programs Programs >...
-
Page 27: Settings
Using MAC Filtering Settings From the MAC Filter screen, type the MAC address Click Settings in the Wi-Fi menu to view and configure for your computer into the Add Trusted Client MAC your Wi-Fi access point profile. Address box and click . - Page 28 The Wi-Fi Settings Screen Open Profile The Wi-Fi Settings screen is divided into three sections: Wi-Fi Access Point Open Profile Secure Profile The Open Profile section displays the following: Wi-Fi Access Point – shows the name of the active Network Name (SSID) ...
- Page 29 Secure Profile – shows the active authentication Authentication requirements. Encryption – shows the active type of encryption. – shows the active network key Network Key (password). – provides the option to setup WPS. Click to update the Wi-Fi Settings Apply configuration options.
- Page 30 Select from the menu. Push Method WPS Method Note: Windows XP does not support WPS. Additional software is required to use WPS. There are two methods available to set up WPS. Choose from the following: Push Method PIN Method ...
- Page 31 On the client device: Using the PIN Method to Set Up WPS From the Wi-Fi client software, navigate to the WPS On your device: setup option. From the Secure Profile section of the Wi-Fi Settings page, click WPS Setup Select from the menu.
-
Page 32: Wwan Menu
The WWAN Menu 2C. WWAN Menu The WWAN Menu is divided into four sections: — view your Internet connection or Sprint Status network connection status, view information about The WWAN Menu (page 26) your TCP/IP connection, or view the event log (see The WWAN menu allows you to update your “WWAN Log”... -
Page 33: The Wwan Status Screen
Status The WWAN Status screen is divided into three sections: Internet Connection Summary Click Status in the WWAN menu to check the status of TCP/IP your Internet connection, TCP/IP, and to view the WWAN log. WWAN log Internet Connection Summary The Internet Connection Summary section displays the following:... - Page 34 — the number of bytes received. WWAN Log Data Received — the number of bytes transmitted. Data Transmitted The WWAN log section lists network connection events and times for the current session only. Sprint technical TCP/IP support uses the log as a troubleshooting tool. The TCP/IP section displays the following: —...
- Page 35 The 3G Screen The 3G screen is divided into four sections: Click in the WWAN menu to access status information about your 3G Internet connection and 3G Network your device. 3G Modem Traffic Counters Service Updates 3G Network The 3G Network section displays the following: —...
- Page 36 — measurement of the portion of the signal that — address of your device on the Sprint network. Ec/lo is usable. — use to verify that your PRL (Preferred PRL Version — subscriber identification number. Roaming List) is the most current. ...
- Page 37 Service Updates Click in the WWAN menu to access status information about your 4G Internet connection and your device. The Service Updates section allows you to update your Preferred Roaming list and your network profile, and access diagnostic information. Click to update your Preferred Update PRL ...
- Page 38 The 4G Screen — measurement of power transmitted in TX Power dBm. The 4G screen is divided into three sections: — displays whether a center Center Frequency 4G Network frequency (midpoint between the upper and lower 4G Modem cutoff frequencies) point has been set.
-
Page 39: Settings
— the current driver version. Settings Driver Version — the current media access control MAC Address Click Settings in the WWAN menu to access Internet address. and network connection options for your device. Traffic Counters Note: This section should be used for informational purposes only and should not be relied upon for billing data. -
Page 40: Connection Options
Connection Options Network Options The Connection Options section displays the following: The Network Options section displays the following: – check to set your device to Auto-connect enable WWAN Mode – select from 3G, 4G, 3G Preferred, or automatically connect to the Internet. 4G Preferred. -
Page 41: Router Menu
The Router Menu 2D. Router Menu The Router Menu is divided into four sections: — use to specify which applications can Port Filtering access the Internet and through which port(s). The Router Menu (page 35) Port Forwarding — use to specify which applications ... -
Page 42: Allowed Applications
Port Filtering The Port Filtering Screen The Port Filtering screen is divided into three sections: Click in the Router menu to enable port Port Filtering filtering, allow selected applications Internet access, Filter Outgoing Traffic and set up custom application Internet access. Allowed Applications ... -
Page 43: Custom Applications
The Allowed Applications section displays the Click Apply following: Note: The device uses standard ports for these applications. If DNS (Domain Name Server) - select to allow/enable you have applications that do not use the standard domain name server. ports or that are not listed under Allowed Applications, use Custom Applications. -
Page 44: Port Forwarding
Click Port Forwarding Custom Applications Enter a name for the application and click the Click in the Router menu to enable Port Forwarding link to the right of the text box. Ports designated users or applications to reach specified Enter the port or port range. You can enter up to servers, such as FTP and DNS servers, on your five ports or port ranges. -
Page 45: Port Forwarding Applications
Port Forwarding Applications Note: You cannot use port forwarding with a standard Sprint data account. To use port forwarding, you must request a static IP (sometimes called public IP) address. Contact your direct sales representative or Sprint Customer Service to purchase a static IP Address for mobile applications. -
Page 46: Tcp/Ip
Custom Applications TCP/IP Click in the Router menu to view the local TCP/IP (WLAN) IP Address and the MAC address for your device, to enable the DHCP Server, and to view information on the clients connected to your device. The Custom Applications section allows you to forward unrecognized incoming traffic to a specified client. - Page 47 The TCP/IP Screen DHCP Server The TCP/IP screen is divided into three sections: TCP/IP DHCP Server Connected Devices TCP/IP The DHCP Server section displays the following: — select to enable the dynamic DHCP Server enable host configuration protocol server. —...
-
Page 48: Settings
Connected Devices Settings Click in the Router menu to access the Router Settings Settings screen. The Connected Devices section displays the following: Interface — the type of connected device. IP Address — the current Internet protocol address of the device. -
Page 49: System Menu
The System Menu 2E. System Menu The System Menu is divided into seven sections: — use to view system information and the Status System Log. The System Menu (page 43) — use to enable and configure GPS searching ... -
Page 50: Status
Status System Information Click in the System menu to view information Status about your system hardware and software, and to check the system usage history. You can also restart or reset your device from the Status screen. The System Information section displays the following: —... -
Page 51: Gps
System Log Click in the System menu to enable and configure GPS searching for your device. The System Log section displays the usage history for your device for the current session only, including date and time information for each session. The GPS Screen The GPS screen is divided into two sections: GPS Status... - Page 52 GPS Status GPS Configuration The GPS Configuration section allows you to configure the GPS settings. The GPS Status section displays the following information once a location fix has been made: – enabled or disabled. GPS Status Select the check box to turn on GPS. Enable GPS Last Fix –...
-
Page 53: Backups
Backups Backup the Configuration File The Backup the configuration file section allows you to Click Backups in the System menu to back up your backup your device’s configuration file to your configuration file (device settings) to your computer or computer. to restore a saved configuration file from your computer. -
Page 54: Software Update
Restore the Configuration File Software Update The Restore the configuration file section allows you to Click in the System menu to view the Software Update restore a configuration file backed up on your software version release and installation history and to computer to your device. - Page 55 The Software Update Screen Network Update The Software Update screen is divided into two sections: Software Version Network Update Software Version The Network Update section displays the following: – allows you to set the frequency Check for updates ...
-
Page 56: Power Management
During a software or network update, you will see the Power Management following: Click in the System menu to Power Management A green LED flashes on the device (it will begin to disable device LEDs and to configure Automatic flash slowly towards the end of the download Shutdown. - Page 57 The Power Management Screen Standby Mode The Power Management screen is divided into three sections: Stealth Mode Standby Mode The Standby Mode section displays the following: Automatic Shutdown – When on battery power, switch to standby mode ...
-
Page 58: Password
Password Retype your new password in the Verify New field. Password Click in the System menu to change your Password Click to confirm the password change. Apply administration password. Settings Click in the System menu to enable Wi-Fi Settings when the device is connected to a USB port and to enable the System log. - Page 59 The System Settings Screen Localization The System Settings screen is divided into two sections: System Localization System The Localization section displays the following: – select preferred language. Language Date/Time Format – select preferred month, day, year format and time format.
- Page 60 2E. System Menu...
-
Page 61: Section 3: Troubleshooting
Section 3 Troubleshooting... -
Page 62: Common Problems And Solutions
The device has no power, or the LED indicator does not come on when the power button is 3A. Common Problems and pressed. Solutions Make sure the battery is properly seated in the device. Make sure the battery is fully charged. Plug in the ... - Page 63 If the LED is not on, check your battery. (See “LED Windows: Click on the left Refresh Network List States” on page 3.) side of the Wireless Network Connection screen. If that does not work you can try the following: Make sure your Windows Wi-Fi adapter/Mac ...
- Page 64 How do I disconnect from the network? bar. For more detailed information, log in and choose . Then click Internet > Diagnostics Open your device’s landing page. Modem Status Log in as the administrator if you have not On the device: Check the battery icon on the ...
- Page 65 How do I access information on the Wi-Fi network To reset the router hardware to the original factory settings: and Wi-Fi clients? Make sure your device is powered on. Log in to your device and choose Settings > Remove the back cover and locate the opening to open the Wi-Fi Status page and Wi-Fi >...
- Page 66 Remove the back cover and locate the opening on the back of the device labeled “RESET.” Insert a paper clip into the hole and hold the button down for six seconds until the LED goes out. The LED color will vary depending on the status of the device when you reset it.
-
Page 67: Section 4: Reference
Section 4 Reference... -
Page 68: Glossary
Computing Device — Any of a variety of computer-like devices (for example, a desktop computer, laptop, 4A. Glossary tablet PC, smartphone, or PDA). DHCP — Dynamic Host Configuration Protocol. Software found in servers and routers that automatically assigns temporary IP addresses to 3G —... - Page 69 Gateway — A network point that acts as an entrance to HTTP — Hypertext Transfer Protocol. An application- another network that uses a different protocol. level protocol for accessing the World Wide Web over the Internet. GPS — Global Positioning System. A radio-based ...
- Page 70 MEID — Mobile Equipment IDentifier. A globally unique interface between certain pieces of electronic number for a physical piece of mobile station equipment, including GPS receiver communications. equipment. Port — A virtual data connection used by programs to Mbps —...
- Page 71 SSID — Service Set Identifier. The name assigned to a USB — Universal Serial Bus. A connection type for Wi-Fi network. computing device peripherals such as a printer, mobile modem, etc. USB connectors may be used for TCP — Transmission Control Protocol. A core ...
- Page 72 Wi-Fi Connected Device — A wireless device that connects to the Internet via Wi-Fi. WLAN — Wireless Local Area Network. A typically low- power network that transmits a wireless signal over a span of a few hundred feet and usually only to stationary devices.
-
Page 73: Index
Index Airport ID 20 Allowed Applications 36, 37 Channel Numerics Port Filtering 36 Secure Profile 23 3G 29 Applications Connected Devices 42 Modem 30 Custom 37 Common Problems 56 Network 29 Menu 12 Configuration 13, 14 Screen 29 Port Forwarding 38 Authentication 14 WWAN Menu 29 Authentication... - Page 74 Filter Outgoing Traffic 36 Port Filtering 36 IMAP 37 Data FTP 35, 37, 38 Interface Settings 11 Widget 15 Date/Time Internet Glossary 62 Wi-Fi Connected Devices 18 Connection 8, 9, 10 DHCP Server 40, 41 GPS 45 IP Address 10 Diagnostics 31 Settings 33 Configuration 46...
- Page 75 MiFi Administration 8, 9 Wi-Fi 16 Navigation Bar Navigation Bar 8 WWAN 26 Status Icons 8 Settings Menu Bar 9 Menu Bar Network Status Icons 8 MiFi Settings 8 Name 10 Wi-Fi Summary 10 microSD 12, 13 Options 33, 34 Login Available Space 13 SSID 10...
- Page 76 Profile Secure Profile 23 Open 22 802. 1 1 Mode 23 Password Secure 23 Authentication 23 Administrative 6 Channel 23 Authentication 14 Encryption 23 Change 43, 52 Reference 61 Network Key 23 Default 5, 58 Roaming 26, 27, 34 Network name (SSID) 23 Forgot 56 Roaming Status 4, 8, 34 Security 23...
- Page 77 Setup Power Management 43, 50 Settings 43, 53 Initial Setup Wizard 5 VPN 12 Software Update 43, 48 Web Address 4 Status 43, 44 SID 30 Wait Time Software Update 48, 49 Failover 34 TCP/IP 26-28, 35, 40, 41 System Menu 43 Switchback 34 Screen 41 Solutions 56...
- Page 78 IP Address 18 WWAN IP Type 18 Log 28 MAC Address 18 Menu 26 Wi-Fi Menu 16 Status Screen 27 MAC Filter 16, 19 WWAN Menu Settings 16, 21 3G 26, 29 Status 16, 17 4G 26, 31 Wi-Fi Network 17 Settings 26, 33 802.
Need help?
Do you have a question about the Sprint mifi 4082 and is the answer not in the manual?
Questions and answers