
Related Manuals for FREERIDER FR1


Summary of Contents for FREERIDER FR1
- Page 1 F reedom R eliability I nnovation USERS INSTRUCTION MANUAL USERS INSTRUCTION MANUAL...
- Page 2 FOREWORD Please read and follow all instructions in this Users Instruction Manual before attempting to operate your Scooter for the first time. If there is anything in this manual that you do not understand, or if you require additional assistance for setting it up, contact your Authorized Agent.
-
Page 3: Table Of Contents
CONTENTS Introduction ......................3 Purpose of your Scooter ..................4 Rules for safe use ................... 5 Getting to know your Scooter ................7 Operating your Scooter ..................8 Freewheeling your Scooter ................15 Safety instructions and warning ................15 Safety warning & instruction labels ............... 17 Learning to get about .................... -
Page 4: Introduction
Please keep in mind that the operator of the Scooter is responsible for hazards occurring to other people or their property. The FR1 provides transportation for an elderly or disabled person. It can be used in a variety of indoor and outdoor settings. -
Page 5: Purpose Of Your Scooter
PURPOSE OF YOUR SCOOTER Your Scooter is suitable for persons who require independent mobility combined with comfort, safety, reliability and a product that needs a minimal amount of maintenance. The intended user should possess some degree of ability with the use of both arms and hands, reasonable balance and good eyesight, and a degree of spatial awareness. -
Page 6: Rules For Safe Use
RULE FOR SAFE USE These symbols below are used in this Users Instruction manual to identify warnings and cautions. It is very important for you to read and understand them. Warning:Failure to note the warnings in this user ’s manual may result in personal injury. - Page 7 20.Transport - Do not sit on your scooter while it is in a moving vehicle. Always strap down your scooter then transfer to the vehicle seat. 21.The batteries fitted to your scooter are maintenance free and do not require topping up with distilled water. 22.Do not drive your scooter through deep water or clean with a high pressure hose.
-
Page 8: Getting To Know Your Scooter
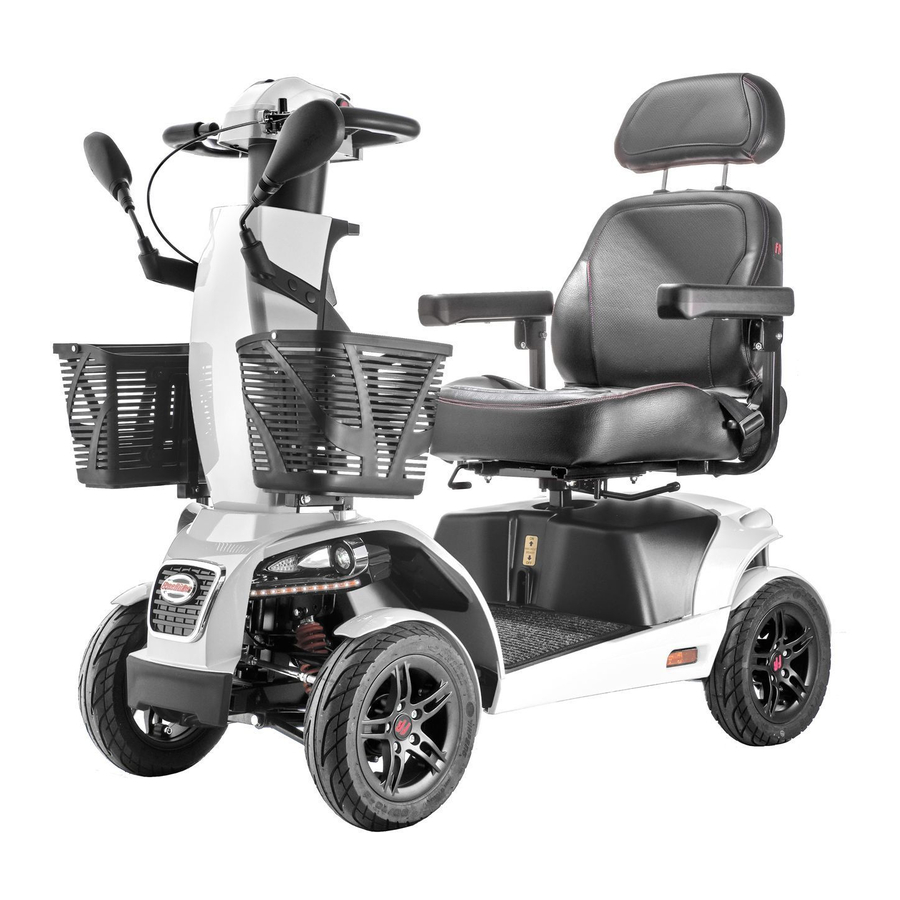
GETTING TO KNOW YOUR SCOOTER 1. Stccring handbars 2. Drining mirror 3. Concole 4. Off-board charger port 5. USB 5V power outlet 6. Injectiion mirror bracket 7.Front lights 8.Direction indicator lights 9.Daytimc running lights 10.Front and rear bumpers 11.Side and rear reflectors 12.Floor mat 13.13"aluminum alloy sporty wheels 14.3 functions in one rear lighting... -
Page 9: Operating Your Scooter
OPERATING YOUR SCOOTER Before setting out on your scooter you need to make sure that your seat is in the correct driving position. The seat has three basic adjustments to assist your comfort. 1.Mirror assemble: 14mm wrench 2.Seat Lock Lever: This allows the seat to swivel through 360 degree: Pull up fully to release the seat allowing rotation. - Page 10 3.Armrest Width Adjustment:On each side at the rear of the seat you will find a large black knob. By simply loosening this knob you are able to slide the armrests in or out to whatever width you desire. Re- tighten the knobs fully. Warning: Do not drive your scooter with the arms removed or in the raised position.
- Page 11 (3).Re-tighten the 10mm fixing screw. (4).Refit the seat onto your Scooter. 6.Seat Slide of the seat:Located on the right front side of the seat. The lever allows you to adjust your seat forwards and backwards when sitting on the seat. Simply pull up the lever and move in the desired position backward by pushing or forward by hitching.
- Page 12 10.Control Features: HI-LOW Your controls are located on the handlebar console they are:...
- Page 13 11.LCD Control Console: Sign Function Description Will activate controller system and control panel On-Off Power Switch Bars will illuminate to show the level of charge in your batteries Batteries condition indicator Will illuminate when power Distance/Temperature on and they also exhibit in /Time indicator different value Will illuminate when the...
- Page 14 Sign Function Description Switch between Km and Miles l. Short press for switching between kilometer and mile. 2. Program Setting Mode for Speed and Loadstone setting, please contact your authorized dealer for adjustment. Reset the distance(range) 1. Short press to switch between ODO/TRIP.
- Page 15 12.Forward, Reverse Control Lever (Wig wag): Forward Reverse Your speed for forward and reverse motion and braking is controlled here. The right thumb lever moves your Scooter in a forwards direction and also controls the rate of speed by the proportional amount of pressure applied. The left thumb lever moves the Scooter in a reverse direction and controls the rate of speed by the pressure applied .
-
Page 16: Freewheeling Your Scooter
FREEWHEELING YOUR SCOOTER If for reasons of convenience, or you require to push your Scooter for a short distance, the drive system can be put into ‘freewheel mode’. This will allow your Scooter to roll freely. 1.Freewheel Procedure: The freewheel device is a red lever located at the rear right hand side of your scooter. - Page 17 a. Check type inflation, maintain at 35 p.s.i. b. Check all battery connections, make certain they are serviceable and not corroded. c. Check front basket is fitted correctly. d. Check batteries have been fully charged. e. Check operation of brakes. Warning: Do not carry passengers on your Scooter.
-
Page 18: Safety Warning & Instruction Labels
SAFETY WARNING & INSTRUCTION LABELS The following labels are positioned on your scooter, they communicate important warnings or instructions regarding the safe operation of your scooter. Please familiarize yourself with their location. LEARNING TO GET ABOUT 1. Basic Driving: Make certain you are comfortably seated on your scooter and both armrests are down. - Page 19 Normal driving position Increased Stability driving position CONTROL OVER STATIONARY OBSTACLES Stationery obstacle (steps, curbs etc.) must be avoided where possible. Proceed with extreme caution when driving near raise surfaces, unprotected ledges and/or drop offs such as curbs, porches, stairs etc. Most new pavements have wheelchair access ramps at intersections, use these at all times.
-
Page 20: Batteries And Battery Charging
BATTERIES AND BATTERY CHARGING 1.Battery Installation: Your Scooter is equipped with two maintenance free 12 volt 75Ah batteries. The batteries are linked together by wiring cables to supply the electronic system with 24 volts of power. Warning: IIt is imperative that the two batteries are connected correctly to prevent a short circuit between the two batteries. - Page 21 2.Battery Charging: Your Scooter has a lot of power. To ensure it works to its full potential you must maintain both batteries on full charge. Nightly recharging, after use, will help you to give them a longer life and will ensure your Scooter is always ready to go when you are.
-
Page 22: Basic Fault Finging
BASIC FAULT FINDING If your Scooter will not start: (1) Check the power key switch is turned 'on'. If it is, the battery condition indicator meter will be operating. If the green status light on your console is flashing once per second, charge your batteries. - Page 23 2.Charging Circuit Fuse: One fuse protects your Scooter charging circuit from receiving an overload of electrical current. The fuse used in the Scooter is the same type which is found on automobiles. In the unlikely event that a fuse should 'blow' and needs replacing. use only a fuse of a 15amp rating.
- Page 24 3.Status Fault Codes: Flash Description Meaning The batteries are running low. Recharge the Battery Low batteries The batteries have run out of charge. Low Battery Fault Recharge the batteries. Check the battery and associated connections and wiring. Note: The low battery fault flash code,described above, is a requirement of various safety standards.
-
Page 25: Technical Specification
TECHNICAL SPECIFICATION Model Number Maximum Safe Slope 6 degree Maximum Climbing Ability 6 degree Maximum Obstacle Climbing Ability 2.36 in.(60 mm) Colors Metallic Gray / Metallic Orange Overall Length 56.9 in.(144.5 cm) Overall Width 27.2 in.(69 cm) Total Weight with Batteries 366 lbs(166.4 kgs) Front Axle Weight 99.2 lbs(45 kgs) -
Page 27: Classification
CLASSIFICATION Type 'B' indoor / with some outdoor capabilities (EN12184:1999) Class 2 (Highway Regulations 1988). Maximum safe climbing angle: 6 degrees with 400 lbs weight capacity (182 kg). Warning: The safe climbing angle is measured with the seat in the highest position, and a weight capacity of 400lbs (182 kg). -
Page 28: Optional Accessories
Charge Socket: Located on the rear tiller cover. (Complies with EMC Directive 89/336/EEC and with Medical Devices Directives 93/42/EEC.) OPTIONAL ACCESSORIES For information regarding these optional accessories please contact your Authorised Freerider Agent. Combined Basket,Stick/Crutch Holder Combining the usefulness of the rear basket and the stick/crutch holder. - Page 29 Oxygen Holder Conveniently fits over the seat back rest, designed to accept a standard mobile N.H.S. issue oxygen bottle. Saddle (SEAT) Bag Looking for somewhere to store rainproof hats, scarves and gloves, just in case you get caught out in a shower? Use the saddle storage bag. Accessory Bracket 1.
-
Page 30: Guarantee Terms
GUARAN TEE TERM S Please keep a note of your serial No…. Your Scooter is guaranteed for 12 months from the date of purchase against faults arising due to defects in manufacture or materials. This guarantee does not detract from, but is in addition to your legal rights. Parts replaced or repaired under the terms of this guarantee will be covered for the balance of the 12 months period. -
Page 31: Service History
SERV I C E H IS TORY This section is designed to assist you in keeping a record of any service and repairs to your Freerider Scooter. Should you decide to sell or exchange your Scooter in the future this will prove most helpful to you.Your Se rvice agent will also benefit from a documented record and this... - Page 32 YOUR LOCAL DEALER PHONE TODAY FOR FREE HOME DEMONSTRATION FREERIDER CORP Head Quarter and Kaohsiung Facility: No.22,Bengong 5th Rd.,Gangshan Dist., Kaohsiung City 820,Taiwan(R.O.C) Tel:886-7-6223093 Fax:886-7-6230373 Email:sales @ freerider.com.tw http://www.freerider.com.tw 2013.06.17 V2...
Need help?
Do you have a question about the FR1 and is the answer not in the manual?
Questions and answers