Table of Contents
Advertisement
Quick Links
Advertisement
Table of Contents

Related Manuals for FREERIDER FR-D04


Summary of Contents for FREERIDER FR-D04
- Page 1 FR-D04 (510DXs2b) USER'S INSTRUCTION MANUAL...
- Page 2 These actions can cause personal injury and/or equipment damage. On the product, this icon is represented as a triangle with red border. Please fill out the following information for quick reference: Freerider dealer:_________________________________________________ Address:_______________________________________________________ Phone Number:_________________________________________________ Purchase Date:__________________ Serial Number:__________________ NOTE: This user's instruction manual is compiled from the latest specifications and product information available at the time of publication.
-
Page 3: Table Of Contents
If there is anything in this manual that you do not understand, or if you require additional assistance for setting it up, contact your nearest Freerider authorised dealer. Using your product safely depends upon your diligence in following the warnings, cautions and instructions in this manual. -
Page 4: Introduction
Before beginning to use your scooter, make sure you completely read and understand all instructions thoroughly. If you have any queries concerning operation or maintenance, consult your authorised Freerider dealer. Please keep in mind that the operator of the scooter is responsible for hazards occurring to other people or their property. -
Page 5: Purpose Of Your Scooter
PURPOSE OF YOUR SCOOTER Your scooter provides transportation for s disabled person. It can be used in a variety of indoor and outdoor settings. The intended user should possess some degree of ability with the use of arms and hands, reasonable balance and good eyesight, and a degree of spatial awareness. The user should have received training in the use of the scooter, preferably in their normal environment. -
Page 6: Rules For Safe Use
RULES FOR SAFE USE These symbols below are used in this User's Instruction manual to identify warnings and cautions. It is very important for you to read and understand them before operating your scooter. Warning: Failure to note the warnings in this user's manual may result !... - Page 7 12.Do not climb or descend curbs that exceed the maximum dimension detailed Do not under technical specification of this manual. turn when negotiating curbs. 13.Always approach obstacles at low speed. 14.Always approach obstacles straight. 15.Always keep your feet on the vehicle when driving. 16.Always proceed carefully while riding, especially as you approach the downgrade of a ramp.
- Page 8 ELECTROMAGNETIC AND RADIO FREQUENCY INTERFERENCE (EMI/RFI) Electromagnetic and Radio Frequency Interference can come from sources such as cellular phones, mobile two-way radios, radio stations, TV stations, amateur radio (HAM) transmitters, wireless computer links, microwave signals, paging transmitters, and medium-range mobile transceivers used by emergency vehicles. In some cases, these waves can cause unintended movement or damage to the control system.
-
Page 9: Getting To Know Your Scooter
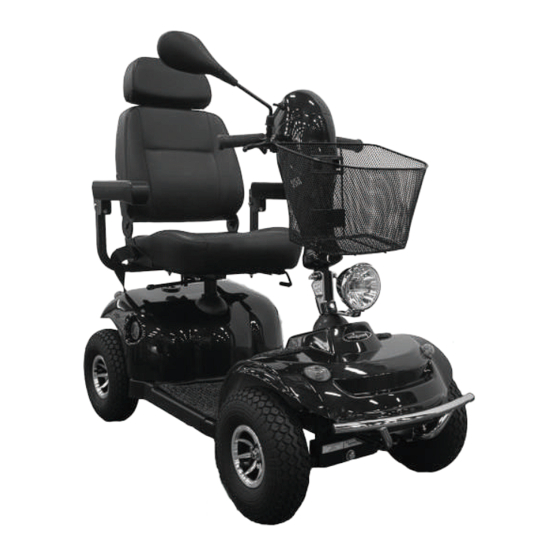
GETTING TO KNOW YOUR SCOOTER 1. Steering handlebars 2. Wing mirror 3. Console 4. Charging socket 5. Basket 6. Front light 7. Direction indicator lights 8. Front and Rear bumper 9. Amber side reflectors 10. Floor mat 11. Pneumatic wheels with black tyres 12. -
Page 10: Comfort Adjustments
COMFORT ADJUSTMENTS Before setting out on your scooter, you need to make sure that your seat is in the correct driving position. The seat has three basic adjustments to assist your comfort. 1. Mirror Assembly: 2. Seat Lock Lever: This allows the seat to swivel through 360 degrees: Pull up fully to release the seat allowing rotation. - Page 11 3. Armrest Width Adjustment: On each side at the rear of the seat you will find a large black knob. By simply loosening this knob you are able to slide the armrests in or out to whatever width you desire. Re-tighten the knobs fully. Warning: Do not drive your...
- Page 12 6. Seat Slide: Located on the right front side of the seat. The lever allows you to adjust your seat forwards and backwards when sitting on the seat. Simply pull up the lever and move in the desired position backward by pushing or forward by hitching.
- Page 13 8. Backrest Height Adjustment: The upper cushion of your backrest can be adjustment for height, giving you more back support if you are tall, by operating the small latch at the base of the left hand round support bar. Lift the cushion up or push down for the most comfortable position.
-
Page 14: Operating Your Scooter
OPERATING YOUR SCOOTER 1.Control Features: Your controls are located on the handlebar console: Direction Battery Direction Status On-Off Front/Rear Warning Condition Warning Warning Power Light Switch Light Indicator Light Indicator Switch Hi/Low Low-Speed Hazard Speed Horn Direction Speed Warning Warning Adjustment Indicator Switch... - Page 15 (3) Battery Condition Indicator: Located at the top left of your console. When your scooter is switched on, the needles on the gauge will move across the scale from the left ‘red’ sector towards the "green" sector, indicating the state of charge in your batteries. As the power is used up in your batteries the needle will move towards the red sector indicating the state of charge at that precise time.
- Page 16 Sleep Time: When you rest your scooter with the electronics switched "on" you are using valuable battery power. Your scooter will automatically go into a sleep mode to preserve battery energy after approximately 15 minutes. To start your scooter again simply switch the key to 'off' and back to "on"...
- Page 17 Caution: The speed adjustment dial (1) works in conjunction with the Hi/Lo speed switch (2), if both are set to their lowest settings there may not be sufficient power delivered to the motor to drive your scooter, in this case turn the speed dial up to a higher setting. (10) 4m.p.h.
- Page 18 Freerider Dealer will advise you of insurance companies who specialise in this field or you could seek advice from your own insurance company.
-
Page 19: Freewheeling Your Scooter
FREEWHEELING YOUR SCOOTER If for reasons of convenience, or you require to push your scooter for a short distance, the drive system can be put into "freewheel mode". This will allow your scooter to roll freely. Freewheel Procedure: The freewheel device is a red lever located at the rear right hand side of your scooter. To freewheel your scooter first switch off the power switch located on the scooter’s control console. -
Page 20: Safety Instructions & Warning
EMI. Do not modify your Scooter in any way unless authorized by Freerider. 1. Safety Check: We recommend that you perform a safety check before each use to make certain your scooter operates smoothly and safely. - Page 21 Warning: Never drive down an incline at full speed. When climbing ! an incline, try to keep your scooter moving, if you must stop, start up again slowly and then accelerate smoothly with caution. Avoid sudden stop starts, lean forward towards your handlebars to increase stability and prevent rearward tipping.
-
Page 22: Safety Warning & Instruction Labels
SAFETY WARNING & INSTRUCTION LABELS The following labels are positioned on your scooter; they communicate important warnings or instructions regarding the safe operation of your scooter. Please familiarize yourself with their location. MIN. CAUTION! DO NOT OPERATE THE SCOOTER UNLESS THE 黑線為刀模... -
Page 23: Learning To Get About
LEARNING TO GET ABOUT 1. Basic Driving: Make certain you are comfortably seated on your scooter and both armrests are down. Ensure that the "Speed Adjustment Dial" is turned to minimum for your first drive. When you have become more confident you can increase the setting to a higher speed. - Page 24 Observe weather conditions. Tires can slip on wet or icy surfaces. FR510DXs2b DO NOT DRIVE THROUGH WATER OR LEAVE YOUR FREERIDER EXPOSED TO HEAVY RAIN" i.e. During or after a thunderstorm. Do not attempt to turn when negotiating an incline, only turn when all wheels are fully on or off the incline;...
-
Page 25: Care & Maintenance
CARE & MAINTENANCE Your scooter like any other electro-mechanical machine will benefit from regular servicing by your Freerider dealer. You too, can help keep your scooter in tip-top condition by following a simple guide to home maintenance. Note: Only Freerider approved dealers should carry out service work. - Page 26 "zero speed", central position. Warning: If your machine can be pushed as described above, the motor ! brake could be faulty. Please do not use, contact your local Freerider dealer. Note: Check the Freewheeling Instructions of this manual. DRIVING BRAKE...
-
Page 27: Batteries & Battery Charging
BATTERIES & BATTERY CHARGING 1.Battery Installation: Your scooter is equipped with two maintenance free 12 volt 50Ah batteries. The batteries are linked together by wiring cables to supply the electronic system with 24 volts of power. Warning: It is imperative that the two batteries are connected correctly !... -
Page 28: Basic Fault Finding
BASIC FAULT FINDING If your scooter will not start: Check the power key switch is turned "on". If it is, the battery condition indicator meter will be operating. If the green status light on your console is flashing once per second, charge your batteries. If the battery condition meter and the green status light fail to operate when the key switch is in the 'on' position, check the following: Make sure the battery charger is not plugged into the tiller charge socket, this will... - Page 29 2.Charging Circuit Fuse: One fuse protects your scooter charging circuit from receiving an overload of electrical current. The fuse used in the scooter is the same type which is found in cars. In the unlikely event that a fuse should 'blow' and needs replacing, use only a fuse of a 10 amp rating.
- Page 30 3.Status Fault Codes: Flash Description Meaning The batteries are running low. Recharge the Battery Low batteries The batteries have run out of charge. Low Battery Fault Recharge the batteries. Check the battery and associated connections and wiring. Note: The low battery fault flash code, described above, is a requirement of various safety standards.
-
Page 31: Technical Specification
TECHNICAL SPECIFICATION Model Number FR-D04 (510DXs2b) Maximum Safe Slope 6 degrees Maximum Climbing Ability 8 degrees Maximum Obstacle Climbing Ability 1.96 inches (5 cm) Colours Red / Blue Overall Length* 55 inches (139 cm) Overall Width* 25 inches (63 cm) Total Weight with Batteries 237.82 lbs. - Page 32 Varies with user weight, terrain type, battery amp-hour (AH), battery charge, battery condition and tyre condition. These specifications can be subject to a variance of (+/- 10%). Due to manufacturing tolerances and continual product improvement, this specification can be subject to a variance of (+ or - 3%). AGM or gel cell type required.
- Page 33 FR-D04 (510DXs2b) TURNING RADIUS 168cm [66.14”] 63cm [24.8”] 91.8cm [36.14”] [3.54”] [2.36”] 139cm [55”] Weight Capacity: 350 lbs (159kg) Maximum Climbibg Ability: 8°...
-
Page 34: Classification
CLASSIFICATION Class "C" indoor / with some outdoor capabilities (EN12184:1999) Class 3 (Highway Regulations 1988). Maximum safe climbing angle: 8 degrees Warning: The safe climbing angle is measured with the seat in ! the highest position, and maximum weight capacity. The motor on your scooter is powerful and may be able to climb a steeper incline than the maximum safe climbing angle. -
Page 35: Optional Accessories
OPTIONAL ACCESSORIES For information regarding these optional accessories please contact your Authorised Freerider Agent. Combined Basket, Stick / Crutch Holder Combining the usefulness of the rear basket and the stick / crutch holder. Stick / Umbrella Holder Ideal way to carry walking aids. -
Page 36: Guarantee Terms
This guarantee applies only to parts supplied or approved by authorised dealer. This guarantee is not transferable. Note: Extended guarantees/ insurances can be arranged by your Freerider dealer. METAL WORK: Metal components, such as the framework and bright metal parts require special attention and may deteriorate in certain conditions. -
Page 37: Service History
SERV IC E HISTO RY This section is designed to assist you in keeping a record of any service and repairs to your scooter. Should you decide to sell or exchange your scooter in the future this will prove most helpful. Your service agent will also benefit from a documented record and this book should accompany the scooter when service or repair work is carried out. - Page 38 SERV IC E HISTO RY DETAILS OF WORK CARRIED OUT DEALER STAMP DATE INITIALS DETAILS OF WORK CARRIED OUT DEALER STAMP DATE INITIALS DETAILS OF WORK CARRIED OUT DEALER STAMP DATE INITIALS DETAILS OF WORK CARRIED OUT DEALER STAMP DATE INITIALS...
- Page 39 SERV IC E HISTO RY DETAILS OF WORK CARRIED OUT DEALER STAMP DATE INITIALS DETAILS OF WORK CARRIED OUT DEALER STAMP DATE INITIALS DETAILS OF WORK CARRIED OUT DEALER STAMP DATE INITIALS DETAILS OF WORK CARRIED OUT DEALER STAMP DATE INITIALS...
- Page 40 YOUR LOCAL DEALER FREERIDER CORP. Head Quarter and Kaohsiung Facility: No.22, Bengong 5th Rd., Gangshan Dist., Kaohsiung City 820, Taiwan(R.O.C) Tel:886-7-6223093 Fax:886-7-6230373 Email: sales @ freerider.com.tw http://www.freerider.com.tw http://www.luggie.com.tw draft...
Need help?
Do you have a question about the FR-D04 and is the answer not in the manual?
Questions and answers