
Subscribe to Our Youtube Channel
Related Manuals for FREERIDER FR168-3X


Summary of Contents for FREERIDER FR168-3X
- Page 1 FR510DXs2b FR168-3X/ FR-168-3Xs FR510DXX/ FR510DXXs/FR510DXXsb USERS INSTRUCTION USERS INSTRUCTION USERS INSTRUCTION USERS INSTRUCTION MANUAL MANUAL MANUAL MANUAL...
-
Page 2: Table Of Contents
Freerider Freerider Scooter. your attempt to operate Freerider Scooter. Your User Instruction Manual will assist you to get the most from your Please remember that when it comes to service and machine. repairs, your authorized... -
Page 3: Product Description
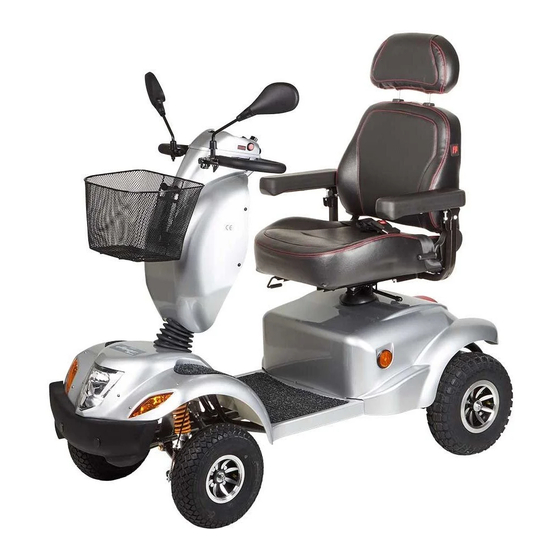
Simple controls siturated on the steering handlebars Your Freerider Freerider Scooter should be serviced as regulate speed and braking recommended in this manual by an approved... - Page 4 FR168-3X/FR168-3XsFEATURE GUIDE Steering handlebars Driving mirror Console Charging socket Basket Front light Direction indicator lights Front and rear bumper Floor mat Pneumatic wheels with grey tyres Rear lights and indicators Adjustable angle seat with backres FR510DXX/FR510DXXs/FR510DXXsb FEATURE GUIDE Steering handlebars...
-
Page 5: Purpose Of Your Freerider
PURPOSE OF YOUR FREERIDER SCOOTER Your Scooter is a 'Class 2' (B) * vehicle and designed for Your Scooter is a 'Class 2' (B) * vehicle and designed for Your Freerider Freerider Scooter is suitable for pavement use at up to 4m.p.h. And for roads at up to pavement use at up to 4m.p.h. -
Page 6: Scooter
Safely dispose of all packaging materials, your local waste disposal authority can advise you on this procedure. Your Freerider Freerider Scooter is delivered fully assembled, fitting the two batteries ,driving mirror and the seat... -
Page 7: Operating Your Freerider
(See Batteries and Battery Charging section of this manual). SAFETY- SAFETY- The advanced speed controller has been designed OPERATING YOUR FREERIDER SCOOTER Before setting out on your Freerider Freerider Scooter you need to make sure that your seat is in the correct driving position. - Page 8 Scooter is moving ,first stop apply the brakes and then FIG 3 carry out the seat positioning. SEAT: SEAT: The seat as fitted to your Freerider Freerider Scooter, has a fold down backrest(see Fig 5).The seat has two height positions. Your Freerider...
- Page 9 take great care when going up steep slopes or kerbs, always lean forward to achieve the best stability for your Scooter. Do not drive up a slope greater than 5 if your backrest is positioned at the 120 position. Failure to observe this warning may put you in a dangerous situation.
- Page 10 Located on the left side of your console this switch controls the maximum high (Hi) and It is not recommended to drive your Scooter regularly with low (Lo) speed range for your Freerider Freerider Scooter. the batter charge indication in the yellow to red sector, as When riding on the pavement or in shopping areas the low this will shorten batter life.
- Page 11 Freerider Distributor may also help you in finding energy after approximately 15 minutes. To start your training in road craft skills.
-
Page 12: Scooter
This indicates that your Scooter is in a freewheel mode and General note: If you are able to push your Freerider you cannot drive your Scooter. Note, the quicker you push Scooter the drive system is disconnected. -
Page 13: Safety Instructions And Warnings
Failure to observe this warning may Warning: Warning: Do not attempt to operate your new Freerider result in a serious failure of the tyre or wheel, causing serious Scooter for the first time without completely reading and personal injury and/or damage to your Scooter. - Page 14 Warning: Freerider Freerider recommends t hat you do not operate your Freerider Scooter in icy or slippery conditions or on salted Your Freerider Freerider Scooter is designed to provide optimum surfaces i.e. Roads and Pavements etc. Such use may result stability under normal driving conditions i.e.
-
Page 15: Freewheeling Your Freerider Freerider Scooter
POSITIONING SAFETY BELT gale force winds i.e. Winds above 61km/h (38mph), avoid exposed areas near to water. Your Freerider Freerider Scooter is fitted as standard with a positioning safety 'lap' belt. It is a legal requirement for Class FREEWHEEL YOUR SCOOTER FREEWHEEL YOUR SCOOTER 3 vehicle riders to wear this belt. - Page 16 INCLINES INCLINES STAIRS AND ESCALATORS STAIRS AND ESCALATORS More and more modern buildings are designed with disability Warning: Warning: Scooters are not designed to travel up or down access in mind. Ramps have specified percentage of inclination, stairs or escalators. Always use an elevator. Failure to designed for easy and safe access.
-
Page 17: Safety Instruction Labels
SAFET Y WARNING & INSTRUCTION L ABELS The following labels are positioned on your Freerider, they communicate important warnings or instructions regarding the safe operation of your scooter. Please familiarize yourself with their location. Located at right rear of handlebars near... - Page 18 Practice in an open area, until you are proficient. Please remember that your Freerider Freerider Scooter is a long vehicle, please take this into consideration when making a turning manoeuvre. In some circumstances you may need to make several manoeuvres to completely change direction i.e.
- Page 19 Caution: Caution: Remember your Freerider Freerider Scooter is a large CONTROL OVER STATIONARY OBSTACLES CONTROL OVER STATIONARY OBSTACLES vehicle and in some situations it may be too long or wide to manoeuvre through some doors or walkways. Stationery obstacles (steps, kerbs etc) must be avoided where possible.
-
Page 20: Transporting Your Scooter For Journeys Away
(26") and length 142cm (56"): please note this will reduce your passenger carrying capacity. You will also require a suitable folding ramp to lift your Scooter into your car. You Freerider Distributor will be able to advise you of suitable products for this purpose (see fig 20 ). -
Page 21: Dismantling Your Scooter
LOADING YOUR SCOOTER LOADING YOUR SCOOTER 1. Remove your seat or fold down the backrest as necessary. 2. Lower the steering handlebars sufficiently to allow the handlebars clearance under the top of your tail gate entry, lock handlebars into position with black locking lever. 3. - Page 22 release it from its mounting tube (fig 1,page7). 3. Lift up the rear cover, disconnect the rear light plug and socket (See Fig 21), please safely to one side. Note the cover is secure by velcro tyre material at each. side at the front and in the centre.
-
Page 23: Re-Assembling Your Scooter
REPLACEMENT FOR A SEAT IN A MOVING VEHICLE. REPLACEMENT FOR A SEAT IN A MOVING VEHICLE. stowed on the front seat of the vehicle. Use the cars safety belt to secure the seat in position. Now enjoy your Freerider. Now enjoy your Freerider. Caution: Caution: The body mouldings on your Scooter have not been designed for lifting your machine. -
Page 24: Battery And Battery Charging
BATTERIES & BATTERY CHARGING BATTERY INSTALLATION BATTERY INSTALLATION Your Freerider Freerider Scooter is equipped with two maintenance free 12 volt batteries. The batteries are linked together by wiring cables to supply the electronic system with 24 volts of velcro strap... - Page 25 12 volts, the charger supplied with battery life. your Scooter will not operate. Please consult your The length of time to re-charge your batteries will vary from 8 Freerider Freerider dealer. up to 13 hours. This variation in time is due to the following 3.
- Page 26 3. If you need to replace your batteries, contact your hectic lifestyle, weight or operating conditions, may wear their hectic lifestyle, weight or operating conditions, may wear their Freerider Freerider Agent. Only batteries supplied as original batteries out during the original battery manufacturer's...
-
Page 27: Care And Maintenance
CARE & MAINTENANCE Your Scooter like any other electro-mechanical machine will treated to prevent further attack from the elements. Wash benefit from regular servicing by your Freerider Freerider dealer. regularly if contact is made with road or sea salt, this is very... - Page 28 Please do not above, the motor brake could be faulty. Please do not use, contact your local Freerider distributor. use, contact your local Freerider distributor. Note: Check the Freewheeling Instructions on page 12 Note: Check the Freewheeling Instructions on page 12 of this manual.
- Page 29 Keep your batteries well charged (see Battery Charging section without first letting air out of the tyre. of this manual). Keep batteries clean and in a dry frost-proof place. Keep battery terminals tight. Your Freerider Agent will TYRE SERVICING TYRE SERVICING be able to test your batteries for their state of service.
- Page 30 1. Push steering column forward as far as it will go with the Cycle test batteries for operating capacity (This test can be locking lever released, i.e. pushed upwards. Support performed by your Freerider Agent) steering column. 2. With a 10mm spanner (not supplied) loosen the locking...
-
Page 31: Basic Fault Finding
If you find the circuit breaker is continually tripping out, contact your authorised Freerider Freerider dealer. The battery condition indicator meter , your Freerider The battery condition indicator meter , your Freerider does not drive: does not drive: Controller 1. Check the 'white' plug's, located under the rear... - Page 32 SAFETY CONDITIONS MONITORED INCLUDE SAFETY CONDITIONS MONITORED INCLUDE If your Freerider does not slow down or behaves erratically: If your Freerider does not slow down or behaves erratically: Speed control system integrity Internal voltages and circuits 1.
- Page 33 SPEED CONTROLLER OVERLOAD PROTECTION The original manufacturer's settings for this Scooter are: Freerider Freerider Scooter's speed controller incorporates a ROOT MENU DESCRIPTION FR510DXs2b FR510DXX/FR510DXXsb FR168-3X/FR168-3Xs current limit thermal protection circuit which is activated when FAST SLOW FAST SLOW FAST SLOW...
-
Page 34: Technical Specification
Middle 12 volt power supply ( yellow 20A ). FIG 44 FIG 44 Bottom Front/Rear Lights ( Blue 15A ). TECHNICAL SPECIFICATION FR510DXs2b Model Code: FR510DXX/FR510DXXs/FR510DXXsb FR168-3X/FR168-3Xs Dimensions Total Length Maximum width over wheels 24.5 Turning Diameter(between walls) Maximum seat height from base... - Page 35 CLASSIFICATION CLASSIFICATION Type 'B' (EN12184 : 1999) Class 3(The 35psi (2.5 bar). Do not exceed maximum use of invalid carriages on the highway regulations 1988) inflation figure indicated on tyre wall. Maximum safe climbing angle: Maximum safe climbing angle: 10 with 350ls (160kg) rider Batteries: Batteries: 2 x 12 volt.
-
Page 36: Circuit Diagrams
CIRCUIT DIAGRAMS BATTERY WIRING DIAGRAM BATTERY WIRING DIAGRAM BLACK BLACK GREY CONNECTORS GREY CONNECTORS BLACK CIRCUIT BREAKER BLACK BLACK CIRCUIT DIAGRAMS CIRCUIT DIAGRAMS... -
Page 39: Advisory Safety Notice
If you require specific accurate data, please contact your If you require specific accurate data, please contact your 3. If unintended movement or brake release should occur, Freerider authorised dealer. Freerider authorised dealer. turn your Freerider Freerider OFF as quickly as it is safe to do so. -
Page 40: Code Of Practice For Class 3 Vehicle Users
Carefully read the owners instruction manual for On most roads at a maximum speed of 8 mph. They cannot be used on motorways, cycle lanes or in your Freerider Freerider Scooter before driving. Please make bus lanes (when in operation). Nor is it advisable to certain it is in full working order. - Page 41 Always use the front and rear lights in the dark It is essential that you keep your vehicle in good or when visibility is poor due to adverse weather conditions. working order in accordance with Freerider's Freerider's recommendations. Freerider Freerider...
-
Page 42: Scooter Spare Parts
FREERIDER SCOOTER SPARE PARTS The following list of components can be purchased from your Your Scooter is an electro-mechanical machine. Some of its local Freerider Agent from whom you purchased your Scooter. consumable components will need replacing due to normal Quoting model code FR510DXs2b/FR510DXX/FR510DXXs/ wear and tear. -
Page 43: Optional Accessories
Warning: The rear basket and crutch/cane holder will extend the dimensions of your Scooter. Please allow for this when turning. Do not overload carrying accessories as this will make your Scooter less stable. Please note : Accessories illustrated are displayed on various models of Freerider Scooters. -
Page 44: Guarantee Terms
Freerider Freerider Authorised Distributor cannot be held responsible. before driving your Scooter. This guarantee does not apply if your Freerider shows signs of excessive wear and abuse, or has been modified without the DISCLAIMER DISCLAIMER authority of Freerider... -
Page 45: Service History
This section is designed to assist you in keeping a record of Service agent will also benefit from a documented record and any service and repairs to your Freerider Scooter. this book should accompany the Scooter when service or Should you decide to seel or exchange your Scooter repair work is carried out. - Page 46 This section is designed to assist you in keeping a record of Service agent will also benefit from a documented record and any service and repairs to your Freerider Scooter. this book should accompany the Scooter when service or Should you decide to seel or exchange your Scooter repair work is carried out.
- Page 47 This section is designed to assist you in keeping a record of Service agent will also benefit from a documented record and any service and repairs to your Freerider Scooter. this book should accompany the Scooter when service or Should you decide to seel or exchange your Scooter repair work is carried out.
- Page 48 Freerider has a policy of continual improvement. We reserve the right to change specification without prior notice.All contents of this manual Freerider 2005 No reproduction in any from of this manual in whole or in part (except for brief quotations in critical articles or reviews),may be made without the written authorisation from Freerider.
Need help?
Do you have a question about the FR168-3X and is the answer not in the manual?
Questions and answers