FREERIDER FR168-4S User Instruction Manual
Hide thumbs
Also See for FR168-4S:
- Users instruction users instruction manual users instruction (44 pages) ,
- User instruction manual (36 pages)

Subscribe to Our Youtube Channel
Related Manuals for FREERIDER FR168-4S


Summary of Contents for FREERIDER FR168-4S
- Page 1 USERS INSTRUCTION USERS INSTRUCTION USERS INSTRUCTION USERS INSTRUCTION MANUAL MANUAL MANUAL MANUAL FR168-4S/ FR168-4S2b FR510DXs2b...
-
Page 2: Table Of Contents
FOREWORD Using your product safely depends upon your diligence in Please read and follow all instructions in this Users Instruction Manual before attempting to operate your following the warnings, cautions and instructions in this Scooter for the first time. If there is anything manual. -
Page 3: Product Description
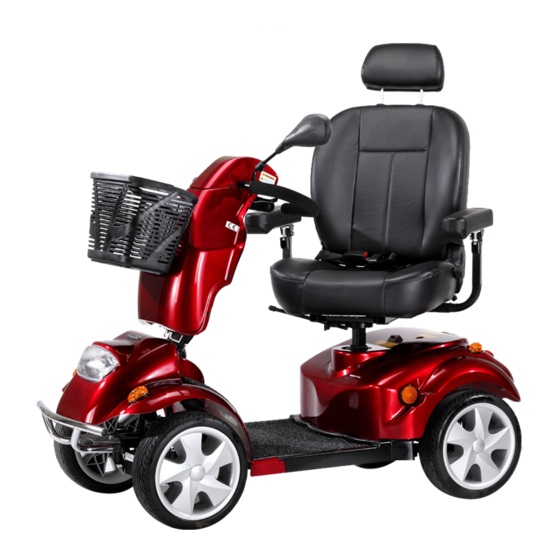
PRODUCT DESCRIPTION Steering is controlled by handlebar attached to a fork system Rear-wheel drive via sealed drive axle containing the single front wheel for FR168-3/FR168-3S. FR168-3/FR168-3S 36 A/H sealed non-maintenance lead-acid batteries. 'System-of-the-art' micro-controller electronics ensure a Automatic charging system. smooth, comfortable and safe drive on all surfaces and Off-board charging facility. - Page 4 FR168-4S/FR168-4S2b FEATURE GUIDE Adjustable steering handlebars Driving mirror Console Charging socket Basket Front light Direction indicator lights Front bumper Amber side reflectors Floor mat Pneumatic wheels with grey tyres Rear lights and indicators Adjustable angle seat with backres...
-
Page 5: Purpose Of Your Scooter
PURPOSE OF YOUR SCOOTER Your Scooter is suitable for persons who require independent mobility combined with comfort, maneuverability,reliability and a product that needs a minimal amount of maintenance. The intended user should possess some degree of ability with the use of both arms and hands, reasonable balance and eyesight, and a degree of spatial awareness. - Page 6 6. Do not switch your scooter 'on' with the forward/reverse will invalidate your battery guarantee. lever depressed. Warning: Warning: Do not hang bags etc over your steering handlebars, always use the front basket. 25. Do not drive your Scooter through deep water or clean Failure to observe this warning may interfere with your with a high pressure hose.
-
Page 7: Getting To Know Your Scooter
GETTING YOU KNOW YOUR SCOOTER Your scooter is delivered in a strong tri-wall carton. SAFETY- SAFETY- The advanced speed controller has been designed When unpacking the carton, first remove all of the sharp with extensive self-checking circuits to give you the maximum metal staples which are located in the top. -
Page 8: Operating Your Scooter
OPERATING YOUR SCOOTER Before setting out on your scooter you need to make sure locking lever and lifting the seat clear of the vehicle (see that your seat is in the correct driving position. Your Fig 4). Note your seat for safety reasons can only be distributor will set the seat to the correct height for removed when it is Turned 90 . - Page 9 The handlebar of your Scooter is designed to allow you to 2. With the aid of a 17mm spanner (not supplied) loosen position it in a comfortable driving position. It can be locked the 10mm seat clamp fixing bolt (see Fig 5). into numberous positions or unlocked to move freely for transportation.
- Page 10 To lock the handlebar into a comfortable driving position, simply push the black lever downwards until the handlebar is locked firmly into position. With the combination of the height adjustment together with the handlebar movement, you should find a suitably comfortable driving position.
- Page 11 batteries the needle will move towards the red sector Warning: Warning: Do not hang bags etc over the steering handlebars indicating the state of charge at that precise time. When which could interfere with the movement of your control the needle is fully over to the right (green sector), the lever.
-
Page 12: Freewheeling Your Scooter
FREEWHEELING YOUR SCOOTER If for the reasons of convenience, you require to push your scooter, the drive from the motor can be disconnected to allow the vehicle to roll freely. Free wheel procedure: Th e free wheel device is a 'red' handled lever located at the rear right hand side of your ENGAGE machine under body cover (See Fig 14). - Page 13 These labels communicate important warnings or Changes in the road surface. This will greatly reduce the instructions - Please familiarize yourself with their location. possibility of a tip or fall. To avoid personal injury or property damage, always exercise common sense when SAFETY CHECK SAFETY CHECK cornering.
- Page 14 source. Over inflation from an unregulated air source could Code. Always obey all local pedestrian traffic rules. Wait until Over inflate your tyres resulting in "blow out" or personal your path is clear of traffic, and then proceed with extreme injury.It is critically important that pneumatic tyres are caution.
- Page 15 Warning: Warning: Avoid putting weight onto the steering Warning: Warning: Do not overload your Scooter at the rear when handlebars, such use may cause the Scooter to tip and climbing an incline. Always lean forward to cause personal injury and/or damage to the Scooter. Provide the best stability and prevent rearward tipping.
-
Page 16: Safety Warning & Instruction Labels
SAFETY WARNING & INSTRUCTION LABELS The following labels are positioned on your Scooter, they communicate important warnings or instructions regarding the safe operation of your scooter. Please familiarize yourself with their location. Located at right rear of handlebars near Located on right of handlebar cover charging socket Located at the left or right hand rear cover of... - Page 17 that a back wheel will go off the pavement, causing a stability instructions provided with this accessory (see also page 40 of problem. Avoid this at all times by steering an exaggerated this manual) wide arc around the obstacle. DISMOUNTING DISMOUNTING If you must steer in a tight spot, such as entering a doorway or when turning around, stop, turn the handlebars to where...
- Page 18 the door is open wide enough, go ahead quickly, leaving the hand on the door to keep it free of the Scooter and letting go as you pass the doorjamb. It is an easy technique. Practice makes perfect. Remember - your Scooter can do the work without wearing you out! Going through doors, with the back wheels: If you're not moving, your rear wheel is probably caught.
-
Page 19: Transporting Your Scooter
PLEASE NOTE: The rear stability of your Scooter is PLEASE NOTE: dependent on a number of factors which you should consider before attempting to climb an incline or other obstacle: (a) your height; (b) the height of your seat; (c) your weight and (d) the angle of the incline you are attempting to climb. - Page 20 7. Lower the handlebars by releasing the locking lever. vehicle. Always keep your body clear of your scooter to prevent entrapment. The handlebar will rest on the floor mat. Note place a soft piece of material under the painted console Always make certain your scooter tyres and your ramp surface is dry, failure of observe this warning could make for protection.
- Page 21 can only be reconnected together one way. Note the locating lugs on the connectors, do not force these connectors together when refitting. 9. A: De-Docking Lock Pin : The de-docking lock pin locates the rear motive powered unit to the front steering platform.
- Page 22 load in Your car, please remember this and adjust your driving to suit this condition. Note: In some midsize cars the scooter seat may need to be Note: stowed on the front seat of the vehicle. Use the cars safety belt to secure the seat in position.
-
Page 23: Battery And Battery Charging
BATTERIES & BATTERY CHARGING Warning: Warning: Do not attempt to remove the safety valves BATTERY INSTALLATION BATTERY INSTALLATION situated in the top of the battery. Failure to observe this warning will invalidate your battery guarantee. Your Scooter is equipped with two maintenance free 12 volt batteries. - Page 24 Your battery Charger is an intelligent automatic charging tear clause. Any battery faults due to a defect in the Instrument. Your Charger's robust framework contains a original manufacture will normally become obvious number of quality components; namely a transformer, within the first two months. Any gradual deterioration rectifier and complex control circuitry.
- Page 25 perform to full capacity for 12 months. This will, of course charge your batteries. You may use your vehicle all day on a be dependent on the actual use of the vehicle and how of Daily basis or you may not use it for weeks at a time. Other ten the batteries are cycled i.e.
-
Page 26: Care And Maintenance
Agent. Only batteries supplied as original equipment on Warning: Warning: When working or disposing of your batteries your machine will give you the best performance. When charging batteries make certain the positive and negative 1. Always make certain the terminals of your batteries are terminals are correctly assembled. - Page 27 a tyre or tube carry out the following instructions Safety Note: For your own safety, we recommend that you (only competent people should carry out this procedure). check the function of your Scooter brakes prior to a journey. 1. Switch off your Scooter and remove the key. Motor Brake: Motor Brake: If the motor brake is functioning correctly and...
- Page 28 Other Scooter users will use their machines less frequently, putting their batteries through a less demanding discharge lifestyle. These batteries will probably have a longer life in excess of 12months). This can only be a general guide and one cannot be more specific, due to other factors such as; motor loads, tyre pressures, general service factors, working conditions, periods of non-use and abuse etc.
- Page 29 RECOMMENDED AREAS FOR ADJUSTMENT STEERING RECOMMENDED AREAS FOR ADJUSTMENT STEERING Spray metal parts with moisture repellent (Wd40) COLUMN ADJUSTMENT COLUMN ADJUSTMENT Seat lock lever pivot bolt Seat rotation, grease face of seat post and pivot pin at The steering column locking system works on a 'cam' base of seat.
-
Page 30: Basic Fault Finding
BASIC FAULT FINDING If your Scooter will not start: 1. Check the power key switch is turned 'on'. If it is, the battery condition indicator meter will be operating. If the green status light on your console is flashing once per second, charge your batteries. - Page 31 slowly as a warning to recharge your batteries. If the 'speed controller' detects a fault the green light will flash rapidly, with the number of flashes indicating the nature of the fault. For example, the controller will not operate if the speed thumb lever (wig-wag) is not in the zero speed position with the Scooter switched 'on'.
- Page 32 STATUS FAULT CODES FLASH CODE FAULT DISPLAYED SCOOTER COMMENT (No.of flashes) BY PROGRAMMER CONDITION Battery needs recharging 1 Flash Driving still possible The battery voltage has dropped below 23.3 volts in neutral. Recharge the batteries soon. The battery voltage at Controller has dropped to 16.5 volts. Battery voltage too low 2 Flashes Drive inhibited...
-
Page 33: Technical Specification
TECHNICAL SPECIFICATION Model Code:FR168-4S Model Code:FR168-4S2b SPECIFICATION: SPECIFICATION: Overall length 124cm/49inches Overall length 120cm/47inches Overall width 61cm/24inches Overall width 58cm/23inches Ground clearance 6.4cm/2.5inches Ground clearance 6.5cm/2.5inches Maximum load 136kgs/300lbs Maximum load 136kgs/300lbs Range up to 46km/29ml Range up to 56km/35ml Total weihgt(excl.batteries) - Page 34 use internal TIA. DC output 24 Volt. CLASSIFICATION CLASSIFICATION Type 'B' indoor/with some outdoor Conforms to: EN60335-2-29 and En12184. capability (EN12184 : 1999) Class 2 (The use of invalid carriages on the highway regulations 1988) Electrical System: Electrical System: 24 volt DC. Maximum safe climbing angle: Maximum safe climbing angle: 8 (136kg) rider...
- Page 35 SIZE SPECIFICATION-FR168-4S...
- Page 36 SIZE SPECIFICATION-FR168-4S2b...
- Page 37 SIZE SPECIFICATION-FR510DXs2b...
-
Page 38: Circuit Diagrams
CIRCUIT DIAGRAMS CI RC UI T D IA G R A M S CIRCUIT DIAGRAMS BATTERY WIRING DIAGRAM... -
Page 39: Advisory Safety Notice
ADVISORY SAFETY NOTICE Warning: Warning: Radio wave sources may affect Scooter control. more susceptible to interference from radio wave sources. Your powered Scooter is designed to operate in appropriate Note: There is no easy way to evaluate their effect on the environments, however radio wave sources overall immunity of your powered Scooter. -
Page 40: Optional Accessories
OPTAINAL ACCESSORIES For information regarding these optional accessories please contact your Authorised Agent. REAR BASKET REAR BASKET LOCKABLE STORAGE BOX LOCKABLE STORAGE BOX Provides easily accessible This smart storage box allows additional carrying you to lock away your valuable capacity for shopping. items when leaving your Basket maximum load 4kg Scooter unsupervised. -
Page 41: Guarantee Terms
GUARANTEE TERMS GUARANTEE TERMS GUARANTEE TERMS batteries and battery charging section of this manual). Any gradual Please keep a note of your serial No........ deterioration in the performance after this period is normal and (This is located on a plate on the front frame tube, under the front associated with fair wear and tear, mis-use or accidental damage and as body cover). -
Page 42: Service History
SERVICE HISTORY This section is designed to assist you in keeping a record of Service agent will also benefit from a documented record and any service and repairs to your Scooter. this book should accompany the Scooter when service or Should you decide to seel or exchange your Scooter repair work is carried out. - Page 43 SERVICE HISTORY This section is designed to assist you in keeping a record of Service agent will also benefit from a documented record and any service and repairs to your Scooter. this book should accompany the Scooter when service or Should you decide to seel or exchange your Scooter repair work is carried out.
- Page 44 Freerider has a policy of continual improvement. We reserve the right to change specification without prior notice.All contents of this manual freerider 2005 No reproduction in any from of this manual in whole or in part (except for brief quotations in critical articles or reviews),may be made without the written authorisation from freerider .
Need help?
Do you have a question about the FR168-4S and is the answer not in the manual?
Questions and answers