Table of Contents
Advertisement
Advertisement
Table of Contents

Related Manuals for FREERIDER FR168-3A3


Summary of Contents for FREERIDER FR168-3A3
- Page 1 FR168-3A3 FR168-4A USER'S INSTRUCTION MANUAL...
- Page 2 These actions can cause personal injury and/or equipment damage. On the product, this icon is represented as a triangle with red border. Please fill out the following information for quick reference: Freerider dealer:_________________________________________________ Address:_______________________________________________________ Phone Number:_________________________________________________ Purchase Date:__________________ Serial Number:__________________ Note: This User's Instruction Manual is compiled from the latest specifications and product information available at the time of publication.
-
Page 3: Table Of Contents
FOREWORD Please read and follow all instructions in this User's Instruction Manual before attempting to operate your scooter for the first time. If there is anything in this manual that you DO NOT understand, or if you require additional assistance for setting it up, contact your nearest authorised dealer. -
Page 4: Introduction
INTRODUCTION Congratulations on the purchase of your scooter. Please read this User's Instruction Manual carefully before you attempt to operate your scooter. Your User's Instruction Manual will assist you to get the most from your machine. This manual contains important information regarding the safe operation and maintenance of your scooter. -
Page 5: Rules For Safe Use
RULE FOR SAFE USE These symbols below are used in this User's Instruction Manual to identify warnings and cautions. It is very important for you to read and understand them. Warning: Failure to note the warnings in this manual may result in personal injury. Your scooter is a powerful machine. - Page 6 ALWAYS approach obstacles straight. ALWAYS keep your feet on the vehicle when driving. ALWAYS proceed carefully while riding, especially as you approach the downgrade of a ramp. ALWAYS reduce speed when descending inclines. ALWAYS avoid uneven surfaces. ALWAYS consult your physician or a therapist if in doubt about your ability to operate a scooter.
-
Page 7: Getting To Know Your Scooter
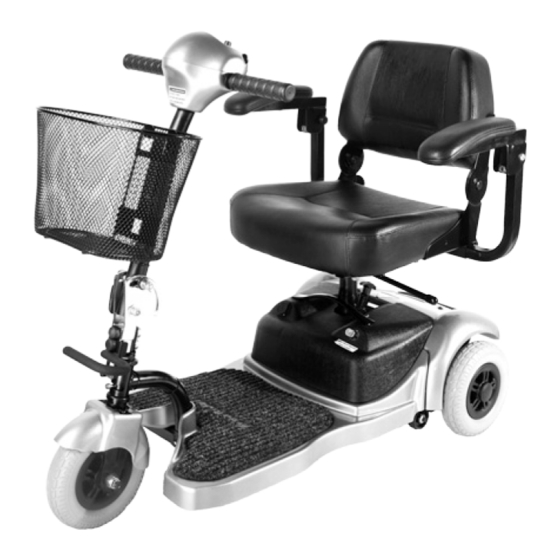
GETTING TO KNOW YOUR SCOOTER FR168-3A3 1. Adjustable steering handle bar 2. Console 3. Charging socket 4. Removable basket 5. Wireless battery pack 6. Floor mat 7. Plastic rear wheels with solid tyres 8. Solid front wheel 9. Adjustable seat 10. -
Page 8: Comfort Adjustments
COMFORT ADJUSTMENTS Before setting out on your scooter, you need to make sure that your seat is in the correct driving position. Your dealer will set the seat to the correct height for your individual needs. The scooter has eight basic adjustments to assist your comfort. 1. - Page 9 Warning: When lowering the arm make certain clothing or fingers are not positioned ! under it. The seat as fitted to your scooter, has a fold down backrest. The seat has four height positions. Your dealer will position the seat to allow you the most comfortable driving position. 4.
-
Page 10: Operating Your Scooter
OPERATING YOUR SCOOTER Battery Condition Status Indicator Light Horn Horn Speed Adjustment Key Switch Dial 1. Control Features: Your controls are located on the handlebar console: Speed Adjustment Dial: This allows you to pre-select your desired top speed. The dial is proportional to speed and can be set anywhere between minimum ("min") and maximum ("max") increments. - Page 11 If you notice the status light flashing at two flashes per second, you are being notified that the battery voltage is too low and you must stop using your scooter at the earliest opportunity. Your status light has nine similar flashing diagnostic signals, reference to these diagnostic codes is found under "Fault Finding"...
-
Page 12: Freewheeling Your Scooter
FREEWHEELING YOUR SCOOTER If for reasons of convenience, you require to push your scooter for a short distance, the drive system can be put into "freewheel mode". This will allow your scooter to roll freely. Freewheel Procedure: The freewheel device is a red lever located at the rear right hand side of your scooter. To freewheel your scooter first switch off the power switch located on the scooter's control console. -
Page 13: Safety Instructions & Warning
SAFETY INSTRUCTIONS & WARNING Warning: DO NOT attempt to operate your new scooter for the first time without ! completely reading and understanding all of the facts in this User's Instruction Manual. Your scooter is a state-of-the-art device designed to enhance and increase your mobility. Dealer provides a range of scooters to best suit the individual needs and circumstance of the scooter user. - Page 14 Warning: Exceeding the weight limit will void your warranty and may result in ! personal injury and damage to your scooter. Dealer will not be held responsible for injuries and/or property damage resulting from failure to observe these weight limitations. Please also remember when carrying heavy objects that this will increase your weight and may make your scooter unstable.
- Page 15 Reduce your scooter's speed to the "Low" switch position when driving on uneven terrain or soft surfaces. Avoid long and unsafe grass that can become tangled in the running gear or may hide debris and holes. Avoid snow, this can quickly build up around your wheels. Avoid loosely packed sand and gravel.
- Page 16 Motor Vehicle Transportation: Currently there are no standards approved for "tie down" systems in a moving vehicle of any type to transport a person while seated in a scooter. Although your scooter may be equipped with a belt, this is not designed to provide proper restraint during motor vehicle movements.
- Page 17 (2) Take a wide arc with your scooter's front wheels around tight corners, your rear wheels will follow preventing you from cutting the corner short and bumping or getting hung up on raised kerbs. When descending an incline keep your speed adjustment set to the slowest speed setting to ensure a safely controlled descent and driving in a forward direction ONLY.
-
Page 18: Safety Warning & Instruction Labels
Data serial plate located on Located at leftside rear front Wheel cross member of battery pack near charging socket Freerider Luggie UK Ltd EC REP (www.freeridernetwork.com) Unit 2C Acre Park, Dalton Lane Keighley West Yorkshire, BD21 4JH, UK Located on the top... -
Page 19: Learning To Get About
LEARNING TO GET ABOUT 1. Basic Driving: Make certain you are comfortably seated on your scooter and both armrests are down. Ensure that the "Speed Adjustment Dial" is turned to minimum for your first drive. When you have become more confident you can increase the setting to a higher speed. Push the right "Thumb Lever Control"... - Page 20 4. Control Over Grass & Gravel ETC. Care must be taken when attempting to drive over soft surfaces such as those found in parks etc. The surface may look level, but this can be deceiving and hidden dangers may make your scooter become unstable or grounded.
-
Page 21: Care & Maintenance
CARE & MAINTENANCE Your scooter, like any other electro-mechanical machine, will benefit from regular servicing by your dealer. You too, can help keep your scooter in good condition by following a simple guide to home maintenance. Note: ONLY competent people should carry out service work. Seat Upholstery: A damp cloth and a little soapy water will keep your seat, backrest and arms looking smart. - Page 22 Caution: Take care when handling the transmission, keep well away from clothing. It is normal to find a light film of lubrication around this part. Motor Brakes: Safety Note: For your own safety, we recommend that you check the function of your scooter brakes prior to a journey.
-
Page 23: Batteries & Battery Charging
BATTERIES & BATTERY CHARGING 1. Battery Installation: Your scooter is equipped with two maintenance free 12 volt 12Ah or 18Ah batteries. The batteries are linked together by wiring cables to supply the electronic system with 24 volts of power. Warning: It is imperative that the two batteries are connected correctly to prevent !... -
Page 24: Basic Fault Finding
BASIC FAULT FINDING If your scooter will not start: (1) Check that the power key switch is turned "on". If it is, the battery condition indicator meter will be operating. If the green status light on your console is flashing once per second, charge your batteries. - Page 25 2. Charging Circuit Fuse: One fuse protects your scooter charging circuit from receiving an overload of electrical current. The fuse used in the scooter is the same type which is found on automobiles. In the unlikely event that a fuse should "blow" and needs replacing. Use ONLY a fuse of a 40 amp rating.
- Page 26 3. Status Fault Codes FLASH Description Meaning The batteries are running low. Battery Low Recharge the batteries. The batteries have run out of charge. Recharge the batteries. Low Battery Fault Check the battery and associated connections and wiring. Battery voltage is too high. This may occur if overcharged &/or travelling down a long slope.
-
Page 27: Technical Specification
TECHNICAL SPECIFICATION Model Number FR168-3A3 (12Ah or 18Ah) Maximum Safe Slope 6 degree Maximum Climbing Ability 6 degree 100.0 cm (39.37 inches) for 12Ah Overall Length* 99.0 cm (38.98 inches) for 18Ah 52.0 cm (20.47 inches) for 12Ah Overall Width* at wheels 54.5 cm (21.46 inches) for 18Ah... - Page 28 Model Number FR168-4A (12Ah or 18Ah) Maximum Safe Slope 6 degree Maximum Climbing Ability 6 degree Overall Length* 110.0 cm (43.31 inches) Overall Width* 54.5 cm (21.46 inches) at wheels 110.44 lbs. (50.2 kg) for 12Ah Total Weight with Batteries 119.24 lbs.
- Page 29 Varies with user weight, terrain type, battery amp-hour (Ah), battery charge, battery condition and tyre condition. These specifications can be subject to a variance of (+/- 10%). Due to manufacturing tolerances and continual product improvement, this specification can be subject to a variance of (+ or - 3%). AGM battery required.
- Page 30 FR168-3A3(12Ah) TURNING RADIUS 87cm [34.25”] 52cm [20.47”] MAX:82cm [32.28”] MIN:74.5cm [29.33”] MAX:52.5cm [20.67”] MIN:45cm [17.72”] 3.5cm [1.38”] 3cm [1.18”] 100cm [39.37”] FR168-3A3(18Ah) TURNING RADIUS 87cm [34.25”] 54.5cm [21.46”] MAX:82cm [32.28”] MIN:74.5cm [29.33”] MAX:52.5cm [20.67”] MIN:45cm [17.72”] 3.5cm [1.38”] 4cm [1.57”]...
- Page 31 FR168-4A (12Ah/18Ah) TURNING RADIUS 133cm [52.36”] 54.5cm [21.46”] MAX:86.5cm [34.05”] MIN:79cm [31.10”] MAX:53.5cm [21.06”] MIN:46cm [16.14”] 5.5cm [2.17”] 5cm [1.97”] 110cm [43.31”]...
-
Page 32: Classification
Tire Size: 1. FR168-3A3(12Ah), Front & Rear 7.5inches (19.1cm), PU solid 2. FR168-3A3(18Ah), Front 7.5 inches (19.1cm) & Rear 8.5inches (21.6cm), PU solid 3. FR168-4A, Front 7.5 inches (19.1cm) & Rear 8.5inches (21.6cm), PU solid Batteries: AGM battery with 12Ah or 18Ah Charger: AC input.100-240 volt, 50/60Hz... -
Page 33: Optional Accessories
OPTIONAL ACCESSORIES For information and installation method regarding these optional accessories please contact your authorised dealer. (Dealer information please refer to the back cover) Combined Basket, Stick / Crutch Holder Combining the usefulness of the rear basket and the stick / crutch holder. Stick / Umbrella Holder Ideal way to carry walking aids. -
Page 34: Guarantee Terms
G UARAN TEE TERMS Please keep a note of your serial number. (This is located on the front frame tube, under the front chassis cover). Your scooter is guaranteed for 12 months from the date of purchase against faults arising due to defects in manufacture or materials. -
Page 35: Service History
SER V IC E HISTO RY This section is designed to assist you in keeping a record of any service and repairs to your scooter. If you decide to sell or exchange your scooter in the future, this will prove most helpful to you. - Page 36 YOUR LOCAL DEALER (TO BE FILLED IN BY LOCAL DEALER) FREERIDER CORP. Head Quarter and Kaohsiung Facility: No.22, Bengong 5th Rd., Gangshan Dist., Kaohsiung City 820, Taiwan(R.O.C) Tel:886-7-6223093 Fax:886-7-6230373 Email: sales@freerider.com.tw http://www.freerider.com.tw http://www.luggie.com.tw 2014.11.03 V1...
Need help?
Do you have a question about the FR168-3A3 and is the answer not in the manual?
Questions and answers