
Related Manuals for Uniden XDECT SSE35 Series


Summary of Contents for Uniden XDECT SSE35 Series
- Page 1 XDECT SSE35 Series For more exciting new products please visit our website: Australia: www.uniden.com.au New Zealand: www.uniden.co.nz...
-
Page 2: Important Safety Instructions
IMPORTANT SAFETY INSTRUCTIONS When using your telephone equipment, basic safety precautions should always be followed to reduce the risk of fire, electric shock and injury to persons, including the following: • This unit is NOT waterproof. DO NOT expose this unit to moisture. • DO NOT expose this unit to rain. - Page 3 Pack (BT-694, BT-694s BT-694n) • If any items are missing or damaged, contact your place of purchase immediately. Never use damaged products! • Need help? Get answers at our website: www.uniden.com.au for Australian model www.uniden.co.nz for New Zealand model.
-
Page 4: Table Of Contents
CONTENTS InstallIng your phone ................5 gettIng to KnoW your phone ..............6 Parts of the Base ............................6 Parts of the Handset ..........................7 Using the Belt Clip ............................9 usIng the Menus ..........................Handset Setup Menu ..........................12 Answering Setup Menu ..........................13 Advanced Setup Menu ...........................13 Entering Text on Your Phone .......................14 usIng your phone ........................ -
Page 5: Installing Your Phone
InstallIng your phone Charge the battery 1. Unpack all handsets, battery packs, and battery covers. If you need to remove a cover, press in on the notch and slide the cover down and off. 2. Line up the battery connector with the jack inside the handset;... -
Page 6: Front View
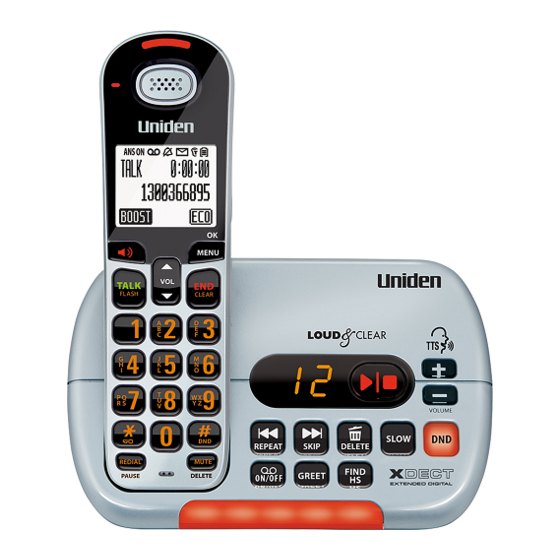
gettIng to KnoW your phone parts of the Base Front View Message counter Speaker PLAY/STOP Volume Up/Down Cradle Charging Contacts SLOW REPEAT FIND HS SKIP ANSWER DELETE Visual ON/OFF GREET Ringer Key Icon What it does • In standby: also start playing new messages. PLAY/STOP • While playing a message: stop playing messages. -
Page 7: Parts Of The Handset
Side View Key Icon What it does • In standby: adjust the brightness VISUAL RINGER of the base visual ringer (see VISUAL RINGER page 18). (HIGH/LOW/OFF) • In standby: cycle through 4 AUDIO RINGER AUDIO RINGER different ringer tones and 2 melodies (see page 18). - Page 8 Key Icon What it does • During a call: adjust the audio tone (see page 29). TONE • In standby: open the menu. MENU/OK • In any menu or list: select the highlighted item. • During a call: hang up. END/CLEAR • In any menu or list: exit and go back to the previous operation.
-
Page 9: Call Info
Reading the Display The table below shows some of the possible icons and what they mean. Since the icons appear based on what you’re doing with the phone, you won’t ever see all of these icons at the same time. Status icons Current... -
Page 10: Using The Menus
usIng the Menus Your phone displays different menus depending on whether you are on-hook or off- hook. Off-hook menus are Hold/Transfer, Recent Calls, Phonebook, and Call Privacy. Hold/Transfer and Call Privacy are unique to off-hook menus but Recent Calls and Phonebook are common to both off-hook and on-hook menus To open the menu, press on the... -
Page 11: Phonebook Menu
recent Calls Menu The Recent Calls menu lets you view the Caller ID list (up to 50) or the Redial list, a list of the last 10 calls made from that handset. phonebook Menu When you select Phonebook from the menus, the system displays the total number of phonebook listings. -
Page 12: Handset Setup Menu
handset setup Menu You can change these settings separately for each handset. Menu Option What it does T-coil Turn on T-coil mode to reduce noise on hearing aids equipped with a telecoil (T-coil) feature. T-coil mode shortens talk time, so keep your battery fully charged. -
Page 13: Answering Setup Menu
answering setup Menu Refer to page 24 for details on setting up your answering system. Date & time setting You need to set the clock so messages get the correct time stamp. Setting the date and time on the base or any handset will set it on all handsets/bases. When you select Date &... -
Page 14: Entering Text On Your Phone
entering text on your phone Use the 12-key dial pad anytime you want to enter text into your phone (a name in the phonebook, the handset banner, etc.). To... Press... To... Press... Move the cursor left move the cursor right DOWN erase the character MUTE/DELETE* erase the entire entry... -
Page 15: Using Your Phone
usIng your phone To... Earpiece Speaker make a call, dial the Press TALK/FLASH. Press SPEAKER. number, then answer a call Press TALK/FLASH. Press SPEAKER. hang up Press END/CLEAR or place the handset in the cradle. ignore the call (mute the Press MUTE/DELETE or END/CLEAR while the phone is ringing. -
Page 16: Using Caller Id And Call Waiting
using Caller ID and Call Waiting Caller ID (CID) is a service available from your telephone provider that shows the phone number (and sometimes the caller’s name) of the incoming calls; if you turned on Text- To-Speech, it also announces the name. Contact your telephone provider for more information. -
Page 17: Using The Phonebook
using the phonebook The base can store up to 200 entries in its phonebook. All handsets share the same phonebook, so only one handset can access it at a time. To... Press... open/close the phonebook Press MENU/OK and select Phonebook and press MENU scroll through the entries DOWN to scroll through the entries from A to Z. -
Page 18: Using Special Features
usIng speCIal Features adjusting the Base ringers Visual ringer The visual ringer blinks for the following conditions: • Incoming call - outside line • Incoming call - page You can change the brightness of the base visual ringer. The VISUAL RINGER switch is on the right-hand side of the base. -
Page 19: Using Caller Announce
using Caller announce With the Caller Announce feature, you can turn on Text To Speech so your phone can announce names in different situations. • You have to turn on Caller Announce separately for each handset (see page 12). • To change the volume of CID announcements, change the ringer volume. To change the volume for all Caller Announce features, change the speaker volume. -
Page 20: Call Blocking
Call Blocking If you subscribe to Caller ID, you can save phone numbers to the call block list. When a call comes in, the phone compares the received phone number to the numbers on the call block list. If the phone number is on the list, the phone replaces the caller’s name with Call Blocked and blocks the call. -
Page 21: Expanding Your Phone
using Multi-handset Features # To use the features in this section, you need at least 2 handsets. expanding your phone • Your base supports a total of 6 cordless handsets, including any that came with your phone. • You must register accessory handsets to the base before using them. Handsets that aren’t registered display a “not registered”... -
Page 22: Using Voice Message Notification
You can use a standard telephone headset (2.5mm diameter jack) with your handsets. To purchase headsets, visit our website; www.uniden.com.au for Australia or www.uniden.co.nz for New Zealand. • To install a headset, remove the headset jack cover and insert the headset plug into the jack. -
Page 23: Staying In Range
staying in range Your system will alert you when you are out of range (or about to go out of range). If... Then... the handset and base are the handset sounds an error tone and unavailable connected (intercom call) and no at this time displays. -
Page 24: Using The Answering System
usIng the ansWerIng systeM answering system options (answering setup) You can change the answering system options from any handset. Just open the menu and select Answering Setup. Menu Options What it does Security Code Enter a 2-digit PIN so you can access your answering system from any touch-tone phone (see page 28). -
Page 25: Accessing The Answering System
accessing the answering system With the phone in standby, you can access your system from the base or remotely from any handset. Only 1 handset or the base can access the system at a time. During remote access; 24/05 • The system beeps so you know it’s waiting for your next command. -
Page 26: Getting Your Messages
Delete your greeting From the handset, switch to your personal greeting; while it is playing back, press MUTE/ DELETE. The system announces “Greeting has been deleted” and displays Deleted! From the base, press and hold the GREET button until the system plays the greeting. Then as the greeting is being played, press DELETE button to delete it. - Page 27 screening your Calls You can use the answering system for call screening. While the system takes a message, you can listen on the base speaker (if you turn on Call Screen) or from a handset. Only one handset can screen calls at a time. If another handset tries to screen the call, error tone will sound, “Unavailable at this time”...
-
Page 28: Using The System While You're Away From Home
using the system While you’re away from home You can also operate your answering system from any touch-tone phone. Before you can use this feature, you have to program a security code. programming a security Code With the phone in standby, open the menu. Select Answering Setup, then select Security Code. -
Page 29: Important Information
IMportant InForMatIon solving problems If you have any trouble with your phone, check this section first. If you need help, visit the customer support page of our website listed on the front cover. General Problems Possible Solutions • Check the telephone cord connection. No handsets can make or receive calls. - Page 30 Caller ID Problems Possible Solutions • Let calls ring twice before answering. Caller ID information does not display. • Make sure your Caller ID service is active. • You may have to change the line Caller ID displays briefly and then clears. mode.
-
Page 31: Liquid Damage
Installing a line Filter or Dsl Filter A telephone line filter or DSL filter prevents services that use the phone line from causing interference on your phone. To get a line filter, contact your service provider or look in an electronics store. - Page 32 • Do not charge the batteries in any charger other than the one specified in the owner’s manual. Using another charger may damage the battery or cause it to explode. Rechargeable batteries must be recycled or disposed of properly. Uniden works to reduce lead content in our products and accessories.
-
Page 33: Index
InDeX Liquid Damage 31 Answer Machine 24 Any key answer 12 Multi-handset Features 21 Auto Talk 12 Mute 8 Banner 12 Noise 29 Battery 32 Paging HS 11 Call Block 20 Personal Ring 12 Caller ID 16 Phonebook 17 Call Transfer 21 Privacy Mode 21 Call Waiting 16 Chain Dialing 17... -
Page 34: One-Year Limited Warranty
Product first purchased either in Australia or New Zealand and will expire one (1) year from the date of the original retail sale. If a warranty claim is made, this warranty will not apply if the Product is found by Uniden to be: (A) Damaged or not maintained in a reasonable manner or as recommended in the relevant Uniden Owner’s Manual;... - Page 35 (such as a legible copy of the sales docket) to Uniden at the addresses shown below. You should contact Uniden regarding any compensation that may be payable for your expenses incurred in making a warranty claim.
- Page 36 ©2012 Uniden Australia Pty Ltd/Uniden New Zealand Limited Printed in Vietnam U01UN465ZZZ(0)
Need help?
Do you have a question about the XDECT SSE35 Series and is the answer not in the manual?
Questions and answers
How to extend rings to 12
To extend rings to 12 on the Uniden SSE35 Series, set the "Ring Time" to 12. You can adjust the number of rings (6, 9, or 12) before the system answers by accessing the Ring Time setting.
This answer is automatically generated
how do I cancel the visual ringer red lights
To cancel the visual ringer red lights on the Uniden XDECT SSE35 Series, slide the VISUAL RINGER switch, located on the right-hand side of the base, to the "OFF" position.
This answer is automatically generated
What are the 3 flashing lights on the handset
I have an xdect uniden system. In connection to the power outlet the plug has one line with broken grey paches and the other line is blac all the way. the one line with broken gray paches is it live or natural line. Thank you