
Related Manuals for Uniden SSE P1


Summary of Contents for Uniden SSE P1
- Page 1 SSE P1 Emergency Alert Pendant For more exciting new products please visit our website: Australia: www.uniden.com.au New Zealand: www.uniden.co.nz...
-
Page 2: Important Safety Instructions
IMPORTANT SAFETY INSTRUCTIONS The SSE P1 Pendant is an accessory product that must be registered to a compatible telephone model before use. Please read this Owner’s Manual in full for details on the installation and operation of the SSE P1. - Page 3 WHAT’S IN THE BOX? Belt Clip AC Adaptor Plastic Pin Wrist Band SSE P1 Pendant with Charging Owner’s Manual Cradle • If any items are missing or damaged, contact your place of purchase immediately. Never use damaged products! • Need help? Get answers at our website: www.uniden.com.au for Australian model...
-
Page 4: Table Of Contents
CONTENTS GETTING TO KNOW YOUR PENDANT ............... 5 GETTING STARTED ..................... 6 Charging Your Pendant ........................... 6 Attach the Belt Clip ........................... 7 Use the Wrist band ............................ 7 REGISTERING TO A bASE .................. 8 Compatible Bases ............................. 8 Registration Methods ..........................9 To SSE 37 Base ............................ -
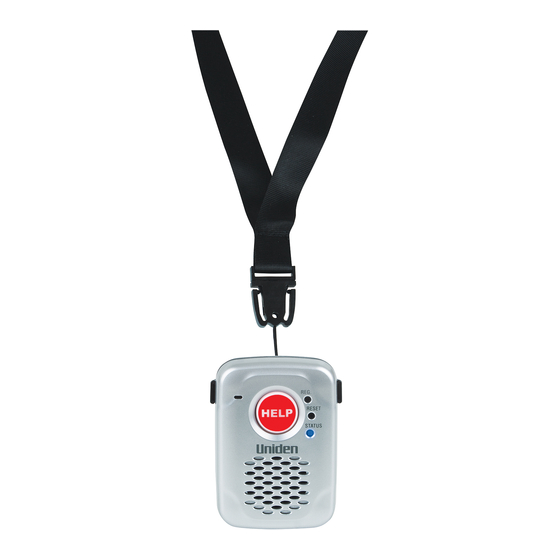
Page 5: Getting To Know Your Pendant
GETTING TO KNOW YOUR PENDANT Microphone Strap Holder HELP RESET Speaker Charging cradle Buttons and What it does Indicators Use to register the Pendant with a compatible phone. (Registration) RESET Use to reset the Pendant if registration fails. Pendant powers off after reset. STATUS (LED) Indicates the Pendant’s status when the Pendant is in use. -
Page 6: Getting Started
GETTING STARTED Before using the SSE P1 Pendant, it must first be charged, then registered to a compatible base. Finally, to get the most out of the SSE P1 Pendant’s features, it is strongly recommended that emergency contact numbers are stored in the phonebook of the compatible base. -
Page 7: Attach The Belt Clip
Attach the belt Clip To attach a belt clip: 1. Line the belt clip with the grooves at the side of the Pendant. 2. Then gently push until it snaps into place. To remove the belt clip: Gently pull out the belt clip from one groove and the other end will loosen on its own. -
Page 8: Registering To A Base
REGISTERING TO A bASE # The Pendant will not work until you register it to a compatible base. Compatible bases The Pendant is designed for use with Uniden’s; • SSE 35 Base • SSE 37 Base SSE 37 SSE 35... -
Page 9: Registration Methods
Registration Methods To SSE 37 base 1. On the SSE 37 base, press MENU to open the menu and select the option, Register Accy. Press OK. To SSE 35 base 1. On the SSE 35 base, press and hold the FIND HS button. - Page 10 2. On the Pendant # Make sure the Pendant is fully charged before registering to the base. a) With the Pendant on the charger, use the plastic pin provided to press and hold REG until the Status LED starts to blink blue and red. b) Take the Pendant off the charger and press HELP for 2-3 seconds until you hear a beep sound.
-
Page 11: Adding The Emergency Numbers
ADDING THE EMERGENCY NUMbERS The Pendant can dial 5 emergency contact numbers that are stored in the phonebook of the compatible base. The emergency contact entries in the phonebook must be saved as these names; SOS1, SOS2, SOS3, SOS4, SOS5. For your convenience the SSE35 and SSE37 come with these name entries pre-loaded into the phonebook. -
Page 12: Recording The Outgoing Message
RECORDING THE OUTGOING MESSAGE You can record a personal emergency message, in addition to the preset recorded message, when the Pendant is registered to the SSE 35 and SSE 37 series. This will enable your family/friends to be able to identify your voice and attend the call and it will also assure them that it is not a prank call. -
Page 13: For Sse 35
For SSE 35 To record a message on the SSE35 base, when the Pendant is registered to the base, follow the steps given below. 1. Press and hold ON/OFF+DELETE keys on the base for 5 seconds. 2. The base plays the following instruction, “Record your Message”. - After playing the confirmation tone, the Base starts recording the emergency message. -
Page 14: Operation
OPERATION Make an Emergency Call 1. Press and hold HELP for 2 seconds, until you hear a beep sound. And after that? 2. The Pendant will first make an intercom call to all handsets registered to the main base. a) If the intercom call is answered then the Pendant’s microphone is activated and you can talk through the Pendant to the other handset. -
Page 15: Important Information
IMPORTANT INFORMATION • Test the Pendant’s HELP function regularly to ensure that it is working properly. • Always place the Pendant back in the cradle to ensure that the battery is charged and the Pendant is ready for the next emergency call. • The Pendant is meant to be used by your personal emergency contacts - family, friends, neighbours. - Page 16 • You have to ensure that the emergency numbers have been programmed, otherwise the Pendant will not dial out anything. • Store the phone numbers with the area code and in the order in which you want. • The emergency feature will stop automatically when all the 5 SOS numbers have been dialled, or until the call has been answered and the receiver has pressed the # key.
-
Page 17: General Information
GENERAl INFORMATION AC Adaptor Parts Number Input Voltage Output Voltage PS-S0540NL2 100-240V~, 50-60Hz 150mA 5.4V 400mA • Use only the supplied AC adaptor. • Do not place the unit in direct sunlight or subject it to high temperatures. battery Information Type Capacity Talk time... -
Page 18: One-Year Limited Warranty
SSE P1 Pendant IMPORTANT Satisfactory evidence of the original purchase is required for warranty service Please refer to our Uniden website for any details or warranty durations offered in addition to those contained below. Warrantor The warrantor is either Uniden Australia Pty Limited ABN 58 001 865 498 (“Uniden Aust”) or Uniden New Zealand Limited (“Uniden NZ”) as the case may be. - Page 19 Product does not conform with this warranty, you should deliver the Product, together with satisfactory evidence of your original purchase (such as a legible copy of the sales docket) to Uniden at the addresses shown below. You should contact Uniden regarding any compensation that may be payable for your expenses incurred in making a warranty claim.
- Page 20 ©2012 Uniden Australia Pty Ltd/Uniden New Zealand Limited Printed in Vietnam U01UU283ZZZ(0)
Need help?
Do you have a question about the SSE P1 and is the answer not in the manual?
Questions and answers