
Related Manuals for Uniden XDECT 8055


Summary of Contents for Uniden XDECT 8055
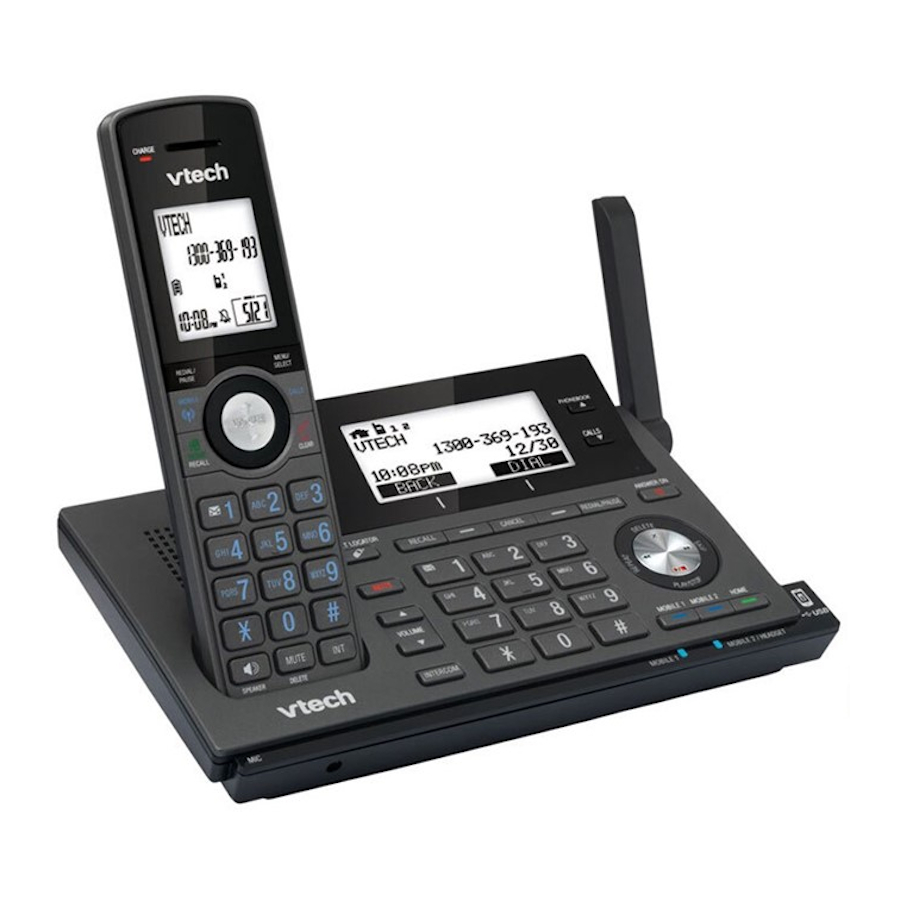
- Page 1 XDECT 8055 Series For more exciting new products please visit our website: Australia: www.uniden.com.au New Zealand: www.uniden.co.nz...
-
Page 2: Save These Instructions
Important Safety Instructions! When using your telephone equipment, basic safety precautions should always be followed to reduce the risk of fire, electric shock and injury to persons, including the following: This unit is NOT waterproof. DO NOT expose this unit to rain or moisture. ... - Page 3 (XDECT 8055 model only) XDECT 8055 None XDECT 8055+1 1 of each* XDECT 8055+2 2 of each* XDECT 8055+3 3 of each* *Only 1 repeater is included per combo. If any items are missing or damaged, contact your place of purchase.
-
Page 4: Table Of Contents
Contents Features of the XDECT 8055 Series ..................5 Installing Your Phone ......................5 Charge the Battery .......................5 Connect the Telephone Cord /Test the connection ............6 Installing the Belt Clip ......................7 Headset Installation (Optional) ....................7 Mounting the base unit on a wall ..................8 Set Up the Repeater .................... -
Page 5: Features Of The Xdect 8055 Series
There is usually a fee for this service. Name Tag, Personal Ring and Call Block features require incoming Caller ID data. Based on normal use with full battery charge. Specifications subject to change. Visit the XDECT 8055 webpage on the website for the latest information. -
Page 6: Installing Your Phone
INSTALLING YOUR PHONE Charge the Battery 1) Unpack all handsets, battery packs, and battery covers. If any battery cover is already on the handset, press in on the notch and slide the cover down and off. Line up the red and black wires on the battery pack with the label inside Black the handset. -
Page 7: Connect The Telephone Cord /Test The Connection
8) Place a handset in the base and any accessory handset(s) in the charger(s) with the display(s) facing forward. The CHArGE light on the handset(s) should all turn on. If... Try... the CHArGE reseating the handset. light does checking the AC adapter connection. not turn on seeing if the outlet is controlled by a wall switch. -
Page 8: Installing The Belt Clip
Headset Installation Your phone may be used with the Uniden HS915 headset (included with XDECT 8055 model). To use this feature, insert the headset plug into the headset jack. Your phone is ready for hands-free conversations. Additional headsets are available through Uniden... -
Page 9: Mounting The Base Unit On A Wall
Mounting the base unit on a wall This phone can be mounted on any standard telephone wall plate. Connect the AC adapter and the telephone cords as shown on pages 6 and 7. Remember to route the AC adapter cord through the channel. - Page 10 Place the mounting slots over the pins on the wall plate. Wall plate Slide the base down to lock it into place. Plug the adapter into a (To AC outlet) standard 240V AC power outlet. Removing the wall-mount bracket Pinch the two prongs locked into the bottom tabs together and push the bracket up.
-
Page 11: Set Up The Repeater
Set Up the Repeater The repeater is not a telephone; it must be registered to a phone base before using. Any repeater that came packaged with a base are already registered to that base for you. For instructions on registering repeaters to the base, see page ... - Page 12 Connect the Repeater Power Cord Use the included adapter to connect the repeater to a regular indoor (240 V AC) Wall-mount holes power outlet. Registration Placing the Repeater button Here are a few tips for placing your Power connector repeater so that you get the clearest signal and the maximum range: Place the repeater just inside the base's ...
- Page 13 Place the repeater anywhere inside the range where the handset had a clear connection with no noise and the icon showed a strong signal. Testing the Location Place the repeater in its final position and connect the AC adapter. light will flash for a few seconds, then stay on. LINk If...
- Page 14 Place the Repeater on the Wall You can mount the repeater directly to a wall using the horizontally aligned mounting slots at the back of the repeater unit. Before doing this consider the following: Avoid electrical cables, pipes, or other items behind the mounting ...
-
Page 15: Getting To Know Your Phone
Getting To Know Your Phone Parts of the Base If the key name is spelled out on the key itself, it's not labeled in the drawing below. FIND HANDSET/ INTERCOM PHONEBOOK/LEFT PLAY/STOP DISPLAY SPEAKER CALLER ID/RIGHT DOWN DELETE DO NOT DISTURB SPEAKER CHARGING TWELVE-KEY... - Page 16 Key name (and What it does icon) In standby: start playing messages. pLAy/STOp While a message is playing: stop playing messages. In the menu or a list: exit the menu completely. In standby or during a call: open the phonebook. In any menu or list: go up one level.
-
Page 17: Parts Of The Handset / Handset Keys And How They Work
Parts of the Handset DISPLAY If the key name is spelled out on the key itself, it's not labeled in the drawing below. SPEAKER CALLER ID/ PHONEBOOK/ RIGHT LEFT DOWN TWELVE KEY DIAL KEYPAD LOCK DO NOT DISTURB INTERCOM/CLEAR MESSAGES/MUTE MICROPHONE CHARGING CONTACTS... - Page 18 Key name (and What it does icon) In standby: open the menu. MENU/SELECT In the menu or any list: select the highlighted item. During a call: hang up. In the menu or any list: exit & go to standby. In standby: page another station using the intercom. INTErCOM/ During a call: put the call on hold &...
-
Page 19: Reading The Displays
Reading the Displays On the base Status icons Day and Answering time system status Banner Message counter Caller ID count On the handset Status icons Handset banner Caller ID count New Message counter Time & Date Answering system status... - Page 20 The table below shows the possible icons and what they mean. Since the icons appear based on what you're doing with the phone, you won't ever see all of these icons at the same time. Icon What it means (Handset only) Received signal strength indicator. The ringer is turned off: this handset will not ring when a call comes in.
-
Page 21: Using The Menus
USING THE MENUS The menus are designed to be as easy as possible. Some users don't even need the manual once they know how to perform these actions: To... Press... Press MENU/SELECT . Open the menu On the handset: Use Up to highlighted option above & DOwN to highlight the option below. - Page 22 Using the Menus Base Setup (Base only) Menu Option What it does Key Touch Tone Have the keypad sound a tone when you press a key. Handset Setup (Handset only) You can change these settings separately for each handset. Menu Option What it does Turn on T-coil mode to reduce noise on some hearing T-coil...
-
Page 23: Ans. Setup / Day & Time / Global Setup
Ans. Setup This menu controls the options and settings for your answering system (see "Ans. Setup menu options" on page 37). Date & Time You need to set the date & time so messages get the right time stamp. The date & time format is; day/month/year, hour/minutes/am/pm Use the number keypad ( 0-9) or Up/DOwN/LEfT/rIGHT to enter the day of the month, month, year and then hour, minutes and... -
Page 24: Entering Text On Your Phone
Entering Text on Your Phone When you want to enter text into your phone (for example, a name in the phonebook), use the twelve-key dial pad to enter the letters printed on the number keys. Here's how it works: The phone enters the letters in the order they appear on the key. ... -
Page 25: Using Your Phone
Using Your Phone From a handset From the base To... From a handset speakerphone speakerphone Press Press make a call: Dial Press SpEAkEr . TALk /fLASH . SpEAkEr . the number, then Press Press Press SpEAkEr . answer a call TALk /fLASH . -
Page 26: Changing The Volume
Changing the Volume You can set the volume of the ringer and speaker separately for the base and each handset; you can also set the earpiece volume on each handset. For each item, press Up to make it louder or DOwN to make it softer. -
Page 27: Using Caller Id And Call Waiting / Dialing From The Caller Id List
Using Caller ID and Call Waiting you have to subscribe to Caller ID, Call waiting, and Caller ID on Call waiting services to use the features described in this section: contact your telephone provider for more information. When a call comes in, the phone displays the caller’s number and name (if available). -
Page 28: Caller Id Menu Options / Using Call Waiting
Caller ID menu options Open the CID list with the phone in standby. Find the number you want and press MENU/SELECT. Choose one of these CID menu options: Menu Option What it does Delete Erase this Caller ID number. Add this number to the phonebook. The phone prompts Store Into you to enter a name &... -
Page 29: Using The Phonebook
Using the Phonebook Each station can store up to 100 entries in its phonebook. All handsets share the same phonebook, so only one handset can access it at a time. To... Press... Press pHONEbOOk. Open/close the phonebook Press DOwN to scroll through the phonebook Scroll through the entries from A to Z or Up to scroll from Z to A. -
Page 30: Chain Dialing
Chain Dialing If you often have to enter a series of digits or a code number during a call, you can save that code number to a phonebook entry and use the phonebook to send the code number. Enter the code number (up to 20 digits) into the phonebook just ... -
Page 31: Using Special Features
Using Special Features Using Do Not Disturb (DND) You can silence the ringers on all handsets for a specific period of time. DND on the base or With the phone in standby, press and hold #/DND on any handset. The phone prompts you to select the number of hours (1 - 9 or Always On) that you want it to stay in silent mode. -
Page 32: Call Blocking Menu Options / Call Block Entry Options
Call Blocking menu options With the phone in standby, open the menu and select Call Blocking. Choose one of these options Menu Option What it does View Number See the numbers on your call block list. Add an entry to your call block list. The phone will prompt you Create New to enter a name &... -
Page 33: Using Voice Message Notification / Resetting The Voice Message Indicator
Using Voice Message Notification This feature supports frequency-Shift keying (fSk) message notification. Contact your voice mail provider for more details. If you subscribe to a voice mail service, your phone can notify you when you have a new message waiting. When you have new messages, the voice message icon ) appears in the display, and the new message light (at the top of... -
Page 34: Using Multi-Station Features
XDECT 8015WP or XDECT 8005WP (waterproof) handset is registered. Your base also supports a total of 2 repeaters, including any that came with your phone. Visit the XDECT 8055 page on the website for compatible repeaters. Your base might be compatible with other Uniden accessory ... -
Page 35: Using Privacy Mode
Using Privacy Mode You can prevent other stations from joining a call. Start your call as usual, then press MENU/SELECT: the display shows Call Privacy. Press MENU/SELECT again to turn privacy mode on (you'll see a the display). When you hang up, privacy mode turns off automatically. As long you have privacy mode on, no other stations can interrupt your call. -
Page 36: Using The Intercom
Using the Intercom Here are some things you need to know about using the intercom: Whenever the phone is in standby, you can make an intercom call between stations without using the phone line. You can make an intercom call from any station, but only two ... -
Page 37: Using The Answering System
Using The Answering System Setting Up Your Answering System You can set up your answering system from any handset or from the base. To... Follow these steps Open the menu with the phone in standby. Select Ans. Setup, then Record Greeting. MENU/SELECT to start recording. -
Page 38: Getting Your Messages / Accessing Your Answering System From A Handset
Set the amount of time callers have to leave a message, Record Time either 1 minute or 4 minutes. Choose Announce Only if you don't want the system to let callers to leave a message. Have the system beep every 15 seconds when you have a new message;... -
Page 39: How To Operate Your Answering System
How to operate your answering system From a handset (remote To... From the base operation) Press pLAy/STOp. Press MESSAGES/MUTE. The system announces the number of new & old messages, play new then plays the first new message followed by the day & time messages it was received. -
Page 40: Screening Your Calls
Screening Your Calls Another feature your answering system gives you is call screening. While the system is taking a message, you can hear the caller on the base speaker (if you turn on Call Screen) or from a handset. To... From the base From a handset hear the caller... -
Page 41: Using The System While You're Away From Home
Using the System While You're Away from Home You can also operate your answering system from any touch-tone phone. Before you can use this feature, you have to program a security code. Programming a security code With the phone in standby, open the menu from any handset. Select Ans. -
Page 42: Solving Problems
Solving Problems If you have any trouble with your phone, try these simple steps first. If you still have a question, visit the website listed on the front cover. If… Try… Checking the telephone cord connection. No stations can make Disconnecting the base AC adapter. - Page 43 If… Try… The phone keeps You may have to change the line mode. Visit the ringing if I answer on website for more information. an extension. Making sure the answering system is turned on. The answering system Making sure the base AC adapter is plugged into a does not work.
-
Page 44: Weak Or Hard To Hear Audio
Weak or Hard To Hear Audio If a caller’s voice sounds weak or soft, the signal might be blocked by large metal objects or walls; you might also be too far from the base, or the handset’s battery may be weak. Try moving around while you’re on a call or moving closer to the ... -
Page 45: Here Are Some Hints For When The Static Is
Here are some hints for when the static is... on 1 handset or in 1 location: on all handsets or in all locations: Check nearby for one of the common Check near the base for the interference sources. source of interference. Try moving the handset away from a Try moving the base away from a suspected source, or try moving the... -
Page 46: Resetting And Registering Handsets
Resetting and Registering Handsets If you are having trouble with a handset or if you want to replace one, you need to clear the registration information from the base and the handset: Do you have the base the handset is registered to? END and # until the END and # until Press &... -
Page 47: Register Repeaters To The Base
Registering Repeaters to the Base If you are having trouble with a repeater or if you want to replace one, you need to register the repeater to the base. Connect the repeater close to the base for easy access to the necessary buttons and indicators. -
Page 48: Handling Liquid Damage
Handling Liquid Damage Moisture and liquid can damage your cordless phone. If the handset or base is exposed to moisture or liquid, but only the exterior plastic housing is affected, wipe off the liquid, and use as normal. If moisture or liquid has entered the plastic housing (i.e. liquid can ... -
Page 49: Important Information
Important Information Terms Used In This Guide An extra handset that can register to and be used with an expand- Accessory able phone base. All accessory handsets must be registered to a handset base before you can use them. The main part of the phone. It connects to your phone line and lets base you make and receive calls. -
Page 50: Battery Information
Using another charger may damage the battery pack or cause the battery pack to explode. Uniden works to reduce lead content in pVC coated cords in our products & accessories. -
Page 51: Index
INDEX Answer Machine Date & Time ........19, 23 Deregister the handset ......46 Call Screen ........38 Get Messages ........38 Distinctive ringer (see Personal Ring) Greeting (Outgoing Message) ..37 Do Not Disturb (DND) ......... 16, 18, 31 Record / Change / Delete .... - Page 52 INDEX (Cont'd) Phonebook .......... 29 Editing ........24, 29 Erasing ..........29 Making calls ........29 Storing ..........29 Viewing ........... 29 Chain dialing ........30 Privacy mode ........35 Receiving a call ........25 Redialing a call ........26 Register the handset ......
- Page 53 NOTES...
-
Page 54: One-Year Limited Warranty
Please refer to our Uniden website for any details or warranty durations offered in addition to those contained below. warrantor The warrantor is either Uniden Australia Pty Limited ABN 58 001 865 498 (“Uniden Aust”) or Uniden New Zealand Limited (“Uniden NZ”) as the case may be. - Page 55 Product does not conform with this warranty, you should deliver the Product, together with satisfactory evidence of your original purchase (such as a legible copy of the sales docket) to Uniden at the addresses shown below. You should contact Uniden regarding any compensation that may be payable for your expenses incurred in making a warranty claim.
- Page 56 © 2011 Uniden Australia Pty Ltd/Uniden New Zealand Limited Printed in Vietnam U01UN346BZB(0)
- Page 57 XDECT 8005 Series For more exciting new products please visit our website: Australia: www.uniden.com.au New Zealand: www.uniden.co.nz...
-
Page 58: Important Safety Instructions
Important Safety Instructions! When using your telephone equipment, basic safety precautions should always be followed to reduce the risk of fire, electric shock and injury to persons, including the following: • This unit is NOT waterproof. DO NOT expose this unit to rain or moisture. •... - Page 59 (BT-694 or BT-694s) Belt clip • If any items are missing or damaged, contact your place of purchase immediately. Never use damaged products! • Need Help? Get answers at our website: www.uniden.com.au for Australian model www.uniden.co.nz for New Zealand model.
- Page 60 Installing Your Phone Charge the Battery 1) Unpack the handset, battery packs, and battery cover. If any battery cover is already on the handset, press in on the notch and slide the cover down and off. Line up the red and black wires on the battery pack with the label Black inside the handset.
-
Page 61: Installing The Beltclip
To remove the belt clip; Pull either side of the belt clip to release the tabs from the holes. Headset Installation Your handset may be used with the Uniden HS915 headset. To use this feature, insert the headset plug into the headset jack. Your handset is ready for hands-free conversations. Headsets can... - Page 62 Compatible Bases This handset is designed for use with Uniden's XDECT 8015 and XDECT 8055 bases. Other Uniden XDECT bases may be compatible with this handset. For the most up-to-date list of which bases this handset is compatible with, see our website.
-
Page 63: Resetting The Handset
Test the connection Pick up the handset and press TALK/FLASH. Make sure you get a dial tone. (Press END to hang up.) If... Try... - you don't hear a dial tone Making sure the handset is fully charged, then trying again. - the display says Registration failed Resetting the Handset... - Page 64 All features and operation for the handset are described in the owner’s manual for one of the bases listed under the Compatible Bases section. • Owner’s manuals for all Uniden phones are available on our website for free downloading. Specifications Part number...
- Page 65 Using another charger may damage the battery or cause it to explode. Rechargeable batteries must be recycled or disposed of properly. Uniden works to reduce lead content in PVC coated cords in our products & accessories.
- Page 66 One Year Limited Warranty UNIDEN XDECT 8005 IMPORTANT: Satisfactory evidence of the original purchase is required for warranty service Please refer to our Uniden website for any details or warranty durations offered in addition to those contained below. Warrantor The warrantor is either;...
- Page 67 Product does not conform with this warranty, you should deliver the Product, together with satisfactory evidence of your original purchase (such as a legible copy of the sales docket) to Uniden at the addresses shown below. You should contact Uniden regarding any compensation that may be payable for your expenses incurred in making a warranty claim.
- Page 68 © 2011 Uniden Australia Pty/Uniden New Zealand Limited Printed in Vietnam U01UU256BZZ(0)
Need help?
Do you have a question about the XDECT 8055 and is the answer not in the manual?
Questions and answers