Table of Contents
Advertisement
Advertisement
Table of Contents

Subscribe to Our Youtube Channel
Related Manuals for Hytera TC-320


Summary of Contents for Hytera TC-320
- Page 1 www.hytera.com...
- Page 2 Preface Thank you for purchasing Hytera TC-320 Business Radio. TC- 320 is unique for its compact and delicate body. It is ergonomically designed to give you exceptional experience of portability. This easy-to-use radio will deliver you secure, instant and reliable communication services at peak efficiency.
-
Page 3: Table Of Contents
Contents Safety Information --------------------------------------------------------- 1 Product Inspection -------------------------------------------------------- 2 Radio Overview ------------------------------------------------------------- 3 Battery Information ------------------------------------------------------- 5 Antenna Information ------------------------------------------------------ 9 Assembly and Disassembly -------------------------------------------- 9 Basic Operations -------------------------------------------------------- 13 Programmable Auxiliary Functions-------------------------------- 13 Advanced Operations -------------------------------------------------- 14 CTCSS/CDCSS ------------------------------------------------------- 14 Battery Save ----------------------------------------------------------- 14 Power Adjust ----------------------------------------------------------- 14 Time-out Timer (TOT) ----------------------------------------------- 14... -
Page 4: Safety Information
◇ This radio shall be serviced by qualified technicians only. ◇ Do not modify the radio for any reason. ◇ Only use Hytera supplied or approved batteries and chargers. ◇ To avoid electromagnetic interference and/or compatibility conflicts, turn off your radio in any area where posted notices instruct you to do so. Turn off your radio before boarding an aircraft. -
Page 5: Product Inspection
Product Inspection Please unpack the package box carefully and check that all shipped items are received; report any missing or damaged items to your dealer. Accessories Item Qty. (PCS) Nylon Strap Belt Clip Screw (Belt Clip) Li-ion Battery Switching Power Owner’s Manual Belt Clip Li-Ion Battery... -
Page 6: Radio Overview
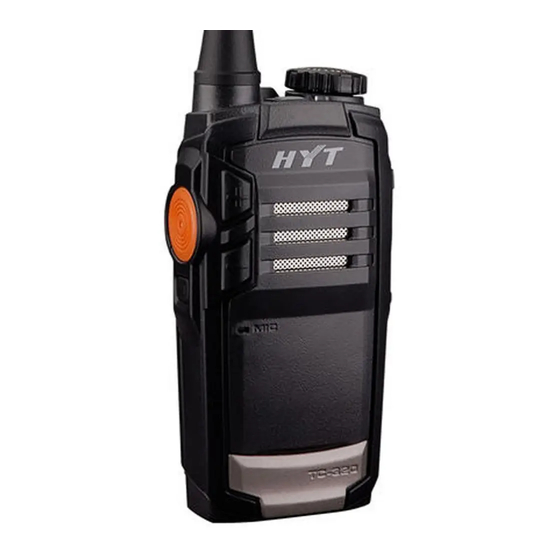
Radio Overview (1) PTT (Push-to-Talk) Key (2) SK (Side Key) (3)Speaker (4) Volume Adjust Keys [+] / [-] (5) Microphone (6) Nameplate (7) Charging Terminal (8) Antenna (9) Power Switch (10) Channel/Status Indicator (11) Channel Selector Knob (12) Charge Indicator (13) Accessory Jack Cover (14) Audio Accessory Jack (15) Mini USB Jack (16) Strap Hole... - Page 7 Radio Overview PTT (Push-to-Talk) Key Press and hold down the PTT key to transmit, and release it to receive. SK (Side Key) Side Key is a programmable key that can be assigned with long/short press functions by your dealer. Note: Short Press: Key press shorter than 1 second. Long Press: Key press longer than 1 second.
-
Page 8: Battery Information
Radio Overview 3.When signal is received on a certain channel, Status Indicator solidly glows green. 4.Scan Exit Alert Tone (programmable by your dealer): A beep is heard. Power adjust 1.A low-pitched tone is heard when transmit power is switched from high power to low power. 2.A high-pitched tone is heard when transmit power is switched from low power to high power. - Page 9 Battery Information Caution: 1. To avoid risk of personal injury, do not dispose of batteries in a fire! 2. Dispose of batteries according to local regulations (e.g. recycling). Do not dispose as household waste. 3. Never attempt to disassemble the battery. Battery Tips 1. When charging your battery, keep it at a temperature among 5℃ - 40℃ . Temperature out of the limit may cause battery leakage or damage.
-
Page 10: Charging The Battery
Battery Information batteries: 6 months), to avoid battery capacity reduction due to over- discharge. 3. Store your battery in a cool, dry place under room temperature, to reduce self-discharge. Charging the Battery When the Status Indicator flashes red and an alert tone sounds at intervals of ten seconds indicating the battery power runs low, please recharge the battery. Use only the charger specified by the manufacturer. - Page 11 Battery Information Status Charge Indicator of the Radio Battery is charging. Charge Indicator solidly glows red. Battery is fully charged. Charge Indicator solidly glows green. Please follow these steps to charge a battery using the desktop charger: 1. Plug the AC connector of the switching power into the AC outlet socket. 2.
-
Page 12: Antenna Information
Antenna Information ◇ Stubby antenna is durable, and is ideal for communication at low transmit power. ◇ Communication range may vary with terrain and your operating conditions. Rainy days or forest locations may narrow your communication range, please make preparation in advance to avoid potential inconvenience. Assembly and Disassembly Attaching/Removing the Battery Attaching the Battery... - Page 13 Assembly and Disassembly Note: If the rear cover is not well locked, please remove the rear cover and attach it again. Fig.3 Removing the Battery 1. Turn off the radio, if it is turned on. Then follow step 1 in the section “Attaching the Battery”...
- Page 14 Assembly and Disassembly back side of the radio, as shown in Figure 5. Align the belt clip screws with screw holes on the metal bracket of the belt clip, and then secure the screws. Fig.5 Removing the Belt Clip Loosen the screw to remove the belt clip. Please refer to the operations for attaching the belt clip.
- Page 15 Assembly and Disassembly Attaching/Removing the Earpiece/Mini USB Attaching the Earpiece/Mini USB 1. Open (not remove) the accessory cover, plug the audio accessory firmly into the accessory jack, and the Mini USB into the USB jack, as shown in figure 7. Fig.7 Removing the Earpiece/Mini USB Open the accessory cover, and then remove the earpiece or Mini USB.
-
Page 16: Basic Operations
Basic Operations Turning the Radio On/Off Long press the Power Switch until an alert tone is heard to turn the radio on. To turn the radio off, do the same as you turn it on. Adjusting the Volume You may adjust the volume level through Volume Adjust Keys [+]/[-]. Press the [+] key to increase the volume, or press the [-] key to decrease the volume. -
Page 17: Advanced Operations
To stop the warning tone, release the PTT key. Your dealer may program the alert tone that sounds before the TOT timer nearly expires. Battery Strength Indicator TC-320 allows you to simply press the programmed Battery Strength Indicator key to illuminate the Status Indicator, which gives different... -
Page 18: Monitor
Advanced Operations indications representing battery strength levels. To exit the indications, release the key. The Status Indicator gives the following indications to represent corresponding battery strength levels: Battery Strength Status Indication The LED glows different colors to represent battery strength levels: 70% - 100% Status Indicator solidly glows green. -
Page 19: Scan
Advanced Operations transmitting party regardless of CTCSS/CDCSS condition. If carrier condition is not satisfied, the receiving party will fail to receive any incoming calls. Operation: Press the Monitor key to enter this mode, and press it again to exit. Monitor Momentary Purpose: Refer to Monitor. Operation: Hold down the programmed key continuously to enter this mode, and release the key to exit. -
Page 20: Busy Channel Lockout (Bcl)
Advanced Operations Scan On/Off You can enter scan mode through any of the following two methods: 1. Key operation Press the programmed Scan key to enter scan mode, provided that there’re no less than 2 members in the scan list. Press Scan key again or power off to exit. -
Page 21: Low Battery Alert
Advanced Operations Low Battery Alert When battery power runs low, Status Indicator will flash red and a low-pitched tone will sound every ten seconds to remind users to replace the battery. VOX (Voice-Operated Transmit) With the dedicated VOX earpiece, you can enjoy hands-free communication. After this function is enabled, the radio will automatically begin transmitting when you speak, and terminate transmitting when you stop talking, with no need of PTT press. -
Page 22: Troubleshooting
Advanced Operations 3. If the earpiece operates abnormally, please pull and plug it again as instructed above. 4. You may select VOX levels according to the operating environment. Too much noise and high VOX level may cause the radio to transmit continuously. -
Page 23: Care And Cleaning
Care and Cleaning ◇ Do not hold the radio by its antenna or external earpiece directly. ◇ Do not place the radio in a dusty or dirty environment. ◇ Clean the radio with a lint-free cloth to remove dirt or grease, to avoid poor contact due to excessive dust. - Page 24 Hytera Hytera is the trademark or registered trademark of Hytera Communications Corp., Ltd. 2011 Hytera Corp., Ltd. All Rights Reserved. Address: HYT Tower, Hi-Tech Industrial Park North, Beihuan RD., Nanshan District, Shenzhen, China Post:518057 http://www.hytera.com X05031 L07157 8110032000110...
Need help?
Do you have a question about the TC-320 and is the answer not in the manual?
Questions and answers