Table of Contents
Advertisement
User Manual
PT35
0
is the trademark or registered trademark of Hytera Communications Corporation Limited.
2019
Hytera Communications Corporation Limited. All Rights Reserved.
Address: Hytera Tower, Hi-Tech Industrial Park North, 9108# Beihuan Road, Nanshan District, Shenzhen, People's Republic of China
Postcode: 518057
http:// www.hytera.com
Advertisement
Table of Contents

Related Manuals for Hytera PT350


Summary of Contents for Hytera PT350
- Page 1 Hytera Communications Corporation Limited. 2019 Hytera Communications Corporation Limited. All Rights Reserved. Address: Hytera Tower, Hi-Tech Industrial Park North, 9108# Beihuan Road, Nanshan District, Shenzhen, People's Republic of China Postcode: 518057 http:// www.hytera.com...
- Page 2 Preface Welcome to the world of Hytera and thank you for purchasing this product. This manual includes a description of the functions and step-by-step procedures for use. To avoid bodily injury or property loss caused by incorrect operation, please carefully read the Safety Information Booklet before use.
- Page 3 Copyright Information Hytera is the trademark or registered trademark of Hytera Communications Corporation Limited (the Company) in the People's Republic of China (PRC) and/or other countries or areas. The Company retains the ownership of its trademarks and product names. All other trademarks and/or product names that may be used in this manual are properties of their respective owners.
- Page 4 Operation is subject to the following two conditions: This device may not cause harmful interference. This device must accept any interference received, including interference that may cause undesired operation. Note: Changes or modifications to this unit not expressly approved by the party responsible for compliance could void the user's authority to operate the equipment.
- Page 5 Quand portés sur le corps, toujours place de la radio dans un étui, hytera approuvé titulaire, ou un harnais ou par l'utilisation de la vidéo pour ce produit.utilisation des accessoires non approuvés d'exposition professionnelle et environnementale peuvent entrainer des fac qui dépassent les niveaux...
-
Page 6: Table Of Contents
Contents Documentation Conventions ........................5 1. Packaging List ............................6 2. Product Overview ..........................7 2.1 Product Layout........................... 7 2.2 Programmable Keys .......................... 8 3. Before Use ............................10 3.1 Charging the Battery ........................10 3.2 Attaching the Battery ........................10 3.3 Attaching the Antenna ........................ - Page 7 6.2.1 Initiating an Individual Call ..................... 20 6.2.2 Receiving an Individual Call ....................20 6.2.3 Ending an Individual Call ....................... 21 6.3 All Call ............................. 21 6.4 PABX/PSTN Call (TMO Only) ......................21 6.4.1 Initiating a PABX/PSTN Call ....................21 6.4.2 Receiving a PABX/PSTN Call ....................
- Page 8 8.5.5 Setting the 2nd PTT Group ....................33 8.5.6 Managing a Normal Folder ....................34 8.5.7 Managing a Favorite Folder ....................34 8.5.8 Managing a Scan List ......................34 8.6 DGNA .............................. 35 8.7 Voice Feedback ..........................35 8.8 Power .............................. 35 8.9 Work Type ............................
- Page 9 12. Abbreviations ............................ 48...
-
Page 10: Documentation Conventions
Documentation Conventions Icon Conventions Icon Description Indicates references that can further describe the related topics. Indicates situations that could cause data loss or equipment damage. Indicates situations that could cause major personal injury or even death. Notation Conventions Item Description Example To save the configuration, click Apply. -
Page 11: Packaging List
1. Packaging List Please unpack carefully and check that you have received the following items. If any item is missing or damaged, contact your dealer. Item Quantity (PCS) Item Quantity (PCS) Terminal Antenna Battery Belt Clip Charger Documentation Kit Power Adapter ... -
Page 12: Product Overview
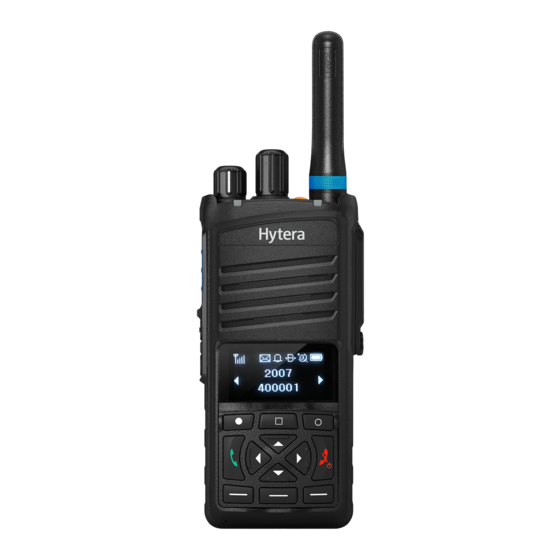
2. Product Overview 2.1 Product Layout Part Name Part Name Push-to-Talk (PTT) Key Build-in Microphone Side Key 1 (SK1) Accessory Connector Cover Side Key 2 (SK2) Speaker Emergency Key Menu Key Group Selector Knob Cancel/Back Key Volume Control Knob Power On-Off/End Key Operation Status Indicator Navigation Keys (Up, Down, Left, and Right) OLED Display... -
Page 13: Programmable Keys
Part Name Part Name Answer/Call Key Battery Latch P1 Key Strap Hole Antenna Belt Clip Battery Status Indicator Battery 2.2 Programmable Keys For enhanced convenience, you can set the following keys as shortcuts to assignable terminal features: Up key, Down key, Answer/Call Key, SK1, SK2, P1 key, P2 key, and P3 key. -
Page 15: Before Use
3. Before Use 3.1 Charging the Battery Use the approved charger to charge the battery. Read the Safety Information Booklet before charging. The remaining lithium-ion battery power is limited to 30% pursuant to the new lithium battery shipment regulation approved by International Air Transport Association (IATA). -
Page 16: Attaching The Antenna
3.3 Attaching the Antenna Do not hold the terminal by the antenna and swing it. This may affect the antenna performance and shorten the life span of the antenna. 3.4 Attaching the Belt Clip Make sure the arc end of the metal rotating component of the belt clip is vertical to the ground. Insert the component into the fastener of the terminal’s rear cover until a click is heard. -
Page 17: Attaching The Audio Accessory
3.5 Attaching the Audio Accessory To avoid short circuit or corrosion, close the accessory connector cover and fasten the screw after removing the accessory. Loosen the screw on the accessory connector cover, and then open the cover. Plug the accessory into the accessory connector, and then rotate the screw on the accessory plug clockwise until hand tight. -
Page 18: Basic Operations
4. Basic Operations 4.1 Turning the Terminal On or Off 4.1.1 Turning the Terminal On Long press for two seconds. Press the Emergency key. If configured, the terminal automatically starts up when you attach the battery. 4.1.2 Turning the Terminal Off Long press for 2 seconds. -
Page 19: Managing The Phonebook
The Auto Mode Switch feature allows the terminal to switch the operation mode automatically, so as to guarantee the normal communication of the terminals in no-signal coverage areas or when the system fails. If the Auto Mode Switch feature is programmed, you can enable it as follows: On the home scree, press the Menu key, go to Settings >... -
Page 20: Viewing Device Information
The used and free space of the PhoneBook are displayed on the screen. 4.6 Viewing Device Information On the home screen, press the Menu key, and then go to Settings > DeviceInfo. The model, version, and ISSI of the device are displayed on the screen. -
Page 21: Status Indications
5. Status Indications 5.1 LCD Icons 5.1.1 Basic Status Icons Icon Terminal Status The number of bars indicates the power left in the battery. The battery is counterfeit. The terminal is prohibited from transmitting due to low battery. The terminal does not registered with the system in TMO. The terminal is registered with the system in TMO, and more bars indicate stronger signal strength. -
Page 22: Accessory Icons
Icon Terminal Status A broadcast call is in progress. The ongoing call is assigned with a preemptive priority. The ongoing call is assigned with a high priority. The ongoing call is assigned with a low priority. A group call is in progress. An individual call is in progress. -
Page 23: Operation Status Indicator
5.2.2 Operation Status Indicator Indicator Terminal Status Glows green The terminal is receiving. Flashes green slowly The terminal is standby in TMO. Glows red The terminal is transmitting. Flashes red rapidly The terminal is out of service in TMO. The channel is busy in DMO. -
Page 24: Call Services
6. Call Services 6.1 Group Call A group call is a call from an individual user in a group to all the other members in the group. 6.1.1 Initiating a Group Call Through the Group Selector knob Rotate the Group Selector knob to set a group as the default group. Press and hold the PTT key. -
Page 25: Initiating An Individual Call
You need to connect an audio accessory that supports the duplex feature before initiating or receiving a full- duplex individual call. 6.2.1 Initiating an Individual Call Half-duplex Individual Call On the home screen, press the Menu key, and then go to PhoneBook or Call Log > Dialed, Received, or Missed. -
Page 26: Ending An Individual Call
6.2.3 Ending an Individual Call An individual call ends when the calling or called party presses In a half-duplex call in TMO, with the Virtual Channel Reservation feature enabled, you can press the PTT key to call back within the preset time after the other party hung up. 6.3 All Call ... -
Page 27: Initiating A Broadcast Call
6.5.1 Initiating a Broadcast Call Through the menu On the home screen, press the Menu key, go to Services, and then select Broadcast Call. Press and hold the PTT key. Through the shortcut Press the Broadcast key. Press and hold the PTT key. 6.5.2 Receiving a Broadcast Call You can listen to an incoming broadcast call without any operation. -
Page 28: Message Services
7. Message Services You can use the following message services on the terminal. Items Operation To view a newly received message on the home screen, press the OK key. To view a messages from the Inbox or Outbox, do as follows: Viewing a message 1. -
Page 29: Templates
Press the Menu key, and then select Send. Select the number type and contact. Through the shortcut If the One Key Status Message feature is programmed, press the OneKeyStatusMsg key. 7.2 Templates A template is a predefined text message that can be sent to the contact 7.2.1 Sending a Template On the home screen, press the Menu key, and then go to Message >... - Page 30 Select the message. Press the Menu key, and then select Forward. Select the number type and contact.
-
Page 31: General Features
8. General Features The features supported by the terminal vary with the operation mode. For details, see the following table. Feature Display (Keypad Light, Brightness, Indicator, and Invert √ √ Display) √ √ Keypad Lock √ √ Alert Tone √ √... - Page 32 Feature √ Network Switch × √ Scan List × √ Virtual Channel Reservation × √ √ Call Priority √ Dynamic Group Number Assignment (DGNA) × √ Energy Saving Mode × √ Work Type × √ √ Power √ Group Call Detector* ×...
-
Page 33: Terminal Settings
Feature √ √ Lone Worker Features with the asterisk icon (*) are paid features. To use these feature, apply for Licenses from your dealer. 8.1 Terminal Settings 8.1.1 Basic Settings To configure frequently used features, on the home screen, press the Menu key, and then go to Settings > Radio. For details, see the following table. -
Page 34: Network Setting
In TMO, you can also switch the network through the Functions menu. You can customize your favorite functions to the terminal. 8.2 Network setting When the signal strength of the current network is weak or the terminal is out of the coverage of the current network, the terminal will be out of service. -
Page 35: Multi Audio
Audio Profile Application Customized Audio This profile is applicable to other situations. You need to configure the audio Profile parameters. To set an audio profile, do one of the following: On the home screen, press the Menu key, and then go to Settings > Profiles. ... -
Page 36: Setting The Threshold
8.4.2 Setting the Threshold The microphone threshold is classified into external and internal microphone threshold. After the VOX feature is enabled, VOX will be triggered when the external or internal microphone detects that the voice volume reaches the threshold. To set the threshold, go to VOX > Mic Threshold, select External or Internal, and then press the Left or Right key. -
Page 37: Talkgroup Type
Type Description Favorite folder It is a special folder to help terminals switch between groups in different work modes. 8.5.2 Talkgroup Type Type Description Static group It is a fixed group configured by your dealer. It is temporarily created in the system or on the LDS. After accepting the dynamic group Dynamic group participation request, you can view the group on the terminal. -
Page 38: Setting The Selected Folder
Dynamic groups, scan groups, background groups, notification groups, 2nd PTT groups, dynamic folders, and scan lists are available in TMO. 8.5.3 Setting the Selected Folder Through the menu All static folders can be set to the selected folder. On the home screen, press the Cancel/Back key, or press the Menu key and then go to Group. Press the OK key, and then go to a folder. -
Page 39: Managing A Normal Folder
On the home screen, press the Cancel/Back key, or press the Menu key and then go to Group. Press the OK key, and then select the folder and group. Press the Menu key, and then select As 2nd PTT Group. 8.5.6 Managing a Normal Folder 8.5.6.2 Creating a Folder On the home screen, press the Cancel/Back key, or press the Menu key and then go to Group. -
Page 40: Dgna
8.5.8.3 Creating a Scan List On the home screen, press the Cancel/Back key, go to Scan List, press the Menu key, and then select New ScanList. 8.5.8.4 Setting the Priority for a Group in the Scan List Go to a group in the scan list, press the Menu key, select Priority, and then select High, Medium, or Low. 8.5.8.5 Other Operations On the home screen, press the Cancel/Back key, select Scan List to select a list, and then press the Menu key. -
Page 41: Work Type
1.8 W (32.5 dBm). In DMO, the maximum transmission power can be s et to "1.8W(32.5dBm)", "1W(30dBm) ", "0.56W(27.5dBm) ", "0.3W(25dBm) ", or "0.18W(22.5dBm) ". In TMO, the maximum transmission power can be se t to "1.8W(32.5dBm)", "1W(30dBm) ", or "0.56W(27.5dBm) ". -
Page 42: Group Call Detector
Before entering the energy saving mode, the terminal needs to send a request to the BS. If the BS supports energy saving and accepts the request, the terminal can enter the mode. If receiving the energy saving level from the BS, the terminal will adjust its energy saving level to that of the 8.11 Group Call Detector In TMO, the Group Call Detector feature allows the terminal to automatically reply a specified status message sent from the LDS after joining the group call initiated by the LDS. -
Page 43: Sending Position Messages
Press the Menu key, and then select Update Time. 8.12.3 Sending Position Messages After receiving the valid GPS data, you can send a message containing the position information to a contact. Do as follows: On the home screen, press the Menu key, and then go to Accessory > Positioning > Info. Press the Menu key, and then select Send Pos Msg. -
Page 44: Enabling The Bt Feature
the built-in BT module, you can connect the terminal to a BT device. The BT feature only applies to terminals with BT. 8.13.1 Enabling the BT Feature You can enable the BT feature as follows: On the home screen, press the Menu key, go to Accessory > BT > On/Off, and then select On. ... -
Page 45: Initiating An Emergency Call
Silent mode: When initiating an emergency call, the terminal gives no visual or audio indications. 8.14.1 Initiating an Emergency Call You can initiate an emergency call to an individual contact, a group contact, the default group, or a PABX/PSTN user, which can be configured. -
Page 46: Emergency Status Message
talk right in turn. In an emergency call, after the transmitting duration of one party reaches the duration limit set for Emergency Cycle, the party automatically enters into the receiving status. In this case, the other party can press the PTT key to speak. The situation repeats until the cycle times expire. -
Page 47: Man Down
Press the preprogrammed shortcut key for Covert Mode. If configured, the terminal will automatically enter the covert mode upon power-on. 8.15.3.3 Exiting the Covert Mode Feature Press the preprogrammed shortcut key for Covert Mode. On the home screen, press the OK key + P2 key. 8.15.4 Man Down The Man Down feature allows the terminal to automatically enter the emergency mode when it is inclined by an angle greater than the preset angle, or keeps motionless or moves at a constant speed longer than the preset time. - Page 48 If the Delete Security Data Urgently feature is programmed, you can press the Menu key, the P2 key, the P1 key, the P2 key, and Menu key in order, and then press the OK key to confirm data deletion.
-
Page 49: Troubleshooting
9. Troubleshooting Phenomena Analysis Solution The battery may be improperly Remove the battery, and then reattach installed. The terminal cannot be The battery power may run out. Recharge or replace the battery. turned on. The battery may be poorly connected due to dirtied or damaged battery Clean the battery contacts. - Page 50 Phenomena Analysis Solution The predefined time period for Make sure that the call is established establishing a call may expire. within the predefined time period. The channel may be occupied by Wait until the channel becomes A half-duplex call cannot another terminal with a higher call available and try again.
-
Page 51: Product Cleaning
10. Product Cleaning To guarantee optimal performance as well as a long service life of the product, please follow these tips. 10.1 Product Care Do not pierce or scrape the product. Keep the product away from substances that can corrode the circuitry. ... -
Page 52: Optional Accessories
11. Optional Accessories Use the accessories specified by the Company only. Otherwise, we will not be liable for any loss or damage arising out of use of unauthorized accessories. Contact your local dealer for the optional accessories used with the product. - Page 53 12. Abbreviations Abbreviation Full Name Direct Mode Operation GLONASS Global Navigation Satellite System Global Positioning System GSDM Graceful Service Degradation Mode Light-Emitting Diode OLED Organic Light-Emitting Diode PABX Private Automatic Branch Exchange PSTN Public Switched Telephone Network Push-To-Talk Side Key Trunked Mode Operation...
Need help?
Do you have a question about the PT350 and is the answer not in the manual?
Questions and answers