Table of Contents
Advertisement
Quick Links
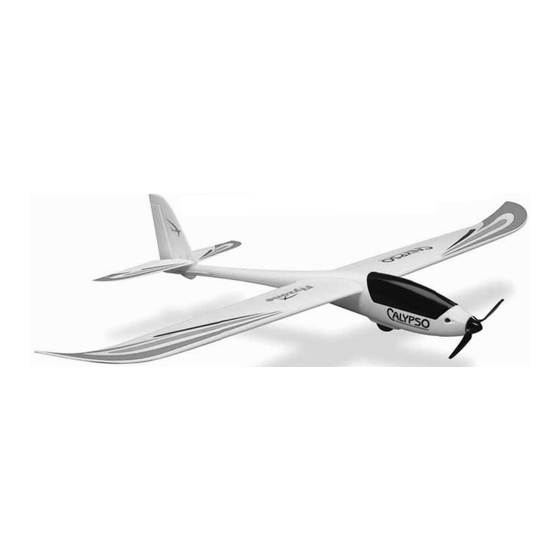
Wingspan: 73 in [1855 mm]
2
Wing Area: 526 in
Wing Loading: 7.9 − 8.5 oz/ft
WARRANTY
Hobbico guarantees this kit to be free from defects in both
material and workmanship at the date of purchase. This warranty
does not cover any component parts damaged by use or
modification. In no case shall Hobbico's liability exceed the
original cost of the purchased kit. Further, Hobbico reserves
the right to change or modify this warranty without notice.
In that Hobbico has no control over the final assembly or material
used for final assembly, no liability shall be assumed nor
accepted for any damage resulting from the use by the user of
the final user-assembled product. By the act of using the
user-assembled product, the user accepts all resulting liability.
If the buyer is not prepared to accept the liability associated
with the use of this product, the buyer is advised to return
READ THROUGH THIS MANUAL BEFORE STARTING CONSTRUCTION. IT CONTAINS IMPORTANT
INSTRUCTIONS AND WARNINGS CONCERNING THE ASSEMBLY AND USE OF THIS MODEL.
®
Entire Contents © 2012 Hobbico,
Inc. All rights reserved.
I N S T R U C T I O N M A N U A L
Weight: 29− 31 oz [820 − 880 g]
2
[33.9 dm
]
Length: 47 in [1195 mm]
2
2
[24 − 26 g /dm
]
Radio: 4 – 5-channel
™
Motor: 28 30 1300 kV outrunner,
this kit immediately in new and unused condition to the
place of purchase.
To make a warranty claim send the defective part or item to
Hobby Services at the address below:
Hobby Services
3002 N. Apollo Dr. Suite 1
Champaign IL 61822 USA
Include a letter stating your name, return shipping address, as
much contact information as possible (daytime telephone
number, fax number, e-mail address), a detailed description of
the problem and a photocopy of the purchase receipt. Upon
receipt of the package the problem will be evaluated as quickly
as possible.
Champaign, Illinois
E-mail: airsupport@hobbico.com
SPECIFICATIONS
18A ESC,
9 5 folding propeller
(217) 398-8970
FLZA3000 Mnl
Advertisement
Table of Contents

Related Manuals for Hobbico Calypso


Summary of Contents for Hobbico Calypso
- Page 1 Hobby Services 3002 N. Apollo Dr. Suite 1 In that Hobbico has no control over the final assembly or material Champaign IL 61822 USA used for final assembly, no liability shall be assumed nor...
-
Page 2: Table Of Contents
And with full fl aps and a gentle breeze you 1. Your Calypso should not be considered a toy, but rather a can land the Calypso on the ground as light as a feather. The sophisticated, working model that functions very much like fl... -
Page 3: Required For Completion
“✘” indicate that the item is required. or recommended) require a banana plugs-to-SuperTigre charge Note: If you plan to fl y your Calypso with the optional fl aps a lead (SUPM0070) and batteries that come with a Deans ®... -
Page 4: Kit Contents
If additional assistance is required for any reason contact F L Z A 6 0 0 8 Flap Linkage Set Product Support by e-mail at productsupport@hobbico.com, F L Z A 6 0 0 9 Wing Screws or by telephone at (217) 398-8970. -
Page 5: Assembly
ASSEMBLY Install the Receiver (Rx-R Only) ❏ ® 3. Mount the receiver to the Velcro strip in the fuselage. Hook Up the Elevator and Rudder Rx-R, Tx-R, and RTF ❏ 1. Cut strips from the included, adhesive-backed hook- and-loop material. Stick one to the back of your receiver and the other inside the fuselage as shown—the softer, “loop”... - Page 6 ❏ ❏ 3. Join the stab/fi n assembly to the fuselage, keying the 6. Disconnect any one of the three motor wires so the motor rudder into the hinge. will not turn inadvertently. ❏ 7. If your receiver is not already “bound” or linked to the transmitter, follow the instructions that came with your radio system to bind the two together so the receiver will receive signals from the transmitter.
- Page 7 Clevis 3rd Hole Control Horn Elevator 4th Hole Rudder ❏ 10. With the transmitter and receiver on and the trims centered, connect the clevises to the hole in the horns shown in the sketch, so the elevator and rudder will be centered by screwing the clevises in or out on the pushrods.
-
Page 8: Optional Flaps
Right Rudder Up Elevator ❏ 12. Be certain the elevator and rudder respond in the correct directions according to the stick movements on the transmitter. If necessary, use the servo reversing in the transmitter to get the controls to respond correctly. ❏... - Page 9 ❏ 3. Use CA to securely glue the fl ap horn to the fl ap. ❏ 4. Tie a small nut or other small weight to the end of a 12" [300mm] string. ❏ 5. Drop the nut on the string down through the servo wire channel, then cut off the nut and tie the string to the fl...
- Page 10 ❏ 6. Connect a 6" [150mm] servo extension wire to the fl ap servo wire. ❏ 9. Connect the fl ap servo to whichever channel in your receiver is controlled by the switch or dial on your transmitter you wish to operate the fl aps—some prefer using a switch, but most prefer a dial so the fl...
-
Page 11: Install The Wings
1. Use a felt-tip pen to mark the C.G. (center of gravity) locations on the bottom of the both wings. The marks will be used later for making sure the Calypso balances correctly, greatly affecting the way it fl ies. - Page 12 ❏ 5. Plug the wing all the way in. ❏ 2. Insert the wing tube and tighten the screw. ❏ 3. Guide the servo wires under the wing tube. ❏ 6. Join the other wing and tightly press them both together. ❏...
-
Page 13: Final Flight Preparation
Balance the Model The C.G. (center of gravity) has a great effect on the way the model fl ies. If the C.G. is not correct the Calypso could be too stable (reacting too slowly to control inputs) or too instable (reacting too quickly to control inputs) possibly causing a crash. -
Page 14: Check The Control Throws
❏ 3. Position the battery where necessary to get the Calypso to balance, or use Great Planes stick-on lead weight. Check the Control Throws Same as the C.G., the control surface throws have a great effect on how the model fl... - Page 15 Less Control Throw More Control Throw Aileron Throw Flap Throw More Less Elevator Throw Control Control Throw Throw ❏ 4. If necessary, use the programming in your transmitter or mount the pushrods in different holes in the control horns or in Rudder Throw the servo arms to increase or decrease the elevator throw as required.
-
Page 16: Calibrate The Throttle
This procedure applies only to Tx-R or Rx-R versions of NOTE: If at any time you encounter problems calibrating the Calypso, or any other time a transmitter different than the one originally calibrated to the included ESC is used. the throttle, or the ESC or motor do not function properly,... -
Page 17: Charge The Lipo Battery
NOTE: Heat from hot, sunny conditions may blister the foam perform this check with the motor off and with the motor running beads under the black paint on the canopy. If your Calypso will at various speeds. If the radio does not pass the range check be laying in the sun, cover the canopy with a towel or remove do not fl... - Page 18 You’ll probably want to launch it at full-throttle the 380 mAh to go before you could have landed, so adjust fi rst time, but once you get used to the Calypso and get it your timer to increase your fl ight time accordingly until you trimmed you could launch it at reduced power.
-
Page 19: Esc Troubleshooting Guide
See the replacement parts list at the front of the manual. Often, Motor does not Battery Voltage is Make sure the parts can be repaired and you can get your Calypso back into the air with a little ingenuity. work, Alert Tone too high or too low. - Page 20 Some replacement parts are sold as assemblies (such as the wing). If the servos in your crashed wing (or fuselage) are still functioning you can remove them, peel off any excess glue, then glue them into your new wing or fuselage—CA is suitable for gluing in servos, but something pliable such as canopy glue or Shoe Goo is recommended.
Need help?
Do you have a question about the Calypso and is the answer not in the manual?
Questions and answers