
Related Manuals for Z Corporation Z 406


Summary of Contents for Z Corporation Z 406
- Page 1 Z406 System User Manual November 2002 ® 406 3D Color Printer User Manual Z Corporation Revision D Copyright © 2002 Z Corporation Part Number 09504...
-
Page 2: Table Of Contents
PRINTING THE BUILD ..................27 POST PROCESSING THE PART................28 REMOVING THE FINISHED PART..............28 DEPOWDERING THE PART................29 DRYING THE PART .................... 30 4.3.1 STARCH AND PLASTER PARTS ................30 4.3.2 ZCAST PARTS ......................30 INFILTRATING THE PART.................. 31 Z Corporation Service (781)852-5050/(887)88-ZCORP... - Page 3 Z406 System User Manual Z Corporation 4.4.1 USING Z CORP. RECOMMENDED RESIN ...............31 ADVANCED USER FEATURES ................32 ORIENTATION FOR SPEED ................32 ORIENTATION FOR STRENGTH ...............32 ORIENTATION TO PREVENT WARPING ............32 MAINTENANCE ......................33 CHANGING THE PRINT HEADS.................33 ALIGNING THE PRINT HEADS................36 COLOR ALIGNMENT...................42...
- Page 4 Figure 2: The Z406 System Shelling and Infrastructure Features..........8 Figure 3: Illustration of Z406 System Print Orientations ............9 Figure 4: The Z406 3D Printer ....................10 Figure 5: Gantry and Printer Assembly................... 11 Figure 6: Z406 System Components ..................12 Z Corporation Service (781)852-5050/(887)88-ZCORP...
- Page 5 You agree to indemnify, defend and hold Z Corporation and its officers, directors and employees harmless from and against any and all claims, losses, damages, costs and expenses resulting from any use of the Equipment other than for the production of early-stage appearance models and prototypes.
-
Page 6: Your Z406 System
7. Maintenance. This section contains instructions for keeping your Z406 3D Printer in proper condition through regular preventative maintenance. 8. Troubleshooting. This section offers some troubleshooting tips. 9. Z406 System Details. This section contains system specifications about the Z406 3D Printer. 10. Index. Z Corporation Service (781)852-5050/(887)88-ZCORP... -
Page 7: How It Works
Z406 System User Manual Z Corporation 1.1.2 HOW IT WORKS The Z406 System is based on the Massachusetts Institute of Technology’s patented 3DP (3D Printing) technology. The software first converts a three-dimensional design built using 3D CAD (and saved in VRML or STL format) into cross-sections or slices that can be between 0.003”... -
Page 8: Figure 2: The Z406 System Shelling And Infrastructure Features
“slow” axis (the gantry direction of travel) and laminated layers along the z-axis. (See figure 3 below.) This discussion only applies to untreated parts; once parts are infiltrated, they uniformly take on the strength characteristics of the infiltrating material. Z Corporation Service (781)852-5050/(887)88-ZCORP... -
Page 9: Figure 3: Illustration Of Z406 System Print Orientations
Z406 System User Manual Z Corporation z-axis Less Strong x-axis Strong Strong y-axis Figure 3: Illustration of Z406 System Print Orientations Accuracy. The accuracy of the system depends on the materials you choose. You can employ the anisotropic scaling feature in the software to adjust for expected shrinkage and bring your parts into true scale. -
Page 10: The Parts Of The Z406 3D Printer
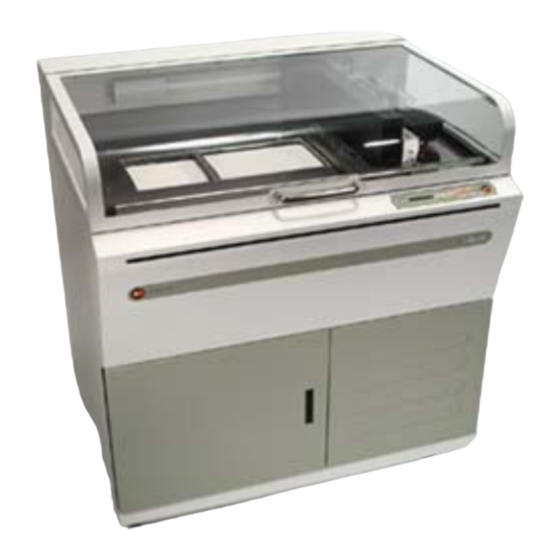
6-8 seconds to shut off Printer.) Feed Box Light Overflow Chute Print Heads Service Station Build Box Control Panel Overflow Bin WasteBottle Clear Binder Bottle Washer Fluid Primary Color Binder Figure 4: The Z406 3D Printer Z Corporation Service (781)852-5050/(887)88-ZCORP... -
Page 11: The Parts On The Printer Assembly And Gantry
Z406 System User Manual Z Corporation 1.3 THE PARTS ON THE PRINTER ASSEMBLY AND GANTRY Head Clamp Cover Spreader Roller Carriage Cover Print Heads Head Release Lever Gantry Head Clamp Latch Figure 5: Gantry and Printer Assembly www.zcorp-users.com... -
Page 12: Z406 System Components
Z Corporation Z406 System User Manual 1.4 Z406 SYSTEM COMPONENTS ZD4i Depowdering Station Z406 3D Printer ZW4 Automated Waxer Figure 6: Z406 System Components Z Corporation Service (781)852-5050/(887)88-ZCORP... -
Page 13: Step 1: Importing The File
Z406 System User Manual Z Corporation Printing a Part Overview Printing a part using the Z406 3D Printer is fast, easy, clean and fully compatible with an office environment. This manual will show tips on how to print the most challenging parts, but for most purposes, printing a part is as simple as 1-2-3. -
Page 14: Preparing The Z406 System To Print
Moving the gantry from left to communication. right allows you to spread powder over the build box. Holding down this button will result continuous spreading of powder. Z Corporation Service (781)852-5050/(887)88-ZCORP... -
Page 15: Preparing The 3D Printer
Z406 System User Manual Z Corporation 2.2 PREPARING THE 3D PRINTER If the machine is off, switch it on by pressing and releasing the Power ON/OFF Switch. The red power light and yellow error light will turn on. Then the Gantry will move slowly as it orients itself. We recommend that you leave the machine on at all times—in sleep mode the machine will exercise the print... -
Page 16: Filling The Feed Box With Powder
Be careful not to “slap” the Tamper into the Feed Box, which will produce airborne particles. About 10-15 pounds of force will give a smooth, flat, and compact surface. Failure to firmly pack Feed Box will affect part quality. Z Corporation Service (781)852-5050/(887)88-ZCORP... - Page 17 Build Box. Make sure powder is even throughout the Build Box. WARNING: Use only powder supplied by Z Corporation. Use of any other material may impact the performance and/or safety of your Z406 System and will void warranty of equipment.
-
Page 18: Cleaning The Service Station
The Service Station cleans the array of the print heads during printing. The Service Station should be cleaned after every build. This should remove any deposits of powder. Make sure Parking Caps are dry before beginning the build. Z Corporation Service (781)852-5050/(887)88-ZCORP... - Page 19 Z406 System User Manual Z Corporation To clean the Service Station: 1. Move the gantry to the left of the top deck by pressing the ‘Spread’ button. 2. Lift the Top Cover. 3. Manually lift up the metal plate covering the service station.
-
Page 20: Checking Fluid Levels
Waste should be treated in accordance with local regulations. Cleaning Solution Binder Solution Color Binder Waste Solution 3. Refill the primary color binder before every build. Pull out the color binder rack. Z Corporation Service (781)852-5050/(887)88-ZCORP... -
Page 21: Checking Powder Overflow Bin
The waste is contaminated with powder and use of this waste in the Z406 3D Printer will clog the fluid system. only binder supplied by Z Corporation. Use of any other material may impact the performance and safety of your Z406 System and will void warranty. -
Page 22: Putting The Machine Online
CHECK FLUID LEVELS! Make sure you have enough fluid to complete the build. Make sure the waste bottle is empty. Keep your Z406 3D Printer as clean as possible. The cleaner it is, the better it will function. Carefully read the MSDS for binder and wash fluid before use. Z Corporation Service (781)852-5050/(887)88-ZCORP... -
Page 23: Setting Up The Build
Z406 System User Manual Z Corporation 3 SETTING UP THE BUILD This chapter will briefly explain how to set up the build, check the 3D Print Settings, and print. For more information about the features in the ZPrint Software, please refer to the ZPrint User Manual. -
Page 24: Orienting The Part
For example, if you were to print a bottle, the bottle would best be printed standing up, with the mouth of the bottle facing the top of the Printer. Z Corporation Service (781)852-5050/(887)88-ZCORP... -
Page 25: Checking Build Settings
Z406 System User Manual Z Corporation CHECKING BUILD SETTINGS ALWAYS check build settings before printing: 1. Choose the ‘3D Print Setup’ option from the File menu (or toolbar). 2. Check that the selected printer, powder type, and powder settings for the build are correct. -
Page 26: Powder Settings
3. ZCast Material System The ZCast material system has been found to remain dimensionally accurate during printing and thus, the recommended anisotropic scaling values are one (1) in all axes. Z Corporation Service (781)852-5050/(887)88-ZCORP... -
Page 27: Printing The Build
Z406 System User Manual Z Corporation 3.3.1.2 Saturation Values The saturation values determine how much binder is placed on the powder to print the part. The part is made up of two areas, the shell and the core, as described in Section 1.1.2, How It Works. Thus, there are two saturation values, one for the shell and core. -
Page 28: Post Processing The Part
WARNING: When performing any vacuuming operation, use the vacuum provided as part of the Z406 System. Vacuuming powder can generate static electricity, and use of a non-grounded vacuum will create static charges, which may affect the operation of the Z406 System and harm the operator. Z Corporation Service (781)852-5050/(887)88-ZCORP... -
Page 29: Depowdering The Part
Z406 System User Manual Z Corporation 4.2 DEPOWDERING THE PART 1. Place parts inside depowdering unit. 2. Using the compressed air system included in the Depowdering Station, remove any excess powder that remains concave surfaces. Technical Tip - The air pressure on your Depowdering Station is adjustable. For bulky parts, turn the air pressure up. -
Page 30: Drying The Part
American Conference of Governmental Industrial Hygienists Industrial Ventilation Manual. 1. Properly dried ZCast parts will have a golden brown finish. 2. Depowder part again after drying to ensure that you have a clean mold. Raw ZCast Part Dried ZCast Part Z Corporation Service (781)852-5050/(887)88-ZCORP... -
Page 31: Infiltrating The Part
For information on other possible infiltration materials call us at Z Corporation, or visit our website at www.zcorp-users.com 4.4.1... -
Page 32: Advanced User Features
Also, be careful when drying parts with thin planar features in the drying oven. We find that thoughtful positioning and limited drying time effectively control warping in starch-based powder. Z Corporation Service (781)852-5050/(887)88-ZCORP... -
Page 33: Maintenance
Z406 System User Manual Z Corporation 6 MAINTENANCE Maintenance Action: Frequency: Change Print Heads Every 30 Billion Pixels (each print head in monochrome mode), 15 Billion Pixels (each print head in color mode), or when needed Flush Binder If not used regularly... - Page 34 5. Remove the carriage cover screw on the left side of the carriage and lift cover. Push head release lever away from you. 7. Lift the head clamp latch and unhook. Lift head clamp up. Z Corporation Service (781)852-5050/(887)88-ZCORP...
- Page 35 Z406 System User Manual Z Corporation 8. To remove the print head, lift the blue handle and pull up gently. Repeat for all four print heads. PLEASE NOTE: All print heads should be changed at the same time to ensure proper print head logging.
-
Page 36: Aligning The Print Heads
Technical Tips – • Use the Z Corporation alignment pads. They are bound on two sides so that the paper lays flatter. If the paper is not flat, you may get erroneous results. - Page 37 Z406 System User Manual Z Corporation 4. Close the Top Cover and put the Printer online. 5. Select the ‘Alignment’ option under the 406Service menu. 6. Click on ‘Print Test Pattern’ in the alignment dialog box. It will take a minute to initialize the Printer, send the pattern, and print.
- Page 38 0 is the reference, print heads 1 through 5 are aligned to print head 0. Each row is labeled at the left, F1 and S1 correspond to Fast1 and Slow1 on the dialog box and following. Z Corporation Service (781)852-5050/(887)88-ZCORP...
- Page 39 Z406 System User Manual Z Corporation See the examples below for properly and improperly aligned reticules. Normal reticule patterns: Fast axis to the left Good fast axis reticule Fast axis to the right The three short lines are interleaved with the long lines.
- Page 40 INI file. Click ‘OK’ to update the Printer’s configurations. 13. Repeat steps 2-11 on a clean sheet of alignment paper until all alignment reticles line up at 0. 14. Look at target drawings to confirm alignment of print heads. Z Corporation Service (781)852-5050/(887)88-ZCORP...
- Page 41 Z406 System User Manual Z Corporation All targets are evenly spaced. All bull's eyes are centered. 15. Purge print heads after alignment process with clear binder. This will clear print heads of black ink and fill them will clear binder. The process should take about 10 minutes.
-
Page 42: Color Alignment
2. Spread powder onto the build piston. 3. Choose ‘Color Alignment’ under the 406Service menu. 4. Choose to print the ‘Pattern’ to print two layers. 5. The pattern shown on the left will print. Z Corporation Service (781)852-5050/(887)88-ZCORP... - Page 43 Z406 System User Manual Z Corporation Look at the left and right edges of the squares. Look for the least color fringing on the sides. For each color choose the corresponding square in the dialog box. In this case, the ‘0’...
-
Page 44: Flushing The Binder
There is one located on the top rail and two located on the lower rail on the edge of the carriage. This procedure should be done before every build. Pillow Block Pillow Block on lower rail Z Corporation Service (781)852-5050/(887)88-ZCORP... -
Page 45: Oiling The Snowplows (For Non-Zcast Powder Users)
Z406 System User Manual Z Corporation 6.6 OILING THE SNOWPLOWS (FOR NON-ZCAST POWDER USERS) Two snowplows are located between the roller on the gantry. Snowplows needs to be oiled before every build. To oil snowplows, squeeze a few drops of oil into the wicks on the snowplow. -
Page 46: Oil Slow Axis Front Rail (For Zcast Powder Users)
6.8 OIL SLOW AXIS FRONT RAIL (FOR ZCAST POWDER USERS) Oil the slow axis rail before every build to prevent slow axis errors. 1. Squeeze a few drops of oil on the wicks located on the front bearing. Z Corporation Service (781)852-5050/(887)88-ZCORP... -
Page 47: Replacing The Scraper Blade (For Zcast Powder Users)
Z406 System User Manual Z Corporation 6.9 REPLACING THE SCRAPER BLADE (FOR ZCAST POWDER USERS) The plastic scraper blade will eventually become worn and will need replacement. Five replacement blades are included in the kit. To replace the blade, peel off the old blade. Take a new blade, remove the adhesive covering, place blade diagonally into the scraper until it reaches the back and then place adhesive strip onto the scraper. -
Page 48: Changing The Binder Supply
Changing the binder supply allows you to change between monochrome and color mode. To change binder supplies, choose the ‘Change Binder Supply’ option under the 406Service Menu. The software will inform you when the printer is finished changing binder supplies. Z Corporation Service (781)852-5050/(887)88-ZCORP... -
Page 49: Changing Material System
Z406 System User Manual Z Corporation 6.11 CHANGING MATERIAL SYSTEM IF USING ZCAST POWDER Before using ZCast powder, a hardware upgrade (Z406 ZCast Kit, part number 06105) is needed Scraper Blade to prevent damage to your Printer. The three Assembly... - Page 50 Bin and empty into a sealed container. 4. To prevent any material contamination, vacuum any remaining powder in the Overflow Bin. 5. Before replacing the Overflow Bin, vacuum the Overflow Bin track. Then replace the Overflow Bin. Z Corporation Service (781)852-5050/(887)88-ZCORP...
- Page 51 Z406 System User Manual Z Corporation 6. Change binder solution (color and clear binder) if necessary. zb52 Binder 7. Change Printer mode from color to monochrome or monochrome to color if needed. 8. If you changed binder solution, flush binder for two minutes by choosing the ‘Flush Binder’...
- Page 52 2.2.2, Filling the Feed Box with Powder. Change Powder Type 11. Open or import your file into the ZPrint Software using version 6.0 or higher. 12. Open up the 3D Print Setup dialog box. 13. Change Powder type in ZPrint Software. Z Corporation Service (781)852-5050/(887)88-ZCORP...
- Page 53 Z406 System User Manual Z Corporation Recommended Saturation Values 14. Override or approve shell and core saturation values and anisotropic scaling factors. Review bleed compensation values. 15. Then proceed to printing your part. www.zcorp-users.com...
-
Page 54: Troubleshooting
If the error and power light come on but nothing happens after that, shut the machine off and turn it back on again. The machine should come online. But if it does not, please call the Service Department. Z Corporation Service (781)852-5050/(887)88-ZCORP... -
Page 55: My Starch-Based Parts Are Unusually "Cakey
Z406 System User Manual Z Corporation 7.5 MY STARCH-BASED PARTS ARE UNUSUALLY “CAKEY” • Is the saturation too high? If your parts (especially bulky parts) are unusually difficult to depowder, too much moisture has moved from the part into the immediately surrounding powder. The first is that you may have the saturation levels set too high for this type of part. -
Page 56: Z406 System Details
The connection to the Windows computer running the software requires a 9 pin to 9 pin null modem cable (also known as a ‘laplink’ cable). This cable is supplied with your Z406 System; if a replacement is required, order Z Corporation part #10267. Diagnostic Connections (Video and keyboard): These connections are used while servicing your Z406 System. -
Page 57: Symbols Used
Z406 System User Manual Z Corporation 8.2 SYMBOLS USED The following symbols are used on the Z406 3D Printer: This is the international symbol for ‘standby power’. It is used on the Z406 3D Printer power switch. The Z406 3D Printer is partially powered as soon as you plug it in. -
Page 58: System Specifications
The expected lifetime of the battery is in excess of five years. Replacement will be handled by your Z Corporation customer service representative. FCC Notice: Note: this equipment has been tested and found to comply with the limits for a Class A digital device, pursuant to part 15 of the FCC rules. -
Page 59: Material Storage Precautions
Z406 System User Manual Z Corporation 8.4 MATERIAL STORAGE PRECAUTIONS Carefully read the Material Safety Data Sheets (MSDS) before using any Z Corporation materials. Material Storage Usage Powder Store powder on pallets in a cool, dry, Use of powder in... - Page 60 THREAD %d: illegal state THREAD %d: refuses to stop THREAD %d: refuses to die QUEUE: out of memory QUEUE: can't create event QUEUE: received null pointer KEYBOARD: can't add callback KEYBOARD: can't create pipe KEYBOARD: error writing pipe Z Corporation Service (781)852-5050/(887)88-ZCORP...
- Page 61 Z406 System User Manual Z Corporation KEYBOARD: error reading pipe KEYMAP: duplicate key %d KEYMAP: bad key index %d COM%d is not a valid port COM%d: queue is too small COM%d: ETS monitor is using port COM%d: port already in use...
- Page 62 LAYERS: zlib Inflate error %d LAYERS: zlib InflateEnd error %d LAYERS: missing layer info packet LAYERS: layer is too big STRIPES: spurious read event STRIPES: bad saturation STRIPES: too many lines per stripe STRIPES: line is too long Z Corporation Service (781)852-5050/(887)88-ZCORP...
- Page 63 Z406 System User Manual Z Corporation STRIPES: bad print mode %d STRIPES: bad line offset UNRLE: bad layer number UNRLE: bad print mode %d BMOCO: LM629 does not respond BMOCO: can't reset motor %d MOVER: bad axis MOVER: axis %d destination out of range...
- Page 64 SEQUENCER: bad interrupt number SEQUENCER: can't save interrupt vector SEQUENCER: can't set interrupt vector SEQUENCER: not enough data SEQUENCER: overrun while waiting for HF SEQUENCER: stalled while waiting for HF SEQUENCER: sequence didn't finish, flags = %x Z Corporation Service (781)852-5050/(887)88-ZCORP...
- Page 65 Z406 System User Manual Z Corporation SEQUENCER: error in DPC, flags = %x SEQUENCER: spurious interrupt, flags = %x SEQUENCER: timed out finishing swath, flags = PRINTER: spurious read event PRINTER: bad dispatch type %d PRINTER: unknown message %d PRINTER: message queue overrun...
- Page 66 TCP: can't launch thread TCP: thread refuses to die TCP: error %d creating socket TCP: error %d setting socket option TCP: error %d binding socket TCP: error %d listening on socket TCP: error %d accepting socket Z Corporation Service (781)852-5050/(887)88-ZCORP...
- Page 67 Z406 System User Manual Z Corporation TCP: error %d selecting socket TCP: error %d getting received byte count TCP: error %d receiving from socket TCP: error %d looking up host by name TCP: error %d connecting to host TCP: error %d sending to socket...
- Page 68 FLUIDS: unsupported pump rate CARWASH: object already exists CARWASH: object not initialized CARWASH: carwash is stuck CARWASH: can't finish squirt BINDER: weak pressure from pump %d BINDER: can't write plumbing state BINDER: invalid plumbing type %d Z Corporation Service (781)852-5050/(887)88-ZCORP...
-
Page 69: Index
Z406 System User Manual Z Corporation 9 INDEX Import, 23 Open, 23 Filling the Feed Box with Powder, 16 3D Print, 27 Flushing the Binder, 44 Aligning the Print Heads. See Alignment Gantry Alignment, 36 Clean, 45 Edit Alignment, 40... - Page 70 Saturation Values, 27 Troubleshooting, 54 Plaster, 27 Starch, 27 ZCast Powder, 27 Vacuum off the Filter, 22 Scraper Blade Replacement, 47 Shelling, 8 Speed, 32 Strength, 32 Warping, 32, 54 Striping of Binder Solution, 54 System Specifications, 58 Z Corporation Service (781)852-5050/(887)88-ZCORP...
Need help?
Do you have a question about the Z 406 and is the answer not in the manual?
Questions and answers