
Related Manuals for GLP YPOC 250


Summary of Contents for GLP YPOC 250
- Page 1 Instruction Manual from software version 1.5 (instruction version 1.6) e-mail: service@glp.de Internet: http://www.GLP.de...
- Page 2 This side is intentionally unlabelled. German Light Production (V1.6)
-
Page 3: Table Of Contents
Table of contents Description of Device ..................... 5 1.1 Safety Instructions.................... 6 Preparation and Installation .................. 7 2.1 Mounting ......................7 2.1.1 Clamps....................7 2.1.2 Mounting plate ..................7 2.2 Secure the 0 ..................8 2.3 Connections ..................... 9 2.3.1 Power supply ..................9 2.3.2 DMX....................... - Page 4 DMX Channel Selection (DMX Protocol) ............. 18 Change the Lamp....................21 5.1 Safety Regulations ..................21 Realize the Lamp Change ................21 5.3 Lamp adjustment.................... 22 Change a Gobo ..................... 23 6.1 Safety Regulations ..................23 6.2 Realize the Gobo Change ................23 Maintenance and Cleaning the 0 ............
-
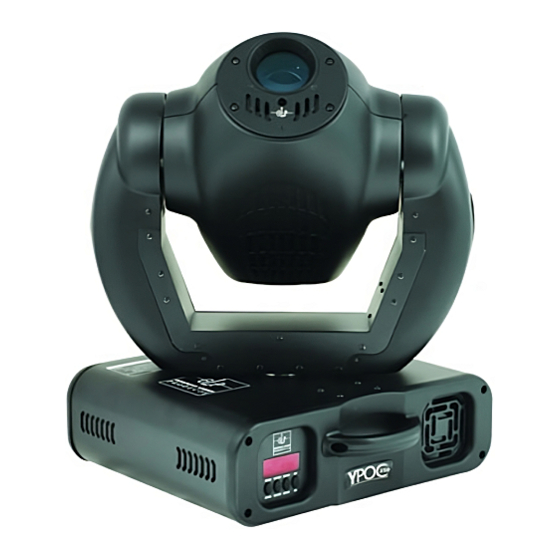
Page 5: Description Of Device
Description of Device 1. Moving Head 2. Arm 3. Base 4. Carrying handles 5. Up- button 6. Down- button 7. Enter- button 8. Mode- button DMX IN DMX OUT POWER 210V ~ FU S E: 230V ~ T3.15A @250V 250V ~ LAMP: 50Hz MSD 250W... -
Page 6: Safety Instructions
1.1 Safety Instructions 0 is a High-Tech Product. To guarantee a smooth operation, it is necessary to keep following rules. The manufacturer of this device will not take responsibility of damages through disregard of the information in this manual. Warranty adjustments will be canceled. 1. -
Page 7: Preparation And Installation
Preparation and Installation 2.1 Mounting 0 is fully operational whether it hangs or is mounted to the wall. It can also be operated while standing on the floor. Keep a safety distance of 0.5 m towards any easy inflammable materials (decoration etc.). Install a safety wire that can hold at least 10 times the weight of the fixture. -
Page 8: Secure The Y P O C
2.2 Secure the Regardless of the rigging of the 0 you have to use a stipulated safety wire. Therefore you have to thread to safety wire through to two provided holes on the backside of the fixture and connect it with the truss-support. Pay attention to a safe and proper fastening. -
Page 9: Connections
2.3 Connections 2.3.1 Power supply 230 Volt, 50 Hz, Connected load 500W <=> 2,2 A (blind current compensation). or 115V, 60 Hz Connected load 500W <=> 4,4 A (blind current compensation). Please see printing on the case for the right Power supply ! 2.3.2 DMX DMX 512 Standard input/output. -
Page 10: The Menu Field
Running time of the lamp (erasable) Running time of the lamp (no destructible) RPAN Reverse Pan-direction RTLT Reverse Tilt-direction MODE GDMX DMX Mode, Standard GLP MDMX DMX Mode 'M' HDMX DMX Mode 'H' SPEC MANU Manual drive of all device functions... -
Page 11: Adjust The Dmx- Address
(D001) 3.1 Adjust the DMX- Address Right after turning on the 0 you can see the current DMX- Address. If there is no DMX- Signal the display flashes. D001 For the address setting please follow this procedure: RESE 1. Switch On the 0 and wait until the fixture reset has finished (' ' is flashing in the display). -
Page 12: Lamp On/Off (Lamp)
If you want to run the systems simultaneously, one of the s must be switched as the master. All others must be "Slave" Master = OFF. Notice: The Audio function is only working if no DMX is connected. This function can work e.g. on small events or as an emergency program. -
Page 13: Invert Tilt Movement (Rtlt)
DMX channels. Use this function for example to adapt the 0 to an older setup of other fixtures or if you use a fader GDMX DMX desk. The standard mode is the GLP mode (GDMX) (MDMX) (HDMX) -
Page 14: Manual Drive (Manu)
(MANU) 3.10.1 Manual Drive MANU This function allows you to drive all the fixture functions manually. Select the desired function with the Up/Down-keys and confirm with Enter. Now choose the desired value with the Up/Down-keys and confirm again with Enter or cancel and return to the menu with the Mode-key. Function Value Remark... -
Page 15: Dmx Input (Dmxi)
If you have chosen you have the possibility to switch off the lamp either direct at the 0 in the Lamp menu or switch off the main switch. (DMXI) 3.10.4 DMX Input DMXI Readout DMX values of each channel received by the fixture. Use the Up/Down-keys to select desired channel and press Enter to read its value. -
Page 16: Fan Control
80°C are not critical. 80°C and more lead the lamp being switched off at a critical point. Please note for a save operation that the outside temperature should not exceed 45°C. (FANS) 3.10.7 Fan Control FANS By using this function you can choose between 4 types of fan speed operations. -
Page 17: Default Settings (Dfse)
(DFSE) 3.10.9 Default Settings DFSE Press Enter to reset all fixture personalities (not the adjusted functions) to the default values. On the display will appear to indicate that the de- faults are set. Function Display Default Settings D001 D001 DMX Address RPAN Pan reverse RTLT... -
Page 18: Dmx Channel Selection (Dmx Protocol)
igniter or ballast. Switch off the power supply and solve the possible problem. OTMP This error message informs you that the fixture was overheating and that the relay switches off the lamp. Pleas look for possible reasons (fan faulty, air in/outlets blocked or very dirty, lamp broken or very old, too high ambient temperature. - Page 19 Channel Function Time and Value color max. 70 BPM open / color 1 (slow) 66..67 42..43 26,1 => 0,86 s color 1, Brilliant Blue (slow) 68..69 44..45 26,9 color 1 / color 2 (slow) 70..71 46..47 27,6 color 2, Blue (slow) 72..73 48..49 28,4...
- Page 20 Channel Function Time and Value Gobo rotation, fast-slow, CCW max. 3,8 turns/sec. 192..253 C0..FD 76..100 Audio gobo rotation, slow each 4 sound impulse new position Audio gobo rotation, fast each sound impulse new position Prism swing out 0..5 00..02 0..2 8) Prism Prism position 0 ...
-
Page 21: Change The Lamp
Channel Function Time and Value 0° 24..25 18..19 90° 26..27 1A..1B 10,4 180° 28..29 1C..1D 11,2 270° 30..31 1E..1F TILT size / phase see also PAN 32..63 20..3F 13..25 PAN / TILT size / phase see also PAN 64..95 40..5F 26..37 PAN / TILT (inverse) size / phase see also PAN... -
Page 22: Lamp Adjustment
Two on the front side and 2 on the back side of the head. 3. Open the 3 screws at the lamp sheet and remove it. 4. Remove the old or broken lamp out of the socket. Attention: The glass bulb of the lamp can splinter. -
Page 23: Change A Gobo
LAMP 1. Strike the lamp (for example in the menu) and wait a while until full intensity of the lamp. 2. Direct the beam straight on a flat and bright surface/wall (beam open, white, no gobo, no effects). Remark: As the optimum distance of the lamp from lens was adjusted during the installation or changing the lamp (by turning the screw A), it is necessary to adjust only the second position by turning the screw B, in order to center the so-called 'Hot-Spot' (the brightest part of the beam). -
Page 24: Maintenance And Cleaningleaning The Y P O Cleaning
3. Remove the gobo springs with a small screwdriver. 4. Change the gobo and fix it with the gobo spring. Pay attention on a safe fit. 5. Close the 0 in reverse order. Attention: If you use glass gobos, the non-vaporized side must be fitted towards the lamp direction. -
Page 25: Circumference And Interval (Rule-Of-Thumb)
7.2 Circumference and Interval (rule-of-thumb) The contamination of the fixture depends on the environment details. Therefore no general guidelines can be given. From this it follows that the intervals are only suggestions from our practice experience. Position Interval In this way Outside optic weekly soft cloth and glass cleaning fluid... -
Page 26: Technical Specification
Technical Specification Power supply Power consumption 500 Watt (blind current compensated) EU-model AC 230V / 50 Hz~ Fuse protection T3,15A, 250V, 5x20 mm (fine-wire fuse) US-model AC 115V / 60 Hz~ Fuse protection T6,3A, 115V, 5x20 mm (fine-wire fuse) Lamp MSD 230V/250W, socket GY-9,5 Type 1 MSD 230V/200W, socket GY-9,5... - Page 27 Brilliant Blue Blue Blue Jade Purple Turquoise Magenta Italian Pink Blue Orange Canary German Light Production (V1.6)
-
Page 28: Index
Index Adjustments............16 Injury of the retina ..........6 Invert ..............12 aspheric lens ............25 Audio ..............11 Lamp adjustment ..........22 BGV C1 ..............7 Maintenance ........... 24 Measures ............26 Calibrations ............16 Menu Field ............10 Change a Gobo..........23 Mounting ............7 Circumference..........24 Clamps ...............7 Mounting plate .......... - Page 29 German Light Production (V1.6)
Need help?
Do you have a question about the YPOC 250 and is the answer not in the manual?
Questions and answers