Table of Contents
Advertisement
Quick Links
ipRocketLink™ Model 3101 Series
ADSL2+ WiFi Four-Port Router
Getting Started Guide
Important
This is a Class B device and is intended for use in a light industrial (commercial) or residential environment. It is not intended for use in
a heavy industrial environment.
Sales Office:
+1 (301) 975-1000
Technical Support:
+1 (301) 975-1007
E-mail:
support@patton.com
WWW:
www.patton.com
Part Number: 07M3101-GS, Rev. C
Revised: September 21, 2011
Advertisement
Table of Contents

Related Manuals for Patton ipRocketLink 3101 Series


Summary of Contents for Patton ipRocketLink 3101 Series
- Page 1 This is a Class B device and is intended for use in a light industrial (commercial) or residential environment. It is not intended for use in a heavy industrial environment. Sales Office: +1 (301) 975-1000 Technical Support: +1 (301) 975-1007 E-mail: support@patton.com WWW: www.patton.com Part Number: 07M3101-GS, Rev. C Revised: September 21, 2011...
- Page 2 Under no condition shall Patton Electronics be liable for any damages incurred by the use of this product. These damages include, but are not limited to, the following: lost profits, lost savings and incidental or consequential damages arising from the use of or inability to use this product.
-
Page 3: Summary Table Of Contents
Information............................17 Applications Overview........................... 23 Installation and Initial Configuration ......................25 Device Access and Information ........................31 Advanced Configuration ..........................37 Wireless Configuration ..........................90 System Management............................ 105 Contacting Patton for assistance ......................... 112 Compliance ..............................115 Specifications .............................. 117... -
Page 4: Table Of Contents
Table of Contents Summary Table of Contents ........................... 3 Table of Contents ............................4 List of Figures ..............................9 List of Tables ..............................12 About this guide ............................13 Audience................................13 Structure................................13 Precautions ................................14 Safety when working with electricity .......................15 General observations ............................16... - Page 5 Model 3101 Series Getting Started Guide Table of Contents Logging In................................32 Viewing Device Information ..........................33 Summary ................................33 WAN Interface ...............................33 Statistics ................................33 ................................33 ................................34 .................................34 xDSL ................................35 xDSL BER Test ..........................35 Route ................................36 ................................36 DHCP ................................36 Advanced Configuration ..........................37 Overview ................................39 Layer2 Interface Setup...
- Page 6 Model 3101 Series Getting Started Guide Table of Contents Parental Control Setup ............................71 Time Restriction .............................71 URL Filter ..............................72 Quality of Service (QoS) Setup..........................73 Queue Management ............................73 Queue Configuration ............................74 QoS Classification ............................75 Routing Setup ...............................76 Default Gateway .............................77 Static Route ..............................77 Policy Routing ..............................78...
- Page 7 Contacting Patton for assistance ......................... 112 Introduction ................................113 Contact information............................113 Patton support headquarters in the USA .......................113 Alternate Patton support for Europe, Middle East, and Africa (EMEA) ............113 Warranty Service and Returned Merchandise Authorizations (RMAs)..............113 Warranty coverage ............................113 Out-of-warranty service ...........................114 Returns for credit ............................114...
- Page 8 Model 3101 Series Getting Started Guide Table of Contents Configuration and Management..........................119 AC Adapter .................................119 Environment ...............................119 Physical Dimensions............................119 USB Drivers ................................119...
-
Page 9: List Of Figures
List of Figures Model 3101 Series front panels ............. 19 Model 3101 rear panel . - Page 10 Model 3101 Getting Started Guide List of Figures WMI: DNS Server Configuration ............54 WMI: IPoA Connection Summary .
- Page 11 Model 3101 Getting Started Guide List of Figures WMI: Storage Device Info ..............80 100 WMI: Storage User Accounts .
-
Page 12: List Of Tables
List of Tables General conventions ..............16 LED Descriptions . -
Page 13: About This Guide
105 describes how to run diagnostic tests and manage system settings • Chapter 8 on page 112 contains information on contacting Patton technical support for assistance • Appendix A on page 115 contains compliance information for the router •... -
Page 14: Precautions
Model 3101 Series Getting Started Guide About this guide Precautions Notes, cautions, and warnings, which have the following meanings, are used throughout this guide to help you become aware of potential problems. Warnings are intended to prevent safety hazards that could result in per- sonal injury. -
Page 15: Safety When Working With Electricity
Model 3101 Series Getting Started Guide About this guide Safety when working with electricity Do not open the device when the power cord is connected. For systems • without a power switch and without an external power adapter, line volt- ages are present within the device when the power cord is connected. -
Page 16: General Observations
Model 3101 Series Getting Started Guide About this guide Electrostatic Discharge (ESD) can damage equipment and impair electrical cir- cuitry. It occurs when electronic printed circuit cards are improperly handled and can result in complete or intermittent failures. Do the following to prevent CAUTION ESD: •... -
Page 17: General Information
Chapter 1 General Information Chapter contents Model 3101 Series Overview ..........................18 Features ................................18 Models ................................18 Front Panel................................19 LEDs ................................19 Rear Panel ................................21 Ports ................................22... -
Page 18: Model 3101 Series Overview
1 • General Information Model 3101 Series Overview Patton’s Model 3101 Series ipRocketLink™ ADSL2/2+ bridge/routers are the perfect choice for users or ser- vice providers who need triple-play ready ADSL CPE with advanced routing functionality. Based on Interna- tional Telecommunications Union (ITU) and American National Standard Institute (ANSI) standards G.992.1, G.992.2, G.992.3, G.992.5 and ANSI T1.413 Issue 2, the Patton ipRocketLink bridge/routers... -
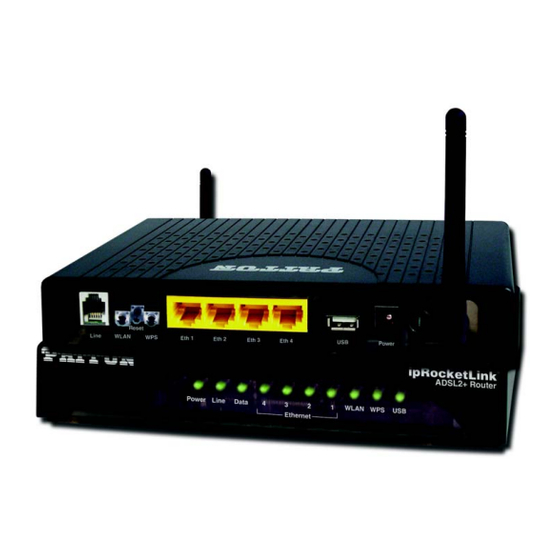
Page 19: Front Panel
Model 3101 Series Getting Started Guide 1 • General Information Front Panel Model 3101/4IWU ipRocketLink ADSL2+ Router WLAN WPS Power Line Data Model 3101/4I ipRocketLink ADSL2+ Router Power Data Line Model 3101/1I ipRocketLink ADSL2+ Router Power Line Data Ethernet Figure 1. Model 3101 Series front panels LEDs Table 2. - Page 20 Model 3101 Series Getting Started Guide 1 • General Information Table 2. LED Descriptions Color Status Description WLAN Green WLAN is enabled. (/4IWU model only) Blink Data is being transmitted through the WiFi. WLAN is disabled. Green Connection succeeds under WiFi Protected Setup. (/4IWU model only) Blink Negotiation is in progress under WiFi Protected...
-
Page 21: Rear Panel
Model 3101 Series Getting Started Guide 1 • General Information Rear Panel Model 3101/4IWU Reset Line WLAN Power Eth 1 Eth 2 Eth 3 Eth 4 Model 3101/4I Line Reset Power Eth 1 Eth 2 Eth 3 Eth 4 Model 3101/1I Power Reset Line... -
Page 22: Ports
Model 3101 Series Getting Started Guide 1 • General Information Ports Table 3. Port Descriptions Port Description Interface for connecting antennas Line RJ-11 port for connecting to ADSL telephone line WLAN WLAN switch for enabling/disabling the WLAN function Reset You may need to reset the Model 3101 if you lose network connectivity or if you can no longer communicate with the Model 3101 via the web interface. -
Page 23: Applications Overview
Chapter 2 Applications Overview Chapter contents Typical applications...............................24... -
Page 24: Typical Applications
Model 3101 Series Getting Started Guide 2 • Applications Overview Typical applications You may use the Model 3101 for the following applications: • Home gateway • SOHO applications • Small enterprise applications • Higher data rate broadband sharing • Audio and video streaming and transfer •... -
Page 25: Installation And Initial Configuration
Chapter 3 Installation and Initial Configuration Chapter contents Installation Overview.............................26 Planning the Installation............................26 Location requirements ............................26 Wireless operation .............................26 Installing the Model 3101 .............................27 Resetting the Model 3101 .............................28 Configuration Overview ............................28 Setting Up the 3101 for Configuration........................29 WAN and LAN Connections ..........................29 ................................29 ................................29... -
Page 26: Installation Overview
Model 3101 Series Getting Started Guide 3 • Installation and Initial Configuration Installation Overview The Model 3101 maintains several separate interfaces– Ethernet LAN, ADSL (WAN), and a wireless LAN interface. Planning the Installation Location requirements Place the 3101 in a location where it can be connected to the various devices as well as to a power source. The 3101 should not be located where it will be exposed to moisture or excessive heat. -
Page 27: Installing The Model 3101
Model 3101 Series Getting Started Guide 3 • Installation and Initial Configuration Installing the Model 3101 Do not work on the system or connect or disconnect cables during periods of lightning activity. WARNING Do not place any objects on top of or near the vent holes on the Model 3101 case. -
Page 28: Resetting The Model 3101
Model 3101 Series Getting Started Guide 3 • Installation and Initial Configuration Resetting the Model 3101 You may press the Reset button while the unit is on to reset to the original factory settings. Use a ballpoint pen or paper clip to gently push the reset button. Remember that this will delete any settings stored in flash mem- ory including user account information and LAN IP settings. -
Page 29: Setting Up The 3101 For Configuration
Model 3101 Series Getting Started Guide 3 • Installation and Initial Configuration Setting Up the 3101 for Configuration Connecting your computer or home network to the 3101 is a simple procedure, varying slightly depending on your operating system. This chapter will help you to seamlessly integrate 3101 with your computer or home network. -
Page 30: Pc Network Configuration
Model 3101 Series Getting Started Guide 3 • Installation and Initial Configuration PC Network Configuration Each network interface on the PC should either be configured with a statically defined IP address and DNS address, or should be instructed to automatically obtain an IP address using the Network DHCP server. 3101 provides a DHCP server on its LAN and it is recommended to configure your LAN to obtain its IP and DNS server IP automatically. -
Page 31: Device Access And Information
Chapter 4 Device Access and Information Chapter contents Overview ................................32 Logging In................................32 Viewing Device Information ..........................33 Summary ................................33 WAN Interface ...............................33 Statistics ................................33 ................................33 ................................34 .................................34 xDSL ................................35 xDSL BER Test........................... 35 Route ................................36 ................................36 DHCP ................................36... -
Page 32: Overview
Model 3101 Series Getting Started Guide 4 • Device Access and Information Overview This chapter describes how to access the Model 3101 Series Web Management Interface (WMI), which allows you to configure and control all of the 3101 features and system parameters, using a user-friendly graphical interface. -
Page 33: Viewing Device Information
Model 3101 Series Getting Started Guide 4 • Device Access and Information Viewing Device Information The Device Info section of the WMI provides an overview of the unit’s interface statistics, con- nection status, and routes. Summary Click Device Info > Summary (Figure 7 on page 32) to view the unit’s software versions and DSL status: Board ID, Software Version, and the information of your WAN connection such as the... -
Page 34: Wan
Model 3101 Series Getting Started Guide 4 • Device Access and Information In the Device Info > Statistics menu, click WAN (Figure 10) to view the WAN interface statistics. You can query information on packets recevied on the WAN interfaces. Click Reset Statistics to return the values to zero. -
Page 35: Xdsl
Model 3101 Series Getting Started Guide 4 • Device Access and Information xDSL In the Device Info > Statistics menu, click xDSL (Figure 12) to view the DSL interface statistics. Figure 12. WMI: xDSL Statistics xDSL BER Test. Click xDSL BER Test on the xDSL Statistics page to run a Bit Error Rate (BER) Test on the DSL line. -
Page 36: Route
Model 3101 Series Getting Started Guide 4 • Device Access and Information Route Click Device Info > Route (Figure 14) to view route table information. Figure 14. WMI: Route Info Click Device Info > ARP (Figure 15) to view MAC and IP information of equipment attached to the 3101. Figure 15. -
Page 37: Advanced Configuration
Chapter 5 Advanced Configuration Chapter contents Overview ................................39 Layer2 Interface Setup ............................39 WAN Service Setup...............................40 PPP over Ethernet (PPPoE) ..........................41 MAC Encapsulation Routing (MER) (IPoE) ....................45 PPP over ATM (PPPoA) ..........................48 IP over ATM (IPoA) ............................52 Bridging ................................55 3G WAN Service Setup............................56 LAN Setup ................................59... - Page 38 Model 3101 Series Getting Started Guide 5 • Advanced Configuration Policy Routing ..............................78 Setup................................78 Universal Plug & Play (UPnP) Setup ........................79 Domain Name System (DNS) Proxy Setup......................79 Print Server Setup..............................79 Packet Acceleration Setup............................80 Storage Service Setup.............................80 Storage Device Info ............................80 User Accounts ..............................80 Interface Grouping Setup...
-
Page 39: Overview
Model 3101 Series Getting Started Guide 5 • Advanced Configuration Overview The Advanced Setup section of the WMI allows you to configure features (see figure 17) for the 3101. Figure 17. Advanced Setup Menu Layer2 Interface Setup Click Advanced Setup > Layer2 Interface > ATM Interface (Figure 21) to configure, modify, and remove DSL ATM interfaces. -
Page 40: Wan Service Setup
Model 3101 Series Getting Started Guide 5 • Advanced Configuration On the ATM PVC Configuration page, you can set the VPI and VCI values, elect the DSL latency, link type (EoA is for PPPoE, IPoE, and Bridge.), connection mode, encapsulation mode, service category, and IP QoS scheduler algorithm. -
Page 41: Ppp Over Ethernet (Pppoe)
Model 3101 Series Getting Started Guide 5 • Advanced Configuration • “PPP over Ethernet (PPPoE)” on page 41 • “MAC Encapsulation Routing (MER) (IPoE)” on page 45 • “PPP over Ethernet (PPPoE)” on page 41 • “IP over ATM (IPoA)” on page 52 •... -
Page 42: Wmi: Ppp Information
Model 3101 Series Getting Started Guide 5 • Advanced Configuration 3. On the PPP Username and Password page, provide information for the PPP username, password, service name, and authentication method. Figure 24. WMI: PPP Information – PPP Username: The valid username provided by your ISP. –... -
Page 43: Wmi: Routing - Default Gateway
Model 3101 Series Getting Started Guide 5 • Advanced Configuration – Use Static IPv6 Address: If enabled, the 3101 uses this IP as the WAN IP address. If disabled, the 3101 obtains an IP address assigned through uplink equipment. – Enable IPv6 Unnumbered Model: Enable or disable this function. –... -
Page 44: Wmi: Pppoe Connection Summary
Model 3101 Series Getting Started Guide 5 • Advanced Configuration 5. On the DNS Configuration page (Figure 26) you may obtain the DNS server addresses from the selected WAN interface or manually enter the static DNS server addresses. If only a PVC with IPoA or static MER protocol is configured, you must manually enter the static DNS server addresses. -
Page 45: Mac Encapsulation Routing (Mer) (Ipoe)
Model 3101 Series Getting Started Guide 5 • Advanced Configuration MAC Encapsulation Routing (MER) (IPoE) To create a new MER WAN service: 1. Click Add from the main WAN service page to configure a new connection. (Before you can add a new PPPoE service, make sure that you have created a proper ATM PVC configuration. -
Page 46: Wmi: Wan Ip Settings
Model 3101 Series Getting Started Guide 5 • Advanced Configuration Figure 30. WMI: WAN IP Settings 4. On the Network Address Translation Settings page (Figure 31), you may modify NAT Settings and select to enable IGMP Multicast. – Enable NAT: Select to enable the NAT functions of the 3101. If you do not enable NAT, you must add a route on the uplink equipment;... - Page 47 Model 3101 Series Getting Started Guide 5 • Advanced Configuration 5. On the Routing-Default Gateway page (Figure 25), select a preferred WAN interface as the system default gateway. Click Next to continue. Figure 32. WMI: Routing - Default Gateway 6. On the DNS Configuration page (Figure 26) you may obtain the DNS server addresses from the selected WAN interface or manually enter the static DNS server addresses.
-
Page 48: Ppp Over Atm (Pppoa)
Model 3101 Series Getting Started Guide 5 • Advanced Configuration 7. The final connection configuration page (Figure 34) shows an summary of the IPoE settings. Click Save to keep your settings. You will need to reboot the unit to activate this WAN service. Figure 34. -
Page 49: Wmi: Pppoa Service Description
Model 3101 Series Getting Started Guide 5 • Advanced Configuration 3. Click Add from the main WAN service page to configure a new connection. The following page displays. Click Next to continue. Figure 36. WMI: Select Layer2 Interface 4. On the Service Configuration page (Figure 23), modify the service description. - Page 50 Model 3101 Series Getting Started Guide 5 • Advanced Configuration – PPP Username: The valid username provided by your ISP. – PPP Password: The valid password provided by your ISP. – Authentication Method: Select from AUTO, PAP, CHAP, MSCHAP. (Default = AUTO) –...
-
Page 51: Wmi: Pppoa Connection Summary
Model 3101 Series Getting Started Guide 5 • Advanced Configuration 7. On the DNS Configuration page (Figure 26) you may obtain the DNS server addresses from the selected WAN interface or manually enter the static DNS server addresses. If only a PVC with IPoA or static MER protocol is configured, you must manually enter the static DNS server addresses. -
Page 52: Ip Over Atm (Ipoa)
Model 3101 Series Getting Started Guide 5 • Advanced Configuration IP over ATM (IPoA) To create a new IPoA connection: 1. Click Advanced Setup > Layer2 Interface > ATM Interface to configure, modify, and remove DSL ATM interfaces. In the main DSL ATM interface list, you can click Add to configure a new ATM PVC identi- fier for PPPoA mode. -
Page 53: Wmi: Ipoa Service Description
Model 3101 Series Getting Started Guide 5 • Advanced Configuration 4. On the Service Configuration page (Figure 44), modify the service description. Click Next to continue. Figure 44. WMI: IPoA Service Description 5. On the WAN IP Settings page, enter the WAN IP address and the WAN subnet mask provided by your ISP. - Page 54 Model 3101 Series Getting Started Guide 5 • Advanced Configuration 7. On the Routing-Default Gateway page (Figure 47), select a preferred WAN interface as the system default gateway. Click Next to continue. Figure 47. WMI: Routing - Default Gateway 8. On the DNS Configuration page (Figure 48) you should use a static DNS IP address for IPoA mode.
-
Page 55: Bridging
Model 3101 Series Getting Started Guide 5 • Advanced Configuration 9. The final connection configuration page (Figure 49) shows an summary of the IPoA connection. Click Save to keep your settings. You will need to reboot the unit to activate this WAN service. Figure 49. -
Page 56: 3G Wan Service Setup
Model 3101 Series Getting Started Guide 5 • Advanced Configuration 2. On the Connection Type page (Figure 51), select the radio button for Bridging and select LLC/SNAP- ROUTING as the Encapsulation Mode. Click Next to continue. Figure 51. WMI: Bridging Connection Type 3. -
Page 57: Wmi: 3G Pin Configuration
Model 3101 Series Getting Started Guide 5 • Advanced Configuration • Information: Click this button to display the information of the 3G network card. • Upload Driver: For an unsupported USB dongle, click this button to upload the new driver for supporting the USB. -
Page 58: Wmi: Adding A 3G Wan Service
Model 3101 Series Getting Started Guide 5 • Advanced Configuration In the 3G WAN Service page, you may configure the settings of the 3G USB modem. • Enable USB Modem: f you want to access the Internet through the 3G network card, you must enable the USB modem. -
Page 59: Lan Setup
Model 3101 Series Getting Started Guide 5 • Advanced Configuration connection takes priority over the 3G connection. When the DSL WAN connection starts to perform dial-up, the 3G connection will be disconnected. If the DSL WAN connection has established, you may manually perform 3G dial-up, and then the DSL WAN connec- tion will be disconnected. -
Page 60: Enabling Igmp Snooping
Model 3101 Series Getting Started Guide 5 • Advanced Configuration Note New settings can only be made after the 3101 has been rebooted. If necessary, reconfigure the IP address on your PC (including one that is statically assigned) so that it matches the new configuration. Enabling IGMP Snooping IGMP snooping enables the router to forward multicast traffic intelligently, instead of flooding all ports in the VLAN. -
Page 61: Editing The Dhcp Option
Model 3101 Series Getting Started Guide 5 • Advanced Configuration Editing the DHCP Option Click the Edit DHCP Option button in the Local Area Network (LAN) Setup page to display the DHCP Option Setup page. On this page, you can add, edit or delete the DHCP options, and these options will be sent to the DHCP client. -
Page 62: Configuring The Second Ip Address And Subnet Mask For A Lan Interface
Model 3101 Series Getting Started Guide 5 • Advanced Configuration Configuring the second IP address and subnet mask for a LAN interface On the Local Area Network (LAN) Setup page, you are allowed to set the second IP address and the subnet mask for a LAN interface. -
Page 63: Network Address Translation (Nat) Setup
Model 3101 Series Getting Started Guide 5 • Advanced Configuration lyzing received MLD messages, a Layer 2 device running MLD Snooping establishes mappings between ports and multicast MAC addresses and forwards IPv6 multicast data based on these mappings. Click the Save/Apply button to apply the settings. Network Address Translation (NAT) Setup Virtual Servers The firewall can prevent unexpected traffic on the Internet from your host on the LAN. -
Page 64: Port Triggering
Model 3101 Series Getting Started Guide 5 • Advanced Configuration • Use interface: Select an interface that you want to configure. • Select a Service: Select a proper service in the drop-down list. • Custom Server: Enter a new service name to establish a user service type. •... -
Page 65: Wmi: Adding A Port Triggering Entry
Model 3101 Series Getting Started Guide 5 • Advanced Configuration Click the Add button to display the Port Triggering Configuration page. Figure 69. WMI: Adding a Port Triggering Entry • Use interface: Select an interface that you want to configure. •... -
Page 66: Dmz Host
Model 3101 Series Getting Started Guide 5 • Advanced Configuration DMZ Host DMZ allows all the ports of a PC on your LAN to be exposed to the Internet. Set the IP address of the PC to be DMZ host, so that the DMZ host will not be blocked by firewall. Click Advanced Setup >... -
Page 67: Security Setup
Model 3101 Series Getting Started Guide 5 • Advanced Configuration Security Setup Click Advanced Setup > Security to manage IP filtering and MAC filtering for the 3101. By default, the fire- wall is enabled. The firewall is used to block the file transmission between the Internet and your PC. It serves as a safety guard and permits only the authorized files to be sent to the LAN. -
Page 68: Incoming
Model 3101 Series Getting Started Guide 5 • Advanced Configuration • Source IP Address: Enter an IP address that the outgoing packet (protocol-selected packet) will block. • Source Port: UPD/TCP source port or a range of ports. • Destination IP Address: The destination IP address of the exterior network. •... -
Page 69: Mac Filtering
Model 3101 Series Getting Started Guide 5 • Advanced Configuration • Filter Name: Enter the name of incoming filter rule. • IP Version: Select the proper IP version from the drop-down list. • Protocol: Select one: TCP/UDP, TCP, UDP, or ICMP. •... -
Page 70: Wmi: Mac Filtering
Model 3101 Series Getting Started Guide 5 • Advanced Configuration FORWARDED means that all MAC layer frames will be forwarded except for packets that match any of the specified rules in the following table. BLOCKED means that all MAC layer frames will be blocked except for packets that match any of the specified rules in the following table. -
Page 71: Parental Control Setup
Model 3101 Series Getting Started Guide 5 • Advanced Configuration Click Add to create a new MAC filter rule. The Add MAC Filter page displays (Figure 80). Figure 80. WMI: Adding a MAC Filter To create a new MAC filter, provide information for the following parameters: •... -
Page 72: Url Filter
Model 3101 Series Getting Started Guide 5 • Advanced Configuration Figure 82. WMI: Adding an Access Time Restriction Policy • User Name: The name of the user you want to prevent from accessing the unit. • Browser’s MAC Address: The MAC address of the LAN device where the browser is currently running (default setting). -
Page 73: Quality Of Service (Qos) Setup
Model 3101 Series Getting Started Guide 5 • Advanced Configuration Figure 84. WMI: URL Filter Setup On the Add URL Filter page, enter the URL address and the corresponding port number. For example, enter the URL address http://www.google.com and the port number, then click the Apply/Save button. The following page displays: Figure 85. -
Page 74: Queue Configuration
Model 3101 Series Getting Started Guide 5 • Advanced Configuration Figure 86. WMI: Enable QoS Queue Configuration Click Queue Config (Figure 87) in the Quality of Service menu to add or remove a QoS rule. The lower inte- ger value for precedence indicates the higher priority. Figure 87. -
Page 75: Qos Classification
Model 3101 Series Getting Started Guide 5 • Advanced Configuration Click Add on the QoS Queue Setup page to create a new queue entry and assign it to a specific network inter- face. Figure 88. WMI: Add QoS Queue Entry •... -
Page 76: Routing Setup
Model 3101 Series Getting Started Guide 5 • Advanced Configuration Figure 90. WMI: Add Network Traffic Class Rule Routing Setup Click Advanced Setup > Routing to manage the default gateway, static route, and Routing Information Proto- col (RIP) settings. Refer to the following sections: •... -
Page 77: Default Gateway
Model 3101 Series Getting Started Guide 5 • Advanced Configuration Default Gateway The Routing–Default Gateway page (Figure 91) is the default page that displays when you click on Routing in the Advanced Setup menu. From this page, you can modify the default gateway settings. Select a proper WAN interface in the list of Available Routed WAN Interfaces as the system default gateway. -
Page 78: Policy Routing
Model 3101 Series Getting Started Guide 5 • Advanced Configuration • Gateway IP Address: The next-hop IP address. • Metric: The metric value of routing. Click Apply/Save to apply the settings. Policy Routing Click Routing > Policy Routing to add or remove a static policy rule. Click the Add button to enter the policy name, source IP and default gateway, and select the physical LAN port and interface on the Policy Routing Setup page (Figure... -
Page 79: Universal Plug & Play (Upnp) Setup
Model 3101 Series Getting Started Guide 5 • Advanced Configuration Universal Plug & Play (UPnP) Setup Click Advanced Setup > UPnP to activate the UPnP capability on the 3101. PCs with UPnP (Universal Plug & Play) can offer their own network services and automatically use services offered in the network. Click Apply/Save to activate any changes. -
Page 80: Packet Acceleration Setup
Model 3101 Series Getting Started Guide 5 • Advanced Configuration Packet Acceleration Setup Click Advanced Setup > Packet Acceleration (Figure 98) to enable packet flow accelerator. Click Apply/Save to activate any changes. Figure 98. WMI: Packet Acceleration Storage Service Setup Storage Device Info Click Advanced Setup >... -
Page 81: Interface Grouping Setup
Model 3101 Series Getting Started Guide 5 • Advanced Configuration Interface Grouping Setup Click Advanced Setup > Interface Grouping to configure mapping groups. Figure 102. WMI: Interface Grouping Entries Interface grouping supports multiple ports to PVC and bridging groups. Each group will perform as an inde- pendent network. -
Page 82: Wmi: Interface Grouping Configuration
Model 3101 Series Getting Started Guide 5 • Advanced Configuration Figure 103. WMI: Interface Grouping Configuration Interface Grouping Setup... -
Page 83: Ipsec Setup
Model 3101 Series Getting Started Guide 5 • Advanced Configuration IPSec Setup Click Advanced Setup > IPSec to configure IPSec tunnel mode connections. Figure 104. WMI: IPSec Tunnel Connections Click the Add button to display the IPSec Settings page. Enter information for the IPSec connection name, tunnel mode, and remote IPSec gateway address. -
Page 84: Certificate Setup
Model 3101 Series Getting Started Guide 5 • Advanced Configuration Certificate Setup Click Advanced Setup > Certificate to request or import a certificate to help identify your device to other devices or verify certificates from other devices. Local Certificates The Local Certificates page (Figure 106) is the default page that displays when you click on Certificate in the Advanced Setup menu. -
Page 85: Wmi: Certificate Signing Request
Model 3101 Series Getting Started Guide 5 • Advanced Configuration • State/Province Name: Enter the name of the state or province where your organization's head office is located. Provide the full name of the state or province. • Country/Region Name: Select the two-letter ISO abbreviation for your country (for example, GB for the United Kingdom). -
Page 86: Import Certificate
Model 3101 Series Getting Started Guide 5 • Advanced Configuration Import Certificate On the Local Certificates page, click Import Certificate (Figure 110) to paste an existing certificate and pri- vate key. Figure 110. WMI: Import Local Certificate Click Apply to add the certificate. Trusted CA Certificates Click Certificate >... -
Page 87: Power Management
Model 3101 Series Getting Started Guide 5 • Advanced Configuration Click Import Certificate (Figure 112) to paste an existing certificate. Click Apply to add the certificate. Figure 112. WMI: Import CA Certificate Power Management Click Advanced Setup > Power Management to control hardware modules and power consumption. Figure 113. -
Page 88: Multicast Setup
Model 3101 Series Getting Started Guide 5 • Advanced Configuration Multicast Setup Click Advanced Setup > Multicast to configure the multicast parameters of the IPv4 and IPv6. Click Apply/ Save to apply the settings. Figure 114. WMI: Multicast Configuration Multicast Setup... - Page 89 Model 3101 Series Getting Started Guide 5 • Advanced Configuration Multicast Setup...
-
Page 90: Wireless Configuration
Chapter 6 Wireless Configuration Chapter contents Overview ................................91 Basic Wireless Setup ..............................91 Wireless Security Setup............................93 WPS Setup ..............................94 Manual Setup AP ............................94 Open or Shared ............................95 802.1X ..............................96 .................................97 WPA-PSK, WPA2-PSK, or Mixed WPA2/WPA-PSK ................98 WPA2 or Mixed WPA2/WPA ........................99 MAC Filter Setup ............................100 Wireless Bridge... -
Page 91: Overview
Model 3101 Series Getting Started Guide 6 • Wireless Configuration Overview Click Wireless in the navigation menu to view wireless configuration options for the 3101. See the following sections for setup instructions: • “Basic Wireless Setup” on page 91 • “Wireless Security Setup”... - Page 92 Model 3101 Series Getting Started Guide 6 • Wireless Configuration • Enable Wireless: If you want to make wireless available, you must check this box first. Otherwise, the Hide Access Point SSID, Country, Enable Wireless Guest Network, and Guest SSID box will not be dis- played.
-
Page 93: Wireless Security Setup
Model 3101 Series Getting Started Guide 6 • Wireless Configuration Wireless Security Setup Click Security in the Wireless menu to configure security features of the wireless LAN for the 3101. The Wireless -- Security page displays (Figure 116). On this page, you can configure the network security settings through the Wi-Fi Protected Setup (WPS) method (see “WPS Setup”... -
Page 94: Wps Setup
Model 3101 Series Getting Started Guide 6 • Wireless Configuration WPS Setup Figure 117. WMI: WPS Configuration There are 2 primary methods used in the Wi-Fi Protected Setup (WPS): • PIN entry, a mandatory method of setup for all WPS certified devices •... -
Page 95: Open Or Shared
Model 3101 Series Getting Started Guide 6 • Wireless Configuration Provide information for the following parameters: • Select SSID: Select the wireless LAN SSID to configure security features. • Network Authentication: Select the authentication mode for the selected SSID. Authentication configura- tion fields display automatically when you select a mode from this menu. -
Page 96: Wmi: Wireless Security - 802.1X Authentication Mode
Model 3101 Series Getting Started Guide 6 • Wireless Configuration 802.1X When you select 802.1X as the Network Authentication mode (Figure 120), you are required to enter infor- mation for the RADIUS server. RADIUS server is short for a Remote Authentication Dial-in User Service server, which is most commonly a third party server, used for authenticating wireless clients that want to con- nect to an access point. -
Page 97: Wpa
Model 3101 Series Getting Started Guide 6 • Wireless Configuration When you select WPA as the Network Authentication mode (Figure 121), provide information for the fol- lowing parameters: Figure 121. WMI: Wireless Security – WPA Authentication Mode • WPA Group Rekey Interval: Enter a value for the time that the WPA key must change. If the value is set to 0, the change is done automatically between the server and the client. -
Page 98: Wpa-Psk, Wpa2-Psk, Or Mixed Wpa2/Wpa-Psk
Model 3101 Series Getting Started Guide 6 • Wireless Configuration WPA-PSK, WPA2-PSK, or Mixed WPA2/WPA-PSK When you select WPA-PSK, WPA2-PSK, or Mixed WPA2/WPA-PSK as the Network Authentication mode (Figure 122), provide information for the following parameters: Figure 122. WMI: Wireless Security – WPA-PSK Authentication Mode •... -
Page 99: Wpa2 Or Mixed Wpa2/Wpa
Model 3101 Series Getting Started Guide 6 • Wireless Configuration WPA2 or Mixed WPA2/WPA When you select WPA2 or Mixed WPA2/WPA as the Network Authentication mode (Figure 123), provide information for the following parameters: Figure 123. WMI: Wireless Security – Mixed WPA2/WPA Authentication Mode •... -
Page 100: Mac Filter Setup
Model 3101 Series Getting Started Guide 6 • Wireless Configuration MAC Filter Setup Click MAC Filter in the Wireless menu to allow or reject access to the wireless network for wireless clients.The Wireless -- MAC Filter page displays (Figure 124). From this page, you can create a list of MAC addresses that are banned from accessing the 3101or allowed to associate with the 3101. -
Page 101: Wireless Bridge Setup
Model 3101 Series Getting Started Guide 6 • Wireless Configuration Wireless Bridge Setup Click Wireless Bridge in the Wireless menu to configure wireless bridge features for the 3101. The Wireless - - Bridge page displays (Figure 125). The Wireless Distribution System (WDS) allows you to extend the range of your wireless network by introducing one or more WDS-enabled devices into your wireless network. -
Page 102: Advanced Wireless Setup
Model 3101 Series Getting Started Guide 6 • Wireless Configuration Advanced Wireless Setup Click Advanced in the Wireless menu to configure advanced wireless features for the 3101. The Wireless -- Advanced page displays (Figure 126). Usually, you do not need to change the settings on this page. Click Apply/Save to activate any changes. - Page 103 Model 3101 Series Getting Started Guide 6 • Wireless Configuration • Channel: Select the appropriate channel to correspond with your network settings. All devices in your wire- less network must use the same channel in order to work correctly. The 3101 supports auto channeling functionalty.
-
Page 104: Station Info
Model 3101 Series Getting Started Guide 6 • Wireless Configuration beacon) before sending the beacon again. The beacon interval may be adjusted in milliseconds (ms). The default value (100) is recommended. • XPress Technology: Select Enable or Disable. This feature is special acceleration technology for IEEE802.11g. -
Page 105: System Management
Chapter 7 System Management Chapter contents Overview ................................106 Running Diagnostic Tests ...........................106 Managing System Settings ...........................106 Settings .................................107 Backup ..............................107 Update ..............................107 Restore Default ............................107 System Log ..............................108 TR-069 Client ..............................109 Access Control ..............................110 Services ..............................110 Passwords ..............................110 Update Software ............................111 Save/Reboot ..............................111... -
Page 106: Overview
Model 3101 Series Getting Started Guide 7 • System Management Overview This chapter provides information on testing connections and configuring typical system settings. For information about testing the DSL connection for the unit, see “Running Diagnostic Tests” on page 106. For information about configuring device settings, see “Managing System Settings”... -
Page 107: Settings
Model 3101 Series Getting Started Guide 7 • System Management Settings Click Settings in the Management menu to backup, restore, and update system configuration files. Backup Click Backup under Settings in the Management menu to create a backup file of the current configuration. Click Backup Settings (Figure 129) to display the Save File prompt. -
Page 108: System Log
Model 3101 Series Getting Started Guide 7 • System Management System Log Click System Log in the Management menu to view and configure logging for the 3101. The System Log page displays (Figure 132). Figure 132. WMI: System Log Click View Security Log to view and configure security logging for the 3101. Click the Close button to exit. Figure 133. -
Page 109: Tr-069 Client
Model 3101 Series Getting Started Guide 7 • System Management Click View System Log to view and configure logging for the 3101. Click the Close button to exit. Figure 135. WMI: System Log TR-069 Client Click TR-069 Client in the Management menu to manage ACS (Auto Configuration Server) connections and other stand-alone routers and LAN-side client devices. -
Page 110: Access Control
Model 3101 Series Getting Started Guide 7 • System Management Access Control The Access Control options in the Management menu allow you to enable/disable services and change pass- words. Services Click Services under Access Control in the Management menu to enable and disable LAN and WAN services (Figure 137). -
Page 111: Update Software
Model 3101 Series Getting Started Guide 7 • System Management Update Software Click Update Software in the Management menu to update the firmware for the 3101(Figure 139). Click Browse to select the new software image file. Click Update Software to apply the update. Wait a few minutes while the 3101 reboots. -
Page 112: Contacting Patton For Assistance
Contacting Patton for assistance Chapter contents Introduction ................................113 Contact information............................113 Patton support headquarters in the USA .......................113 Alternate Patton support for Europe, Middle East, and Africa (EMEA) ............113 Warranty Service and Returned Merchandise Authorizations (RMAs)..............113 Warranty coverage ............................113 Out-of-warranty service ...........................114 Returns for credit ............................114... -
Page 113: Introduction
RAS warranty and obtaining a return merchandise authorization (RMA). Contact information Patton Electronics offers a wide array of free technical services. If you have questions about any of our other products we recommend you begin your search for answers by using our technical knowledge base. Here, we have gathered together many of the more commonly asked questions and compiled them into a searchable database to help you quickly solve your problems. -
Page 114: Out-Of-Warranty Service
RMA#: xxxx 7622 Rickenbacker Dr. GaithersbuModel 3101, MD 20879-4773 USA Patton will ship the equipment back to you in the same manner you ship it to us. Patton will pay the return shipping costs. Warranty Service and Returned Merchandise Authorizations (RMAs) - Page 115 Appendix A Compliance Chapter contents Compliance .................................116 ................................116 Low-Voltage Directive (Safety) ........................116 PSTN ................................116 CE Notice (Declaration of Conformity) ......................116 Authorized European Representative ........................116...
-
Page 116: A Compliance
This device is not intended nor approved for connection to the PSTN CE Notice (Declaration of Conformity) Patton Electronics, Inc declares that this device is in compliance with the essential requirements and other rel- evant provisions of Directive 1999/5/EC. The Declaration of Conformity may be obtained from Patton Elec- tronics, Inc at www.patton.com/certifications. -
Page 117: Specifications
Appendix B Specifications Chapter contents Ethernet Interface..............................118 WiFi Interface ..............................118 ADSL Interface..............................118 OAM...................................118 ...................................118 Bridging ................................118 Routing ................................118 Security ................................119 Configuration and Management..........................119 AC Adapter .................................119 Environment ...............................119 Physical Dimensions............................119 USB Drivers ................................119... -
Page 118: B Specifications
Model 3101 Series Getting Started Guide B • Specifications Ethernet Interface Model 3101/1I: One 10/100 Base-TX Ethernet port, IEEE 802.3/3u Model 3101/4I: 4-port 10/100 Base-TX Ethernet port, IEEE 802.3/3u Model 3101/4IWU: 4-port 10/100 Base-TX Ethernet port, IEEE 802.3/3u; One USB 2.0 device port, type B connector WiFi Interface IEEE 802.11b/g... -
Page 119: Security
Model 3101 Series Getting Started Guide B • Specifications Point-to-Point Protocol (including PPPoA and PPPoE) and user authentication via PAP or CHAP TCP, UDP, ARP, RARP, IPCP, ICMP, IGMP IP routing: static route, RIP v1 and v2 NAT/PAT with extensive ALG supports DNS relay agent;...
Need help?
Do you have a question about the ipRocketLink 3101 Series and is the answer not in the manual?
Questions and answers