Table of Contents
Advertisement
Advertisement
Table of Contents

Related Manuals for Piazzetta P937


Summary of Contents for Piazzetta P937
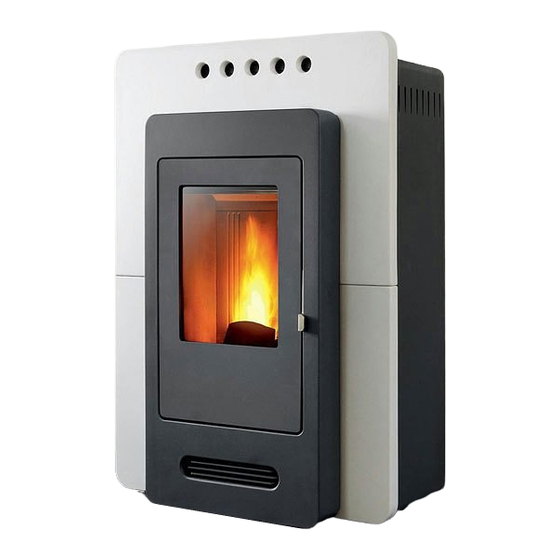
- Page 1 Pellet Stove P937 INSTALLATION, USE AND MAINTENANCE MANUAL...
- Page 2 In line with its policy of constant product improvement and renewal, the manufacturer may make changes without notice. This document is the property of Gruppo Piazzetta S.p.A.; no part of it may be disclosed to third parties without the written permission of Gruppo Piazzetta S.p.A.
-
Page 3: Table Of Contents
1.11 Prevention of domestic fires 1.12 Minimum safety distances TECHNICAL DATA AND SPECIFICATIONS Characteristics Product identification data Technical data Accessories supplied Dimensions P937 FUEL PREPARATION FOR INSTALLING INSTALLATION Multifuoco system Electrical connections and control devices Installation of the external thermostat... -
Page 4: General Indications
1.0 GENERAL INDICATIONS DT2010216-05 Check that the installation of your product conforms to all the indications given below. Fig. 1 CHIMNEY STACK CHIMNEY CONNECTION TO FLUE FLUEWAY SOOT INSPECTION APERTURE FRESH AIR INTAKE ELECTRIC POWER SUPPLY CAPACITY LOAD OF THE FLOOR MINIMUM SAFETY DISTANCES DT2030321-01... -
Page 5: Single Chimney Or Flueway
Ø If the flue is the incorrect size or installed other than in Deposit of creosote compliance with the above instructions, Gruppo Piazzetta DT2030050-00 DT2030188-00 S.p.A. cannot be held liable for malfunctioning of the product, damage to property or injury to persons or animals. -
Page 6: Chimney
1.3 ChImNEy DT2010025-03 The chimney is the part which is positioned on the top of the flue to ease the Fig. 7 Fig. 8 dispersion of combustion products into the atmosphere. The chimney must comply with the following requirements: - it must have an internal section and shape the same as the flue (A); - it must have a useful outlet section (B) of not less than twice that of the flue (A);... -
Page 7: Fresh Air Intake
1.4 fRESh AIR INTAkE DT2010539-03 In order to operate correctly the stove/fireplace must have the necessary Fig. 12 Fig. 13 air available provided through a fresh air intake. The air intake must: - have a total free cross section of at least the size indicated in the section “TECHNICAL DATA”;... -
Page 8: Load-Bearing Capacity Of The Floor
Type B gas appliances are not allowed (refer to current legislation and regulations in the country where the appliance is to be installed). The stove or fireplace must not be used simultaneously with collective type ventilation ducts with or without extractor fan, other devices or other appliances such as: forced ventilation systems or other heating systems using ventilation to change the air. - Page 9 This fitting can be purchased from the Gruppo Piazzetta S.p.A. dealer together with the pipes. Below is an example of a connection that allows thorough cleaning without the need to dismantle the pipes of the system (Fig.
-
Page 10: Connection To The Traditional Type Flue
150 mm, it is also advisable to insulate the smoke outlet pipe (Fig. 18-19). For connection to the flue, it is recommended that pipes and bends produced by the Gruppo Piazzetta SpA are used, as these are compatible WITH DAMAGED FLUE with the smoke outlet. -
Page 11: Fresh Air Intake
1.10 fRESh AIR INTAkE DT2010232-02 Only a flue which meets the following requirements can be used: Fig. 20 - only insulated (double wall) stainless steel pipes fixed to the building are to be used (Fig. 20); - at the base of the pipe there should be an inspection point for periodic inspections and maintenance;... -
Page 12: Minimum Safety Distances
DT2030335-00 DT2032226-00 * = Values refer to the use of original smoke flues provided by Gruppo Piazzetta; if using other pipes for the smoke flue, see the documentation supplied with the pipes H072043UK0 / DT2001455 - 00... -
Page 13: Technical Data And Specifications
Another plate with the serial number is also applied on the last page of this manual. Always provide this information when requesting service and/or spare parts from the Gruppo Piazzetta After-Sales Service Centre. Fig. 24 Fig. 25... -
Page 14: Technical Data
2.3 TEChNICAL DATA DT2012051-01 P937 Unit of Measurement at rated power at minimum power Thermal power 10.4 Hourly consumption kg/h Thermal yield 89.1 89.2 CO content at 13% of O % / (mg/Nm 0.020 / (189.9) 0.030 / (431.5) Ash dust mg/Nm 11.4... -
Page 15: Dimensions P937
2.5 DImENSIONS p937 DT2034202-00 12 12 Ø 8 Ø 8 Ø 8 Sizes in cm H072043UK0 / DT2001455 - 00... -
Page 16: Fuel
Pellet specifications This "customisation" of stove settings must only be carried Parts Natural pure wood pellet out at a Gruppo Piazzetta S.p.A. service centre or by specially Length, approx. 10 - 30 mm qualified personnel authorised by Gruppo Piazzetta S.p.A. -
Page 17: Preparation For Installing
4.0 pREpARATION fOR INSTALLING DT2010074-06 To prevent accidents or damage to the product we recommend the following: - unpacking and installation must be carried out by at least two people; - the product must always be moved and handled with suitable equipment in full compliance with current safety regulations; - the packaged product must be kept in the position according to the directions shown by the diagrams and signs on the pack;... -
Page 18: Installation
With reference to the safety standards in force overseeing electrical appliances, in the instance of all installation, maintenance or intervention operations, which involve accessing the inside of the cladding or smoke box, you must seek the assistance of a Piazzetta Technical Support Centre or qualified personnel. - Page 19 Instructions for ducting hot air Fig. 31 • The ventilation kit which expels heat into the atmosphere is equipped with two Y shaped elements (one per motor) which allow the air flow to be doubled up, directing it via a flexible pipe to the back of the stove from where it can be directed into other environments.
- Page 20 Solution 2 - Fig. 35: Fig. 35 The stove is installed in the room which is to be heated with the heat directed to the front by one fan. In addition, a second fan directs heat to the rear allowing the heating a second room. For the example shown in Figure 35, it is necessary to use a non-closable vent.
- Page 21 Wall and flooring ducting - Fig. 38 - 41 Fig. 38 Fig. 39 For effective channelled heat distribution, you must: - coat the pipe with insulating sheath 2 cm thick (e.g. mineral fibre, ceramic fibre, rock fibre) in order to limit dispersions and to ensure an adequately high air temperature.
-
Page 22: Electrical Connections And Control Devices
5.2 ELECTRICAL CONNECTIONS AND CONTROL DEvICES DT2012052-00 Power cable (5) Fig. 43 • The stove comes supplied with a power cable which must be connected to a 230 V/50 Hz socket. • The power input is detailed in the section “TECHNICAL DATA”. The appliance must be connected to an effective earthing system. -
Page 23: Installation Of The External Thermostat
5.3 INSTALLATION Of ThE ExTERNAL ThERmOSTAT DT2010997-02 The purpose of the room thermostat is to establish stove operation Fig. 45 based upon the temperature revealed by the thermostat itself. The appliance is designed to be connected to an external room thermostat with normally open contact (not supplied by the manufacturer). -
Page 24: Use
6.0 USE DT2012055-00 • Do not use the stove as a cooking appliance. • Ensure that the room in which the stove is installed is sufficiently well ventilated (fresh air intake). • Ensure that all joints in the flue are hermetically sealed using a silicone (not cement-based) sealant which is resistant to heat (250°C) and which shows no sign of deterioration. -
Page 25: Pellet Lcd Remote Control
The functions of the various remote control keys are listed below. GRUPPO PIAZZETTA MENU DT2030325-00 NUMBER KEY / DISPLAY... -
Page 26: First Start-Up
6.3 fIRST START-Up DT2010082-06 • Before turning on the power, check that the brazier is positioned correctly in its seat and pushed back towards the deflector. • During the first few times you turn on the stove, an odour will be released due to the evaporation of the paints and oils used in the manufacture. At this stage, it is best to have proper ventilation of the installation premises, avoiding prolonged stay therein because the vapours may be harmful to people or animals. -
Page 27: Start-Up And Normal Functioning
6.4 START-Up AND NORmAL fUNCTIONING DT2012308-00 • Before proceeding with lighting the stove remember: Fig. 51 Check that the fireside door is well closed. O F F C O N T R O L • The pellet tank must be full or contain enough fuel to run the stove for the desired time. - Page 28 C L E A N I N G 1 2 : 0 0 2 6 Gruppo Piazzetta. This operation is necessary in order to eliminate ash 1 2 : 0 0 2 6 B R A Z I E R...
- Page 29 Action Description Display message The unit is equipped with a device which informs of the lack of fuel in the tank. Where the amount of fuel reaches the minimum level, the unit works at minimum power and the message “SHORT ON PELLET” appears on the display in addition to the time in minutes until the unit goes flat, replacing S H O R T O N the usual display (set power level, time and temperature).
- Page 30 EXTERNAL THERMOSTAT Description Display message Stove operation can be controlled by an external room thermostat (normally open) connected to the power board. For thermostat connection see the table "INSTALLATION OF EXTERNAL ROOM THERMOSTAT”. The ENERGY SAVING mode cannot be activated if the external thermostat is set on STOP and vice-versa. Operation of the external thermostat is conditioned by the appliance set temperature.
-
Page 31: Possible Problems And Solutions
EMPTY BRAZIER Description Display message E M P T Y E M P T Y E M P T Y If the stove was - either voluntarily or due to power failure - shut down during the START PHASE I E M P T Y B R A Z I E R or START PHASE II, the brazier must be cleaned of unburnt pellets after the smoke motor has been... - Page 32 Description Display message WHAT TO DO N O L I T E M P T Y - Press the ON/OFF key to shut the stove down. B R A Z I E R - The alarm beep stops. - The smoke motor remains active for 8 minutes and the display shows the message WAIT COOLING. 1 2 : 0 0 2 2 1 2 : 0 0 2 2 - This message is followed by EMPTY BRAZIER (see the table “EMPTY BRAZIER”).
- Page 33 SHUT DOWN DURING THE START PHASE Description Display message E M P T Y The stove is in START PHASE I and is shut down by pressing the ON/OFF key. B R A Z I E R The readout “EMPTY BRAZIER” appears. Completely empty the brazier before setting a new start-up.
- Page 34 POWER SUPPLY FAILURE Description Display message The power supply may fail during stove operation. It is necessary to distinguish between: 1) power failure during START PHASE I or START PHASE II; 2) power failure without chrono settings; 3) power failure with chrono settings. Power failure during START PHASE I or START PHASE II.
-
Page 35: Control Panel
SERVICE Description Display message S E R V I C E Upon reaching 200 hours of stove use and with stove off the display shows the message "SERVICE" alternated with "OFF" The display is showing a message for scheduled maintenance of the stove. 1 2 : 0 0 2 2 WHAT TO DO - Call the authorised technical assistance centre. -
Page 36: Setting The Language
6.7 SETTING ThE LANGUAGE DT2010469-04 This function allows the user to select one of the languages available in relation to country of installation. HOW TO SET THE LANGUAGE Function Action Display message S E L E Z I O N A S E L E Z I O N A S E L E Z I O N A Selecting the... -
Page 37: Programming
6.8 pROGRAmmING DT2012072-01 With the remote control it is possible to select the following functions from the main MENU : • SELECT LANGUAGE LANGUAGE ENGLISH Remote control LANGUAGE FRANCAIS LANGUAGE NEDERLAND LANGUAGE PORTUGUES MENU LANGUAGE ESPANOL LANGUAGE ITALIANO LANGUAGE DEUTSCH •... -
Page 38: Setting The Clock
6.9 SETTING ThE CLOCk DT2011296-00 The appliance leaves the factory with the clock set therefore simply check that the clock is giving the correct time or adjust for daylight saving time. The correct time setting is required for the use of all time-dependant functions. Setting the clock implies programming the following values: day of the week, hour, minute, day, month, year. -
Page 39: Thermostat
6.10 ThERmOSTAT DT2010242-05 The function of the thermostat is to allow the user to program the stove so that it is switched on and off independently without the manual intervention of an operator. This thermostat allows you to select the daily, weekly and weekend programs with a maximum of 2 cycles in two different time slots. For example: 1st cycle: from 06.00h to 09.00h. - Page 40 Function Action Display message S E T S E T S T A R T S T A R T S E T S T A R T S E T S E T S E T S T A R T S T A R T S T A R T S E T...
- Page 41 PROGRAM WEEK Function Action Display message S E T S E T S E T S E T S E T S E T S E T Select set chrono Press the MENU key then using the SELECT MENU key, select SET CHRONO C H R O N O C H R O N O menu...
- Page 42 Function Action Display message S E T S E T S E T S E T S E T S E T S E T S E T Set desired power Press SELECT MENU to set the desired power (for example you want C H R O N O C H R O N O P O W E R...
- Page 43 PROGRAM WEEK-END Function Action Display message S E T S E T Select set chrono Press the MENU key, then using the SELECT MENU key select the menu C H R O N O C H R O N O menu SET CHRONO and confirm using the SET key.
- Page 44 o f f o f f o f f Function Action Display message D A Y S Press the top part of SELECT MENU key to select the day of the week, then D A Y S D A Y S Activate or deactivate press the bottom part of the SELECT MENU key to select ON to activate L I T...
-
Page 45: Fan Mode
6.11 fAN mODE DT2040069-04 This function allows you to have the two fans operating at the same speed (NORMAL FANS) or at different speeds (SEPARATE FANS). To maximise the potential of the Multifuoco fan functions, read the sections MULTIFUOCO SYSTEM e MULTICOMFORT OPERATION. FAN MODE Function Action... -
Page 46: Energy Saving
MULTICOMFORT This function is used to choose the sensor for reading the room temperature, from the stove or the remote control. To maximise the potential of the Multifuoco fan functions, read the sections MULTIFUOCO SYSTEM and MULTICOMFORT OPERATION. Function Action Display message M U L T I M U L T I... - Page 47 ENERGY SAVING E N E R G Y Function Action Display message E N E R G Y S A V I N G E N E R G Y S A V I N G E N E R G Y S A V I N G E N E R G Y S A V I N G...
-
Page 48: Parameter Menu
6.14 pARAmETER mENU DT2011866-00 The User can only interact with the LOADING AUGER and MEMORY COUNTERS in the parameter menu as described in the tables below. The other parameters can only be used by an authorised service centre. LOADING AUGER M E N U M E N U M E N U... - Page 49 MEMORY COUNTER Function Action M E N U Display message M E N U M E N U P A R A M E T E R M E N U P A R A M E T E R M E N U P A R A M E T E R M E N U...
-
Page 50: Enable Beep (Audio Signal)
6.15 ENAbLE bEEp (AUDIO SIGNAL) DT2040065-03 This function allows you to engage or disengage the beep signal emitted by the stove to indicate that it has received the remote control commands. ENABLE BEEP (audio signal) Function Action Display message E N A B L E E N A B L E Select enable beep Press the MENU key, then using the SELECT MENU key select ENABLE... -
Page 51: State Stove
6.17 STATE STOvE DT2012057-02 This function shows stove state during the various operating conditions. STOVE STATUS Function Action Display message S T A T E S T O V E S T A T E Select stove status Press the MENU key, then using the SELECT MENU key select STOVE S T O V E menu STATUS and confirm using the SET key. -
Page 52: Safety Devices
6.19 SAfETy DEvICES DT2010223-01 Some parts of the stove (door, handle, ceramic parts) may reach extremely high temperatures during operation. Remember to maintain the safety distances indicated previously. Be extremely careful, take the necessary precautions and always follow the instructions. If any part of the appliance or of the outflow pipe leaks smoke while the stove is in use, shut down the appliance immediately and air out the room(s). - Page 53 PELLET TANK TEMPERATURE Description Display message The automatic rearm thermal probe is positioned on the pellet tank and serves to safeguard it against excessive thermal excursions. If the temperature of the pellet tank exceeds the safety threshold, the thermostat isolates the supply voltage to the auger, thus stopping pellet feed to the brazier, followed by engaged appliance shut down.
- Page 54 STOVE ROOM TEMPERATURE PROBE Description Display message The room probe is connected to the rear of the stove and constantly monitors room temperature near the appliance, allowing for its use in utmost safety. The alarm is triggered if the smoke probe connector momentarily and/or accidentally detaches from its seat.
- Page 55 NO LIT Description Display message - The message NO LIT E9 is shown on the display. N O L I T This means that the smoke probe has not detected the necessary temperature increase during start 1 2 : 0 0 2 2 - The alarm beep sounds.
-
Page 56: Opening The Door
6.20 OpENING ThE DOOR DT2010087-04 To clean the glass and carry out stove maintenance, open the door by pulling the handle. While the stove is operating the door must remain closed and may only be opened for maintenance interventions when the appliance is off and cold. -
Page 57: Maintenance
DT2012056-00 Pursuant to current regulations on the safety of electrical equipment appliances, you must contact and seek the assistance of Piazzetta Technical Support Centre or qualified personnel for all and any work connected with installation, maintenance or servicing that involves access to inside the cladding or the smoke chamber. -
Page 58: Cleaning The Combustion Chamber
7.3 CLEANING ThE COmbUSTION ChAmbER DT2011697-00 Once a week, clean the combustion chamber as follows: Fig. 57 - remove the brazier deflector; - release the brazier from its housing; UPPER - remove the upper deflector by lifting it out of its housing and extracting BAFFLE PLATE it from the front part while rotating gently around the side support pins;... -
Page 59: Cleaning The Flue System
7.5 CLEANING ThE fLUE SySTEm DT2010092-03 We recommend that this maintenance is carried out monthly until the Fig. 61 relevant experience of operation conditions has been acquired. Remove the plug from the T fitting and clean the pipes. If necessary, particularly on the first few occasions, we recommend calling a qualified technician. -
Page 60: Replacing The Glass
The stove is fitted with a 4mm thick glass panel, resistant to thermal shock up to 750°C; the glass can only be broken by heavy impact or misuse. Do not slam the door or hit the window. In case of breakage, only replace with a GRUPPO PIAZZETTA S.p.A. spare part. To replace, proceed as follows: - wear protective gloves;... -
Page 61: Cleaning The Fans
The fans must therefore be cleaned, at least, once a year. Since this operation involves dismantling some parts of the appliance, call upon the assistance of a Piazzetta Technical DT2033447-00 Support Centre or qualified personnel to clean the fans. -
Page 62: Scheduled Maintenance
7.13 SChEDULED mAINTENANCE DT2012636-00 Scheduled maintenance must be carried out ANNUALLY and before the commissioning of the device even after a long period of inactivity. These operations are necessary to ensure the maintenance of the efficiency of the stove and guarantee its safe operation. Any cleaning and / or maintenance should be performed with CURRENT OFF. -
Page 63: Main Anomalies
8.0 mAIN ANOmALIES (In grey the user operations) DT2012630-00 Some of the anomalies below can be resolved by following the instructions. All operations must be carried out when the appliance is cold and in the absence of electrical power (pull the plug). As pursuant to law, qualified personnel must resolve anomalies or make repairs that require work to be performed on the components inside the covering or combustion chamber. - Page 64 Problem Cause Solution Evacuation system obstructed Clean the smoke evacuation system Faulty electronic board. Replace the electronic board (use only original parts). Threshold temperature probe is faulty Replace the control probe (use only original parts). THRESHOLD TEMPERATURE Check the proper position of the probe in its seat (see wiring Incorrect position of the smoke probe.
-
Page 65: Replacing The Fuses
8.1 REpLACING ThE fUSES DT2010557-03 Electronic board fuse. Fig. 65 Unscrew the fuse box plug (A) from the electronic board and replace the fuse with a similar one. Motherboard fuse type: F4AL250V. DT2032940-00 Fuse on the IEC power socket. Fig. 66 Extract the fuse carrier drawer (B) in the power socket and replace the fuse with the spare to be found inside the small drawer. -
Page 66: European Standards
EUROPEAN STANDARDS DT2010382-05 This product “Pellet Stove P937” with Multicomfort, has been designed, tested and manufactured in accordance with the European directives R&TTE 1999/5/EC. On the basis of these directives, the product may be installed in the following countries: (BE) - Page 68 Product serial number, to be quoted when requesting service from the Gruppo Piazzetta After-Sales Service Centre. Via Montello, 22 31011 Casella d’Asolo (TV) - ITALY Tel. +39.04235271 - Fax +39.042355178 www.piazzetta.it e-mail:infopiazzetta@piazzetta.it...
Need help?
Do you have a question about the P937 and is the answer not in the manual?
Questions and answers