
Related Manuals for Piazzetta P955


Summary of Contents for Piazzetta P955
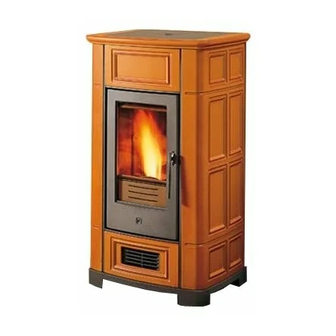
- Page 1 RIVESTIMENTO P955 P955 CLADDING VERKLEIDUNG P955 ISTRUZIONI PER L’INSTALLATORE INSTRUCTIONS FOR THE INSTALLER AUFBAUANLEITUNG FÜR DEN OFENSETZER...
-
Page 2: Installazione 6
Questo documento è di proprietà del Gruppo Piazzetta S.p.A.; non può essere divulgato totalmente o in parte a terzi senza autorizzazione scritta del Gruppo Piazzetta S.p.A. Il Gruppo Piazzetta S.p.A. si riserva i diritti a rigore di legge. - Page 3 INDICE DT2010187-00 Capitolo Titolo Pagina Codice Dimensioni DT2010225-01 Esploso DT2010226-03 Preliminari all’installazione DT2010108-03 Installazione DT2010228-04 Questo libretto codice H07001420 / DT2000026-07 (12-2008) è composto da 24 pagine.
-
Page 4: Dimensioni 4
1.0 DIMENSIONI DT2010225-01 16 23 Scarico Ø 8 cm Dimensioni in centimetri DT2030311-01... -
Page 5: Preliminari All'installazione 5
6 Stufa P955 ........1... - Page 6 4.0 INSTALLAZIONE DT2010228-04 Fig. 1 1) Serbatoio umificatore (7 – 8) - Posizionare il serbatoio umidificatore (7) nell’apposita sede, inserendo le linguette del coperchio (8) negli appositi “tranci” (Fig.1) Tranci DT2031127-01 Fig. 2 2) Frontalino inferiore (3) Il frontalino è reversibile. - Mettere dei punti di silicone nella parte inferiore e superiore del frontalino.
- Page 7 Fig. 4 - Rimuovere la staffa di bloccaggio del laterale Staffa bloccaggio laterale allentando le relative viti M4 di fissaggio. (Fig. 4) Vite M4 DT2032158-00 Fig. 5 4) Laterale in ceramica (4) Il laterale è reversibile. - Fare scivolare il laterale (4) nelle apposite sedi della stufa fino all’appoggio sulla base della stufa prestando attenzione a non scheggiare o graffiare lo smalto (Fig.5-6)
- Page 8 Fig. 8 5) Piano (1) - Fare scendere il piano (1) sopra i laterali (4). Verificare il corretto appoggio altrimenti correggere con del nastro fibra vetro in dotazione. Nastro fibra Nastro fibra (Fig.8) vetro vetro DT2030333-01 Fig. 9 6) Griglia verniciata (5) - Fare scendere sul piano in ceramica (1) la griglia (5), verificando che sia allineata al piano.
- Page 9 In line with its policy of constant product improvement and renewal, the manufacturer may make changes without notice. This document is the property of Gruppo Piazzetta S.p.A.; no part of it may be disclosed to third parties without the written permission of Gruppo Piazzetta S.p.A.
- Page 10 CONTENTS DT2010187-00 Sec. Title Page Code Dimensional diagram DT2010225-01 Exploded view DT2010226-03 Preparations for installation DT2010108-03 Installation DT2010228-04 This booklet code H07001420 / DT2000026-07 (12-2008) comprises 24 pages.
- Page 11 1.0 DIMENSIONAL DIAGRAM DT2010225-01 16 23 Exaust outlet diameter Ø8 Measurements in cm DT2030311-01...
- Page 12 Upper front panel 02 ......1 P955 Stove ........1 Lower front panel 03 .
- Page 13 4.0 INSTALLATION DT2010228-04 Fig. 1 1) Humidifier tank (7 – 8) - Insert the humidifier tank (7) into its seat, inserting the tabs of the lid (8) into the relative “slots” (Fig. 1) Slots DT2031127-01 Fig. 2 2) Lower front (3) The front panel is reversible - Put spots of silicone on the top and bottom of the lower front.
-
Page 14: Dt2032158
Fig. 4 - Loosen the M4 fastening screws of the side Side blockage bracket blockage bracket and remove it. (Fig. 4) Screw M4 DT2032158-00 Fig. 5 4) Ceramic side panel (4) The side panel is reversible - Let the side panel (4) slide down in the relative guides until it rests on the bottom of the stove, taking care not to chip or scratch the glaze (Fig. -
Page 15: Fig.9
Fig. 8 5) Top surround (1) - Rest the top surround (1) on top of the side panels (4). Check that it fits correctly, adjusting if necessary with the fibreglass tape provided in the Fibreglass Fibreglass kit. (Fig. 8). tape tape DT2030333-01 Fig. - Page 16 Der Hersteller behält sich jedoch vor, aufgrund ständiger technologischer Entwicklung und Erneuerung des Produktes, ohne vorherige Ankündigung, Änderungen daran vorzunehmen. Diese Aufbauanleitung ist Eigentum der Gruppo Piazzetta S.p.A.. Sie darf nicht ohne vorherige schriftliche Genehmigung seitens des Herstellers für Dritte teilweise oder im Ganzen vervielfältigt werden. Gruppo Piazzetta S.p.A. behält sich alle Rechte vor.
- Page 17 INHALT DT2010187-00 Abschnitt Titel Seite Art. NR. Abmessungen DT2010225-01 Explosionszeichnung DT2010226-03 Hinweise für den Aufbau DT2010108-03 Aufbau DT2010228-04 Diese Bedienungsanleitung Art. NR. H07001420 / DT2000026-07 (12-2008) hat 24 Seiten.
- Page 18 1.0 ABMESSUNGEN DT2010225-01 16 23 Abgastutzen Ø 8 Abmessungen in cm DT2030311-01...
- Page 19 Frontverkleidung 02 ......1 P955 Ofenkorpus ....... . .1 untere Frontverkleidung 03 .
- Page 20 4.0 AUFBAU DT2010228-04 Abb. 1 1) Luftbefeuchter (7-8) - Den Wasserbehälter (7) einsetzen und den Deckel (8) mit den Halterungen in die entsprechenden Öffnungen einhaken (Abb. 1). Öffnungen DT2031127-01 Abb. 2 2) Untere Frontblende (3) Die untere Frontblende kann gewendet werden.
- Page 21 Abb. 4 - Das Befestigungsbu ¨ gel des Seitenteils durch Seitlicher Haltebügel lösen der Schrauben M4 entnehmen. Schraube M4 DT2032158-00 Abb. 5 4) Seitliche Kachelverkleidung (4) Die Seitenverkleidung kann gewendet werden. - Die Seitenverkleidung (4) langsam auf die Bodenplatte des Ofens absetzen und darauf achten, dass die Glasur nicht beschädigt oder zerkratzt wird (Abb.
- Page 22 Abb. 8 5) Oberer Abdeckkachel (1) - Die obere Abdeckkachel Seitenverkleidungen (4) legen. Überprüfen, dass diese genau aufliegt, anderenfalls mit dem Glasfaserband beigefügten Glasfaserband korrigieren (Abb. 8) Glasfaserband DT2030333-01 6) Lackiertes Luftgitter (5) Abb. 9 - Das Luftgitter (5) auf die Abdeckkachel (1) legen. Sicherstellen, dass das Gitter bündig mit der Abdeckkachel abschließt (Abb.
- Page 24 Via Montello, 22 I - 31011 Casella d’Asolo (TV) Italia Tel. +39.04235271 - Fax +39.042355178 www.piazzetta.it e-mail:infopiazzetta@piazzetta.it...
Need help?
Do you have a question about the P955 and is the answer not in the manual?
Questions and answers