Table of Contents
Advertisement
Master Forge & M Design® are registered
trademarks of LF, LLC. All rights reserved.
ATTACH YOUR RECEIPT HERE
Serial Number
Questions, problems, missing parts? Before returning to your retailer, call our customer
service department at 1-800-963-0211, 8:00 a.m. – 6:00 p.m. EST, Monday – Thursday,
8:00 a.m. – 5:00 p.m. EST, Friday.
#70-10-023
Rev. 10/12
Purchase Date
1
ITEM #0411913
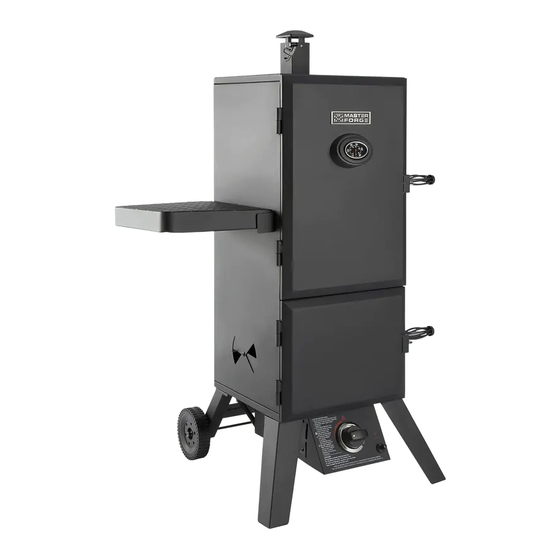
2-Door Gas Smoker
MODEL #MFX784BDP
Lowes.com/masterforge
Français p. 27
Español p. 54
ANS Z21.89b-2012
CSA 1.18b-2012
Advertisement
Table of Contents

Related Manuals for Master Forge MFX784BDP


Summary of Contents for Master Forge MFX784BDP
- Page 1 ITEM #0411913 2-Door Gas Smoker MODEL #MFX784BDP Français p. 27 Master Forge & M Design® are registered trademarks of LF, LLC. All rights reserved. Español p. 54 ANS Z21.89b-2012 CSA 1.18b-2012 ATTACH YOUR RECEIPT HERE Purchase Date Serial Number Questions, problems, missing parts? Before returning to your retailer, call our customer service department at 1-800-963-0211, 8:00 a.m.
-
Page 2: Table Of Contents
taBle oF coNteNts Safety Information ....................... 2 Package Contents ....................... 5 Hardware Contents......................6 Preparation .......................... 6 Assembly Instructions......................6 Operating Instructions ....................... 13 Care and Maintenance ...................... 21 Troubleshooting ......................... 23 Warranty ..........................24 Replacement Parts List ..................... 25 Assembler/Installer: This instruction manual contains important information necessary for the proper assembly and safe use of this appliance. -
Page 3: Safety Information
saFetY iNFormatioN Please read and understand this entire manual before attempting to assemble, operate or install the product. If you have any questions regarding the product, please call customer service at: 1-800-963-0211, 8:00 a.m. – 6:00 p.m. EST, Monday – Thursday, 8:00 a.m. – 5:00 p.m. EST, Friday. caliForNia ProPositioN 65 • F uels used in gas or oil-fired appliances and the products of combustion of such fuels contain chemicals known to the state of California to cause cancer, birth defects or other reproductive harm. - Page 4 saFetY iNFormatioN • I f you must dispose of ashes in less time than it takes for the ashes to completely cool down, remove the ashes from the appliance, keeping them in the heavy-duty foil, and soak them completely with water before disposing of them in a noncombustible container. • T his appliance will be hot during and after use. Use insulated oven mitts or gloves for protection from hot surfaces or splatter from cooking liquids. • M ake sure that the orifice of the control valve properly mates with the burner mixing tube by visual observation. Please refer to maintenance section. • U se caution when opening the door of the smoker while in operation. Keep hands, face and body safe from hot steam or flare-ups. Do Not inhale smoke.
-
Page 5: Package Contents
PackaGe coNteNts Part DescriPtioN QUaNtitY Part DescriPtioN QUaNtitY Side Table Rear Leg Assembly Side Table Front Support Side Table Rear Support Wood Chip Box Smoke Stack Wood Chip Box Lid Rear Handle Water Bowl Hose Retention Cooking Grate Tank Retention Temperature Gauge & Bezel Tank Heat Shield Cooking Grate Support Door Locking Bracket Upper Door... -
Page 6: Hardware Contents
HarDWare coNteNts (shown actual size) M6x12 Bolt M5x12 Bolt M5 Nut Spring Clip Qty. 34 Qty. 8 Qty. 2 Qty. 2 PreParatioN Before beginning assembly of product, make sure all parts are present. Compare parts with package contents list and hardware contents list. If any part is missing or damaged, do not attempt to assemble the product. -
Page 7: Assembly Instructions
assemBlY iNstrUctioNs 2. Align the rear leg assembly (M) on the smoker body (K). Secure with six M6x12 bolts (AA). Tighten all bolts. Hardware Used M6x12 Bolt 3. Open bottom door (V). Turn the burner and control unit (L) upside down and place it on the bottom of the smoker body (K). Align the four mounting holes on the burner and control unit (L) with the holes on the smoker body (K). - Page 8 assemBlY iNstrUctioNs 5. Align the tank heat shield (H) on the back of the smoker body (K). Secure with four M6x12 bolts (AA). Tighten all bolts. Hardware Used M6x12 Bolt 6. Remove pre-assembled cotter pin from the tank retention wire (G). Attach the ends of the tank retention wire (G) on the back of the tank heat shield (H) as shown, then insert the cotter pin.
-
Page 9: Cooking Grate
assemBlY iNstrUctioNs 8. Insert the cooking grate support (T) into the corresponding holes inside the smoker body (K) from the bottom up. 9. Repeat step 8 for the remaining cooking grate supports (T). NOTE: There are 8 positions to install the cooking grate supports. The cooking grate supports can be installed into positions according to the need of the owner. -
Page 10: Assembly Instructions
assemBlY iNstrUctioNs 11. Align the door locking brackets (I) with the holes on the right side of the smoker body (K). Secure each bracket with two bolts (AA). Tighten all bolts. Hardware Used M6x12 Bolt 12. Open doors (U, V). Slide door handle (J) through brackets in door. Using pliers, slide a spring clip (CC) over the groove in the door handle as shown. - Page 11 assemBlY iNstrUctioNs 14. With the side table (A) in a perpendicular position, align the slots in the side table with the side table supports (B, C) and insert. To lock the side table (A) in the upright position, swing the side table (A) 90 degrees up, push towards the body (K), and press down on the side table (A) near the body until it is fully fastened in place.
- Page 12 assemBlY iNstrUctioNs 17. Slide the four cooking grates (R) into the top cooking grate supports (T) inside the smoker body (K). 18. Insert the probe of the temperature gauge assembly (S) through hole in top door (U) from the outside. Secure using two M5 nuts (DD) on inside panel.
-
Page 13: Operating Instructions
OPERATING INSTRUCTIONS Connecting the LP Tank WARNING: ALL INSTRUCTIONS AND SAFEGUARDS ON THIS PAGE MUST BE FOLLOWED TO PREVENT FIRE, DAMAGE AND/OR INJURY. 1. The knob on the LP tank must be closed. Make sure that the knob is turned clockwise to a full stop. The cylinder supply system must be arranged for vapor withdrawal. -
Page 14: Operating Instructions
oPeratiNG iNstrUctioNs This smoker is designed to operate on LP gas only. The gas cylinder used must include a collar to protect the cylinder valve. The cylinder supply system must be arranged for vapor withdrawal. Do not allow dirt or foreign material to get into or onto tank connection when it is not attached to the fuel supply system. - Page 15 oPeratiNG iNstrUctioNs Disconnect the lP tank Make sure that the knob on the LP tank is turned clockwise to a full stop (CLOSED). Hold the regulator in one hand, turn the coupling to the valve outlet counterclockwise unthread the connection by hand only. Do not use tools. Place dust cap on cylinder valve outlet whenever the cylinder is not in use.
- Page 16 oPeratiNG iNstrUctioNs adding Water To add water before cooking, simply remove the water bowl and fill it with water slightly below the rim. Place the bowl back into the smoker. Adding water before cooking is recommended. To add water while cooking, if a sizzling sound indicating lack of water is heard, or there is a need to add water, open the bottom door with care and avoid taking in the smoke.
-
Page 17: Operating Instructions
oPeratiNG iNstrUctioNs tips on smoking Here's a list of the most popular smoking woods and information about each. type of Wood suggested Food comments Apple All meats Mild and sweet flavor with a slight hint of fruity flavor. Each species of apple wood should give off a slightly different flavor. Apple smoke produces an attractive browning effect. Almond All meats Produces a sweet smoke with a natural nutty flavor. - Page 18 oPeratiNG iNstrUctioNs suggested smoking times and temperatures Please understand these are only guidelines. All smokers are different. Take into consideration other variables such as weather conditions, wind, ambient temperature, etc. and things can vary by as much as an hour or more. Food to be smoked suggested smoking estimated time...
-
Page 19: Lighting Instructions
oPeratiNG iNstrUctioNs lighting instructions caUtioN: If the flame extinguishes accidentally during ignition or operation, immediately TURN OFF the cylinder valve and then TURN OFF the control knob. 1. C heck all connections for leaks using the “soap water” test as explained on page 15 for “Checking For Leaks.” 2. Open both of the smoker cabinet doors. Always keep the doors open during lighting. 3. Check for any blockage to the venturi tube or burner, damper setting, ventilation setting. Remove any foreign objects or matter. - Page 20 oPeratiNG iNstrUctioNs cooking tip–Damper adjustments WarNiNG: The dampers on the smoker body and the handle on the smoke stack may become very hot while cooking. Always wear a heat resistant glove when adjusting. • F or best performance, rotate the smoker so that the front or back of the body is facing the wind. This allows the adjustment of the dampers to be more effective and accurate. • The two dampers on smoker body should never be fully closed.
-
Page 21: Care And Maintenance
oPeratiNG iNstrUctioNs after Use safety and maintenance WarNiNG: Use caution when lifting and moving the smoker to avoid strain injuries. • D o Not store the smoker near gasoline or other combustible liquids or where combustible vapors may be present. Keep the area around the smoker clear and free of combustible materials and vapors. • D o Not store this smoker in an area accessible to children or pets. Store the smoker in a dry, protected location. - Page 22 care aND maiNteNaNce Keep the ventilation opening(s) of the cylinder enclosure free and clear of debris. Inspect the flames at the burner by looking through the observing hole on left side of the burner and control unit. A good flame should be blue with a yellow tip 1 to 2 inch high. If flames are excessively yellow and irregular, oil residue and food deposits may be collecting on the burner. Try cleaning the burner surface with hot, soapy water and cleaning the holes with a pipe cleaner to improve the flames.
-
Page 23: Troubleshooting
troUBlesHootiNG ProBlem PossiBle caUse correctiVe actioN The burner will not 1. The igniter electrode may be 1. Clean the igniter electrode. light using the covered with grease or residue. igniter procedure. 2. No spark is being generated. 2. Check the connection and reconnect any loose or disconnected wires 3. N o gas flow or cylinder valve not... -
Page 24: Warranty
8:00 a.m. – 6:00 p.m., EST, Monday – Thursday 8:00 a.m. – 5:00 p.m., EST, Friday. Some states do not allow the exclusion or limitation of incidental or consequential damages or limitations on how long an implied warranty lasts, so the above limitations or exclusions may not apply to you. This warranty gives you specific legal rights, and you may have other rights that vary from state to state. GHP Group Inc. 8280 Austin Avenue Morton Grove, IL, USA 60053-3207 Item name: LP Gas Vertical Smoker Model #: MFX784BDP Item #: 0411913 Rated BTU: 15,000 BTU/Hr Lowes.com/masterforge... -
Page 25: Replacement Parts List
rePlacemeNt Parts list For replacement parts, call our customer service department at 1-800-963-0211, 8:00 a.m. – 6:00 p.m. EST, Monday – Thursday, 8:00 a.m. – 5:00 p.m. EST, Friday. Part DescriPtioN Part # Part DescriPtioN Part # 313-01015-00 313-02026-00 Burner and Control Unit Hardware pack 70-10-023 Side Damper Plate –... - Page 26 rePlacemeNt Parts list Lowes.com/masterforge...
Need help?
Do you have a question about the MFX784BDP and is the answer not in the manual?
Questions and answers
What.part number do I use to ordetba new regulator hose?