Table of Contents
Advertisement
Advertisement
Chapters
Table of Contents

Related Manuals for Master Forge BG179A


Summary of Contents for Master Forge BG179A
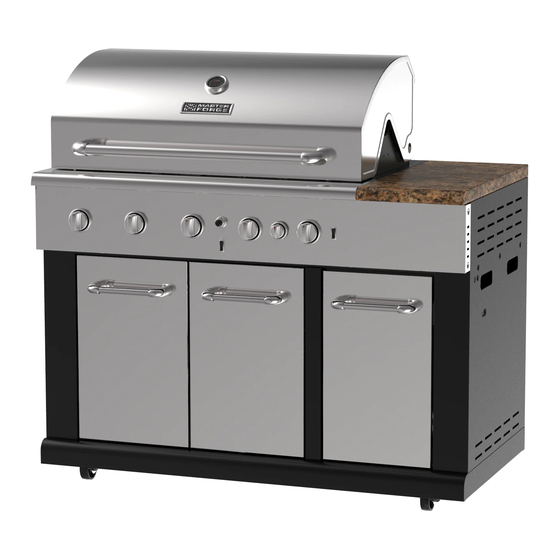
- Page 1 AB15664...
- Page 2 Grill Operation 1-2-3 Before Grilling: Step 1 Keep your grill a safe distance away from your property.* Step 2 Always perform a leak test.* Step 3 Keep children away from the grill. During Grilling: (To avoid tripping safety valves, please follow these instructions carefully!) Step 1 First open lid and turn gas tank on slowly.
-
Page 3: Table Of Contents
TABLE OF CONTENTS Safety Information…………………………………….………...….………….………….…. ………4 Package Contents…..………………..…..….……...…....………………………………..6 Hardware Contents……………………………………………………………….……………………7 Preparation…..………………..…………………..….……………………………………………..….7 Assembly Instructions……………………..……………….………………………………………...8 Natural Gas Conversion……………………………………………..........11 Operation Instructions…………………………….……...…………………………....18 Care and Maintenance……………………………….………………………………………………27 Troubleshooting …………………………………………………………………..….……………...32 Warranty………………………………………………………………………………………………..35 Exploded View……………….………………………………………………………………………..36 Replacement Parts List…….………………………………………………………………………..37... -
Page 4: Safety Information
SAFETY INFORMATION Please read and understand this entire manual before attempting to assemble, operate or install the product. If you have any questions regarding the product, please call customer service at 1-800-963-0211, 8:00 a.m. - 8:00 p.m., EST, Monday - Friday. 1. - Page 5 SAFETY INFORMATION 16. The cylinder used must include a collar to protect the cylinder valve. 17. Do not store a spare LP-gas cylinder under or near this appliance. 18. Never fill the cylinder beyond 80 percent full. 19. If the information in “17” and “18” is not followed exactly, a fire causing death or serious injury may occur.
-
Page 6: Package Contents
PACKAGE CONTENTS PART DESCRIPTION QUANTITY PART DESCRIPTION QUANTITY Main Body Flame Tamer 1 Warming Rack Flame Tamer 2 Grid Trash Bin Drip Tray... -
Page 7: Hardware Contents
HARDWARE CONTENTS AA Battery 9V Battery Orifice Phillips Head Qty. 1 Qty. 1 Removal Tool Screwdriver Qty. 1 Qty. 1 Slotted 1.45mm 17 x 19 mm Grill Cover Rod Extender Screwdriver Orifice Wrench Qty. 1 Qty. 1 Qty. 1 Qty. 6 Qty. -
Page 8: Assembly Instructions
ASSEMBLY INSTRUCTIONS Remove all the packing material from inside and outside gill. 2. Place all three flame tamer 1s (E) and the flame tamer 2 (F) on top of each burner on the main body (A). Flame tamer 2 (F) should be placed on top of the far right burner. - Page 10 ASSEMBLY INSTRUCTIONS 7. Open the cabinet door of the main body (A) and place a 9V battery (BB) for the control panel light as shown. Hardware Used 9V Battery 8. Your grill is now assembled.
-
Page 11: Natural Gas Conversion
NATURAL GAS CONVERSION PREPARATION: IMPORTANT: The 10 ft. Natural Gas Hose is NOT INCLUDED in the product. 10 ft. Natural Gas Hose Before beginning conversion, make sure all parts are present. Compare parts with package contents. If any part is missing or damaged, do not attempt to convert. Contact customer service for replacement parts. - Page 12 NATURAL GAS CONVERSION IMPORTANT: After your outdoor kitchen is converted to natural gas, the working pressure for natural gas is 7 in. water column (WC). Gas pressure is affected by gas line size and the length of gas line run from house.
- Page 13 NATURAL GAS CONVERSION CONVERSION INSTRUCTION: Before the conversion, make sure all control knobs are in the OFF position, LP tank valve is closed, and tank is disconnected from regulator and removed from grill. 9. Before the conversion, make sure all control knobs are in the OFF position, LP Warming tank valve is closed, and tank is...
- Page 14 NATURAL GAS CONVERSION 12. Adjust the air shutters of main burners and searing burner by loosening the air shutter screws with the Phillips screwdriver (DD). Hardware Used Phillips Head Screwdriver 13. Remove the LP orifices of all the main burners and the searing burner with the orifice removal tool (CC) and install the 1.45mm orifices (FF).
- Page 15 NATURAL GAS CONVERSION 15. Use the 17 x 19 mm wrench (GG) to remove the hex nut securing the rotisserie burner orifice and hose assembly. Detach the assembly from the bracket. Remove the LP orifice of the rotisserie burner with the orifice removal tool (CC) and install the 1.45mm orifice (FF).
- Page 16 NATURAL GAS CONVERSION 18.1 18. Remove the 5 main burner control knobs by grasping and pulling out. Do not remove the control knob for the rotisserie burner. Insert the supplied slotted screwdriver (JJ) into the hole of each main burner control valve stem as shown.
- Page 17 NATURAL GAS CONVERSION WARNING: Please remember this is an outdoor gas grill. Many areas of the grill generate extreme heat. We have taken every precaution to protect you from the contact areas. However, it is impossible to isolate all high-temperature areas. Therefore, use good judgment and a certain degree of caution when grilling on this product.
-
Page 18: Operation Instructions
OPERATING INSTRUCTIONS Never attach an unregulated gas line to the appliance. Connection to an unregulated gas line can cause excessive heat or fire. Verify the type of gas supply to be used, either Natural Gas (N.G.) or Liquid Propane (L.P.), and make sure the serial plate agrees with that of the supply. - Page 19 OPERATING INSTRUCTIONS L.P. GAS INSTALLATION Gas grills that are set to operate with L.P. gas come with a high capacity hose and regulator assembly. (Note: Only use the pressure regulator and hose assembly supplied with the grill or a replacement pressure regulator and hose assembly specified by the manufacturer). This assembly is designed to connect directly to a standard 20 lb.
- Page 20 OPERATING INSTRUCTIONS 6. Connect the hose and regulator assembly to the tank valve (See Fig. 5). Fig. 5 Hand tighten the quick coupling nut clockwise to a full stop. DO NOT use a wrench to tighten because it could damage the quick coupling nut and result in a hazardous condition.
- Page 21 OPERATING INSTRUCTIONS Disconnecting A Liquid Propane Gas (LP Gas) Tank From Your Grill: Fig. 8 1. Turn the burner knobs and LP gas tank valve to the full OFF position. (Turn clockwise to close.) 2. Detach the hose and regulator assembly from the LP gas tank valve by turning the quick coupling nut counterclockwise.
- Page 22 OPERATING INSTRUCTIONS WARNING DO NOT store a spare L.P. gas cylinder under or near the grill. Never fill the cylinder beyond 80% full. If this information is not followed exactly, a fire causing death or serious injury may occur. PRE OPERATION LEAK TESTING...
- Page 23 OPERATING INSTRUCTIONS WARNING When leak testing this appliance, make sure to test and tighten all loose connections. A slight leak in the system can result in a low flame or hazardous condition. Most L.P. gas tanks now come equipped with a leak detector mechanism internal to the tank. When gas is allowed to escape rapidly, it shuts off the gas supply.
- Page 24 OPERATING INSTRUCTIONS BEFORE AND AFTER LIGHTING 1. Ensure your grill is located on a level surface. 2. Keep the gas grill area clean and free from combustible materials, gasoline, and other flammable vapors and liquids. 3. Ensure nothing is obstructing the flow of combustion and ventilation air. 4.
- Page 25 OPERATING INSTRUCTIONS GRILL BURNER LIGHTING Warning: Do not lean over grill when lighting. Turn off LP supply at cylinder when appliance is not in use. Main Burner Lighting Illustration: 1. Check that the control knobs are in the OFF position. 2.
- Page 26 OPERATING INSTRUCTIONS If ignition does not take place within 5 seconds, immediately turn the control knob to the OFF position. Wait 5 minutes and repeat step 4 above or refer to match lighting instructions in manual. If the igniter does not function, the burner can be lit by holding a lit match to the burner while the control knob is turned counter-clockwise to “HIGH.”...
-
Page 28: Care And Maintenance
CARE AND MAINTENANCE GRANITE MAINTENANCE Outdoors can be very harsh on the granite of your grill. Dirt, pollen and even UV rays can affect the granite. Please follow these instructions to preserve the granite’s natural beauty: - Granite is a hard, non-porous natural stone and is relatively not affected by harsh chemicals. However, it is recommended to use a neutral cleaner or stone soap (available in hardware stores or from a stone dealer), or a mild dishwashing liquid and warm water. - Page 29 CARE AND MAINTENANCE STAINLESS STEEL After initial usage, areas of the grill may discolor from the intense heat given off by the burners. This is normal. Purchase a mild stainless steel cleaner and rub in the direction of the grain of the metal. Specks of grease can gather on the surface of the stainless steel and bake on to the surface and give a worn appearance.
- Page 30 CARE AND MAINTENANCE Definitions: (+) Guard – Guard is a portion of portable luminaries unit that prevents inadvertent contact with the bulb. It may be integrated with the UV filter or lamp containment barrier or as part of an enclosure or shade. (+) Lamp containment barrier –...
- Page 31 CARE AND MAINTENANCE WARNING The light glass cover should not be in contact with water or any other liquid when it’s warm. Sudden change of temperature may cause cracks on glass cover. WARNING To ensure continued protection against electric shock: 1.
-
Page 32: Troubleshooting
TROUBLESHOOTING Many solutions given here can make your grilling experience safer and more enjoyable. You can also call customer service department at 1-800-963-0211, 8:00 a.m. - 8:00 p.m., EST, Monday - Friday. PROBLEM POSSIBLE CAUSE CORRECTIVE ACTION 1. The ignition wire came off the 1. - Page 33 TROUBLESHOOTING PROBLEM POSSIBLE CAUSE CORRECTIVE ACTION 1. This model is set for 7 in. natural gas usage. Please check your natural gas supply system to have correct gas pressure. Regulator is not needed for NG model. Check the orifice if you installed NG Low heat 1.
- Page 34 TROUBLESHOOTING PROBLEM POSSIBLE CAUSE CORRECTIVE ACTION 1. Install 9V batteries in the LED battery box. 1. No power supply. 2. Check all wiring connections between 2. Damaged wiring or loose LED control the battery box and the LED. Also connection. panel lights check the connections between the 3.
- Page 35 8:00 a.m. - 8:00 p.m., EST, Monday - Friday.
-
Page 36: Exploded View
EXPLODED VIEW For replacement parts, call our customer service department at 1-800-963-0211, 8:00 a.m. - 8:00 p.m., EST, Monday - Friday. Item/Article/Artí culo # 0098162 BG179A Questions,problems,missing parts? Before returning to your retailer, call our customer service department at 1-800-963-0211, 8:00 a.m. - 6:00 p.m. -
Page 37: Replacement Parts List
REPLACEMENT PARTS LIST PART DESCRIPTION QUANTITY PART DESCRIPTION QUANTITY Hood Assembly Hood Handle Hood Handle Bracket Heat Pad Silica Pad Thermometer Hood Axis Warming Rack Cooking Grate Flame Tamer 1 Flame Tamer 2 Rear Cover Hood Lighting Rear Infrared Burner Assembly 100mm Assembly Wire... - Page 38 REPLACEMENT PARTS LIST PART DESCRIPTION QUANTITY PART DESCRIPTION QUANTITY Cart Closure Panel Drip Tray Assembly Regulator Manifold Big Knob Bezel Big Knob Small Knob Bezel Small Knob Electric Ignitor Switch Control Panel Middle Left Door Support Support Right Door Support Control Panel Door Handle Bracket Door Handle...
- Page 39 entre 8 h et 20 h (HNE), du lundi au vendredi.
- Page 40 Grill Operation 1-2-3 Before Grilling: Étape 1 Placer le gril à une distance sécuritaire de votre propriété.* Step 1 Keep your grill a safe distance away from your property.* Étape 2 Toujours effectuer un essai d’étanchéité.* Step 2 Always perform a leak test.* Étape 3 Tenir les enfants à...
- Page 41 TABLE DES MATIÈRES TABLE OF CONTENTS ....................42 Safety Information…………………………………….………...….………….………….…. ………4 ........................44 Package Contents…..………………..…..….……...…....………………………………..6 Matériel ............................45 Hardware Contents……………………………………………………………….……………………7 Préparation..........................45 Preparation…..………………..…………………..….……………………………………………..….7 ....................... Assembly Instructions……………………..……………….………………………………………...8 Conversion au gaz naturel......................Natural Gas Conversion……………………………………………..........11 Operation Instructions…………………………….……...…………………………....18 ........................... Care and Maintenance……………………………….………………………………………………27 Nettoyage et entretien....................... Troubleshooting …………………………………………………………………..….……………...32 Dépannage ..........................
- Page 42 RENSEIGNEMENTS SUR LA SÉCURITÉ Veuillez lire et prendre connaissance de ce manuel en entire avant de tenter d’assembler, d’utiliser ou d’installer le produit. Si vous avez des questions au sujet du produit, veuillez téléphoner au service à la clientèle au 1 800 963-0211, entre 8 h et 20 h (HNE), du lundi au vendredi.
- Page 43 RENSEIGNEMENTS SUR LA SÉCURITÉ 16. La bouteille utilisée doit être munie d’un collier qui protège la valve. 17. Ne pas entreposer de bouteille de propane liquide de rechange en dessous ou près de cet appareil. 18. Ne jamais remplir la bouteille au-delà de 80 pour cent de sa capacité. 19.
-
Page 44: Package Contents
CONTENU DE LA BOÎTE PACKAGE CONTENTS PART È I DESCRIPTION QUANTITY É PART È I DESCRIPTION QUANTITY É Module principal Main Body Flame Tamer Grille de réchaud Warming Rack Flame Tamer Grille Grid Trash Bin Poubelle Bac d’égouttement Drip Tray... -
Page 45: Matériel
MATÉRIEL Pile AA Pile 9 V Clé de changement Tournevis à tête Qté. 1 Qté. 1 d’orifices cruciforme Qté. 1 Qté. 1 Tournevis à Orifice de Clé de Couvre-gril Tige extensible tête plate combustion 17 x 19 mm Qté. 1 Qté. - Page 46 ASSEMBLY INSTRUCTIONS 1. Retirer tout le matériel d’emballage à Remove all the packing material from inside and outside gill. 2. Place all three flame tamer 1s (E) and the flame tamer 2 (F) on top of each burner on the main bod (A). F l chaque brûleur du module principal (A).
-
Page 48: Assembly Instructions
ASSEMBLY INSTRUCTIONS 7. Ouvrir la porte du module principal (A) et 7. Open the cabinet door of the main body placer la pile de 9 V (BB) pour le panneau (A) and place a 9V battery (BB) for the de contrôle tel qu’illustré. control panel light as shown. -
Page 49: Natural Gas Conversion
NATURAL GAS CONVERSION CONVERSION AU GAZ NATUREL PREPARATION: PRÉPARATION : IMPORTANT : IMPORTANT: The 10 ft. Natural Gas Hose is NOT INCLUDED in the product. Le tuyau de gaz naturel de 3 m n’est PAS INCLUS avec ce produit. 10 ft. Natural Tuyau de gaz naturel de 3,05 m Gas Hose... - Page 50 CONVERSION AU GAZ NATUREL NATURAL GAS CONVERSION IMPORTANT : IMPORTANT: After your outdoor kitchen is converted to natural gas, the working pressure for natural gas is 7 pour le gaz naturel est 17,78 cm de colonne d’eau (CE). La pression du gaz est affectée par la in.
- Page 51 CONVERSION AU GAZ NATUREL NATURAL GAS CONVERSION INSTRUCTIONS DE CONVERSION : CONVERSION INSTRUCTION: Avant la conversion, s’assurer que tous les boutons de commande sont en position OFF, que Before the conversion, make sure all control knobs are in the OFF position, LP tank valve is la valve de la bouteille de propane liquide est fermée et que la bouteille est débranchée du régulateur et retirée du gril.
- Page 52 CONVERSION AU GAZ NATUREL NATURAL GAS CONVERSION 12. Ajuster les obturateurs d’air des brûleurs 11. Adjust the air shutters of main burners and searing burner by loosening en desserrant les vis des obturateurs d’air the air shutter screws with the Phillips screwdriver (DD).
- Page 53 CONVERSION AU GAZ NATUREL NATURAL GAS CONVERSION 15. Use the 17 x 19 mm wrench (GG) to remove the hex nut securing the brûleur à rôtir et l’assemblage de tuyau. rotisserie burner orifice and hose Détacher l’assemblage du support. Retirer assembly.
-
Page 54: Conversion Au Gaz Naturel
CONVERSION AU GAZ NATUREL 18.1 18. Retirez les 5 boutons de commande du brûleur principal en les agrippant et en les tirant. Ne retirez pas le bouton de commande du brûleur du tournebroche. Insérez le tournevis à tête plate fourni (JJ) dans le trou de chaque tige de robinet de commande du brûleur principal, tel qu’il est illustré. - Page 55 CONVERSION AU GAZ NATUREL AVERTISSEMENT : Veuillez noter que ceci est un gril au gaz extérieur. Plusieurs zones du gril génèrent une chaleur extrême. Nous avons pris toutes les précautions pour vous protéger des zones de contact. Malheureusement, il est impossible d’isoler toutes les zones à haute température.
- Page 56 OPERATING INSTRUCTIONS Never attach an unregulated gas line to the appliance. Connection to an unregulated gas line can cause excessive heat or fire. Verify the type of gas supply to be used, either Natural Gas (N.G.) or Liquid Propane (L.P.), and liquide (P.L.) et s’assurer que la plaque signalétique concorde avec l’alimentation.
- Page 57 OPERATING INSTRUCTIONS INSTALLATION DE GAZ P.L. L.P. GAS INSTALLATION Les grils au gaz qui utilisent du gaz P.L. sont munis d’un assemblage de régulateur et d’un tuyau à Gas grills that are set to operate with L.P. gas come with a high capacity hose and regulator assembly. haute capacité.
- Page 58 OPERATING INSTRUCTIONS 6. Brancher l’assemblage de régulateur et de tuyau à la valve de la bouteille (voir 6. Connect the hose and regulator Fig. 5). Serrer l’écrou à raccord rapide assembly to the tank valve (See Fig. 5). manuellement dans le sens des aiguilles Fig.
- Page 59 OPERATING INSTRUCTIONS Disconnecting A Liquid Propane gaz propane liquide de votre gril : Gas (LP Gas) Tank From Your Grill: Fig. 8 1. Tourner les boutons des brûleurs et la 1. Turn the burner knobs and LP gas valve de la bouteille de gaz à la position tank valve to the full OFF position.
- Page 60 OPERATING INSTRUCTIONS utilisation du gril. ATTENTION valve de la bouteille lorsqu’elle n’est pas WARNING utilisée. Utiliser seulement le capuchon DO NOT store a spare L.P. gas cylinder under fourni avec la valve de la bouteille. or near the grill. Never fill the cylinder beyond D’autres types de bouchons pourraient 80% full.
- Page 61 OPERATING INSTRUCTIONS AVERTISSEMENT : Lors de l’essai d’étanchéité, s’assurer de tester et de serrer tous les WARNING When leak testing this appliance, make sure to test and tighten all loose connections. A slight leak in the system can result in a low flame or hazardous condition. Most L.P.
- Page 62 OPERATING INSTRUCTIONS AVANT ET APRÈS LE DÉMARRAGE BEFORE AND AFTER LIGHTING 1. S’assurer que le gril est placé sur une surface plane. 1. Ensure your grill is located on a level surface. 2. Keep the gas grill area clean and free from combustible materials, gasoline, and other flammable vapors and liquids.
- Page 63 MODE D’EMPLOI ALLUMAGE DES BRÛLEURS DU GRIL Avertissement : Ne pas se pencher au-dessus du gril lors de l’allumage. Couper l’alimentation en P.L. de la bouteille lorsque l’appareil n’est pas utilisé. Illustration de l’allumage d’un brûleur principal: 1. Vérifier que les boutons de commande sont à OFF. 2.
- Page 64 OPERATING INSTRUCTIONS Si le brûleur ne s’allume pas en moins de 5 secondes, tourner If ignition does not take place within 5 seconds, immediately immédiatement le bouton de commande à OFF. Attendre turn the control knob to the OFF position. Wait 5 minutes and repeat step 4 above or refer to match lighting instructions in instructions d’allumage à...
- Page 65 CARE AND MAINTENANCE NETTOYAGE ET ENTRETIEN AVERTISSEMENT LE COUVERCLE NE DOIT PAS ÊTRE FERMÉ PENDANT DE LONGUES PÉRIODES SI LE BRÛLEUR INFRAROUGE EST EN UTILISÉ. ÉVITEZ LES DÉGATS INFRAREDBURNER CLEANING INFRAROUGE. NETTOYAGE DU BRÛLEUR INFRAROUGE After each use, it is necessary to burn the bottom Après chaque utilisation, il est nécessaire de faire brûler infrared burner with the hood open for at least five le brûleur infrarouge inférieur avec la hotte ouverte...
- Page 66 NETTOYAGE ET ENTRETIEN CARE AND MAINTENANCE GRANITE MAINTENANCE ENTRETIEN DU GRANIT Outdoors can be very harsh on the granite of your grill. Dirt, pollen and even UV rays can affect the granite. Please follow these instructions to preserve the granite’s natural beauty: rayons UV peuvent affecter le granit.
- Page 67 NETTOYAGE ET ENTRETIEN CARE AND MAINTENANCE STAINLESS STEEL After initial usage, areas of the grill may discolor from the intense heat given off by the burners. Après la première utilisation, certaines zones du gril peuvent se décolorer à cause de la chaleur This is normal.
- Page 68 SOIN ET ENTRETIEN CARE AND MAINTENANCE Definitions: (+) Protecteur - Le protecteur est la partie de l’unité luminaire portable qui prévient tout contact (+) Guard – Guard is a portion of portable luminaries unit that prevents inadvertent contact with the bulb. It may be integrated with the UV filter or lamp containment barrier or as part of an partie d’une enceinte ou d’un ombrage.
- Page 69 CARE AND MAINTENANCE NETTOYAGE ET ENTRETIEN AVERTISSEMENT WARNING The light glass cover should not be in contact with water or any other liquid when it’s warm. Sudden change of temperature may cause cracks on glass cover. AVERTISSEMENT WARNING To ensure continued protection against electric shock: 1.
- Page 70 DÉPANNAGE Plusieurs solutions fournies ici peuvent rendre votre expérience de gril plus sécuritaire et agréable. Vous pouvez aussi téléphoner au service à la clientèle au 1 800 963-0211, entre 8 h et 20 h (HNE), du lundi au vendredi. PROBLÉME CAUSES POSSIBLES MESURES CORRECTIVES 1.
- Page 71 TROUBLESHOOTING DÉPANNAGE PROBLEM POSSIBLE CAUSE CORRECTIVE ACTION PROBLÈME CAUSES POSSIBLES MESURES CORRECTIVES 1. Ce modèle est réglé pour un usage 1. This model is set for 7 in. natural gas le système d’alimentation en gaz naturel usage. Please check your natural gas pour obtenir la pression adéquate.
- Page 72 TROUBLESHOOTING DÉPANNAGE PROBLEM POSSIBLE CAUSE CORRECTIVE ACTION PROBLÈME CAUSES POSSIBLES MESURES CORRECTIVES 1. Install AA batteries in the LED battery 1. Installer des piles 9V dans le box. 1. No power supply. boîtier à pile à DEL. 2. Check all wiring connections between 1.
- Page 73 entre 8 h et 20 h (HNE), du lundi au vendredi.
- Page 74 VUE ÉCLATÉE Pour obtenir des pièces de remplacement, appeler notre department du service à la clientèle au 1 800 963-0211, entre 8 h et 20 h (HNE), du lundi au vendredi.
- Page 75 LISTE DES PIÈCES DE RECHANGE PIÈCE DESCRIPTION QUANTITÉ PIÈCE DESCRIPTION QUANTITÉ Assemblage de hotte Poignée de hotte Support de poignée Bloc de chaleur de hotte Bloc de silice Thermomètre Axe de hotte Grille de réchaud Grille de cuisson Diffuseur de flamme 1 Diffuseur de flamme 2 Couverture arrière Assemblage de...
- Page 76 LISTE DES PIÈCES DE RECHANGE PIÈCE DESCRIPTION QUANTITÉ PIÈCE DESCRIPTION QUANTITÉ Panneau de décoration Bouclier thermique avant de la chambre de combustion support droit Support pour panneau Panneau décoratif de contrôle Assemblage du comptoir Traverse de la porte en granit Assemblage du panneau de fermeture égouttage...
- Page 77 de lunes a viernes de 8:00 a.m. a 8:00 p.m., hora estándar del Este.
- Page 78 Grill Operation 1-2-3 Antes de utilizar la parrilla: Before Grilling: Paso 1 Mantenga la parrilla a una distancia prudente de su casa.* Step 1 Keep your grill a safe distance away from your property.* Paso 2 Siempre realice una prueba de fugas.* Step 2 Always perform a leak test.* Paso 3...
- Page 79 ÍNDICE TABLE OF CONTENTS ......................Safety Information…………………………………….………...….………….………….…. ………4 Contenido del paquete......................... Package Contents…..………………..…..….……...…....………………………………..6 Aditamentos..........................Hardware Contents……………………………………………………………….……………………7 ........................... Preparation…..………………..…………………..….……………………………………………..….7 ...................... Assembly Instructions……………………..……………….………………………………………...8 ......................Natural Gas Conversion……………………………………………..........11 ....................Operation Instructions…………………………….……...…………………………....18 Care and Maintenance……………………………….………………………………………………27 Cuidado y mantenimiento......................Troubleshooting …………………………………………………………………..….……………...32 ......................Warranty………………………………………………………………………………………………..35 Garantía ............................111 Exploded View……………….………………………………………………………………………..36 Vista despiezada.........................
- Page 80 INFORMACIÓN DE SEGURIDAD Lea y comprenda completamente este manual antes de intentar ensamblar, usar o instalar el producto. Si tiene preguntas relacionadas con el producto, llame al Departamento de Servicio al Cliente al 1-800-963-0211, de lunes a viernes de 8:00 a.m. a 8:00 p.m., hora estándar del Este.
- Page 81 INFORMACIÓN DE SEGURIDAD 16. El cilindro utilizado debe incluir un anillo para proteger la válvula del mismo. 17. No almacene un tanque de gas PL de reserva debajo o cerca de este electrodoméstico. 18. Nunca llene el cilindro más allá del 80% de su capacidad. 19.
- Page 82 CONTENIDO DEL PAQUETE PACKAGE CONTENTS PART DESCRIPTION Ó QUANTITY PART DESCRIPTION Ó QUANTITY a l l Main Body Flame Tamer 1 Rejilla para Warming Rack Difusor de llama 2 Flame Tamer 2 calentar Recipiente para Grid Trash Bin Rejilla basura Bandeja para Drip Tray líquidos...
- Page 83 ADITAMENTOS Batería AA Batería de Herramienta para Destornillador Cant. 1 9 voltios eliminar orificios phillips Cant. 1 Cant. 1 Cant. 1 Destornillador Orificio de Llave inglesa Cubierta para Extensor de ranurado 1,45 mm de 17 x 19 mm parrilla varilla Cant.
- Page 84 ASSEMBLY INSTRUCTIONS INSTRUCCIONES DE ENSAMBLAJE 1. Retire todo el material de empaque del Remove all the packing material from inside and outside gill. 2. Place all three flame tamer 1s (E) 2. Ubique los tres difusores de llama and the flame tamer 2 (F) on top of each 1 (E) y el difusor de llama 2 (F) en la burner on the main body (A).
- Page 86 INSTRUCCIONES DE ENSAMBLAJE ASSEMBLY INSTRUCTIONS 7. Abra la puerta del gabinete del 7. Open the cabinet door of the main body cuerpo principal (A) y ubique la batería (A) and place a 9V battery (BB) for the de 9V (BB) para la luz del panel de control como se muestra.
- Page 87 CONVERSIÓN A GAS NATURAL NATURAL GAS CONVERSION PREPARATION: PREPARACIÓN: IMPORTANT: IMPORTANTE The 10 ft. Natural Gas Hose is NOT INCLUDED in the product. NO SE INCLUYE La manguera de 3,05 m para gas natural con el producto. Manguera para gas 10 ft.
- Page 88 CONVERSIÓN A GAS NATURAL NATURAL GAS CONVERSION IMPORTANTE IMPORTANT: After your outdoor kitchen is converted to natural gas, the working pressure for natural gas is 7 es de 17,78 cm de columna de agua (C.A.). La presión de gas se ve afectada por el tamaño y el in.
- Page 89 CONVERSIÓN A GAS NATURAL NATURAL GAS CONVERSION INSTRUCCIONES DE CONVERSIÓN: CONVERSION INSTRUCTION: Antes de realizar la conversión, asegúrese de que todas las perillas de control se encuentren en Before the conversion, make sure all control knobs are in the OFF position, LP tank valve is la posición “OFF”...
- Page 90 CONVERSIÓN A GAS NATURAL NATURAL GAS CONVERSION 12. Ajuste los obturadores de aire de los 11. Adjust the air shutters of main quemadores principales y el quemador para burners and searing burner by loosening the air shutter screws with the Phillips de aire con el destornillador Phillips (DD).
- Page 92 CONVERSIÓN A GAZ NATURAL 18.1 18. Retire las 5 perillas de control del quemador principal sujetándolas y jalándolas. No retire la perilla de control del quemador rostizador. Inserte el destornillador ranurado provisto (JJ) en el orificio de cada vástago de válvula de control del quemador principal como se muestra.
- Page 93 CONVERSIÓN A GAS NATURAL ADVERTENCIA: recuerde que esta es una parrilla a gas para exteriores. Muchas áreas de la parrilla generan calor extreme. Hemos tomado todas las precauciones a fin de protegerlo de las áreas de contacto. Sin embargo, es imposible aislar todas las áreas de alta temperature.
- Page 94 INSTRUCCIONES DE FUNCIONAMIENTO OPERATING INSTRUCTIONS Never attach an unregulated gas line to the appliance. Connection to an unregulated gas line can cause excessive heat or fire. Verify the type of gas supply to be used, either Natural Gas (N.G.) or Liquid Propane (L.P.), and (LP) y asegúrese de que la placa de serie coincida con la del suministro.
- Page 95 INSTRUCCIONES DE FUNCIONAMIENTO OPERATING INSTRUCTIONS INSTALACIÓN DE GAS PROPANO LÍQUIDO L.P. GAS INSTALLATION Gas grills that are set to operate with L.P. gas come with a high capacity hose and regulator assembly. manguera y un regulador de alta capacidad. (Note: Only use the pressure regulator and hose assembly supplied with the grill or a Este juego está...
- Page 96 INSTRUCCIONES DE FUNCIONAMIENTO OPERATING INSTRUCTIONS 6. Conecte la manguera y el regulador a la válvula del tanque (Consulte la Fig. 5). 6. Connect the hose and regulator Apriete a mano la tuerca de acoplamiento assembly to the tank valve (See Fig. 5). rápido en dirección de las manecillas del Fig.
- Page 97 INSTRUCCIONES DE FUNCIONAMIENTO OPERATING INSTRUCTIONS Disconnecting A Liquid Propane Gas (LP Gas) Tank From Your Grill: Fig. 8 1. Gire las perillas del quemador y la 1. Turn the burner knobs and LP gas válvula del tanque de gas PL a la posición tank valve to the full OFF position.
- Page 98 INSTRUCCIONES DE FUNCIONAMIENTO OPERATING INSTRUCTIONS antes de comenzar a usar de nuevo la parrilla. ADVERTENCIA de la válvula del cilindro cuando no WARNING esté en uso. Solo instale el tipo de DO NOT store a spare L.P. gas cylinder under tapa para polvo que se proporciona con or near the grill.
- Page 99 INSTRUCCIONES DE FUNCIONAMIENTO OPERATING INSTRUCTIONS ADVERTENCIA Al realizar una prueba de fugas de este electrodoméstico, asegúrese de WARNING When leak testing this appliance, make sure to test and tighten all loose connections. A slight leak in the system can result in a low flame or hazardous condition. Most llama baja o una condición peligrosa.
- Page 100 OPERATING INSTRUCTIONS INSTRUCCIONES DE FUNCIONAMIENTO ANTES Y DESPUÉS DEL ENCENDIDO BEFORE AND AFTER LIGHTING 1. Ensure your grill is located on a level surface. 2. Mantenga el área de la parrilla a gas despejada y libre de materiales combustibles, gasolina y 2.
- Page 101 INSTRUCCIONES DE FUNCIONAMIENTO ENCENDIDO DEL QUEMADOR DE LA PARRILLA Advertencia: no se incline sobre la parrilla al encenderla. Corte el suministro de propane líquido en el cilindro cuando no use la parrilla. Ilustración del encendido del quemador principal: 1. Verifique que las perillas de control estén en la posición OFF(APAGADO).
- Page 102 INSTRUCCIONES DE FUNCIONAMIENTO OPERATING INSTRUCTIONS If ignition does not take place within 5 seconds, immediately Si el quemador no enciende en 5 segundos, gire de inmediato la perilla de control a la posición OFF. Espere 5 minutos y turn the control knob to the OFF position. Wait 5 minutes and repita el paso 4 o consulte las instrucciones de encendido en repeat step 4 above or refer to match lighting instructions in el manual.
- Page 103 CARE AND MAINTENANCE CUIDADO Y MANTENIMIENTO ADVERTENCIA LA CUBIERTA NO DEBE ESTAR CERRADA POR LARGOS PERÍODOS CUANDO SE USE EL QUEMADOR INFRARROJO EVITE QUE EL AGUA DAÑE EL INFRAREDBURNER CLEANING LIMPIEZA DEL QUEMADOR INFRARROJO QUEMADOR INFRARROJO. After each use, it is necessary to burn the bottom Después de cada uso, se debe quemar la parte inferior del quemador infrarrojo con la cubierta abierta durante infrared burner with the hood open for at least five...
-
Page 104: Care And Maintenance
CUIDADO Y MANTENIMIENTO CARE AND MAINTENANCE GRANITE MAINTENANCE MANTENIMIENTO DEL GRANITO Outdoors can be very harsh on the granite of your grill. Dirt, pollen and even UV rays can affect the granite. Please follow these instructions to preserve the granite’s natural beauty: los rayos ultravioletas pueden afectar el granito. - Page 105 CUIDADO Y MANTENIMIENTO CARE AND MAINTENANCE STAINLESS STEEL After initial usage, areas of the grill may discolor from the intense heat given off by the burners. Después del uso inicial, algunas áreas de la parrilla pueden decolorarse debido al calor intenso de This is normal.
- Page 106 CUIDADO Y MANTENIMIENTO CARE AND MAINTENANCE Definitions: (+) Protección: la protección es una porción de la unidad de luminaria portátil que previene (+) Guard – Guard is a portion of portable luminaries unit that prevents inadvertent contact with the bulb. It may be integrated with the UV filter or lamp containment barrier or as part of an compartimiento o pantalla.
- Page 107 CARE AND MAINTENANCE CUIDADO Y MANTENIMIENTO ADVERTENCIA WARNING The light glass cover should not be in contact with water or any other liquid when it’s warm. Sudden change of temperature may cause cracks on glass cover. ADVERTENCIA WARNING To ensure continued protection against electric shock: 1.
- Page 108 SOLUCIÓN DE PROBLEMAS Muchas de las soluciones ofrecidas aquí le permitirán disfrutar de su parrilla de manera más segura. También puede llamar a nuestro Departamento de Servicio al Cliente al 1-800-963-0211, de lunes a viernes de 8:00 a.m. a 8:00 p.m., hora estándar del este. PROBLEMA CAUSA POSIBLE SOLUCIÓN...
- Page 109 TROUBLESHOOTING SOLUCIÓN DE PROBLEMAS PROBLEM POSSIBLE CAUSE CORRECTIVE ACTION PROBLEMA CAUSA POSIBLE SOLUCIÓN 1. This model is set for 7 in. natural gas para utilizar 17,78 cm de gas natural. usage. Please check your natural gas gas natural para determinar si tiene supply system to have correct gas una presión de gas correcta.
- Page 110 TROUBLESHOOTING SOLUCIÓN DE PROBLEMAS PROBLEM POSSIBLE CAUSE CORRECTIVE ACTION PROBLEMA CAUSA POSIBLE SOLUCIÓN 1. Install AA batteries in the LED battery 1. Instale la batería 9V en la caja de box. la batería de la bombilla LED. 1. No power supply. 2.
- Page 111 de lunes a viernes de 8:00 a.m. a 8:00 p.m., hora estándar del Este.
- Page 112 VISTA DESPIEZADA Para obtener piezas de repuesto, llame a nuestro Departamento de Servicio al Cliente al 1-800-963-0211, de lunes a viernes de 8:00 a.m. a 8:00 p.m., hora estándar del este.
- Page 113 LISTA DE PIEZAS DE REPUESTO PIEZA DESCRIPCIÓN CANTIDAD PIEZA DESCRIPCIÓN CANTIDAD Cubierta Manija de la cubierta Abrazadera de la Termóforo manija de la cubierta Almohadilla de sílice Termómetro Eje de la cubierta Rejilla para calentar Rejilla de cocción Difusor de llama 1 Difusor de llama 2 Cubierta posterior Quemador infrarrojo...
- Page 114 LISTA DE PIEZAS DE REPUESTO PIEZA DESCRIPCIÓN CANTIDAD PIEZA DESCRIPCIÓN CANTIDAD Soporte derecho del panel decorativo Protector térmico frontal de la cámara de combustión Soporte del panel de Panel decorativo control Viga transversal de la Cubierta de granito puerta Panel de cierre del Bandeja para liquidos carrito Regulador...
Need help?
Do you have a question about the BG179A and is the answer not in the manual?
Questions and answers
Does a universal 50,000 BTU’s natural gas conversion kit fit this grill
How many BTU’s is this grill
Spacer that separate the fame tamer are not located or illustrated on diagrams!Need to replace as they are completely rusted.Where cans l get replacement parts for model 0098162