Table of Contents
Advertisement
Advertisement
Table of Contents

Related Manuals for Nespresso AGUILA


Summary of Contents for Nespresso AGUILA
- Page 1 AG420PRO User Manual...
-
Page 2: Table Of Contents
Signals, signal words and safety guidelines ............................5 Machine overview ...................................6 Refrigerator overview ..................................7 Operating overview ..................................8 Nespresso Grand Cru recommendation ............................10 First use ......................................11 Energy save mode / Maximum energy save mode ...........................13 Coffee preparation ..................................14 Milk based coffee recipes ................................16 Milk preparation....................................18... -
Page 3: Safety Precautions
• Position the machine on a flat, horizontal, stable • This machine works with Nespresso capsules, avail- liability. and heat-resistant surface. before starting up the machine. able exclusively trough Nespresso ® and its author- • Do not install the machine in an area where a water ized distributors. jet could be used to clean the machine. General safety instructions • The milk container must only be used to store cold... - Page 4 • The manufacturer cannot be held liable for any dam- • All Nespresso ® machines must pass stringent itly trained by a responsible person or briefed in the age caused by misuse or inappropriate handling of controls. Reliability tests under practical conditions use of the dispensing machine to ensure their safety.
-
Page 5: Signals, Signal Words And Safety Guidelines
Signals, signal words and Dispensing machines The warning triangle appears in the instruc- Hygiene tions where non-adherence to the safety safety guidelines Dispensing machines are devices that can dispense Danger of illness through wrong / instructions may result in risks to the user or coffee, milk and hot water products. -
Page 6: Machine Overview
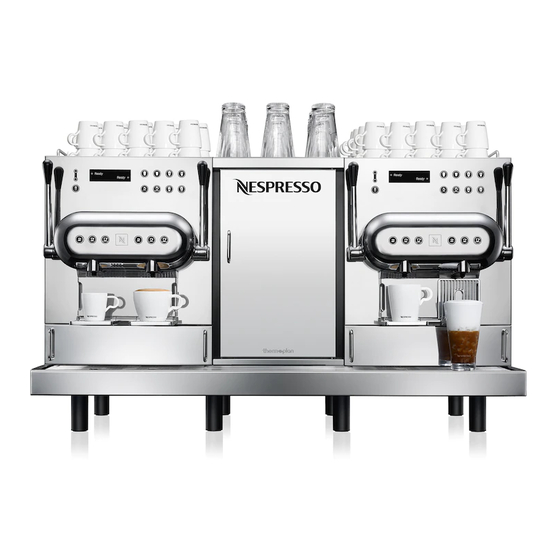
Machine overview 1 13 7/12 cold 1 Capsule insertion slots 5 Energy save button 9 Drip grid for small cups 13 M2M technology antenna for added value services. Please 2 Cup heater 6 Hot water outlet 10 Used capsule containers see also page 28. -
Page 7: Refrigerator Overview
Refrigerator overview max. 5l 1 Cleaning key 2 Milk suction tube 3 Milk container cover 4 Milk container Always fill with cold milk (below 5° C) -
Page 8: Operating Overview
Operating overview Display System cleaning Ready Ready System rinsing Hot water Hot water Ristretto Espresso Lungo Coffee preparation Beverage selection To view the name of the product on the display please press button for Coffee / hot water outlets 5 sec. To exit wait 10 sec. without pressing any button. - Page 9 Hot milk froth Hot milk Milk & milk froth Cold milk froth Cold milk Milk based coffee recipe Espresso Macchiato Cappuccino Latte Macchiato Lattino Coffee preparation Ristretto Coffee / milk outlets Espresso Lungo...
-
Page 10: Brewing Recommendation Table
Nespresso Grand Cru recommendation Ristretto Espresso Lungo Espresso Macchiato Cappuccino Latte Macchiato Lattino... -
Page 11: First Use
First use Close the lever Close the lever The main switch is located underneath Close all four levers. Press any button. the machine. Don’t put the fingers into the capsule insertion slots while closing the levers. Up to 15 min. Heating up Ready Heating up Ready Machine heats up. - Page 12 First use Open all four levers. Thoroughly clean the milk container and Wipe milk suction tube. cover with a merchantable household cleaner. max. 5 °C Do not use unpasteurised milk! max. 5 l Only use heat treated (e.g. pas- max. 24 h teurised or ultra heat treated) milk.
-
Page 13: Energy Save Mode / Maximum Energy Save Mode
Energy save mode The machine switches to the energy save mode after 30 min. of non-use. All buttons appear in a dimmed white. Press any button to return to the operating mode of the machine. 1 min. Energy save mode Ready Press any key Heating up... -
Page 14: Coffee Preparation
Coffee preparation Ristretto Espresso Lungo Pull down the drip grid for small cups. Choose preferred Nespresso Grand Cru. Espresso Ready For all coffee, milk and tea products: Product preparation can be stopped by pressing the prod- uct button again. To top up some coffee to your Pull down the lever to the lowest posi- Choose cup size. - Page 15 Coffee preparation To top up see Info on page 14. Ready Ready By pulling up the lever, the used capsule Machine is ready for next beverage. is ejected.
-
Page 16: Milk Based Coffee Recipes
Milk based coffee recipes Espresso Macchiato Cappuccino Latte Macchiato Lattino Choose preferred Nespresso Grand Cru. Pull down the lever to the lowest posi- tion. Ready Cappuccino Coffee preparation. Choose coffee recipe desired. - Page 17 Milk based coffee recipes Frothing milk preparation according to By pulling up the lever, the used capsule chosen product. is ejected. Ready Ready A 10 sec. automatic rinsing of the the inter- nal milk system will begin 5 min. after the last milk based preparation is finished.
-
Page 18: Milk Preparation
Milk preparation Hot milk froth Hot milk Ready Hot milk Cold milk froth Cold milk Choose milk product. A 10 sec. automatic rinsing of the the internal milk system will begin 5 min. after the last milk based preparation is finished. Caution! Risk of scalding! -
Page 19: Hot Water Preparation
Hot water preparation Hot water Hot water Ready Ready Ready For more water, press the button Caution! again. Press again to stop. Risk of scalding! -
Page 20: Daily Cleaning
Daily cleaning Empty capsule drawer! Cleaning the machine on a daily basis is not only an absolute must, but it also guarantees the 3 sec. necessary hygiene and neutral taste as well as a longer life of the machine. External cleaning Ready Press ‘cleaning’... - Page 21 Daily cleaning Insert cleaning key Remove cleaning key Insert cleaning tablet Container must be empty. When key inserted cleaning Remove cleaning key and insert two Afterwards press any button. starts automatically. cleaning tablets. After handling the cleaning tablets wash your hands! Use only the Thermoplan milk cleaning tablets to perform Cleaning in progress: the automatic cleaning proc-...
- Page 22 Daily cleaning Clean the milk outlets with a cloth. Insert coffee outlets. Pull down coffee outlets and clean them. Caution! Caution! Risk of scalding! Risk of scalding! 1 min. Ready Ready Clean entire outside of machine. After cleaning process the machine It may require up to 15 min.
-
Page 23: Milk Froth Settings
Milk froth settings Menu settings max. 5 ° C 1 Unpasteurised milk 2 Pasteurized milk 3 Ultra heat treated milk (UHT) Do not use unpasteur ised milk! Only use heat treated (e.g. pasteurised or ultra heat treated) milk. When pouring milk into the container, pay atten tion to A Cold milk froth regulator. -
Page 24: Menu Settings
Menu settings Language setting Statistic Press and hold the rinse button for 3 sec. Press and hold the rinse button for 3 sec. USER MENU USER MENU GENERAL SETTINGS GENERAL SETTINGS Select menu “Language” Select menu “statistic” On the second display, the statis- Enter tic of all four outlets is shown. -
Page 25: Alarms
Alarms Description Display message LED status Remarks Change water filter Immediately call Nespresso representative. Change water filter Ready Alternating Immediately call Nespresso representative. Service required Service required Ready Alternating Milk tank empty Milk products are locked. Ready Add Milk Fill up the milk container (in fridge). - Page 26 Alarms Description Display message LED status Remarks Cleaning required in When timer ends machine will be locked until Ready cleaned. xy min. Cleaning required in Only milk products will be blocked. Alternating Timer starts 2h before locking milk preparation. Milk products not available Milk products not available. Ready Cleaning required! Start cleaning as described on page 20.
- Page 27 Open lever and try new capsule. Preparation time too short Preperation too short Message appears if no capsule is inserted. Lift the lever If messages appears repetitive call Nespresso Alternating representative. Heating up boiler 1 Slow blinking during heating -...
-
Page 28: Specifications
Specifications 1003 1003 Power supply: 220-240 V / 50/60 Hz / 2850-3150 W Product capacity/h depending on the power supply 380-415 V / 50/60 Hz / 8600-9400 W Espressos 208 V / 60 Hz / 8300 W Ristrettos Lungos Dimension: 1003 x 693 x 632 mm (L /D /H) Milk based beverages Weight: 100 kg (empty) Hot water 120 kg (in operation) Chlorine: none Outlet height standard: 190 mm TDS:... - Page 29 The type plate contains the following details: Machine type: Automatic Coffee Machine The capsule container must be re- Model: AGUILA moved to see the type plate. Type: AG420PRO The type plate is located beneath Voltage: according to type plate the left capsule container on the baseplate.
-
Page 31: Ec-Declaration
We Thermoplan AG, Roehrlistrasse 22, CH-6353 Weggis, Switzerland declare under our sole responsibility that the product Product Automatic Coffee Machine Model AGUILA Type AG420PRO to which this declaration relates is in conformity with the following standards and corresponding IEC standards: EN 50366:2006... - Page 32 English 120.620-C...
Need help?
Do you have a question about the AGUILA and is the answer not in the manual?
Questions and answers