Advertisement
Quick Links
Instruction Manual
Join us on facebook
to share delicious
ideas.
Register your
new Holland Grill at:
www.hollandgrill.com
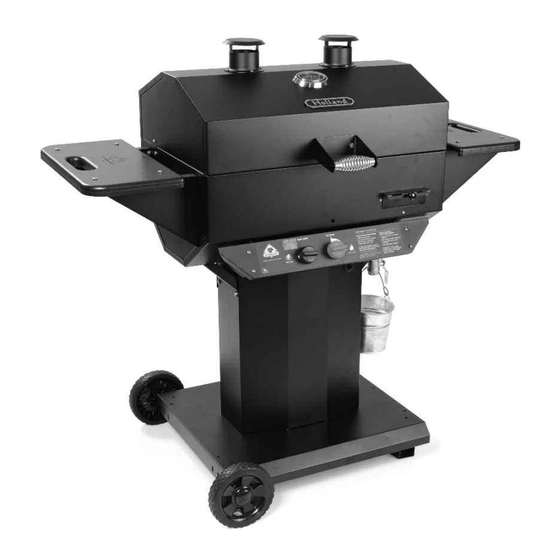
The Holland
Vintage
Vintage
L.P. Tank
not included.
L.P. NOTICE: This grill shall be
connected only to a 20 lb. L.P. cylinder that is
equipped with a Sherwood Valve #PV3349 and
an overfill protection device (OPD).
www.hollandgrill.com
ANSI Z21.58b - CSA 1.6b - 2010
©The Holland Grill Co., Inc.
PN AG8-MAN V2013a
B RBECUE INDUSTRY
SSOCI TION MEMBER
3RR4
Included Free!
One-temperature cooking
the Holland Grill way. Easy
to follow demonstrations will
help you prepare a mouth
watering meal today.
Gas Grill
BH421 G8
The only Grill
not to flare up!
Advertisement

Related Manuals for Holland Grill Vintage BH421AG8


Summary of Contents for Holland Grill Vintage BH421AG8
- Page 1 Join us on facebook to share delicious ideas. Register your new Holland Grill at: www.hollandgrill.com Included Free! One-temperature cooking the Holland Grill way. Easy to follow demonstrations will The Holland help you prepare a mouth Vintage Vintage watering meal today. Gas Grill BH421 G8 L.P.
- Page 2 USE GRILL AT LEAT 3 FT. FROM ANY WALL OR SURFACE. MAINTAIN 10 FT. CLEARANCE Thank you for purchasing a Holland Grill. This is truly a grill that you, your family and friends TO OBJECTS THAT CAN CATCH FIRE will use and enjoy for many years to come.
-
Page 3: Safety Information
Turn off LP supply at device (OPD) should be used. to set it up properly. The N.G. Holland Grill is set to operate at 7 • KEEP OUTDOOR COOKING GAS APPLIANCE AREA CLEAR AND FREE FROM cylinder when appliance is not in use. -
Page 4: Tools Needed
VINT GE GRILL SSEMBLY INSTRUCTIONS Fasteners Guide #10 - 24 x 1” Carriage olt, Lockwasher & Locknut, Side shelves 1/4 - 20 x 1/2” Hex Head olt, Nut and lockwasher, ngle brackets 1/4 - 20 x 1/2” Hex Head olt and lockwasher, ttach most parts of the grill #10-24 x 1/2”... - Page 5 Step 4. Install the Shelf Brackets and Shelves B. Fasten the handle bracket to the grill lid using 2-1/4-20 x 1/2 Hex Step 6. Tank Installation Head Bolts and lock washers. Tighten securely. Select the following parts for assembly: Select the following parts for assembly: Place your 20-lb propane tank into the hole in grill base.
- Page 6 CAUTION: The drip pan must be kept clean and free of C UTION: NEVER MOVE GRILL WITH BURNER LIT OR WITH life of your Holland Grill, but it is wise to check the flame color each heavy build-up for grill to perform properly, and to eliminate flare-ups.
- Page 7 An average hamburger, under normal circumstances, should take chip tray or chip drawer. NOTE: Remember, the Holland Grill needs to warm up completely. Temperature will remain about 400 degrees F. approximately 10 to 12 minutes on each side. Thicker burgers will sim- All grilling times are approximate depending on size, weight and individual taste preference.
- Page 8 NOTE: Be sure to properly adjust the air shutter before tightening the jam nut. Place conversion sticker in highly visible location. If you have a question about the warranty or want to order parts or accessories, please contact your local Holland Grill WARNING: After installation is complete check for leaks using a soapy water solution.
- Page 9 100% of the original purchase price, replace the parts that are causing the flare-ups, or replace your Holland grill with a new Holland grill of the same or comparable model. This no flare-up warranty applies...
- Page 10 (please consult your use & care manual), or failure to follow local codes. Product repair or parts replacement at the option of the Holland Grill Co. is the exclusive remedy under this warranty. The Company shall not be liable for any incidental or consequential damages resulting from the use or transportation of any Holland grill, or for breach of any express or implied warranty on the Holland grill.
Need help?
Do you have a question about the Vintage BH421AG8 and is the answer not in the manual?
Questions and answers