Advertisement
Instruction Manual
Join us on facebook
to share delicious
ideas.
Register your
new Holland Grill at:
www.hollandgrill.com
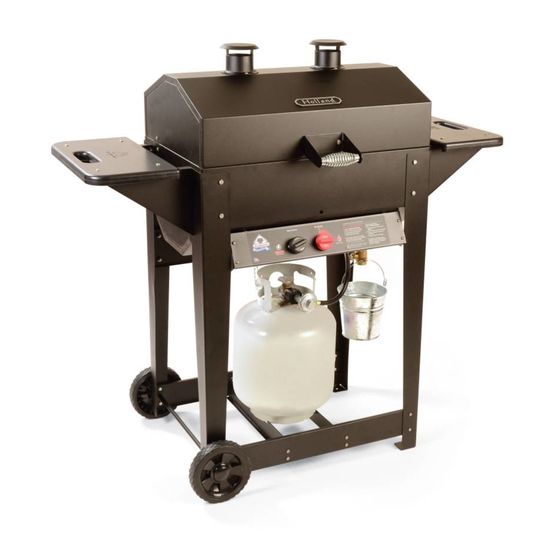
The Holland
Liberty
Liberty
BH421 G9
L.P. Tank
not included.
L.P. NOTICE: This grill shall be
connected only to a 20 lb. L.P. cylinder that is
equipped with a Sherwood Valve #PV3349 and
an overfill protection device (OPD).
www.hollandgrill.com
ANSI Z21.58b - CSA 1.6b - 2010
©The Holland Grill Co., Inc.
PN AG9-MAN-3G V2015a
Gas Grill
The Holland
Independence
Independence
The Holland
Freedom
Freedom
BH421 G11
B RBECUE INDUSTRY
SSOCI TION MEMBER
Included Free!
One-temperature cooking
the Holland Grill way. Easy
to follow demonstrations will
help you prepare a mouth
watering meal today.
Gas Grill
BH421SS6
Gas Grill
The only Grill
not to flare up!
Advertisement
Table of Contents

Related Manuals for Holland Grill freedom BH421AG11


Summary of Contents for Holland Grill freedom BH421AG11
- Page 1 Join us on facebook to share delicious ideas. Register your new Holland Grill at: www.hollandgrill.com Included Free! One-temperature cooking the Holland Grill way. Easy to follow demonstrations will help you prepare a mouth The Holland watering meal today. Liberty Liberty Gas Grill...
- Page 2 DANGER GRILL INSTALLER - LEAVE THIS INSTRUCTION BOOKLET FOR THE GRILL OWNER. IF YOU SMELL GAS: GRILL OWNER - SAVE THIS INSTRUCTION 1. SHUT OFF GAS TO APPLIANCE. BOOKLET FOR FUTURE REFERENCE. 2. EXTINGUISH ANY OPEN FLAME. 3. OPEN LID. 4.
- Page 3 Simply close the lid and cook by time. It’s guaranteed not to flare-up. Thank you for purchasing a Holland Grill. This is truly a grill that you, your family and friends will use and enjoy for many years to come.
-
Page 4: Safety Information
The visual inspection should include leak testing the entire length of PERFORMANCE. • CHOOSE ONLY A LEVEL LOCATION FOR GRILL OPERATION. THE HOLLAND GRILL hose and fittings. (See final assembly instructions for more informa- MUST BE SITTING SECURELY ON A LEVEL SURFACE FOR PROPER OPERATION tion.) - Page 5 NATURAL GAS: If natural gas is used, contact your local supplier device (OPD) should be used. to set it up properly. The N.G. Holland Grill is set to operate at 7 inches water column pressure, using an orifice with a (#53 drill size The LP gas cylinder shall be used only outdoors in a well ventilated INDEPENDENCE) or (#48 drill size LIBERTY, FREEDOM).
-
Page 6: Tools Needed
HOLL ND GRILL SSEMBLY INSTRUCTIONS Fasteners Guide Freedom and Independence extra feature fasteners #10 - 24 x 1” Carriage olt, Lockwasher & Locknut, Side shelves #10-24 x 1/2” Carriage olt, Lockwasher & Locknut, Condiment tray #10-24 x 3/8” Pan Head Phillips, lockwasher & nut, Leg braces and lid stacks #10-24 x 3/8”... - Page 7 tank braces legs bottom brace front legs have 4 holes legs back brace on the side front of grill D. Attach the legs back brace using 4 10-24 x 3/8 Pan Head Phillips Step 1. Open Boxes screws, lockwashers and nuts. Finger tighten at this point. On a flat surface (table or garage floor), OPEN AND EMPTY BOTH E.
- Page 8 . Place the grill lid onto grill bottom assembly. Fasten the two body Step 5. Install the Shelves Tighten legs hinges to the lid assembly using 8-1/4-20 x 1/2 Hex Head Bolts and lock washers. Align the grill lid top with the grill bottom then tighten all 8 Select the following parts for assembly: hinge bolts completely.
- Page 9 F. Open the lid fully. Using 8 10-24 x 3/8 Pan Head Phillips screws, Tank Installation lock washers and hex nuts fasten the smoke stacks to the grill lid as shown. Tighten all 8 securely. Place your 20-lb propane tank into the tank brackets. Connect the regulator and hose assembly to the propane tank valve.
- Page 10 THE FOLLOWING STEPS RE FOR BOTH THE Step 9. Install the condiment shelf FREEDOM ND INDEPENDENCE GRILLS Select the following parts for assembly: 1. condiment shelf Step 8. Install the two front panels 2. condiment shelf brackets (2) 3. utensil hooks and retainer push nuts(2) Select the following parts for assembly: .
- Page 11 Step 10. Install the grill lid handle Step 11. Install the thermometer and control knobs Select the following parts for assembly: 1. handle and brackets Select the following parts for assembly: 1. Thermometer . Select the two handle brackets and handle. First attach the brackets 2.
-
Page 12: Lighting Instructions
There should be no need for re-adjustment for the life of your Holland Grill, but it is wise to check the flame color each time you light your grill. When proper setting is obtained be sure to... -
Page 13: Turning Grill Off
Following these instructions will improve the longevity and quality of cooking. To assure safe operation of your Holland Grill, the area for cooking should always be kept free of combustible materials of any type, such as gasoline or other flammable vapors or liquids. - Page 14 Be sure to check out the Holland Grill recipes, tips and tricks listed on the website. Why not try to create a few of your own!
-
Page 15: Grilling Instructions
Fish 20 minutes total NOTE: Remember, the Holland Grill needs to warm up completely. Temperature will remain about 400 degrees F. All grilling times are approximate depending on size, weight and individual taste preference. Grill needs to remain closed at all times during grilling to be accurate with this time chart. Each time grill is opened during the grilling process, increase grilling time by approximately 10 minutes. - Page 16 SS5-200W WELD Independence Bottom ssembly SS6-100W WELD If you have a question about the warranty or want to order parts or accessories, please contact your local Holland Grill dealer or call 800-880-9766 or visit us on the web at hollandgrill.com HG-13...
- Page 17 G S CONVERSION INSTRUCTIONS G S CONVERSION INSTRUCTIONS LIBERTY and FREEDOM MODELS LP (propane) Gas to Natural Gas STEP 1 Close valve on LP (propane) tank. STEP 2 Disconnect and remove the regulator and hose assembly from the LP (propane) tank by unscrewing counter-clockwise the large black plastic nut.
- Page 18 Ask your dealer to see some of our new Holland Grill Accessories. Dual Scraper Veggie Roastin’ Rack Holland Grill Family Cookbook Seasoning Mixes Patio Heaters Flavored Infrared SearMate Wood Smoke Pellets For more information on our complete line of Holland Grills and Accessories visit us on the web at:...
- Page 19 100% of the original purchase price, replace the parts that are causing the flare-ups, or replace your Holland grill with a new Holland grill of the same or comparable model. This no flare-up warranty applies only to flare-ups of edible foodstuffs from the drip pan and does not apply to any fire from flammable, toxic or poisonous substances unfit for human consumption.
-
Page 20: Warranty Procedure
(please consult your use & care manual), or failure to follow local codes. Product repair or parts replacement at the option of the Holland Grill Co. is the exclusive remedy under this warranty. The Company shall not be liable for any incidental or consequential damages resulting from the use or transportation of any Holland grill, or for breach of any express or implied warranty on the Holland grill.
Need help?
Do you have a question about the freedom BH421AG11 and is the answer not in the manual?
Questions and answers