Table of Contents
Advertisement
Quick Links
Download this manual
See also:
User Manual
Advertisement
Table of Contents

Related Manuals for Pima HUNTER-PRO 32


Summary of Contents for Pima HUNTER-PRO 32
- Page 1 HUNTER-PRO 32 Intruder Alarm System Installation Guide PIMA Electronic Systems Ltd. 5 Hatzoref Street, Holon 58856, Israel ℡ +972-3-5587722 +972-3-5500442 support@pima-alarms.com http://www.pima-alarms.com...
- Page 2 PIMA Electronic Systems Ltd. does not represent that its Product may not be compromised and/or circumvented, or that the Product will prevent any death, personal and/or bodily injury and/or damage to property resulting from burglary, robbery, fire or otherwise, or that the Product will in all cases provide adequate warning or protection.
-
Page 3: Table Of Contents
HUNTER-PRO 32 Intruder Alarm System - Installation Manual ABLE OF ONTENTS Table of Contents ................ 3 Chapter 1 Introduction ............... 8 Main Features HUNTER-PRO 32 ..........9 Safety Precautions............... 10 Signs and Abbreviations Key ..........10 The Control-Panel..............12 1.4.1 Control Panel Fuses............13 1.4.2... - Page 4 HUNTER-PRO 32 Intruder Alarm System - Installation Manual 3.3.3 I/O-8: External Expenders ..........30 3.3.4 RC-PRO: Wireless Expansion.......... 31 Connecting Key/Remote Control ........... 32 TMPR1 and TMPR2 .............. 33 Connecting Sirens..............33 3.6.1 Siren without built-in oscillator: Horn (AC)...... 34 3.6.2...
- Page 5 HUNTER-PRO 32 Intruder Alarm System - Installation Manual 4.3.2.3 Using Technician Code ..............52 Chapter 5 Technician Menu ............53 Entering Technician Menu ............ 53 Installing the System ............53 5.2.1 Service Provider ............53 5.2.2 Wire Expenders............. 54 5.2.2.1 Local Expansion ................54 5.2.2.2...
- Page 6 HUNTER-PRO 32 Intruder Alarm System - Installation Manual 5.5.2 Programming Outputs Time........... 69 5.5.3 AC Report Delay ............70 5.5.4 Soak Test Days ............. 70 5.5.5 Double Knock ............... 70 5.5.6 Conditioned Zones Time ..........71 5.5.7 Bypass Limit Time ............71 5.5.8...
- Page 7 HUNTER-PRO 32 Intruder Alarm System - Installation Manual 7.3.1 Clock................86 7.3.2 Battery ................. 86 7.3.3 Low DC ................ 86 7.3.4 AC Line................. 87 7.3.5 Tamper ................ 87 7.3.6 Zone ................87 7.3.7 Keyboard Not Connected ..........87 7.3.8 Telephone ..............88 7.3.9...
-
Page 8: Chapter 1 Introduction
Installer Guide. Furthermore, the User Guide includes user’s programming parameters instructions, which is crucial for operating the system. For any further questions, please do not hesitate to contact your local PIMA distributor or PIMA directly at: PIMA Electronic Systems Ltd. -
Page 9: Main Features Hunter-Pro 32
Two options for viewing system status: Detailed: Scrolling events, zones’ and system’s status “PIMA” Style: Status of all 32 zones is displayed simultaneously Four Subscriber dialing numbers with optional voice message Four Monitoring Stations phone numbers PIMA unique Integrated Digital Communicator (telephone, long-range radio) -
Page 10: Safety Precautions
HUNTER-PRO 32 Intruder Alarm System - Installation Manual Safety Precautions Your HUNTER-PRO 32 alarm system has been registered with the CE in accordance with EN 60950 of its rules. The CE requires us to tell you the following information: ! To reduce the risk of fire or electric shock, do not expose this alarm system to rain or moisture. - Page 11 HUNTER-PRO 32 Intruder Alarm System - Installation Manual “LCD Zone Numbers”: Referring to the frame of zones engraved above and below the LCD display window, indicating the zones’ numbers. CMS: Central Monitoring Station...
-
Page 12: The Control-Panel
HUNTER-PRO 32 Intruder Alarm System - Installation Manual 1.4 The Control-Panel 9 11 9 10 HUNTER-PRO... -
Page 13: Control Panel Fuses
Zone inputs can be connected to all types of detectors with dry contact outputs. All zones can be connected with single or double EOL resistors NOTE: The number of zones can be doubled by connecting line/wireless expenders (refer to section 3.2 for expending options in HUNTER-PRO 32. - Page 14 HUNTER-PRO 32 Intruder Alarm System - Installation Manual 4 (+) – Power Supply for Detectors Power supply for detectors that require DC operating voltage, such as infrared detectors, beam-detectors etc. 5 KEY – Key or remote Arming Input Use momentary or ON/OFF key to arm/disarm the system.
- Page 15 HUNTER-PRO 32 Intruder Alarm System - Installation Manual ⑪ TMPR1 and TMPR2 – Tamper Inputs Inputs for tamper switches from detectors and boxes that can be connected with/without EOL resistor/s. Different responses can be programmed to arm/disarm system status. These inputs can serve as indicators other than tamper, for example: thermostat, 24 hours zone monitoring, panic button etc (see section 3.5).
- Page 16 ⑱ TRANSMIT – Connection to Long-Range Radio Transmitter Connection to PIMA long-range radio transmitters TRU/TRV-100. NOTE: It is possible to connect long-range transmitters other than PIMA’s by connecting the TX-1000 adaptor. ⑲ JP5-Select Siren Type Connection to two types of sirens: with internal oscillator/driver (speakers) and without internal oscillator/driver (horn).
-
Page 17: Chapter 2 Partitions
HAPTER ARTITIONS 2.1 General HUNTER-PRO 32 can consist up to 16 partitions that are controlled by different user codes, different keypads, or, on the other hand, share the same keypads. This chapter scans the different partitioning options in HUNTER-PRO 32. -
Page 18: Examples
HUNTER-PRO 32 Intruder Alarm System - Installation Manual 2.2 Examples 2.2.1 Example A Keypad 1 Partition 1 Partition 2 Partition 3 User 1 User 2 User 3 Drawing 1-Using partitions (example A) In example A: Keypad 1 controllers 3 partitions... -
Page 19: Example B
HUNTER-PRO 32 Intruder Alarm System - Installation Manual code for arming/disarming the system. In this case, the keypad will display the entire system’s status. A detector that is allocated to several partitions can be installed in order to protect the entrance of the offices’ hallway (i.e. a zone shared by several/all partitions). -
Page 20: Classical Application For Example B
HUNTER-PRO 32 Intruder Alarm System - Installation Manual Classical Application for Example B Storage floor partition 4 Keypad 4 Management floor partition 3 Keypad 3 Production floor partition 2 Keypad 2 Store (floor) partition 1 Keypad 1 A company building is divided into 4 departments that have different entrances and different working hours: Each of the departments has its own individual keypad. -
Page 21: Example C
HUNTER-PRO 32 Intruder Alarm System - Installation Manual 2.2.3 Example C Keypad 1 Keypad 2 Keypad 3 Keypad 8 Partition 1 Partition 2 Partition 3 Partition 8 User 1 User 2 User 3 User 8 Drawing 3- Using sub-systems (example C) - Page 22 HUNTER-PRO 32 Intruder Alarm System - Installation Manual...
-
Page 23: Chapter 3 Installing Peripherals
HUNTER-PRO 32 Intruder Alarm System - Installation Manual HAPTER NSTALLING ERIPHERALS 3.1 General Connect the various accessories according to the following diagram and instructions:... -
Page 24: Connecting Zones
HUNTER-PRO 32 Intruder Alarm System - Installation Manual MIC or PSTN Voice Unit Keypad BUS RX 404, RX 414, or RX 200 10K ¼W 10K ¼W 12VDC 7.2AH MAX 3.2 Connecting Zones IMPORTANT! Always disconnect battery and mains power supply when you connect and disconnect wires. -
Page 25: Connecting Detector Without Using Eol Resistor
HUNTER-PRO 32 Intruder Alarm System - Installation Manual (one or two) is defined as a general rule for all the zones (refer to section. 5.3.1). 3.2.2 Connecting Detector without using EOL resistor Connect a detector with NC output (for example, Defender-2K) without EOL resistor according to the below diagrams. - Page 26 HUNTER-PRO 32 Intruder Alarm System - Installation Manual PIR (NC) 10K ¼W TAMPER NC RELAY NC TAMPER NC RELAY NC PIR1 PIR1 Zone One EOL resistor One EOL resistor in serial Separate connections for connected to a NC to the relay and the...
-
Page 27: Connecting Detector Using Two Eol Resistors
HUNTER-PRO 32 Intruder Alarm System - Installation Manual One EOL resistor One EOL resistor in serial Separate connections for connected to a NC to the relay and the the relay and the TAMPER; detector TAMPER each with a dedicated EOL resistor 3.2.4... -
Page 28: Connecting Zone-Expenders (General)
NO output 3.3 Connecting Zone-Expenders (General) It is possible to expand HUNTER-PRO 32’s zones and outputs by using different expansion cards and Add-On devices. The following is a brief scan of the zone and outputs expansion options. A detailed installation description is found later on (check the section reference at the end of each expansion option.) -
Page 29: Exp-Local: Local Expansion
3.3.1 EXP-LOCAL: Local Expansion An 8-zone expansion card, used for connecting 8 additional wired zones. These zones are identical to those of the HUNTER-PRO 32, and shall always be programmed in the system as zones 9 to 16. NOTE: Disconnect all of the system’s power sources before installing the expansion card. -
Page 30: I/O-8: External Expenders
HUNTER-PRO 32 Intruder Alarm System - Installation Manual 3.3.3 I/O-8: External Expenders A zone and output expansion card connected to the keypad’s communication lines (BUS). The card has 8 zones and one relay output. It is possible to install up to three I/O-8 cards (providing an EXP-LOCAL is not installed) in order to expend the system to 32 zones. -
Page 31: Rc-Pro: Wireless Expansion
HUNTER-PRO 32 Intruder Alarm System - Installation Manual HUNTER-PRO 32 IN OUT zones KEYPAD RXN-400/410 I/O-8 EXP-1 KEYBOARD ID=1 I/O-8 KEYBOARD EXP-2 ID=2 KEYBOARD ID=3 Drawing 5-Connecting external expansion cards on control panel’s bus In order to configure the number of I/O-8 cards connected to the system, see expender menus in section 5.2.2.2. -
Page 32: Connecting Key/Remote Control
HUNTER-PRO 32 Intruder Alarm System - Installation Manual Along with the RC-PRO the HUNTER-PRO 32 becomes a Hybrid system that supports both wired and wireless detectors. To connect the RC-PRO: Use the Communication Cable to connect the control panel to the serial output. -
Page 33: Tmpr1 And Tmpr2
EOL. Refer to the “System Configuration” screen in order to change the defaults (section 5.6). Control Panel TMPR TMPR ALARM SIREN SMOKE KEYPAD TAMPER switch Drawing 8-Connecting tamper to control-panel 3.6 Connecting Sirens Three siren types can be connected to HUNTER-PRO 32... -
Page 34: Siren Without Built-In Oscillator: Horn (Ac)
A Siren without a built-in oscillator (AC). Consumes up to 200 mA. The siren is connected between terminal block outputs (S1, S2) and GND (-). The siren’s sounds are produced by HUNTER-PRO 32 inner built-in oscillator. When the zones’ features are configured (see section 5.3.1), it is possible to program different siren sound to different zones. -
Page 35: High-Current Stand-Alone Siren
(zone is activated, pressing Relay Code on keypad, via telephone, and as response to faults/events). Connect the relay outputs NO/NC/COM to activate the designated device. To program Relay Code refer to “HUNTER-PRO 32 User Manual”. To program relay activation time see section 5.5.2 “Output Time”... -
Page 36: (Aux1) Alarm (Aux2)
ALARM (AUX1) (AUX2) HUNTER-PRO 32 has two outputs for general use. In “General Parameter” screen (see section 5.6) the default is that AUX1 is designated for arming/disarming the system and AUX2 for the keypad’s buzzer. AUX1 switches (-) when activating system (ON/OFF output) system default AUX2 switches (-) at time of alarm (ALARM output) system default Also, these outputs can be allocated for further uses when the zone’s... -
Page 37: Connecting Keypads
HUNTER-PRO 32 Intruder Alarm System - Installation Manual EXPANSION CARD TRANSMIT KEYBOARD SERIAL Drawing 11-Connecting OUT-1000 to control panel Use the cable to connect the control panel’s JP3 connector to OUT-1000’s JP1 connector. NOTE: OUT-1000 can be connected simultaneously with EXP-LOCAL by connecting OUT-1000’s JP2 to EXP-LOCAL’s JP1 (see OUT-1000 Manual for instructions). -
Page 38: Lcd Keypads: Rxn-400/410
12:40 Drawing 12-Connecting LCD keypad to control panel PIMA’s new keypads contain a tamper switch that “supervises” the keypads connected to the system. In order to enable this feature: 1. Configure exactly the number of keypads connected to the system: Short JP1 legs 1 and 2 on the keypad (see drawing 11). -
Page 39: Telephone Line And Devices
HUNTER-PRO 32 Intruder Alarm System - Installation Manual Important! If keypad supervision is not needed, The number of keypads connected to the system is not to be configured The keypads’ ID need be set as zero (0). Note Up to 8 keypads can be connected to the system, whether they have supervision or not. -
Page 40: Trv/Tru-100
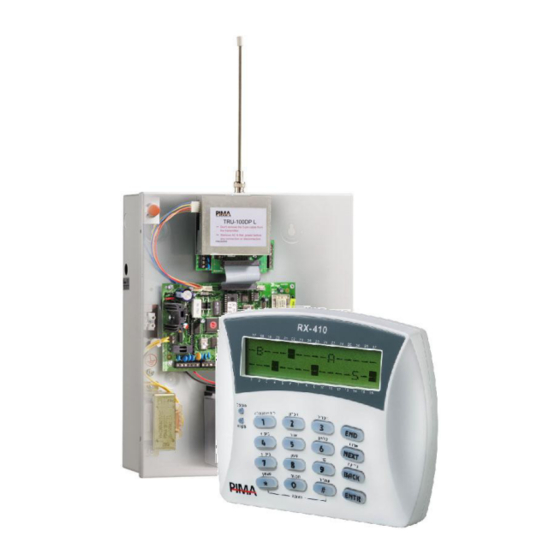
NOTE: The TRV/TRU-100 can transmit in two frequencies. 1. Mount the HUNTER-PRO 32 metal box on the wall 2. Screw the transmitter to the box (4 screws at the base of the antenna.) Make sure the screws are tightened; else, the transmitter’s range can be reduced. - Page 41 HUNTER-PRO 32 Intruder Alarm System - Installation Manual Follow the pervious 1 to 5 instructions, and then: Connect the 2-pin cable to the transmitter’s F2 Molex (named F2 on the transmitter’s sticker.) Connect the other end of the 2-pin cable to the control panel depends on the...
-
Page 42: Microphone Unit: Mic-100
HUNTER-PRO 32 Intruder Alarm System - Installation Manual Antenna connector TRV/TRU-100 DPR-44 comax TRANSMITTER Control Panel Drawing 16- Connecting TRV/TRU-100 to control panel 3.14 Microphone Unit: MIC-100 Connect Mic-100’s IN output to the control panel’s OUT terminal. Connect Mic-100’s OUT output to the control panel’s AUD IN terminal. -
Page 43: Connecting Battery
Drawing 18-connecting VU-20 to control panel 3.16 Connecting Battery The HUNTER-PRO 32 incorporates a rechargeable 12V backup battery. The charging voltage for the battery is 13.8 V. The system performs two battery tests as well as a manual test: ! “Low level” test”: A continuous monitoring for battery failures such as a disconnected wire, poor contact, etc. -
Page 44: Connecting Mains
HUNTER-PRO 32 Intruder Alarm System - Installation Manual 3.17 Connecting Mains IMPORTANT! Verify that the power cord is disconnected from the mains power supply. Connect the three power cord wires to the connection terminals of the Power Supply terminals. Verify that the transformer outputs are connected to the AC terminals on the PCB, and that the transformer supplies 2A. -
Page 45: Setting Time
HUNTER-PRO 32 Intruder Alarm System - Installation Manual ! Connect AC mains power supply. ! Connect the backup battery to the fast connection terminals, red wire to (+) and black wire to (-). IMPORTANT! Failing to connect the cables as described will permanently damage the control... - Page 46 HUNTER-PRO 32 Intruder Alarm System - Installation Manual NOTE: Use the keys to move the cursor to the left and to the right. Another way to access User Menu: Technician Code...
-
Page 47: Chapter4 Operating & Programming The System
ROGRAMMING YSTEM 4.1 General The HUNTER-PRO 32 is supplied with factory default parameters. In most installations you will have none or a few parameters to program, except for user-specific parameters such as telephone numbers, zone names etc. 4.2 Programming Possibilities There are four different ways to program the HUNTER-PRO 32: ! Fast Local-Uploading with the PIMA Fast Programmer PRG–22. -
Page 48: Local Programming With Comax & Lcl-11A
HUNTER-PRO 32 Intruder Alarm System - Installation Manual 12:53 OP: TOMAS OFFICE PRG-22 Drawing 19-Connecting LCD Keypad to Control Panel and PRG-22 4.2.2 Local Programming with COMAX & LCL-11A In order to commence local programming with the COMAX software, you need to use the LCL-11A adaptor. -
Page 49: Remote Programming With Modem And Comax
Remote Programming with Modem and COMAX You can program the HUNTER-PRO 32 over a telephone line with a PC, PIMA modem, and the COMAX programming software. In addition to programming, you also have access to the memory log. Please refer to the COMAX User Manual for detailed information 3.18.2... -
Page 50: Programming With A Keypad
HUNTER-PRO 32 Intruder Alarm System - Installation Manual Technician Menu: The technician’s programming screens are organized in menus 4.3 Programming with a Keypad 4.3.1 PIMA Programming Method All programmable parameters in HUNTER-PRO 32 are S RK121 23HTB L divided according to subjects presented in menus. -
Page 51: Entering "User Menu
HUNTER-PRO 32 Intruder Alarm System - Installation Manual Installing a system .............page 53 Zones................page 57 Communication ............page 60 Timers...............page 68 General Parameters............page 72 System Responses............page 74 Output Programming ..........page 76 Programming the entire system........page 76 Technician Code............page 78 Test ................page 78 4.3.2... -
Page 52: Using Technician Code
HUNTER-PRO 32 Intruder Alarm System - Installation Manual NOTE: When the parameter (M) is enabled (User Code>Menu) in General Parameter screen (see section 5.6), it is possible to enter the user menu directly without long-pressing the key. In this case, actions such as arming and disarming are not automatically activated and the arming/disarming key must be pressed. -
Page 53: Chapter 5 Technician Menu
HUNTER-PRO 32 Intruder Alarm System - Installation Manual HAPTER ECHNICIAN 5.1 Entering Technician Menu System Default Codes 5555 Master Code 1234 Technician Code In order to enter Technician Menu: User Menu Technician Menu NEXT TECHNICIAN CODE MASTER CODE Choose 1,2.. -
Page 54: Wire Expenders
HUNTER-PRO 32 Intruder Alarm System - Installation Manual In this screen it is possible to program the system supporter’s name and phone number. Press and hold the key in order to view the entered information (this feature is possible only when the system is in OFF mode). -
Page 55: Wireless Expender
HUNTER-PRO 32 Intruder Alarm System - Installation Manual Remote Expanders ENTR In this screen you program the amount of remote expenders (I/O-8) installed on the keypad’s BUS. It is possible to install up to three expenders in the system. NOTES: If a parameter larger than possible is entered into the system, the system will reset the parameter. -
Page 56: Keypads
HUNTER-PRO 32 Intruder Alarm System - Installation Manual Jam Signal Level: The receiver’s frequency minimum signal level (RSSI) to which the system will respond. There are 11 levels from which you can choose, rating from “0” to “10”. “0” means this feature is neutralized and from “1” until “10”... -
Page 57: Zone Programming
HUNTER-PRO 32 Intruder Alarm System - Installation Manual For example: if keypad 2 is designated to work with partition 2, a “+” is to be marked above 2 in the LCD screen. NOTE: Keypad partitions are only activated in case of a partitioned system. - Page 58 HUNTER-PRO 32 Intruder Alarm System - Installation Manual NOTE: To navigate on bar, use keys. Marking a “+” under a parameter’s letter enables the zone with this parameter. Marking a “-” denies this possibility. In order to change the mark from “-“ to “+” (and vise versa) use Par.
-
Page 59: Zone Name
HUNTER-PRO 32 Intruder Alarm System - Installation Manual Following Zone (+) Zone activates alarm only when his “paired” zone activated alarm. Double Pulse (+) Zone activates alarm only after two successive pulses occur in the duration of time set in Timers Menu. -
Page 60: Zone Sensitivity
HUNTER-PRO 32 Intruder Alarm System - Installation Manual In this screen the three basic zone responses are programmed: Alarm Panic and Smoke. All the S R K O A 1 2 3 H T B L zones that get the same characteristics shall have + - - - _ + + + + - - - the same responses (refer to Zone Programming”... -
Page 61: Communication To Central Monitoring Station
HUNTER-PRO 32 Intruder Alarm System - Installation Manual Communication to Central Monitoring Station 5.4.1 Communication Commun. to MS ENTR ENTR ENTER/NEXT/END ENTER/NEXT/END In this menu all the functions related to the Monitoring Station are programmed. 5.4.1.1 Number of Central Monitoring Stations... -
Page 62: Monitoring Station 2 Options
HUNTER-PRO 32 Intruder Alarm System - Installation Manual ! Monitoring Station Protocol: In this screen the Monitoring Stations’ are programmed. MS 1 Protocol ! Monitoring Station Reports: A P F O L T W I _ + + + + + + +... -
Page 63: General Monitoring Station Options
HUNTER-PRO 32 Intruder Alarm System - Installation Manual 5.4.1.6 General Monitoring Station Options In these screens the Communication’s different features are programmed: ! Test Time and Interval: Test Time:00:00 Interval:24 Test Time: The automatic test time is programmed in 24 hour format (HH:MM). - Page 64 HUNTER-PRO 32 Intruder Alarm System - Installation Manual ! Press the key as many times as needed in order to choose a letter between “A” and “F” Event Table in 4 x 2 Format Z1 ,Z2 ... Z32 Alarms according to zones.
-
Page 65: Radio Transmitter
HUNTER-PRO 32 Intruder Alarm System - Installation Manual Different Double Report Options MS Format 1 MS Format 2 Event Report to MS 2 Event Report to MS 1 PIMA PIMA Default Default American PIMA Programming* Default American American Programming Programming... -
Page 66: Modem Call Back
HUNTER-PRO 32 Intruder Alarm System - Installation Manual Raddio Rep. Codes Z1 :FF Z2:FF Press to move to the next report codes ENTR ENTR Z3: FF Z4:FF ENTER/NEXT/ENF In these screens the Report Codes to the different Radio Formatted events is programmed. -
Page 67: External Line
HUNTER-PRO 32 Intruder Alarm System - Installation Manual Rings ENTER/NEXT/END In this screen you program the number of rings before the system picks up an incoming call. 5.4.4.2 External Line External Line In this screen the area code is programmed in case the system needs an external line in order to make the call (due to switch-board system or a code to access the external line). -
Page 68: Timers
HUNTER-PRO 32 Intruder Alarm System - Installation Manual check (in case system connected via switch-board/ non standard PSTN) PSTN checked every minute the system is on Checking line in ON PSTN checked every minute the system is off Checking line in OFF Tone “+”... -
Page 69: Programming Outputs Time
HUNTER-PRO 32 Intruder Alarm System - Installation Manual Entry Exit 5.5.2 Programming Outputs Time Timers, Counters Output Timers ENTR NEXT ENTR ENTER/NEXT/END ENTER/NEXT/END In this screen the various output times in the system are programmed. NOTE: The programmed time in this screen is the time that takes an output to return to its previous state. -
Page 70: Ac Report Delay
Thus note that a zone in Test Days is different than bypassed zone. NOTES: The zone’s soak test can last up to 3 days. In PIMA display: Alarms triggered by a Test Zone in the memory log have the letter “T” under/above their number. 5.5.5... -
Page 71: Conditioned Zones Time
HUNTER-PRO 32 Intruder Alarm System - Installation Manual Double Knock is used for reducing false alarms from “problematic” zones. In order for a zone configured as “double knock” to trigger am alarm, it must transmit two events to the system in a predetermined time set in this screen (see “Zone Programming”... -
Page 72: General Parameters
HUNTER-PRO 32 Intruder Alarm System - Installation Manual 5.6 General Parameters Gen. Parameters ENTR ENTER/NEXT/END In the following group of screens there are different system parameters. Each screen contains up to 16 parameters set together on a bar and presented in two rows: the upper line has the letter parameters, the bottom line presents the “+”... -
Page 73: General Parameters Second Screen
HUNTER-PRO 32 Intruder Alarm System - Installation Manual Par. Para. Full name Note Key State (+) Switch key (-) Momentary key DC Siren (+) DC Siren (-) Horn Siren TAMPER 1 (+) TAMPER 1 connected TAMPER 1 (+) TAMPER 1-EOL protected... -
Page 74: System Responses
HUNTER-PRO 32 Intruder Alarm System - Installation Manual NOTE: To navigate on bar, use keys. Marking a “+” under a parameter’s letter enables this parameter. Marking a “-” denies this possibility. In order to change the mark from “-“ to “+” (and vise versa) use Par. -
Page 75: System In On State
HUNTER-PRO 32 Intruder Alarm System - Installation Manual 5.7.1 System in ON State System Response System ON ENTR ENTR ENTER/NEXT/END ENTER/NEXT/END In this screen you program the system responses to various events and faults occurring when the system is ON:... -
Page 76: Programming Outputs
HUNTER-PRO 32 Intruder Alarm System - Installation Manual 5.8 Programming Outputs In this screen the system’s outputs are programmed. 5.8.1 Polarity In this screen you program the manner in which each of the following outputs operates: Output Configur. Output Polarity... -
Page 77: Initializing System
ENTR ENTR Programming Using this feature, HUNTER-PRO 32 is connected directly to a local computer running COMAX and connected to the system using LCL-11A adaptor that is connected to the keypad (see section 4.2.2 for connecting programming keypad with LCL11A). -
Page 78: Installer Code
HUNTER-PRO 32 Intruder Alarm System - Installation Manual This feature is for fast-loading HUNTER-PRO 32 with parameters from the Fast- Programmer PRG-22. The programmer needs to be connected to the right plug in the keypad before activating this feature. Furthermore, a filed from which the parameters are uploaded need be chosen (1 or 2). -
Page 79: Wireless Test
HUNTER-PRO 32 Intruder Alarm System - Installation Manual Untested Zones: Untested Zones: UT: Living Room All Zones Tested and if all zones were tested: keys to scroll between the zones. This test is extremely useful at the end of installing the system in order to make sure all the zones are in order and connected to the system. -
Page 80: Configuring Soak Test Zones
HUNTER-PRO 32 Intruder Alarm System - Installation Manual 5.11.4 Configuring Soak Test Zones Tests Set Soak Zone ENTR NEXT ENTER/NEXT/END ENTER/NEXT/END Z o n e N u m b e r : ENTR E n t r - C o n f... -
Page 81: Remote-Controlling Via Telephone
HUNTER-PRO 32 Intruder Alarm System - Installation Manual 5.12 Remote-Controlling via Telephone The system can be controlled from afar using any dial-tone telephone, including cellular phone. It is possible to control the system once the communication between the system and the telephone has been established. - Page 82 HUNTER-PRO 32 Intruder Alarm System - Installation Manual Key [0] Siren and Dialer OFF. The dialer will not dial to the private numbers NOTE: During communication time between the system and the telephone the following message will appear on LCD screen: Other keypad in use”. If the system does not receive any order within a minute’s time, it will disconnect...
-
Page 83: Chapter 6 Name Programming
HUNTER-PRO 32 Intruder Alarm System - Installation Manual HAPTER ROGRAMMING Writing names in HUNTER-PRO 32 is done by the LCD keypad. Each key has allocated characters (letters/numbers/signs). Space and delete characters to move cursor right/left Save data NOTE: The order of characters is identical to that in a cellular telephone. -
Page 84: Chapter 7 Troubleshooting
HUNTER-PRO 32 Intruder Alarm System - Installation Manual HAPTER ROUBLESHOOTING The HUNTER-PRO 32 incorporates many operating parameters and options. Some of the system operations depend on the method of programming, and if one of the parameters is not programmed correctly, the operation depending on it will not be executed. -
Page 85: Displaying System Faults
HUNTER-PRO 32 Intruder Alarm System - Installation Manual NOTE: After connecting the battery, the system enables access using the default code (5555) for 30 seconds only. If access does not occur during this time, the process need be repeated from starters. If the battery is low, connect the main voltage. -
Page 86: Solutions
HUNTER-PRO 32 Intruder Alarm System - Installation Manual “Other keypad in use”. This message appears also when the system is being programmed from a different source such as remote programming via computer and telephone. 7.3 Solutions 7.3.1 Clock This failure appears after initial connection to Power such as first time operation or operation after AC and battery backup failure. -
Page 87: Ac Line
HUNTER-PRO 32 Intruder Alarm System - Installation Manual 7.3.4 AC Line AC mains power failure. If other electrical appliances are working, then check the entire AC conduit to the system. Solution: ! Connect AC power. ! If you find a blown AC fuse, then replace the fuse; if failure persists then replace the PCB. -
Page 88: Telephone
HUNTER-PRO 32 Intruder Alarm System - Installation Manual ! Check for malfunction in the control panel – Replace PBC. NOTE: If there are several keypads connected to the control panel and all show the same indication then either the control panel PCB is malfunctioning or there is a short on one of the wires 7.3.8... -
Page 89: Checking Communications To The Monitoring Station
HUNTER-PRO 32 Intruder Alarm System - Installation Manual ! Correct telephone numbers have been entered. ! A prefix has been programmed if the system is installed in an office (usually 9). 7.3.9.2 Checking communications to the Monitoring Station: Enter Installer code without the Master Code, press in order to initiate an event and watch the progression of communication to the MS. -
Page 90: Automatic Arming Failure
HUNTER-PRO 32 Intruder Alarm System - Installation Manual Check the following: ! The telephone line is properly connected to the IN terminal block. ! In Communication menu the “P” for telephone is programmed with +. The system is programmed to pick up after a reasonable number of rings – not more than 10. -
Page 91: Chapter 8 Tables
HUNTER-PRO 32 Intruder Alarm System - Installation Manual HAPTER ABLES 10.1 Programming System Defaults... - Page 92 HUNTER-PRO 32 Intruder Alarm System - Installation Manual...
- Page 93 HUNTER-PRO 32 Intruder Alarm System - Installation Manual...
- Page 94 HUNTER-PRO 32 Intruder Alarm System - Installation Manual...
- Page 95 HUNTER-PRO 32 Intruder Alarm System - Installation Manual...
- Page 96 HUNTER-PRO 32 Intruder Alarm System - Installation Manual Status...
- Page 97 HUNTER-PRO 32 Intruder Alarm System - Installation Manual...
-
Page 98: Central-Station Report Formats
HUNTER-PRO 32 Intruder Alarm System - Installation Manual 10.2 Central-Station Report Formats 10.2.1 Pulse Formats ERROR I.D. RATE(PPS) NAME CONTROL EVENT ADEMCO 3 – 1 SLOW 3 - 2 DOUBLE 1400 ROUND 4 - 1 4 - 2 3 – 1... - Page 99 HUNTER-PRO 32 Intruder Alarm System - Installation Manual ERROR I.D. RATE(PPS) NAME CONTROL EVENT 3 - 2 4 - 1 4 - 2 3 - 1 3 - 2 DOUBLE 2300 ROUND 4 - 1 4 - 2 3 - 1...
- Page 100 HUNTER-PRO 32 Intruder Alarm System - Installation Manual ERROR I.D. RATE(PPS) NAME CONTROL EVENT UNIVERSAL 3 - 1 HIGH- 3 - 2 2300 CHECK SUM SPEED 4 – 2 RADIONICS 3 - 1 3 - 2 DOUBLE 1400 ROUND 4 - 1...
-
Page 101: Dtmf Formats
HUNTER-PRO 32 Intruder Alarm System - Installation Manual 10.2.2 DTMF Formats I.D. I.D. ERROR RATE EVENT EVENT CONTROL (PPS) 3 - 2 4 - 2 3 - 1 3 - 2 CHECK SUM 1400 4 - 1 4 - 2...
Need help?
Do you have a question about the HUNTER-PRO 32 and is the answer not in the manual?
Questions and answers