Pima HUNTER-PRO 832 Installation Manual
Hunter-pro series
Hide thumbs
Also See for HUNTER-PRO 832:
- User manual (40 pages) ,
- Programming steps (2 pages) ,
- Installation manual (116 pages)

Related Manuals for Pima HUNTER-PRO 832


Summary of Contents for Pima HUNTER-PRO 832
- Page 1 HUNTER-PRO S ERIES 8-144 Z NTRUDER LARM YSTEMS FOR ONES 832, 896, 8144 UNTER NSTALLATION UIDE ERSION PIMA Electronic Systems Ltd. P/N: 4410281, A1, XX en www.pima-alarms.com March 2009...
- Page 2 PIMA’s prior written consent is granted. All efforts have been made to ensure that the content of this manual is accurate. Pima retains the right to modify this manual or any part thereof, from time to time, without serving any prior notice of such modification.
-
Page 3: Table Of Contents
HUNTER-PRO Series Installation Guide Table of Contents CH. 1. Introduction ................6 Comparison table between the Hunter-Pro series models......6 The Hunter-Pro Series Main Features............7 Terms and Abbreviations ................7 Entering names, digits and characters ............8 Technical Specifications.................8 The Control Panel’s PCB ................10 PCB Outputs and Output Types ..............13 CH. - Page 4 HUNTER-PRO Series Installation Guide Key #5: General Parameters ..............69 Key #6: System Responses...............70 Key #7: Outputs Configuration ..............71 5.10 Key #8: Full Programming .................75 5.11 Key #9: Installer Code................76 Asterisk Key * : Express Programming Menu........76 5.12 5.13 Key #0: Tests....................76 5.14 Locating a Zone in an Expander ..............80 CH.
- Page 5 HUNTER-PRO Series Installation Guide The keypad keys table Functions Page System installation Zone Configuration Communication Timers General Parameters System Responses Outputs Configurations Full programming (reset), Local and Fast Downloading Change Installer Code Fast programming Tests...
-
Page 6: Ch. 1. Introduction
NTRODUCTION This guide provides the installation, wiring and programming instructions for PIMA’s intruder alarm series, Hunter-Pro 832, 896 & 8144 for 8-144 zones. PIMA is enhancing its successful HUNTER-PRO 896 with 2 new versions: Hunter-Pro 832 and Hunter-Pro 8144 for 32 & 144 zones. -
Page 7: The Hunter-Pro Series Main Features
HUNTER-PRO Series Installation Guide 5. Install this product in a protected location where no one can trip over any line or power cord. Protect cords from damage or abrasion. 6. Disconnect all sources of power supply before proceeding with the installation. Pay attention: do not install low voltage wires near by AC power wires they should be separated. -
Page 8: Entering Names, Digits And Characters
HUNTER-PRO Series Installation Guide Entering names, digits and characters Each keypad key is used for entering letters, digits and other characters as follows: No. of presses Space Zero Enable/Disable [END] Cancel/ Return to previous screen/s without saving [NEXT] Next char. [BACK] Prev. - Page 9 HUNTER-PRO Series Installation Guide Zone Protection Single or double EOL circuits Other Protection Continuous battery telephone line monitoring Panel Outputs Relay: N.O./N.C. 1A Transistor outputs: 4, 200 mA max Bell/Siren outputs: 2 with separate thermal fuses protection Serial output: RS-232 Communication Channels PSTN: Telephone interface and communicator GSM: GSM-200 transmitter...
-
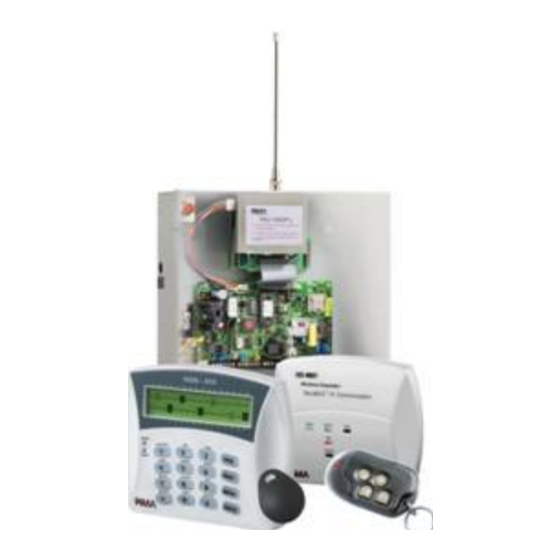
Page 10: The Control Panel's Pcb
HUNTER-PRO Series Installation Guide The Control Panel’s PCB Figure 1. HUNTER-PRO Series PCB 1.6.1 Model & Version The PCB/System model (832, 896 or 8144) is printed on a colored sticker on the EPROM. - Page 11 HUNTER-PRO Series Installation Guide • A model can be expanded to its limit number of zones and users. For example, Hunter-Pro 896 cannot be expanded to 97 zones or 97 users • The EPROM version and the system’s software version must match, or a ‘System Error’...
- Page 12 AUD IN is used for 2 purposes: receiving information from audio resources and sending SMS messages using SMS-100. TRANSMITTER: Radio, GSM-200 & SMS-100 unit TRANSMITTER is a connector to PIMA long-range radio transmitters TRU/TRV-100, to the cellular transmitter GSM-200 (see section 3.12) and to the SMS-100 PSTN SMS unit.
-
Page 13: Pcb Outputs And Output Types
See section 3.5 PCB Outputs and Output Types Unlike in previous PIMA alarm systems such as the Hunter-Pro 32, the responses to events in the Hunter-Pro series are determined through a set of new functions called ‘output types’. These are made of zone types and system events (more than 30 in all) that trigger the PCB outputs. - Page 14 HUNTER-PRO Series Installation Guide In the same manner the mains fault event can also trigger the relay. The only disadvantage is when only one zone type or event needs to trigger the relay: the technician should then verify that no other event or zone type is programmed to trigger the same output.
-
Page 15: Ch. 2. Partitioning
HUNTER-PRO Series Installation Guide CH. 2. P ARTITIONING Introduction A partition is a sub-division of the system, made of several zones. By using partitions you can control user access authorizations. Each partition can be controlled by one or more keypads and a user can be given a code that will allow him to control only a specific partition in a specified time frame. - Page 16 HUNTER-PRO Series Installation Guide A detector located next to the entrance and allocated to all partitions protects the entrance, as soon as all partitions are armed. This zone will be unarmed as soon as the first partition is disarmed. 2.2.2 Example B Control Panels (up to 8 monitored) ..
- Page 17 HUNTER-PRO Series Installation Guide Each department has its keypad: Keypad 1 controls partition 1 (store/storage floor), Keypad 2 controls partition 2 (production floor), Keypad 3 controls partition 3 (management floor), Keypad 4 controls partition 4 (storage/store floor) Employees (i.e. users) can have access only to their partition, or to several partitions. 2.2.3 Example C Control panel #2...
-
Page 18: Ch. 3. Connecting Zones & Accessories
Figure 8. Connections scheme The overall length of the wirings connected to the SecuBus™ cannot exceed 500 meters (call PIMA support when longer distance is required) The SecuBus™ uses PIMA proprietary protocol Connecting Zones Disconnect all power supply prior to installation! 3.1.1... - Page 19 HUNTER-PRO Series Installation Guide Figure 9. Connecting DEFENDER PIR without EOL resistor 3.1.3 Connecting a Detector using a Single EOL Connecting N.C. detector with a single EOL resistor is done according to the next diagrams. The tamper needs be connected to the TMPR input on the control panel’s PCB or as a “24 hours”...
- Page 20 HUNTER-PRO Series Installation Guide 3.1.3.2 Connecting EOL resistor to N.O. DEFENDER PIR Detector Zone N.O. Tamper switch detector Figure 13. One EOL resistor Figure 14. One EOL resistor in serial to the connected to N.O. detector relay and the tamper 3.1.4 Connecting a Detector using 2 EOL resistors Apart from the tamper connection there is no difference whether the detector is a N.O.
-
Page 21: Connecting Zone Expanders
Max. no. of expanders I/O-8N expanders: In Hunter-Pro 832: 3 expanders in total, 2 if EXP-PRO UNIV is installed In HUNTER-PRO 896: 11 expanders in total, 10 if EXP-PRO UNIV is installed In Hunter-Pro 8144: 16 expanders in total, 15 if EXP-PRO UNIV is installed... -
Page 22: Zone Doubling
HUNTER-PRO Series Installation Guide 3.2.3 Zone Doubling The 8 onboard zones can be doubled to 16 by using different resistors, so zone #1 input is used by both zone #1 and zone #9, zone #2 input is used by both zone #2 and zone #10 etc., up to zone #16. - Page 23 HUNTER-PRO Series Installation Guide 3.2.5 I/O-8N, I/O-16, I/O-R Each card must have a unique ID, determined by its dip-switch: 2 cards cannot have the same ID I/O-8N IDs must be successive. The I/O-16 IDs are 1, 3, 5, 7 or 2 ,4 ,6 etc. 3.2.5.1 Expanders’...
- Page 24 HUNTER-PRO Series Installation Guide Follow the information in the next pages for connecting expansion cards. To program the number of expansion cards, refer to section 5.4. 3.2.5.3 I/O-8N: 8 zones & a relay expansion card I/O-8N has three LEDs described in the following table: STATUS DESCRIPTION RUN (Green)
- Page 25 HUNTER-PRO Series Installation Guide RXN-410 Control panel ID=1 +V IN OUT I/O 8N/16, I/O W KEYPAD ID=2 Figure 19. Connecting external expansion cards on control panel BUS Control panel PS-2 Power +V IN OUT supplier RXN-410 ID=1 I/O-8N/16/W Figure 20. Connecting external expansion cards to control panel BUS with external power supplier PS-2...
- Page 26 HUNTER-PRO Series Installation Guide 3.2.5.4 I/O-16: 16 zones & a relay expansion card Parallel connection POWER SUPPLY To external Tamper Tamper Expander ID Connection to other Relay expanders TECH KEYPAD I/O-16 (max. 3) Wiring MASTER DATA Connection Panel Exp. -V 1 Jumper to set EOLs to control FAIL...
- Page 27 HUNTER-PRO Series Installation Guide 3.2.6 I/O-WN I/O-WN is a wireless receiver that integrates with HUNTER-PRO Series. It enables the connection of wireless detectors (such as PIR, Reed Switch etc). See section 3.2 for more details. I/O-WN connects to the PCB’s KEYPAD connections. See the next drawing and the table that follows.
-
Page 28: Connecting A Key
HUNTER-PRO Series Installation Guide Description Status Flashes Signal has been acquired VALID Acquiring a signal (Green) from wireless devices Signal has not been acquired (no reception from the wireless device) No valid frame is received from the panel 2 long No ACK is received from the panel flashes FAIL... -
Page 29: Connecting Sirens
HUNTER-PRO Series Installation Guide Control Panel Tamper switch Figure 25. Connecting a tamper switch Connecting Sirens Two siren types can be connected to the HUNTER-PRO series control panel: 1. AC Siren: This is usually a horn or 8Ω speaker, driven by the control panel’s built-in oscillator. - Page 30 HUNTER-PRO Series Installation Guide 3.5.1.2 Settings for the AC siren In “General Parameters”, set “D” to “-”. This will set the siren to AC (see section 5.7.1). Set JP5, JP10 & JP6 to short pins 2 & 3. Figure 26. Connecting AC Siren 3.5.2 DC Siren Connect the siren between the Ext.
-
Page 31: Relay Output
HUNTER-PRO Series Installation Guide Opt Siren Type JP5/ Parameter ‘D’ in JP10 “General” menu Speaker: Panel generates a tone. Uses Set to “-” unregulated voltage High current self-activating bell Set to “+” (protected by 1.1A thermal fuse): Uses the panel’s battery Relay Output The relay can be used for activating external devices (light, CCTV etc.) and is activated response to alarm/fault, when entering relay code in the keypad and via telephone. -
Page 32: Keypads
HUNTER-PRO Series Installation Guide Keypads Reminder: The system can monitor up to 8 keypads Connect the keypad’s wires to the PCB KEYPAD terminals. The 4 keypad wires must be separated from other wires 3.8.1 RXN-400 & RXN-410 LCD Keypads (Incl. ACE) Control panel IN OUT KEYPAD... -
Page 33: Telephone Line And Devices
3.10 VKD-1: Virtual Keypad VKD-1 is PIMA’s software for creating a virtual LCD keypad and connecting it to any PIMA control panel, locally (via cable) or remotely, via the internet. With VKD-1 you can view and control the system just as if you use a real LCD keypad connected to the... - Page 34 HUNTER-PRO Series Installation Guide The VKD-1 can operate any PIMA control panel directly from your PC, is easy to install (does not require any special panel settings), and suitable for new and existing PIMA panels. C ON SOLE L OO P...
-
Page 35: Trv/Tru-100 Long Range Radio Transmitters
HUNTER-PRO Series Installation Guide 3.11 TRV/TRU-100 Long Range Radio Transmitters 3.11.1 Mounting Guidelines Following these guidelines will minimize RF interference: Do not mount the Panel close to a metal wall or ceiling Make sure you leave enough space for the atenna between the metal box and the ceiling Install the antenna at a distance from the Control Panel’s wiring Mount the antenna after you complete all other installations... -
Page 36: Gsm-200: Cellular Transmitter
HUNTER-PRO Series Installation Guide TRV/TRU-100 To the Program System Figure 34. TRV-100 2 Channels Controller transmitter TRANSMITTER Control Panel DPR-44 PC with Comax Figure 35. TRV/TRU-100 Connections 3.12 GSM-200: Cellular Transmitter Figure 36. GSM-200 PCB To prevent RF interference: Do not mount the system close to a metal roof or wall Check that there is enough space for the antenna between the system and ceiling Keep wiring as distant as possible from antenna... -
Page 37: Mic-200: Microphone Unit
HUNTER-PRO Series Installation Guide 3.13 MIC-200: Microphone Unit Connect MIC-200’s CON to the control panel’s CONT terminal. Connect MIC-200’s OUT to the control panel’s AUD IN terminal. Connect MIC-200’s (-) and (+) to the detectors’ power source. Control Trimmer Panel MIC-200 Z O N E S (-)12(+) CON OUT TA MP... -
Page 38: Battery
HUNTER-PRO Series Installation Guide 3.14.2 Programming the VU-20N for dual messages Using VU-20N in HUNTER-PRO series for dual messages can be done only through partitioning, i.e., each voice message is sent from a zone and an output allocated to a different partition. -
Page 39: Mains
HUNTER-PRO Series Installation Guide 3.16 Mains Before connecting the power cord to the system, verify that the cord is disconnected from mains Connect the transformer to the AC terminals on the PCB and then to mains. With an Ohm meter, check for continuity between the grounding point on the control panel, PCB and GND terminal, to the electrical outlet grounding point. -
Page 40: Wireless Faults Display
The user code must be enabled by the installer to set the time Another way to access the user menu: Installer Code 3.18 Wireless Faults Display 3.18.1 In PIMA Fast Display Wireless accessories faults: Zone Indi. Fault Wireless zone (Detector’s tamper is open) - Page 41 HUNTER-PRO Series Installation Guide Display Fault J U N 1 4 : 2 0 Tamper open in zone #14 F L : Z o n e J U N 1 4 : 2 5 Low Battery in zone #19 L B : Z o n e O C T 1 6 : 3 2...
-
Page 42: Ch. 4. Programming Basics
There are 3 ways to program the HUNTER-PRO series: 1. Locally with the PIMA Fast Programmer PRG–896. The PRG-896 can have 4/7 different presets. It connects to any LCD keypad. 2. Locally or remotely (via telephone or GSM DATA channel) using COMAX 3. - Page 43 4.1.3 Remote Programming with COMAX The HUNTER-PRO series can be programmed and controlled remotely from any PC, using PIMA’s COMAX software (with PIMA PSTN modem). Please refer to the COMAX user guide for detailed information. 4.1.4 Programming with a Keypad The HUNTER-PRO series has two basic menus: User menu, made of single-press key commands (the commands are printed above the keypad’s keys), and Installer menu.
-
Page 44: Default Codes
HUNTER-PRO Series Installation Guide 4.1.5 Navigating through the menu [NEXT] / [BACK]: Backward/Forward keys. Press these keys to navigate between screens/ options/parameters [ENTR]: Selection/Conformation key [END]: Exit/End key: Return to the previous screen without saving [#]: Reset/Erase/Change status key (“-” to “+” and vice-versa) Default Codes The system default codes are: 5555... -
Page 45: Technician Menu
HUNTER-PRO Series Installation Guide Technician Menu To enter Technician Menu: User Menu Techn ician M enu MAS TER C ODE T EC HNIC IAN C ODE NEXT Choo se 1,2. . Choos e 1, 2.. -OR- Technician Menu Choose 1,2.. TECHNICIAN CODE Express Programming Menu To make programming as easy and quick as possible, the HUNTER-PRO SERIES has a... - Page 46 HUNTER-PRO Series Installation Guide Sub-menu Details Set the 4 phone numbers of the monitoring station #1. Use the asterisk key for ‘+’, ‘*‘, ….. ‘#’, ‘P’ (one second pause) Set monitoring station #1 reports Set the monitoring station #1 test time and interval Set monitoring station #1 radio test interval Set the Installer code (4-6 digits)
-
Page 47: Ch. 5. Programming The System
[END]. Enhanced Communication Menu The HUNTER-PRO 832/896/8144 has an enhanced communication menu with various parameters. By default, this menu is not visible, because most installations do not require changing the defaults for these parameters, which necessitates knowledge in communication networks to set them. -
Page 48: Key #1: System Installation
Remote Expanders Set the number of the installed remote expanders (with no EXP-PRO UNIV installed). The no. of remote expanders varies according to the system: In Hunter-Pro 832: 3 max. In Hunter-Pro 896: 11 max. In Hunter-Pro 8144: 16 max. - Page 49 HUNTER-PRO Series Installation Guide 5.3.3 Setting the Wireless Expander To set the wireless expander parameters, first mark “+” under “W” in the expanders menu (see previous section). Sys Installation Wireless Setup ENTR NEXT ENTR ENTER/NEXT/END ENTER/NEXT/END Add Zone? Add Zone? ENTR ENTER/NEXT/END ENTER/NEXT/END...
-
Page 50: Key #2: Zone Programming
HUNTER-PRO Series Installation Guide If monitoring the keypads is not required, the number of keypads should be set to zero 5.3.5 Keypad Partitions In systems that use partitions, each keypad can control one or more partitions (and have no control on the others). Part. - Page 51 HUNTER-PRO Series Installation Guide Par. Full Name Enabling (marking “+”) this parameter means Bypassed The zone is permanently bypassed Permanently Normally Open The zone is set as N.O. zone 24 Hour Zone The zone is armed around the clock, regardless of the system arming state Active in ‘Home 1’...
-
Page 52: Zone Name
HUNTER-PRO Series Installation Guide 5.4.3 Zone Sensitivity Se nsi tiv .(X 50m S) Press [ENTR] Set the zones’ sensitivity in milliseconds. Sensitivity is the time a zone is violated before it triggers the alarm. The number entered is multiplied by 50. In the screen above, entering 8 means a sensitivity of 8 times 50, that is 400 ms. -
Page 53: Partition Name
HUNTER-PRO Series Installation Guide 5.4.6 Partition Name Zones Partition Name ENTR NEXT ENTR ENTER/NEXT/END ENTER/NEXT/END Partition1 Name Partition The partition’s name will appear on every of its allocated keypad. To enable the displaying of partitions: Enter Display Type: BACK ENTR Master Show Part Name Code... -
Page 54: Key #3: Communication Parameters
HUNTER-PRO Series Installation Guide Key #3: Communication Parameters 5.5.1 Monitoring Station #1 Options 5.5.1.1 Protocol Communication Options Protocol EN TR E NT R ENTER/NEXT/END ENTER/NEXT/END Set MS1 PSTN protocol and radio station no. ‘A’ & ‘B’ (above) determine the PSTN protocol (see the matching columns in the codes table, section 7.4) and ‘T’... -
Page 55: Account Numbers
HUNTER-PRO Series Installation Guide 5.5.1.3 PSTN Test Time and Interval Test Time:00:00 Interval:24 Set the daily time and interval for sending test events to the MS. If the time is left 00:00, the system will send the tests only according to the interval. For example, if the test time is set to 23:00 (11 PM) and the interval to 3 Hrs, then test reports will be sent every 3 hours and everyday at 23:00. -
Page 56: Communication Options
HUNTER-PRO Series Installation Guide 5.5.3 The MS Telephone Numbers Communication Phone Numbers ENTR NEXT ENTER/NEXT/END ENTER/NEXT/END …. MS Phone 1<Del=# MS Phone 4<Del=# ENTR ENTR Set MS1 telephone numbers (4 max.). If the system reports to 2 MSs (double report), telephones #1 &... - Page 57 HUNTER-PRO Series Installation Guide Par. Description Setting to ‘+’ means… Pre Alarm Report The system reports when entry delay starts Tst Rprt in OFF Test reports are sent when the system is disarmed Split Account No. When reporting to 2 MSs (with different account numbers), account #1 will be reported to MS1 and #2 to MS2.
- Page 58 HUNTER-PRO Series Installation Guide 5.5.4.5 Communication Channels Set the main communication channel with the MS: PSTN, GSM or IP. If the system cannot communicate through the main channel, it will try to send reports through the other two, while continuing to try in the first. Par.
-
Page 59: Gsm Settings
HUNTER-PRO Series Installation Guide Code Details AC + RESTR Mains voltage (AC) failure + Restore Code LB + RESTR Low Battery + Restore Code PF + RESTR Power Failure: Card voltage lower than 9 volts + Restore Code. Low card voltage indicates AC failure and low battery PHN + RESTR Telephone Line Failure + Restore Code Panic code... - Page 60 HUNTER-PRO Series Installation Guide 5.5.6.2 GSM Modes Communication GSM Transmitter ENTR NEXT ENTR ENTER/NEXT/END ENTER/NEXT/END GSM Settings GSM Modes GSM-200 Mode 1 ENTR NEXT ENTER/NEXT/END ENTER/NEXT/END Voice Channel GSM-200 Mode 1 GSM-200 Mode 1 GSM-200 Mode 1 NEXT NEXT NEXT Data Channel GPRS Channel SMS Channel...
-
Page 61: Sms Settings
Set the serial output use, regarding the connection to the MS. The MS can be connected locally, using RS-232 cable, or remotely, through the net4pro IP interface. It can use a home automation (“Smart home”) or PIMA proprietary protocol. Par. Name Marking “+”... -
Page 62: Modem Call Back
HUNTER-PRO Series Installation Guide 5.5.9 Modem Call Back Communication ENTR NE XT ENTER/NEXT/END Modem Call Back Call Back1<Del=# ENTR ENTER/NEXT/END Set the modem callback phone numbers. Up to 3 numbers can be programmed. If callback telephone #1 is set, in any attempt to contact the system over the telephone line, the panel will hang up and call the PC back. -
Page 63: Advanced Programming
HUNTER-PRO Series Installation Guide 5.5.11.1 MS2 Protocol Set MS2 PSTN protocol. Setting this protocol indicates the system to report to 2 monitoring stations (Double report). In order to report to 2 monitoring stations with 2 different account IDs, mark “+” under “S” (Split Subscriber) in “Communication Options”... -
Page 64: Network Settings
HUNTER-PRO Series Installation Guide 5.5.12.2 PSTN SMS Phones Communication PSTN SMS Phone ENTR BACK ENTR NEXT ENTER/NEXT/END ENTER/NEXT/END SMS Center OUT SMS Center IN ENTR ENTR Set the details for the SMS-100 PSTN module. OUT is the PSTN SMS center phone no. IN is currently not in use 5.5.12.3 Network Settings... - Page 65 HUNTER-PRO Series Installation Guide Screen Data URL or IP Enter either the MS IP no. (e.g. 145.85.24.8) or URL (e.g. www.cmsaddress.com). Use up to 47 characters including spaces. Station port MS1 & MS2 NETsoft/PIMAnet port no.’s. Upload port For future use Web port For future use Static IP...
-
Page 66: Key #4: Timers, Counters
HUNTER-PRO Series Installation Guide Key #4: Timers, Counters Set the system’s timings for entry/exit delays, outputs tripping, faults response and more. Timers, Counters Output Times NEXT ENTR NEXT ENTER/NEXT/END ENTER/NEXT/END Ext. Siren Time AC Report Delay NEXT NEXT ENTER/NEXT/END ENTER/NEXT/END Phone Rprt Delay Burg. - Page 67 HUNTER-PRO Series Installation Guide Following is a table of the output types (see section 1.7) with their default timing. [NEXT] Output type Timing (Sec.) Ext. Siren Int. Siren Burglary Anti-mask Special Burglary 1 Special Burglary 2 Smoke Fire Special Fire Panic Silent Panic Hold Up...
-
Page 68: Ac Report Delay
If set to “0” the zone returns to normal at midnight of the same day the test begun. There is no limit of the number of soaked zones. The soak zone menu is located under Tests (#0). In PIMA display mode, the letter “T” indicates the zone is under a test mode 5.6.7 Double Knock Double Knock is a feature for reducing false alarms: A zone set as ‘Double knock’... -
Page 69: Key #5: General Parameters
HUNTER-PRO Series Installation Guide 5.6.9 Bypass Limit Time Set the time (in minutes) in which a zone can be bypassed (by a user, during arming), before it is automatically becomes armed again. This protects against burglary preparation by bypassing zones before the system is armed. 5.6.10 False Code Set the number of allowed keystrokes (max 24), after which the system reports the MS... -
Page 70: Key #6: System Responses
HUNTER-PRO Series Installation Guide Par. Name Marking “+” means… Not in use Byps. Tmpr. in Arm Arming is enabled with faulty tamper Byps. Fail in ARM Arming is enabled with system fault Press [ENTR] to save and proceed to the second parameters screen. 5.7.2 General Parameters Second Screen CLDSF12ZERPFCJAO... -
Page 71: Key #7: Outputs Configuration
HUNTER-PRO Series Installation Guide The differentiation of responses between armed & disarmed modes, as in other PIMA systems like the HUNTER-PRO 32, does not apply to HUNTER-PRO series and has been replaced by the parameter ‘L’. See the next table Par. -
Page 72: Output Types
HUNTER-PRO Series Installation Guide Press PCB/Expanders [NEXT] Output Internal Siren RELAY SMOKE (reset detectors) ON/OFF ALARM Audio Control OUT-1000 Outputs I/O-R Outputs I/O-8N Outputs 5.9.2 Output Types Following, is a table of the output types by their order in the menu. To clarify, the process of programming is as follows: Pick an output and press [ENTR];... - Page 73 HUNTER-PRO Series Installation Guide Output type What trips the PCB output? Smoke Detector Resetting smoke detectors Power Tamper Tamper switch opened Zone Tamper/fail Zone tamper switch triggered or zone failure Buzzer Keypad buzzer activated Armed Arming the system Installer Program Entering installer code General Fault System general fault MAINS Fault...
- Page 74 HUNTER-PRO Series Installation Guide 5.9.5 ‘Ext. Siren’ and ‘Int. Siren’ Outputs These 2 onboard outputs are both high current outputs and can trigger any speaker siren. However, the ‘Ext. Siren’ output can be triggered only when the ‘Int. Siren’ output is. As a result, the sirens connected to the HUNTER-PRO series can be activated in one of 3 ways: Both the internal and external, the internal only &...
-
Page 75: Key #8: Full Programming
HUNTER-PRO Series Installation Guide 2. ALRM output: Configure the ALRM output so when any zone is opened, the output is tripped. To do so, allocate the ‘Zone opened’ output type to the ALRM output. Output Configur. ALARM Output ENTR NEXT ENTR ENTER/NEXT/END ENTER/NEXT/END... -
Page 76: Key #9: Installer Code
Set/change the Installer code. A code is 4 - 6 digits long. If the Installer code begins with zero it is locked and cannot be reset, in case of power loss. This is a security measure. If this happens, please contact PIMA support team Asterisk Key 5.12... - Page 77 HUNTER-PRO Series Installation Guide The memory log keeps record of the test, including the number of zones triggered. Untested Zones: All Zones Tested When the tests are over, press [ENTR]. If all zones were tested: If not, the system displays the names of the zones not tested, in the following order: Zone No.
- Page 78 HUNTER-PRO Series Installation Guide 5.13.4 Set Soak Zone Set Soak Zone Zone Number: ENTR NEXT ENTR ENTER/NEXT/END Entr-Conf #-Rst Soak Zone ENTR Zone Set a zone to be soaked (tested). When a zone/detector is suspected in causing false alarms, they can be tested. A test can last up to 7 days (to set the number of soak days, refer to section 5.6.6).
- Page 79 HUNTER-PRO Series Installation Guide Output Key Presses Details Exp IO-R [ENTR] [BACK] Press [ENTR], pick an output and press Outputs [ENTR] to trigger it Exp IO-8 [ENTR] [BACK] Press [ENTR], pick an output and press Outputs [ENTR] to trigger it 5.13.6 MS Dialer Test ….
-
Page 80: Locating A Zone In An Expander
HUNTER-PRO Series Installation Guide 5.13.10 Network Statistics L:T0 G:T0 This screen gives information regarding the network and GPRS. The top line shows the PIMAnet™ IP network statistics and the bottom shows the GPRS. The numbers are the no. of packets sent and received. When the ‘L’... -
Page 81: Ch. 6. Remote Control Via Touch-Tone Telephone
HUNTER-PRO Series Installation Guide CH. 6. R EMOTE ONTROL VIA OUCH TONE ELEPHONE HUNTER-PRO series can be remotely controlled via any touch-tone telephone, including a cellular. The system can be controlled in one of 2 options: Mode A: Basic commands, including arming and disarming (the default mode). Mode B: Full control, including triggering all the outputs The entire chapter applies both when you call the system and vice versa... -
Page 82: Mode B
HUNTER-PRO Series Installation Guide 6.1.1 Example for Mode A Arming the system via telephone: Dial the system’s phone no. The system answers wait for the confirmation tone to end Enter Main code Wait for command confirmation tone to end Press [1] Mode B Repeat steps 1-4 in Mode A to contact the system. - Page 83 HUNTER-PRO Series Installation Guide I/O-R expander #1 I/O-R expander #2 Press Relay Press Relay Press Relay Press Relay I/O-R expander #3 I/O-R expander #4 Press Relay Press Relay Press Relay Press Relay Send system status via SMS to the private dialer Press Phone Press...
-
Page 84: Ch. 7. Troubleshooting
The process is also useful for Installer code (Default code 1234), with the exception of a code that begins with zero. In this case the code cannot be reset and you need to call PIMA support Faults Displayed on the LCD Keypad In case a fault occurs, the red fault LED on the keypad flashes. - Page 85 3. If ID and wiring is OK, disconnect the keypad and connect it as close as possible (50 cm max.) to the system box. If the keypad still out-of-order, consult PIMA support Detec. Vol. Fault Check for short in the detectors’ wires Expander X Fault Expander’s X comm.
- Page 86 Supervision: Wireless detector ceased to send reports to the system System Error The EPROM version and the system’s software version do not match. Contact PIMA support If more than one fault occurs simultaneously they will be displayed one by one...
-
Page 87: Additional Faults
HUNTER-PRO Series Installation Guide Additional Faults 7.3.1 MS Comm. Fault The system has preset to test all aspects of communication to MS: Press [6] for 2 seconds and enter technician code. All testing process will be displayed on the keypad. 7.3.2 MS Radio Fault Make sure that:... -
Page 88: Ms Report Formats & Codes
HUNTER-PRO Series Installation Guide 7.3.6 Auto-Arming & Auto-Arming by Partition Make sure that: 1. Auto-arming start time is programmed (see HUNTER-PRO series User guide). 2. System time is correct. 3. The desired partition is programmed as so. 7.3.7 Violating a Zone does not Set-off the Alarm Make sure that: 1. - Page 89 HUNTER-PRO Series Installation Guide Name Rate (pps) ACK (Hz) Error Control ID Event 3 - 1 3 - 2 Double Round 4 - 1 4 - 2 1400 3 - 1 3 - 2 Checksum 4 - 1 Silent 4 - 2 Knight 3 - 1 Fast...
- Page 90 4 - 2 DTMF 3 - 1 3 - 2 Double Round 4 - 1 4 - 2 2300 3 - 1 3 - 2 Checksum 4 - 1 4 - 2 Contact 1400 PAF™ 2300 NPAF™ Call PIMA support EPAF™...
-
Page 91: Ch. 8. Supplementary Products For The Hunter-Pro Series
HUNTER-PRO Series Installation Guide CH. 8. S UPPLEMENTARY RODUCTS HUNTER-PRO S ERIES Led Keypads LCD Keypads RXN-416 – For 16 Zones RXN-400 - Small LCD Display RXN-9 – For 9 Zones RXN-410 - Large LCD Display RXN-400 ACE – LCD Display W/RFID Tag Special Keypads Wireless Technician Keypad... -
Page 92: Index
HUNTER-PRO Series Installation Guide NDEX Accessories Keypads MIC-200, 12, 37, 51, 72, 81, 91 ACE, 32 PRG-896, 42 RXN-400/410, 32 VU-20N, 37, 38 Setting the keypads, 49 Comax, 42, 43, 56, 60, 75, 76 VKD-1, 33 Enhanced Communication Menu, Network Interface net4pro, 9, 61, 64, 65 Expanders Output Types, 13, 72...
Need help?
Do you have a question about the HUNTER-PRO 832 and is the answer not in the manual?
Questions and answers