
Subscribe to Our Youtube Channel
Related Manuals for Avalue Technology EAX-Q77


Summary of Contents for Avalue Technology EAX-Q77
- Page 1 EAX-Q77 Intel® Q77 with Core™ i7/ i5/ i3 ATX Motherboard User’s Manual Ed – 16 November 2012 Part No: E2047AQ7700R...
- Page 2 Disclaimer Avalue Technology Inc. reserves the right to make changes, without notice, to any product, including circuits and/or software described or contained in this manual in order to improve design and/or performance. Avalue Technology assumes no responsibility or liability for the...
-
Page 3: Technical Support
EAX-Q77 User’s Manual Avalue Technology’s PRODUCTS ARE NOT FOR USE AS CRITICAL COMPONENTS IN LIFE SUPPORT DEVICES OR SYSTEMS WITHOUT THE PRIOR WRITTEN APPROVAL OF Avalue Technology Inc. As used herein: 1. Life support devices or systems are devices or systems which, (a) are intended for... - Page 4 Room 805, Building 9, No.99 Tianzhou Rd., 3F Ishiyama-Bldg, 1-6-1 Taito, Caohejing Development Area, Taito-Ku, Tokyo 110-0016 Japan Xuhui District, Shanghai Tel: +81-3-5807-2321 Tel: +86-21-5169-3609 Fax:+86-21-5445-3266 Fax: +81-3-5807-2322 Information: sales.china@avalue.com.cn Information: sales.japan@avalue.com.tw Service: service@avalue.com.tw Service: service@avalue.com.tw 4 EAX-Q77 User’s Manual...
-
Page 5: Product Warranty
(such as your sales receipt) in a shippable container. A product returned without proof of the purchase date is not eligible for warranty service. 5. Write the RMA number visibly on the outside of the package and ship it prepaid to your dealer. EAX-Q77 User’s Manual 5... -
Page 6: Table Of Contents
2.6.16 ME Firmware Update Jumper (ME_DIS) ............37 2.6.17 GPIO 15 Pin Header (GP15_CPT) ..............37 2.6.18 SATA 3 Connectors (SATAIII_1 / SATAIII_2) ............ 38 2.6.19 SATA 2 Connectors (SATAII_1 / SATAII_2 / SATAII_3 / SATAII_4) ....39 6 EAX-Q77 User’s Manual... - Page 7 BIOS setup ........................ 43 3.5.1 Main Menu and System information ..............44 3.5.2 Advanced Settings ..................... 45 3.5.3 Chipset Settings ....................75 3.5.4 Boot Settings ...................... 77 3.5.5 Security Settings ....................79 3.5.6 Save and Exit Settings ..................81 EAX-Q77 User’s Manual 7...
-
Page 8: Getting Started
1.2 Packing List Before you begin installing the single board, make sure that the following materials are included in the package: 1 x EAX-Q77 ATX Motherboard 1 x CD-ROM contains OS drivers/QIG/User’s Manual ... -
Page 9: Document Amendment History
We strongly recommend that you read this manual carefully before attempting to install the EAX-Q77 series or change the standard configurations. Whilst all the necessary information is available in this manual, it is recommend to contact your supplier for guidance for any queries and concern. -
Page 10: System Specifications
Realtek 269Q, 5.1 Channel HD Audio Build-in 2W amplifier Audio Interface Mic-in, Line-in and Line-out, Speaker out Ethernet ® Chipset Intel 82574L GbE controller ® Intel 82579 GbE PHY Ethernet Interface 10/100/1000 Gigabit Ethernet Compatible Back Panel I/O Port 10 EAX-Q77 User’s Manual... - Page 11 Single power ATX Support S0, S1, S3, S4, S5 ACPI 3.0 Compliant Mechanical & Environmental Operating Temperature 0~60°C (32~140°F) Operating Humidity 0%~90% relative humidity, non-condensing Size ( L x W ) 12" x 9.6" (304.8 mm x 243.84 mm) Weight 1.32 lbs (0.6 Kg) EAX-Q77 User’s Manual 11...
-
Page 12: Architecture Overview - Block Diagram
EAX-Q77 User’s Manual 1.5 Architecture Overview – Block Diagram The following block diagram shows the architecture and main components of EAX-Q77. 12 EAX-Q77 User’s Manual... -
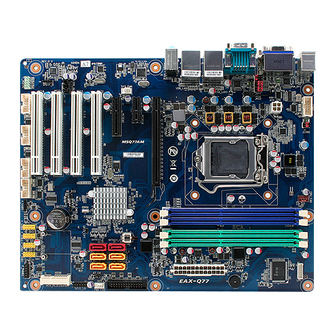
Page 13: Motherboard Layout
PCI Slot (PCI1) PCI Express x4 Slot (PCIE4X) System Fan Header (SYS_FAN) PCI Express x1 Slot (PCIE1X) PCI Express 3.0 x16 Slot (PCIE16X) COM1 RS232/422/485 Jumpers (JRS1/JRS2/JRS3) COM Port Header (COM2) Serial Port +5/+12V Power Select Jumper (JCOM2) EAX-Q77 User’s Manual 13... - Page 14 USB 2.0 Header (F_USB4) Clear CMOS Jumper (CLR_CMOS) USB Pin Header (F_USB5) ME Firmware Update Jumper (ME_DIS) COM Port Header (COM3) COM Port Header (COM4) COM Port Header (COM5) COM Port Header (COM6) Front Panel Audio Header (F_AUDIO) 14 EAX-Q77 User’s Manual...
-
Page 15: I/O Panel
LAN RJ-45 Ports Line-in Port (Blue) PS/2 Keyboard Port (Purple) DVI-I Port HDMI Port USB 3.0 Port Microphone (Pink) Line out Port (Green) This chapter describes the installation procedures including the safety precautions one must observe before installation. EAX-Q77 User’s Manual 15... -
Page 16: Hardware Installation
Use a grounded wrist strap or touch a grounded object before handling any of the components. When attaching screws to secure the motherboard to the chassis, do not over tighten the screws to avoid damaging the motherboard. 16 EAX-Q77 User’s Manual... -
Page 17: Installing The Cpu
1. Press the lever and slide it out of the hook. 2. Lift to open the socket cover. 3. Install the CPU making sure the gold triangle is located in the correct direction. EAX-Q77 User’s Manual 17... - Page 18 Do not force to insert the CPU into the socket. If the CPU does not fit, check for proper orientation. Forcing the CPU into the socket may damage the CPU. 4. Close the socket cover. 5. Press the lever down and slide it under the hook. 18 EAX-Q77 User’s Manual...
-
Page 19: Installing The Cpu Fan And Heat Sink
Perform the following steps to install the CPU fan and heat sink: 1. Apply the thermal grease onto the center of the CPU socket surface. 2. Align and install the CPU fan and heat sink. 3. Tighten the heat sink screws. EAX-Q77 User’s Manual 19... - Page 20 4. Connect the fan header onto the CPU fan connector on the motherboard. Note: Make sure the heat sink and the CPU top surface are in total contact to avoid CPU overheating problems that may cause the system to hang or be unstable. 20 EAX-Q77 User’s Manual...
-
Page 21: Installing A Memory Module
EAX-Q77 User’s Manual 2.4 Installing a Memory Module EAX-Q77 provides four (4) 240-pin DDR3 Dual In-Line Memory Module (DIMM) sockets which support data transfer rates of 1333 and 1600 MT/sec. The total maximum memory size is 32 GB. Perform the following steps to install a memory module to the motherboard: 1. -
Page 22: Jumper And Connector List
Serial port1, RS232 / RS422 / RS485 signal select JRS3 Serial port1, RS232 / RS422 signal select JCOM2 Power Select Jumper, +5V / +12V power select AT_CN Power Mode Select Jumper, AT / ATX power mode select ME_DIS ME Update Firmware Jumper GP15_CPT GPIO_CN 22 EAX-Q77 User’s Manual... -
Page 23: Internal Connector List
PCIEX4 PCI Express x4 slot PCI1 PCI slot PCI2 PCI slot PCI3 PCI slot PCI4 PCI slot PWR_FAN Power fan header SATAIII_1 Serial ATA 3 connector SATAIII_2 Serial ATA 3 connector SATAII_1 Serial ATA 2 connector EAX-Q77 User’s Manual 23... - Page 24 EAX-Q77 User’s Manual Label Function SATAII_2 Serial ATA 2 connector SATAII_3 Serial ATA 2 connector SATAII_4 Serial ATA 2 connector SPDIF_O SPDIF header SPK_OUT Speaker out header SYS_FAN System fan header 24 EAX-Q77 User’s Manual...
-
Page 25: Setting Jumpers & Connectors
2.6 Setting Jumpers & Connectors 2.6.1 Clear CMOS Jumper (CLR_CMOS) Default Clear CMOS PINS Signal -RTCRST 2.6.2 Serial Port 2 5V / 12V Power Select Jumper (JCOM2) +12V Ring (Default) Signal PINS Signal RI2-/5V/12V NRI2- RI2-/5V/12V +12V RI2-/5V/12V EAX-Q77 User’s Manual 25... -
Page 26: Serial Port 1 Signal Select Jumpers (Jrs1/Jrs2/Jrs3)
RS232 RS422 RS485 Signal PINS Signal RXD232 RXD 422 RXD 485 (Default) JRS2 RS422/RS485 RS232 Signal PINS Signal RS485_B RS485_A NDCD1_D- NRXD1_D- NDCD1- NRXD1- JRS3 RS422 RS232 Signal PINS Signal RS422_B NTXD1_D- RS422_A NDTR1- NDTR1_D- NTXD1- 26 EAX-Q77 User’s Manual... -
Page 27: Power Mode Select Jumper (At_Cn)
EAX-Q77 User’s Manual RS422/485 Pin Mapping RS-232 RS-482 RS-422 TXD- TXD- TXD+ TXD+ RXD+ RXD- 2.6.4 Power Mode Select Jumper (AT_CN) Signal AT_PWR_F_BTN# -PWRBT_F (Default) EAX-Q77 User’s Manual 27... -
Page 28: Com Port Headers (Com2/Com3/Com4/Com5/Com6)
EAX-Q77 User’s Manual 2.6.5 COM Port Headers (COM2/COM3/COM4/COM5/COM6) COM2 Signal PIN PIN Signal NDCD2- NRXD2- NTXD2- NDTR2- NDSR2- NRTS2- NCTS2- RI2-/5V/12V COM3 Signal PIN PIN Signal NDCD3- NRXD3- NTXD3- NDTR3- NDSR3- NRTS3- NCTS3- NRI3- 28 EAX-Q77 User’s Manual... - Page 29 EAX-Q77 User’s Manual COM4 Signal PIN PIN Signal NDCD4- NRXD4- NTXD4- NDTR4- NDSR4- NRTS4- NCTS4- NRI4- COM5 Signal PIN PIN Signal NDCD5- NRXD5- NTXD5- NDTR5- NDSR5- NRTS5- NCTS5- NRI5- EAX-Q77 User’s Manual 29...
-
Page 30: Front Panel Audio Header (F_Audio)
EAX-Q77 User’s Manual COM6 Signal PIN PIN Signal NDCD6- NRXD6- NTXD6- NDTR6- NDSR6- NRTS6- NCTS6- NRI6- 2.6.6 Front Panel Audio Header (F_AUDIO) F_AUDIO Signal PIN PIN Signal MIC_L AGND MIC_R -ACZ_DET HPOUT_R SRTN1 FAUDIO_JD HPOUT_L SRTN2 30 EAX-Q77 User’s Manual... -
Page 31: Usb Pin Header (F_Usb5)
HPOUT_L_H Front panel headphone left channel SRTN1 Jack detection for front panel microphone SRTN2 Jack detection for front panel headphone FAUDIO_JD Front panel jack detect 2.6.7 USB Pin Header (F_USB5) F_USB5 Signal USB Power -FUSBP12 +FUSBP12 EAX-Q77 User’s Manual 31... -
Page 32: Usb 3.0 Header (F_Usb1 / F_Usb2 / F_Usb3 / F_Usb3 / F_Usb4)
USB Power -FUSBP5 -FUSBP4 -FUSBP7 -FUSBP6 +FUSBP5 +FUSBP4 +FUSBP7 +FUSBP6 F_USB3 F_USB4 Signal PIN PIN Signal Signal PIN PIN Signal USB Power USB Power USB Power USB Power -FUSBP9 -FUSBP8 -FUSBP11 -FUSBP10 +FUSBP9 +FUSBP8 +FUSBP11 +FUSBP10 32 EAX-Q77 User’s Manual... -
Page 33: Cpu Fan Header (Cpu_Fan)
EAX-Q77 User’s Manual 2.6.9 CPU Fan Header (CPU_FAN) CPU_FAN Signal +12V TACH_CPUFAN PWM_CPUFAN 2.6.10 Power Fan Header (PWR_FAN) PWR_FAN Signal +12V TACH_PWRFAN PWM_PWMFAN EAX-Q77 User’s Manual 33... -
Page 34: System Fan Header (Sys_Fan)
EAX-Q77 User’s Manual 2.6.11 System Fan Header (SYS_FAN) SYS_FAN Signal +12V TACH_SYSFAN PWM_SYSFAN 2.6.12 Low Pin Count Header (LPC) Signal PIN PIN Signal LAD0 VCC3 LAD1 -PFMRST LAD2 -LFRAME LAD3 LPCCLK33_LPC SERIRQ 5VDUAL 34 EAX-Q77 User’s Manual... -
Page 35: Front Panel Header (F_Panel)
2.6.13 Front Panel Header (F_PANEL) F_PANEL Signal PIN PIN Signal -PWRBT_F -SYS_RST MPD+ SATALED- -INTRUDER STB_LED+ STB_LED- 2.6.14 General Purpose I/O Connector (GPIO_CN) GPIO_CN Signal PIN PIN Signal PCH_GPIO1 PCH_GPIO49 PCH_GPIO6 PCH_GPIO19 PCH_GPIO7 PCH_GPIO21 PCH_GPIO17 PCH_GPIO22 SMBCLK SMBDATA EAX-Q77 User’s Manual 35... -
Page 36: Printer Port Header (Lpt)
EAX-Q77 User’s Manual 2.6.15 Printer Port Header (LPT) Signal PIN PIN Signal LPT1 LPT14 LPT2 ERR- LPT3 LPT16 LPT4 LPT17 LPT5 LPT6 LPT7 LPT8 LPT9 ACK- BUSY SLCT 36 EAX-Q77 User’s Manual... -
Page 37: Me Firmware Update Jumper (Me_Dis)
EAX-Q77 User’s Manual 2.6.16 ME Firmware Update Jumper (ME_DIS) ME_DIS Signal VCC3_DSW HAD_SDOUT 2.6.17 GPIO 15 Pin Header (GP15_CPT) GP15_CPT Signal GPIO15 EAX-Q77 User’s Manual 37... -
Page 38: Sata 3 Connectors (Sataiii_1 / Sataiii_2)
EAX-Q77 User’s Manual 2.6.18 SATA 3 Connectors (SATAIII_1 / SATAIII_2) SATAIII_1 / SATAIII_2 SATAIII_1 SATAIII_2 Signal Signal SATAIIIRX0P SATAIIIRX1P SATAIIIRX0N SATAIIIRX1N SATAIIITX0N SATAIIITX1N SATAIIITX0P SATAIIITX1P 38 EAX-Q77 User’s Manual... -
Page 39: Sata 2 Connectors (Sataii_1 / Sataii_2 / Sataii_3 / Sataii_4)
2.6.19 SATA 2 Connectors (SATAII_1 / SATAII_2 / SATAII_3 / SATAII_4) SATAII_1 / SATAII_2 / SATAII_3 / SATAII_4 SATAII_1 SATAII_2 Signal Signal SATAIIRX0P SATAIIRX1P SATAIIRX0N SATAIIRX1N SATAIITX0N SATAIITX1N SATAIITX0P SATAIITX1P SATAII_3 SATAII_4 Signal Signal SATAIIRX2P SATAIIRX3P SATAIIRX2N SATAIIRX3N SATAIITX2N SATAIITX3N SATAIITX2P SATAIITX3P EAX-Q77 User’s Manual 39... -
Page 40: Eax-Q77 User's Manual
EAX-Q77 User’s Manual 2.6.20 SPDIF Header (SPDIF_O) SPDIF_O Signal SPDIF 2.6.21 Speaker Out Header (SPK_OUT) SPK_OUT Signal OUT_R+ OUT_R- OUT_L- OUT_L+ 40 EAX-Q77 User’s Manual... -
Page 41: Bios Setup
If you do not press the keys at the correct time and the system does not boot, an error message will be displayed and you will again be asked to. Press F1 to Continue, DEL to enter SETUP EAX-Q77 User’s Manual 41... -
Page 42: Using Setup
To Display Help Press F1 to display a small help window that describes the appropriate keys to use and the possible selections for the highlighted item. To exit the Help Window press <Esc> or the <F1> key again. 42 EAX-Q77 User’s Manual... -
Page 43: In Case Of Problems
Note: The BIOS setup screens shown in this chapter are for reference purposes only, and may not exactly match what you see on your screen. Visit the Avalue website (www.avalue.com.tw) to download the latest product and BIOS information. EAX-Q77 User’s Manual 43... -
Page 44: Main Menu And System Information
Use the system Date option to set the system date. Manually enter the day, month and year. System Time Use the system time option to set the system time. Manually enter the hours, minutes and seconds 44 EAX-Q77 User’s Manual... -
Page 45: Advanced Settings
EAX-Q77 User’s Manual 3.5.2 Advanced Settings This section allows you to configure the CPU and other system devices for basic operation through its sub-menus. EAX-Q77 User’s Manual 45... - Page 46 Enables or disables VGA palette snooping. PERR# Generation Enables or disables PCI devices to generate PERR# SERR# Generation Enables or disables PCI devices to generate SERR# PCI Express Settings See “PCI Express Settings” on the next page. 46 EAX-Q77 User’s Manual...
- Page 47 PCI-E devices to fail. Extended Synch Enables or disables generation of Extended Synchronization patterns. Link Training Retry Sets the link training retry. Link Training Timeout Sets the link training timeout. Sets the unpopulated links. Unpopulated Links EAX-Q77 User’s Manual 47...
- Page 48 Use the APCI Settings menu to configure the ACPI sleep state when the system is suspended. Item Description ACPI Sleep State Sets the sleep state that the system enters when it is suspended. Enables or disables users to invoke VA BIOS POST during S3 S3 Video Repost mode. 48 EAX-Q77 User’s Manual...
- Page 49 EAX-Q77 User’s Manual 3.5.2.3 S5 RTC Wake Settings Use the S5 RTC Wake Settings menu to enable or disable the system to wake up on a specified time. EAX-Q77 User’s Manual 49...
- Page 50 Use the Trusted Computing menu to view the current TCP status and enable or disable the system to support security devices. When the Security Device Support field is set to [Disabled], the operating system will not show security devices. 50 EAX-Q77 User’s Manual...
- Page 51 Virtualization Technology, which utilizes the additional hardware capabilities. Hardware Prefetcher Enables or disables hardware prefetching. Adjacent Cache Line Prefetch Enables or disables prefetching of adjacent cache lines. Sets the TCC activation offset value. TCC Activation Offset EAX-Q77 User’s Manual 51...
- Page 52 EAX-Q77 User’s Manual Sets the maximum instantaneous current allowed for the Primary Plane Current Value primary plane. Secondary Plane Current Sets the maximum instantaneous current allowed for the Value secondary plane. 52 EAX-Q77 User’s Manual...
- Page 53 Use the SATA Configuration menu to view and configure SATA devices. Item Description Enables or disables Serial ATA controller. SATA Controller(s) SATA Mode Selection Sets the SATA mode. IDE Legacy / Native Mode Sets the IDE mode to Legacy or Native. Selection EAX-Q77 User’s Manual 53...
- Page 54 Use the Intel Rapid Start Technology menu to enable or disable this feature. The Intel Rapid Start Technology enables the system to get up and run faster from the deepest sleep, saving time and power consumption. 54 EAX-Q77 User’s Manual...
- Page 55 Use the Intel TXT (LT) Configuration menu to enable or disable support of this feature. Item Description Enables or disables secure mode extensions. Secure Mode Extensions (SMX) ® Intel TXT(LT) Support Enables or disables Intel TXT(LT) support. EAX-Q77 User’s Manual 55...
- Page 56 MDES BIOS Status Code and re-flash ME firmware image. Item Description MDES BIOS Status Code Enables or disables MDES BIOS status code. Firmware Update Enables or disables firmware ME firmware image Configuration re-flash function. 56 EAX-Q77 User’s Manual...
- Page 57 Intel® Anti-Theft Technology Enables or disables Intel® Anti-Theft Technology. Intel® Anti-Theft Technology Sets the number of Intel® Anti-Theft Technology record. Enter Intel® AT Suspend Mode Enables or disables the system to enter suspend mode when theft is detected. EAX-Q77 User’s Manual 57...
- Page 58 Amt Wait Timer Sets the wait timer for AMT. Disable ME Enables or disables disable ME. Enables or disables ASF. Activate Remote Assistance Enables or disables Remote Assistance Process. Process Enables or disables USB configuration. USB Configure 58 EAX-Q77 User’s Manual...
- Page 59 EAX-Q77 User’s Manual Item Description PET Progress Enables or disables PET Progress. AMT CIRA Timeout Sets AMT CIRA Timeout. Enables or disables WatchDog. WatchDog OS Timer Sets the OS timer. BIOS Timer Sets the BIOS timer. EAX-Q77 User’s Manual 59...
- Page 60 Enables or disables DOS or legacy support of USB 3.0 Support devices. Enables or disables XHCI Hand-off. XHCI Hand-off EHCI Hand-off Enables or disables EHCI Hand-off. Mass Storage Devices Setting to [Auto] disables legacy support if no USB device is connected. 60 EAX-Q77 User’s Manual...
- Page 61 3.5.2.13 F81214 Super I/O Configuration (COM1/COM2) Use the F81214 Super I/O Configuration (COM1/COM2) menu to configure serial ports 1 and 2. Select the Serial Port number to configure, and then press the <Enter> key. The Serial Port [number] Configuration screen appears. EAX-Q77 User’s Manual 61...
- Page 62 EAX-Q77 User’s Manual Serial Port 1 Configuration Item Description Serial Port Enables or disables the serial port. Device Settings Displays the device settings. 62 EAX-Q77 User’s Manual...
- Page 63 EAX-Q77 User’s Manual Serial Port 2 Configuration Item Description Serial Port Enables or disables the serial port. Device Settings Displays the device settings. EAX-Q77 User’s Manual 63...
- Page 64 3.5.2.14 F81214 Super I/O Configuration (COM3/COM4) Use the F81214 Super I/O Configuration (COM3/COM4) menu to configure serial ports 3 and 4. Select the Serial Port number to configure, and then press the <Enter> key. The Serial Port [number] Configuration screen appears. 64 EAX-Q77 User’s Manual...
- Page 65 EAX-Q77 User’s Manual Serial Port 3 Configuration Item Description Serial Port Enables or disables the serial port. Device Settings Displays the device settings. EAX-Q77 User’s Manual 65...
- Page 66 EAX-Q77 User’s Manual Serial Port 4 Configuration Item Description Serial Port Enables or disables the serial port. Device Settings Displays the device settings. 66 EAX-Q77 User’s Manual...
- Page 67 Select the port to configure, and then press the <Enter> key. If one of the serial ports is selected, the Serial Port [number] Configuration screen appears. If Parallel Port Configuration is selected, the Parallel Port Configuration screen appears. EAX-Q77 User’s Manual 67...
- Page 68 EAX-Q77 User’s Manual Serial Port 5 Configuration Item Description Serial Port Enables or disables the serial port. Device Settings Displays the device settings. 68 EAX-Q77 User’s Manual...
- Page 69 EAX-Q77 User’s Manual Serial Port 6 Configuration Item Description Serial Port Enables or disables the serial port. Device Settings Displays the device settings. EAX-Q77 User’s Manual 69...
- Page 70 EAX-Q77 User’s Manual Parallel Port Configuration Item Description Parallel Port Enables or disables the parallel port. Device Settings Displays the device settings. Device Mode Sets the parallel port mode. 70 EAX-Q77 User’s Manual...
- Page 71 Power FAN Fail Detect CPU SMART FAN Control Enables or disables CPU smart fan control. SYS SMART FAN Control Enables or disables system smart fan control. POWER SMART FAN Control Enables or disables power smart fan control. EAX-Q77 User’s Manual 71...
- Page 72 EAX-Q77 User’s Manual 3.5.2.17 Platform Miscellaneous Configuration Use the Platform Miscellaneous Configuration menu to enable or disable PCI Express ® Native support. This option is available only in Windows Vista OS. 72 EAX-Q77 User’s Manual...
- Page 73 EAX-Q77 User’s Manual ® 3.5.2.18 Intel Smart Connect Technology ® Use the Intel Smart Connect Technology menu to enable or disable this feature. EAX-Q77 User’s Manual 73...
- Page 74 SpeedStep feature allows the system to dynamically adjust the processor voltage and core frequency, which can decrease average power consumption and heat production. CPU C3 Report Enables or disables CPU C3 report. CPU C6 Report Enables or disables CPU C6 report. 74 EAX-Q77 User’s Manual...
-
Page 75: Chipset Settings
EAX-Q77 User’s Manual 3.5.3 Chipset Settings This section allows you to configure the chipset settings. EAX-Q77 User’s Manual 75... - Page 76 Enables or disables LAN2 PXE ROM. Wake on LAN Enables or disables the system to wake on via LAN. Modem Ring On Enables or disables modem to ring. System Agent Configuration Enables or disables the VT-d function on MCH. 76 EAX-Q77 User’s Manual...
-
Page 77: Boot Settings
GateA20 Active Sets the GateA20 mode. Sets the option for ROM messages. Option ROM Messages INT19 Trap Response Sets the INT19 trap response action time. Sets the Compatibility Support Module (CSM) options. CSM parameters See below. EAX-Q77 User’s Manual 77... - Page 78 Sets the CSM boot option filter. Sets the storage OpROM policy when launching CSM. Launch Storage OpROM policy Launch Video OpROM policy Sets the video OpROM policy when launching CSM. Sets other PCI device ROM priority. Other PCI device ROM priority 78 EAX-Q77 User’s Manual...
-
Page 79: Security Settings
EAX-Q77 User’s Manual 3.5.5 Security Settings This section allows you to configure the security settings, such as passwords and secure boot. EAX-Q77 User’s Manual 79... - Page 80 Item Description Administrator Password Sets the administrator password. User Password Sets the user password. Enables or disables opening of case detection. Case Open Security option Sets the security option. Secure Boot Enables or disables secure boot. 80 EAX-Q77 User’s Manual...
-
Page 81: Save And Exit Settings
Save as User Defaults Saves the current settings as user default settings. Restores the user default settings. Restore User Defaults Launch EFI Shell from Launches EFI shell from the file system device (such as filesystem device a USB storage). EAX-Q77 User’s Manual 81...
Need help?
Do you have a question about the EAX-Q77 and is the answer not in the manual?
Questions and answers