Table of Contents
Advertisement
Quick Links
Advertisement
Table of Contents

Related Manuals for Intellinet 524421


Summary of Contents for Intellinet 524421
- Page 1 Model 524421 INT-524421-UM-1108-02...
-
Page 2: Table Of Contents
table of contents section page INTRodUCTIoN ....................3 HARdWARe ......................4 Camera ......................4 Mounting Bracket/Stand ................... 4 Cables ......................4 INSTAllATIoN/SeTUP ..................5 Software ......................5 oPeRATIoN ......................5 Using the Camera with a Windows Web Browser ..........5 Using the Camera with a Mac Web Browser ............ -
Page 3: Introduction
Thank you for purchasing the INTellINeT NeTWoRK SolUTIoNS ™ SoHo Network Camera, Model 524421. offering the latest technology and many of today’s most popular features, this camera presents the versatility and reliability that makes it an ideal choice for a wide variety of applications. -
Page 4: Hardware
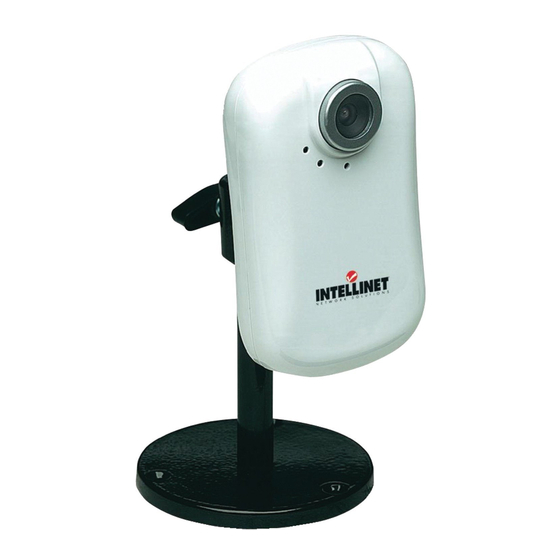
hardware camera As identified below, camera components, indicators and connections are self-explanatory except for the recessed Reset button, which can be 1) pressed (with a common pin or similar pointed object) and released to reboot the camera when it’s powered on, or 2) pressed and Focus Adjustment Ring held in for 10 seconds to revert to Network led... -
Page 5: Installation/Setup
installation/setup system requirements For normal operation and viewing of the SoHo Network Camera, it’s recommended that your system meet these minimum requirements for proper operation: • Pentium 4 1600 MHz (or equivalent AMD) CPU • 64 MB RAM graphic cards (or equivalent on-board graphic cards) •... -
Page 6: Using The Camera With A Mac Web Browser
display in your browser along with the Setting, Client Setting and Image Setup menu options (see Main Menu section in this manual). using the camera with a mac web Browser 1. Click the Safari (browser) icon on your desktop and enter the IP address of the IP camera in the Location / Address field of your browser. -
Page 7: Using The Camera With A Mobile/Cell Phone
using the camera with a mobile/cell Phone To use the SoHo Network Camera through a mobile/cell phone, make sure the Real Time Streaming Protocol (RTSP) is set to “on” (which is the default setting: Setting → Basic → Camera → General). 3g moBile Phone Viewing/streaming For 3G mobile phone viewing, enter “rtsp://<IP>:<PORT>/video.3gp”... -
Page 8: Using The Camera With Msn Messenger
using the camera with msn messenger You can download free MSN software and create a new MSN account (“camera at home” is the example used in this manual) to use Microsoft live Messenger. 1. Go to Setting → Basic → Network → Messenger and refer to the options below. - Page 9 3. Camera at home will display with its public IP and private IP if the IP Notification option is selected. 4. Click the camera icon and select “View a new contact’s webcam.” camera at home says: 5. The camera will “accept your invitation” and display the live video in the right screen after few seconds.
- Page 10 6. open the Actions menu and select “Start Control Panel.” Main Menu 7. A message displays stating “This application is not part of Windows live Messenger..” Select “don’t show me this again” and click “oK.” oPeRatIon...
-
Page 11: Main Menu
8. When the Control Panel screen displays, you have several options: • Click the camera/ snapshot icon to instantly send the image being viewed. • Click the paint/pallete icon to display the tool bar for setting up an image: Brightness, Contrast, Saturation and Hue. •... -
Page 12: Image Setup
MJPEG video compression modes. NOTE: MJPEG streaming is unavailable if RTSP mode is activated. View Size — Select the desired display image resolution: 640 x 480 or 320 x 240. Protocol — Select the transfer protocol: TCP, UdP, HTTP or Multicast. Video Buffer —... -
Page 13: Setting / Basic
Audio buttons — Click on the speaker button (4) to turn the speakers on/off. Click on the microphone button (5) to turn the microphone on/off. The volume control bar (6) indicates the loudness level. NOTE: When the speaker button is clicked “on,” the speakers on your computer are turned on to transmit sound from the connected camera(s). - Page 14 date/time Current date/time — The current date and time of the device is displayed. PC clock — This displays the date and time of the monitoring PC clock. Date & time format — In the pull-down menu, select a time display format: yyyy-mm-dd hh:mm:ss (year-month-day / hour:minute:second), mm-dd-yyyy hh:mm:ss (month-day-year / hour:minute:second) or dd-mm-yyyy hh:mm:ss (day-month-year / hour:minute:second).
- Page 15 • Synchronize with NTP: Specify the NTP server name and the Refresh Interval to synchronize the date and time of the device with those of the time server, known as the NTP (Network Time Protocol) server. Note: The NTP server is an Internet standard protocol server (built on top of TCP/IP) that ensures accurate synchronization to the millisecond of computer clock times in a network of computers.
-
Page 16: Camera
Firmware update — To upgrade the device software, click “Browse” and select the file for upgrading. When the confirmation displays, click “oK” to start upgrading. The device will reboot upon completion. NOTE: Use only upgrade files that are meant specifically for this device;... - Page 17 • Alias: Enter a name for the camera in this field. • Date/Time: Turn this display on or off to suit your preference. • Display position: Select where you want the date/time to appear. mPeg4 / computer View RTSP — This set of options (shown above) is available if RTSP mode is enabled (on the Camera / General screen).
- Page 18 • Unicast streaming / Video/Audio Port Number: Specify the transmission port number (any even number from 1024 to 65534) of the video data, which is initially set to 8090. If you change the setting of Video/Audio Port Number, the setting of Video/Audio Port Number (SSl) will change automatically.
- Page 19 is enabled (on the Camera / General screen). RTP — This set of options is available if RTSP mode is enabled (on the Camera / General screen). • Unicast streaming: Specify the transmission port range of RTP streaming video. RTP will select a port randomly from the range. •...
-
Page 20: Network
Image Size, Frame rate and Quality) are unavailable if the RTSP mode is enabled (which means the MJPEG streaming is closed). • Unicast streaming: Specify the transmission port number (any even number from 1024 to 65534) of the video data, which is initially set to 8070. If you change the setting of Video/Audio Port Number, the setting of Video/Audio Port Number (SSl) will change automatically. - Page 21 Use the following IP address — Select when a fixed IP address is set. • IP address: Enter the IP address of the device. • Subnet mask: Enter the subnet mask. • Default gateway: Enter the default gateway. Use the following DNS server address — Select when setting the fixed address as the IP address of dNS server.
- Page 22 (digital affiliate lines such as ADSL, VDSL or SDSL) as the authentication and connection system. When you use the PPPoe function, you need to turn on the DDNS or IP Notification function at same time. IP address — displays the IP address obtained at the PPPoe connecting with the network.
- Page 23 To use the DDNS function, you first need to register and create an ac- count on the ddNS server. 1. log on to http://www.dyndns.org and click “Create Account.” 2. Follow the step-by-step instructions on the dyndNS screens, inputting all information requested. 3.
- Page 24 is enabled by default. If UPnP is also enabled on your computer, the device will automatically be detected and a new icon will be added to your My Network Places folder. It provides port forwarding for opening a port in a router or firewall in a private network in order to let a party from the outside world contact a user inside.
- Page 25 IP Notification When IP Notification is enabled (“On”), you can send an e-mail notification of the completion of the network setting. Notify type — Select one of the options listed. SMTP server name — enter the SMTP server name (to 64 characters) or the IP address of the SMTP server.
- Page 26 e-mails performs authentication using the PoP user account. • User name, Password: Enter the username and password of the user who has the mail account. This is needed when the SMTP server that sends e-mails performs authentication. Recipient e-mail address — enter the recipient e-mail address (up to 64 characters).
-
Page 27: Security
Protocol — only MSN is supported. Login Account — The camera will use this account to log in to the MSN server. (You can establish an account at http://www.msn.com). Password — enter the password for authentication. Re-type password — Re-type the password to confirm. Alias —... - Page 28 User name — enter a username between 4 and 16 characters. Password — enter a password between 4 and 16 characters. Re-type password — Re-enter the password to confirm. Viewer Mode — From the drop-down menu, select a level of access. •...
-
Page 29: Setting / Advanced
advanced ftP client Configure these settings to capture and send images triggered by the built-in motion detection function to an FTP server. general FTP client function — Select “on” to enable and display the Client Setting screen. NOTE: Frame rate and operability on the main viewer may decrease while a file is being transmitted by the FTP client function. -
Page 30: Periodic Sending
Suffix — Select a suffix to add to the file name: • Date Time: Seven pairs of digits (14 total) represent the year, month, day, hour, minute, second and consecutive number. • Sequence number: Select to append a consecutive-number sequence of 10 digits (between 0000000001 and 4294967295) and two fixed digits to the image file name. -
Page 31: Smtp
day, hour, minute, second and consecutive number. • Sequence number: Select to append a consecutive-number sequence of 10 digits (between 0000000001 and 4294967295) and two fixed digits to the image file name. Click “Clear” to return the number to 1. Interval —... - Page 32 SMTP server name — enter the SMTP server name (up to 64 characters) or IP address. SMTP Server Port — You can set port number from 1 to 65535 according to your mail server. The default value is 25. • SSL: Select if the mail server you use has security restrictions. NOTE: If you use g-mail as your mail server, use 587 as the port number.
-
Page 33: Alarm Sending
server that sends e-mails performs authentication. Recipient e-mail address — enter as many as three recipient e-mail addresses (up to 64 characters each). Administrator e-mail address — enter the administrator e-mail address (up to 64 characters). This address is used for reply mail and for sending system messages from the SMTP server. - Page 34 of 10 digits (between 0000000001 and 4294967295) and two fixed digits to the image file name. Click “Clear” to return the number to 1. Alarm — Select to use the Motion detection function as a sensor (and display the motion detection function screen — see the Motion detection section below).
-
Page 35: Http Event
Effective period — Select the period for which the periodic sending is in effect: “Always” or “Schedule.” To specify the period, select/click “Schedule” (see the Schedule section below). httP eVent Configure to capture and send images — linked with the external sensor input or with the built-in motion detection function —... -
Page 36: Schedule
alarm detection by the external sensor input or by the built-in motion detection function. Alarm — Select to use the Motion detection function as a sensor (and display the motion detection function screen). NOTE: This works only when the Video mode is set to “MPeG4.” Parameter —... -
Page 37: Motion Detection
Start time, End time — enter your preferences. Use the same time schedule every day — When this is selected, the start and end times set for Monday are applied to all days and the times for the other days can’t be input. motion detection There are three zones covered by the Motion Detection function —... -
Page 38: System Log
system log This screen displays any changes or events that have occurred. setting Remote Log — Select to enable and send the log data to a specified log server. oPeRatIon... -
Page 39: Frame Rate & Bit Rate Tables
frame rate & bit rate tables These tables can help guide you in optimizing the performance of your SoHo Network Camera within your network environment. tables... - Page 40 tables...
-
Page 41: Storage Requirement Tables
storage requirement tables These tables can help you configure your recording storage system by indicating your capability for recording onto your hard disk. tables... -
Page 42: Specifications
specifications Standards • Pixel size: 6.0 µm x 6.0 µm • IEEE 802.3 (10Base-T Ethernet) • Automatic Exposure Control (AEC), • IEEE 802.3u (100Base-TX Fast Ethernet) Automatic Gain Control (AGC), Automatic White Balance (AWB), Automatic Band General Filter (ABF) and Automatic Black-level •... - Page 44 INTELLINET NETWORK SOLUTIONS ™ offers a complete line of active and passive networking products. Ask your local computer dealer for more information or visit www.intellinet-network.com Copyright © INTELLINET NETWORK SOLUTIONS All products mentioned are trademarks or registered trademarks of their respective owners.
Need help?
Do you have a question about the 524421 and is the answer not in the manual?
Questions and answers