
Subscribe to Our Youtube Channel
Related Manuals for FREERIDER Luggie Classic


Summary of Contents for FREERIDER Luggie Classic
- Page 1 ~ Smart Fold , Easy Go ~ Luggie Classic USER'S INSTRUCTION MANUAL USER'S INSTRUCTION MANUAL...
- Page 2 FOREWORD Note to the User: For your safety and the safety of everyone around you, we ask that you read and follow the suggested rules and regulations outlined in this User’s Instruction Manual. Always think safety first!
-
Page 3: Table Of Contents
CONTENTS Introduction ......................3 Product Description ....................3 About Your Luggie Scooter ..................4 Luggie Feature Guide ..................5 Guidelines For Safe Use ..................6 Getting To Know Your Luggie ...................8 Operating Your Luggie .....................9 Freewheeling Your Luggie..................12 Safety Instructions And Warnings ................13 Safety Warnings & Instruction Labels ..............18 Learning To Get Around ..................19 Transporting Your Luggie ..................22 Battery And Battery Charging .................24... -
Page 4: Introduction
INTRODUCTION Congratulations on the purchase of your Luggie scooter! Please read this User's Instruction Manual carefully before you attempt to operate your scooter. Your User's Instruction Manual is your guide to safe operation and maintenance of your Luggie scooter. Before beginning to use your scooter, make sure you completely read and understand all instructions thoroughly. -
Page 5: About Your Luggie Scooter
ABOUT YOUR LUGGIE SCOOTER Warning: The Luggie is a motorized scooter which provides transportation for an elderly or disabled person. It can be in a variety of indoor and outdoor settings. The maximum user weight capacity for the Luggie can be found in the rear of this manual, under "Technical Specification". -
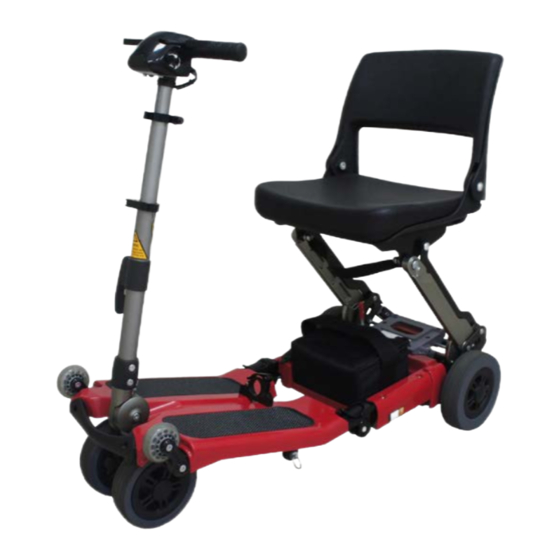
Page 6: Luggie Feature Guide
LUGGIE SCOOTER LABELED Top Console 12. Chassis Locking Release Ring Wig-Wag lever 13. Chassis Hook Speed Control Knob 14. Charging Socket Turtle(slow) 15. Battery pack Rabbit(fast) 16. Magnetic Brake Lever Tiller Adjustment Clamp 17. Seat Lock Handle Tiller 18. Rear Solid Tire Trigger 19. -
Page 7: Guidelines For Safe Use
GUIDELINES FOR SAFE USE These symbols below are used in this owner’s manual to identify warnings and cautions. It is very important for you to read and understand them. Warning: Failure to obey and follow the warnings in this User’s Manual may result in personal injury. - Page 8 DO NOT drive your Luggie where you cannot safely or legally walk. OBEY THE HIGHWAY CODE. DO NOT drive your Luggie over deep, soft terrain (ie. soft earth, sand, tall grass, loose gravel or snow). DO NOT drive when under the influence of alcohol or drugs which may impair your safety.
-
Page 9: Getting To Know Your Luggie
GETTING TO KNOW YOUR LUGGIE Your Luggie scooter is delivered in a strong carton or in the suitcase if you purchased this option. When unpacking the carton, remove and dispose of all of the sharp metal staples which are located on the top to avoid injury. Remove all packing materials and follow the steps outlined in the Quick Start Guide shipped with your Luggie scooter. -
Page 10: Operating Your Luggie
OPERATING YOUR LUGGIE Before setting out on your Luggie, you need to make sure that your seat is in the correct riding position. Set the seat to your desired height for your needs. UNFOLD LUGGIE SCOOTER 1. Make sure your Luggie is on flat ground before adjusting the height of the seat. With the scooter upright as shown in (FIG 1), pull the chassis locking release ring to your scooter to separate the front and rear chassis. - Page 11 Warning: If the installed Luggie battery has been idle for a long period, the battery may be in a low power state. Warning: The best practice is to remove the battery when transporting the scooter so as not to accidently power on the scooter which cause injuries and drain the battery.
- Page 12 Note: When driving up a slope or similar obstacles your Luggie motor will be working harder than usual, the battery gauge will move into the red sector. The indicator on the battery meter will regulate to actual charge once the load on your motor is reduced. In conditions listed above, the battery indicator gauge is not a true indicator of amount of charge left on the battery.
-
Page 13: Freewheeling Your Luggie
FREEWHEELING YOUR LUGGIE Your scooter is equipped with a manual freewheel device for your convenience when you need to push the scooter. To put your scooter in freewheel mode, locate the magnetic brake release (red handled lever) located in the rear right hand side of your scooter under your seat as pictured. -
Page 14: Safety Instructions And Warnings
SAFETY INSTRUCTIONS & WARNINGS Warning: Do not attempt to operate your new Luggie scooter for the first time without completely reading and understanding all of the facts in this User’s Manual. Your Luggie scooter is a state-of-the-art device designed to enhance and increase your mobility. - Page 15 CORNERING Excessively high cornering speeds may result in tipping. Factors which affect the possibility of tipping include, but are not limited to, cornering speed, steering angle (how sharply you are turning), uneven surfaces, inclined surfaces (such as heavily cambered pavements), riding from an area of low traction to an area of high traction (such as passing from grass areas to a paved area - especially at high speed while turning), and abrupt directional changes.
- Page 16 These surfaces may not be sound and fail to give good traction, caution should be considered before driving on these types of surface to prevent stability problems resulting in injury or damage to you and your scooter. Always reduce your scooters speed when driving on uneven terrain or soft surfaces by turning the speed control knob (located on the left side of the top console) counter clockwise (toward the turtle mode).
- Page 17 MOTOR VEHICLE TRANSPORTATION Currently there are no standards approved for "tie down" systems in a moving vehicle of any type to transport a person while seated in a scooter. Warning: Do not sit on your scooter while it is in a moving vehicle. Personal injury may result.
- Page 18 INCLINES 6 degrees maximum incline 6 degrees maximum incline FIG 11 More and more modern buildings are designed with disability access in mind. Ramps have specified percentage of incline designed for easy and safe access. Some ramps may have turning switchbacks (180 degree turns) that require you to have good cornering skills on your scooter.
-
Page 19: Safety Warnings & Instruction Labels
SAFETY WARNING & INSTRUCTION LABLES The following labels are positioned on your Luggie. These labels communicate important warnings or instructions regarding the safe operation of you scooter. Please familiarize yourself with their location. Located on front of chassis Located on middle of chassis Located on middle of chassis Located on side of chassis Located on tiller... -
Page 20: Learning To Get Around
LEARNING TO GET AROUND Warning: If you are not an accomplished outdoors mobility scooter driver, we strongly recommend that you first practice in an open area, free from traffic and preferably with an attendant who can assist you. When ready, proceed to power on the Luggie. The battery indicator gauge needle will move to the amount of charge left on your battery and the status light on the power switch will illuminate as a solid. - Page 21 behind you, if you go quickly enough. If not, just stop when you have clear of the door before pushing it close. If, however, the door opens toward you, hold the knob or bar with one hand and gently let the reverse power do the work.
- Page 22 MOVING OVER GRASS & GRAVEL Care must be taken when attempting to drive over soft surfaces such as those found in parks, etc. These surfaces may look level; but, hidden dangers on these surfaces may make your Luggie become unstable. Avoid unkempt and wet grass, loose deep gravel and/or sand. Do not exceed the capabilities of your scooter.
-
Page 23: Transporting Your Luggie
TRANSPORTING YOUR LUGGIE Whether it is for a holiday, a day out to visit family and friends, or a trip to go shopping, your Luggie can be taken along. Depending on the size or model of your car, you will be able to load your Luggie in one of the following methods. FIG 15 Load your Luggie with the aid of a car hoist. - Page 24 Warning: Do not place metal objects over open battery contacts. This may cause the battery to short circuit. Caution: Protect clothing when lifting your Luggie. Some components may have lubricating fluids on their surfaces. Work out the best position to stow the components of your scooter.
-
Page 25: Battery And Battery Charging
For air travel, please consult your carrier prior to departure. They will need advance warning that you wish them to carry the AGM battery. Please note that each carrier reserves the right not to carry what may be termed Hazardous cargo. FreeRider cannot be held responsible for their final decision. - Page 26 To charge your batteries follow these simple steps: Switch off your Luggie. Your charger has two leads exiting from it. Plug the 3-prong plug to charging socket located on the rear chassis of your scooter and the second lead to the charger unit before plugging it into the wall socket.
- Page 27 DO NOT smoke or expose your Luggie near open flame while the battery is being charged. DO NOT use an extension cord to connect the charger onto the charging unit of your Luggie unless absolutely necessary. Use of an improper extension lead could result in fire and/or electric shock.
-
Page 28: Frequently Asked Questions
FREQUENTLY ASKED QUESTIONS Q: How do I turn on Luggie scooter? A: Locate the on/off switch below the handlebar on the right side. If you do not see a solid red on the switch, check to make sure the battery has been properly installed. Refer to the owner’s manual for diagnosis. - Page 29 Q: How long will it take to fully charge the battery? A: The time required to fully charge your battery will depend on the depth of discharge on the battery. The minimum time taken to recharge the battery fully will vary between 4 to 6 hours.
- Page 30 Q: What should I do if my battery doesn’t charge? A: Call the customer service department to trouble shoot. Do not attempt to remove the safety valves situated in the top of the battery. Failure to observe this warning will invalidate your battery guarantee.
- Page 31 Gradual deterioration in performance and reduction in range is normal and associated with fair wear and tear, misuse or accidental damage. Under these circumstances, the warranty will not apply. Some users due to their hectic lifestyle, weight or operating conditions, may wear their battery out during the original battery manufacturer's guarantee period due to extensive use of their scooter.
-
Page 32: Care And Maintenance
CARE & MAINTENANCE Your Luggie, like any other electro-mechanical scooter, will benefit from regular servicing by your Authorized Luggie Dealer. You too, can help keep your Luggie in tip top condition by following the simple guidelines outlined below. Note: Only competent people should carry out service work. SEAT UPHOLSTERY A damp cloth and a little soapy water will keep your seat, backrest and armrests looking new. - Page 33 Caution: When lifting the transmission, keep well away from clothing. It is normal to find a light film of lubrication around this part. MOTOR BRAKES Safety Note: For your own safety, we recommend that you check the function of your Luggie brakes prior to any journey.
- Page 34 Locking Screws: The special 'locking' center hub screws may lose its effectiveness when it has been removed over a number of times. New screws should be used each time the wheel is removed. Contact your Authorized Luggie Reseller to purchase parts or have the tires replaced.
- Page 35 WEEKLY CHECK Chassis locking mechanism. Armrest adjustment knobs. Allow battery charger to go through a full recharge cycle. Wait until the green light illuminates. Clean paintwork with auto shampoo. DO NOT use harsh abrasives or power washer. SIX MONTHS CHECK Tire wear, replace as necessary.
-
Page 36: Basic Fault Finding
BASIC FAULT FINDING Q: What if my Luggie will not start? A: Check to see whether the power switch has been switched ‘on’. If it is, the battery indicator meter will be operating. If the status light on your top console is flashing once per second, your battery is low in charge. - Page 37 When the battery voltage is low, the 'status' indicator light situated on power switch will flash slowly as a warning for you to recharge your batteries. If the 'speed controller' detects a fault, the light will flash more rapidly, with the number of flashes indicating the nature of the fault.
- Page 38 STATUS FAULT CODES FLASH Description Meaning The batteries are running low. Battery Low Recharge the batteries. The batteries have run out of charge. Recharge the batteries. Low Battery Fault Check the battery and associated connections and wiring. Battery voltage is too high. This may occur if overcharged &/or travelling down a long slope.
-
Page 39: Technical Specification
Model Number Luggie Classic Overall Length(Unfold) 98.2 cm / 38.66 inches Overall length(Fold) 66 cm / 25.98 inches Overall width 45.5 cm / 17.91 inches Ground clearance 6.4 cm / 2.52 inches Maximum load 113.6 kg / 250 lbs Range up to 15.3 km / 9.6 miles(90 kg / 198 lbs) - Page 40 Located on the rear chassis cover. (Complies with EMC Directive 89/336/ EEC and with Medical Devices Directives 93/42/EEC.) TURNING RADIUS 103.8cm [40.87”] 30.5cm [12.01”] MAX-78.5cm [30.91”] MIN-44.7cm [17.60”] 84cm [33.07”] MAX-53.5cm [21.06”] MIN-48.5cm [19.09”] 15.5cm [6.10”] 73.8cm [29.06”] 45.5cm [17.91”] 98.2cm [38.66”] Luggie Classic...
-
Page 41: Luggie Armests Installation Guide
LUGGIE ARMRESTS INSTALLATION GUIDE... -
Page 42: Advisory Safety Notices
ADVISORY SAFETY NOTICE Warning: Radio wave sources may affect scooter control. Your powered scooter is designed to operate in appropriate environments; however, radio wave sources such as radio or TV broadcasting stations, amateur (ham) radio transmitters, two-way radios and cellular portable telephones can affect powered motorized scooters. The following warnings listed below should reduce the chance of unintended brake release or uncontrolled powered scooter movement. -
Page 43: Optional Accessories
OPTIONAL ACCESSORIES Storage bag Sling bag Adjustable armrest Luggie is a one piece foldable mobility scooter with optional accessories for your convenience. For information regarding these optional accessories listed above, please contact your Authorized Luggie Dealer. Warning: Do not over load accessories as this will affect the weight capacity of your scooter and decrease stability. -
Page 44: Warranty Terms
WARRANTY TERMS Please keep a note of your serial No........ (This is located on the front frame tube, under the front chassis cover). The frame of your scooter is warranted for 36 months, 12 months from the date of purchase against faults arising due to defects in manufacture or materials on electronic components. - Page 45 PAINT WORK: This warranty does not cover deterioration of paint resulting from the lapse of time i.e. natural fading. It is the user’s responsibility to clean and protect the painted surfaces. SPEED CONTROLLER: Servicing of the speed controller or battery charger must only be carried out by your local Authorized Luggie Dealer.
-
Page 46: Service Record
SERV I C E REC ORD This section is designed to assist you in keeping records of any service and repairs done to your Luggie scooter. Should you decide to sell or exchange your scooter in the future, this will prove most helpful to you. Your service agent will also benefit from a documented record. - Page 47 S E RV IC E RE C ORD This section is designed to assist you in keeping records of any service and repairs done to your Luggie scooter. Should you decide to sell or exchange your scooter in the future, this will prove most helpful to you.
- Page 48 YOUR LOCAL DEALER (TO BE FILLED IN BY LOCAL DEALER) FREERIDER USA 8696 Utica Avenue Rancho Cucamonga, CA 91730 Tel:(909) 466-7996 Fax:(909) 466-7990 Email: Sales@freeriderusa.com http://www.FreeRiderUSA.com FREERIDER CORP. Head Quarter and Kaohsiung Facility: No.22, Bengong 5th Rd., Gangshan Dist., Kaohsiung City 820, Taiwan(R.O.C)
Need help?
Do you have a question about the Luggie Classic and is the answer not in the manual?
Questions and answers