Table of Contents
Advertisement
Quick Links
Advertisement
Table of Contents

Related Manuals for Focal Point Elysee Fanflue


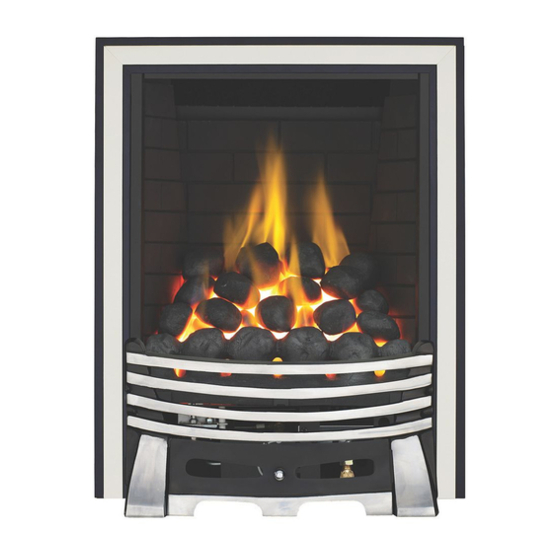
Summary of Contents for Focal Point Elysee Fanflue
-
Page 2: Installation Instructions
INSTALLATION INSTRUCTIONS Preliminary Notes Before Installation This appliance is an Inset Live Fuel Effect appliance which provides radiant warmth utilising the latest type burner technology. The fire is designed to fit various types of fireplaces and natural draught flues as listed in the Installation Requirements. -
Page 3: Table Of Contents
Section Contents Page No. Section Contents Page No. Important Notes Fuel Bed Layout Appliance Data 10.0 Fitting Frame and Front Installation Requirements 11.0 Testing & Commissioning Terminal Location 11.1 Operating the Appliance Site Requirements 11.2 Flame Control Ventilation 11.3 Spark Failure Unpacking the Appliance 11.4 Setting Pressure... -
Page 4: Appliance Data
APPLIANCE DATA Gas Group G20 Natural Gas CAT I2H Inlet Pressure 20 mbar Max Energy Input (gross) 6.8 kW Min Energy Input (gross) 3.5 kW Pilot Energy Input (gross) 210 W Setting Pressure 14.8 mbar Main Injector Burner Stereo size 81 Gas Inlet Connection 8mm compression Ignition... -
Page 5: Terminal Location
INSTALLATION REQUIREMENTS (continued) Avoid locating the terminal in close proximity to combustible materials, such as plastic drainpipes and fences. If these are impossible to avoid, then a suitable metal deflector must be used if the flue gases begin to heat the object. -
Page 6: Site Requirements
SITE REQUIREMENTS For aesthetic purposes it is essential that the hearth and infill plinth area are flat and level. The hearth and infill must also be square to the back panel. Failure to comply with this could cause the appliance to lean away from the fireplace resulting in an unsatisfactory installation. -
Page 7: Ventilation
VENTILATION No purpose provided ventilation is normally required with this appliance. However, the ventilation requirements of other gas appliances in the same room or space should be taken into consideration. A spillage test should be carried out as described in the relevant section with the doors and windows both open and closed, and with any extractor fan running on full. -
Page 8: Outer Wall Aperture
PREPARING FOR INSTALLATION (continued) Apply the self adhesive sealing strip to the rear perimeter of Proposed location of appliance the firebox frame, this will eventually seal the firebox to the fireplace back panel. Place the fire to one side whilst the site 120mm is prepared for flue installation. -
Page 9: Installation Method 1
INSTALLATION METHOD 1 Outer cavity leaf Fireplace backpanel Rockwool Insulation Inner cavity leaf False chimney breast A- Opening width: 375mm min. 460mm max. B- Overall width: 480mm C- Overall height (exc hearth): 590mm. D- Opening height: (exc hearth): 565mm min. 580mm max. E- Recessed depth of fire: 180mm F- The hearth must extend 300mm in front of the appliance, with it’s top surface 50mm above the surrounding floor level or having a 50mm high fixed fender around it’s perimeter. -
Page 10: Installation Method 2
INSTALLATION METHOD 2 This method allows for installation of the appliance with the rear part of it’s firebox recessed into the inner leaf of the the cavity wall. This will enable a standard fireplace to be flush fitted to the wall and the appliance will then be fitted flush into the fireplace. -
Page 11: Installation Method 3
INSTALLATION METHOD 2 (continued) It is essential the Rockwool pad be fitted to the rear of the appliance to prevent condensation and to insulate the appliance’s heat exchanger from the cold air of the cavity. Note: Neither the appliance nor the Rockwool insulating pad should bridge the cavity. Consult your local Building Control Department for any additional construction requirements or further advice. - Page 12 INSTALLATION METHOD 3 (continued) Installation using extended fire surround or false chimney breast. When using this method of installation the following amendments should be incorporated. Superlux board 25mm clearance must be allowed from the appliance firebox to any insulated combustibles. 75mm clearance must be allowed to any unprotected combustibles.
-
Page 13: Flue Preparation
FLUE PREPARATION When all the preparation work has been completed for whichever method of installation has been chosen, and with the firesurround fitted, take the appliance and slide the round flue section over the spigot on the rear of the fire. - Page 14 FITTING THE FAN TERMINAL (continued) Fitting the fan terminal by recessing into the outer wall If already fitted in the fan box, remove the four long M4 screws from the top and bottom of the fan terminal. Fit the terminal into the wall opening previously prepared, ensuring the flue tube seats correctly over the terminal spigot.
-
Page 15: Fuel Bed Layout
FUEL BED LAYOUT Place the ceramic burner pad onto the top of the burner as shown, taking care to ensure it is centralised and pushed fully against the back location ledge. Check that all of the holes in the burner top plate are unobscured. Place the matrix into position as shown. -
Page 16: Fitting Frame And Front
FUEL BED LAYOUT (continued) Place the second row of six coals on the placement pads behind the first row of coals as shown. These coals MUST NOT impede the flames passing through the rear flame holes of the matrix. Ensure that no corners of coals or rough edges project back into the slots. -
Page 17: Testing & Commissioning
11.0 TESTING AND COMMISSIONING Turn on and test the gas supply up to the fire for any leaks, in accordance with current Approved Codes Of Practice (ACOPs). When the appliance is first used, protective oils coating the firebox may burn off. It is advisable to ventilate the room during this period, at least one hour. -
Page 18: Flue Monitoring System
11.4 SETTING PRESSURE (continued) If the pressure is too low, then check the meter governor pressure with the appliance running. If this is incorrect it will need to be reset by the gas supplier. If the setting pressure is too low, but the meter pressure is acceptable, then a problem in the supply pipework is to be suspected. -
Page 19: Briefing The Customer
BRIEFING THE CUSTOMER 12.0 All instructions must be handed to the user for safekeeping. Show the customer how to light and control the fire. After commissioning the appliance, the customer should be instructed on the safe use of the appliance and the need for regular servicing. -
Page 20: Dismantling The Burner Tray
13.2 DISMANTLING THE BURNER TRAY Remove the tray as previously described. The pilot unit can be removed by undoing the tubing nut, the thermocouple nut on the rear of the valve, and the two securing screws, and lifting away. Remove the tubing nut from the valve end of the pilot pipe, and blow through to dislodge any debris. -
Page 21: Troubleshooting Guide
14.0 TROUBLESHOOTING GUIDE Fan fails to start Check wall switch is turned ON Check the light on the control box illuminates when ON switch is pressed. If no light, check fuse. Turn OFF the wall switch, check all plugs and connectors from fire to fan and fully and correctly fitted. -
Page 22: User Instructions
USER INSTRUCTIONS Section Contents Page No. Important Notes Firefront Clearances to Combustibles Ventilation Operating Instructions Flame Control Lever Flue Spillage Monitoring System Cleaning Coals and Ceramics 10.0 List of Spares IMPORTANT NOTES The installation of this fire MUST only be carried out by a competent person (such as a CORGI registered fitter) in accordance with the Gas Safety (Installation and Use) Regulations 1998, the relevant British Standards, Codes of Practice, the Building Regulations and the manufacturers’... -
Page 23: Clearances To Combustibles
FIREFRONT This fire is supplied with a particular style of firefront. Use of the firefront will ensure an adequate airflow under the firebed for the correct functioning of this appliance. Compliance with safety standards cannot be guaranteed if another style of front is used. CLEARANCES TO COMBUSTIBLES A combustible shelf may be fixed to the wall above the fire, providing that it complies with the dimensions given below. -
Page 24: Flue Spillage Monitoring System
FLAME CONTROL LEVER On Natural Gas appliances there is a flame control lever behind the ashpan door that varies the flame colour from blue to a decorative yellow. This lever can be used to vary the flame picture as required. To minimise any carbon deposition that may occur, it is recommended that the fire is used on the COKE setting for the first and last periods (approximately 20 mins.) of each use.
Need help?
Do you have a question about the Elysee Fanflue and is the answer not in the manual?
Questions and answers