Table of Contents
Advertisement
Advertisement
Table of Contents

Related Manuals for Rcom USB 20


Summary of Contents for Rcom USB 20
- Page 1 DIGITAL EGG INCUBATOR...
-
Page 2: Table Of Contents
Contents How to use Rcom USB 20 / Rcom PRO 20 1. Introduction (1) Rcom USB, PRO 20 Introduction (3) Identification of Parts Introduction (4) Basic Components (5) Function of Digital Control & How to Operate (6) SET UP(Other Functions) / Easy Function Operation 2. -
Page 3: How To Use Rcom Usb 20 / Rcom Pro 20
Ground Connection for preventing electric shock. Tip : References or useful suggestions in using Rcom product Warning of actions which may be dangerous or cause damage to the incubator. For Rcom USB 50 MODEL PC connecting, refer to the PC-SOFTWARE manual. -
Page 4: Main Features
Rcom 20 Thank you for choosing the Rcom incubator. The Rcom 20 incubator is the first incubator with creditability to have a superior design and function which help in controlling optimum incubation conditions. It has two sensors, one for detecting surrounding environments and the another for internal incubator conditions. -
Page 5: Introduction
1. Introduction (2) Safety Precautions Electrical hazards Be careful the details below when you use. Do not use a damaged power Do not pull the cord when Never pull the plug out of the Do not twist or crush electric Do not insert multiple cord or loose outlet. -
Page 6: Introduction
You can set and store If you register your information Power Connecting Socket incubation conditions with your machine’s serial with your Computer. number on our web-site Connecting the electric cord (www.Rcom.co.kr), you can get < USB MODEL Only > 2 year warranty service. - Page 7 Standard Egg Tray * Can be attached anywhere for easy viewing < USB MODEL > Large Egg Tray PC SOFTWARE CD Universal Tray Divider(10EA) USB Cable Universal Tray SET Rolling Divider SET USB MODEL - You can download updated information at www.Rcom.co.kr...
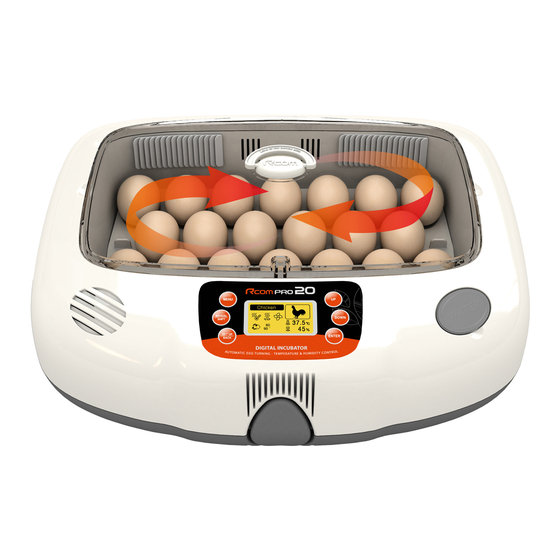
- Page 8 (5) Function of Digital Control & 1. Introduction How to Operate Function of Digital Control & How to Operate Select Birds Temp. & Humidity UP Incubation Termination Setting Value Change Select Auto/Manual Temp. & Humidity DOWN Pass to next stage Setting Value Change Other function display, Save input and...
- Page 9 (6) SET UP(Other Functions) / 1. Introduction Easy Function Operation Push SET UP key and then select each function icon using SET UP(Other Functions) UP/DOWN key(ENTER) WARNING Be sure to read CAUTIONS. We do no recommend customers T.CAL Temperature Fatal Damage to recalibrate by their own.
-
Page 10: Before Use
(1) How to Assemble the Incubator / 2. Before use Egg-turning plate How to Assemble Lock the three locking buttons at the front and rear of the incubator. View Window BACK Standard Tray Insert the power cord in the socket at the back of the main body. - Page 11 (2) What is an incubation room? / 2. Before use Preparation for Incubation What's an Incubation Room? / Preparation for Incubation The Incubation Room is a confined space for setting and operating an incubator. Because the incubation room environment has a considerable effect on hatch rate, it's recommended to control the environment for setting up an incubator;...
- Page 12 (2) What is an incubation room? / 2. Before use Preparation for Incubation Some gap (about 2mm) around the eggs is needed for easy egg turning as shown on the below. About 2mm About 2mm When you use the 'universal rolling divider' which is sold separately, be careful to adjust the distance of rolling divider so that eggs do not roll out of position.
- Page 13 (1) Incubation Modes / 3. Function Setting Incubation start with Automatic Mode Rcom Pro 20 incubator has two modes as automatic and manual mode, Incubation Modes and Rcom USB 20 incubator has three modes as automatic, manual, and PC connecting mode.
- Page 14 Temperature and humidity is optimized when Rcom products are released. We do no recommend customers to recalibrate by their own. If you need to recalibrate, please visit our website (www.rcom.co.kr Download Manual) or ask purchase place.
- Page 15 (2) Incubation start 3. Function Setting with Manual Mode Egg-turning angle setting Setting of egg turning angle of Setting of date of egg turning angle change early and middle stages of incubation. in the final stage of incubation. The egg turning angle showing on LCD screen may be different from the setting angle depending on egg tray (based on standard egg tray) and size of eggs.
-
Page 16: Function Settings
(3) Incubation Start for 3. Function Settings Other Birds Incubation Start for other birds This function is used when user wishes to incubate other birds which are not memorized in the incubator MENU menu setting. User can change incubation conditions according to needs. -
Page 17: Return To Factory Setting
3. Function Settings Return to Factory Setting Incubation start with PC connecting mode <Rcom USB 20 MODEL ONLY> With this function, you can share incubation process, optimum incubation setting by building a database. Refer to the PC Software Manual for starting incubation in PC connecting mode. - Page 18 (6) Incubation conditions reset / 3. Function Settings How to Set Egg Turning Test / Turn ON, OFF Humidification Function Incubation Condition Reset during Incubation This is used when you want to change incubation setting mode again during incubation. Press MANUAL button during incubation, then Temp.
-
Page 19: Other Functions
(1) Egg Turning Check / Alarm for water supplement / 4. Other Functions Abnormal High or Low temperatue Alarm / Power Failure Alarm Function Egg Turning Check Function When starting egg turning, animation showed on display with melody. Water Shortage Detecting Function When water is short, humidification icon is changed and water supplement... - Page 20 (Please move all the eggs 1~3 days before hatching into Hatcher or Brooder.) Hatcher : The machine for egg-hatching. Operate it 1~3 days before egg-hatching. (Rcom MARU H&B) Brooder : The machine makes baby chickens or birds warm up against cold or cool environment. You can set up proper temperature and humidity.
- Page 21 6. How to Clean (1) How to Disassemble Pull out the electric cord from the connecting jack and also take out the plug from the outlet. Don't turn off the power soon after using the incubator, as this may cause a break down due to moisture left inside the main controller.
- Page 22 6. How to Clean (2) How to Clean Start the vacuum cleaner to remove the dust as shown on the right and thoroughly shake out the minute dust with a fine brush. If the incubator goes through incubations several times, feather, dust, shell, etc.
- Page 23 Frequently Asked Questions (FAQ) Servicing All our Rcom digital incubators of Autoelex Co., Ltd. are made by precision systems under strict quality control. But occasionally some defective products are found on the way of their distribution. If any problem occurs, then please contact Rcom service center or distributorsin your country.
- Page 24 7. Product Information (2) Troubleshooting If you need detail self diagnosis, Troubleshooting please click “self diagnosis” on our website. CIRCUMSTANCE ITEMS TO BE CONFIRMED SOLUTIONS Check electric cord is properly connected. Connect the cord again. No signs of power Check if there is a power outage. Check the main socket with any other to the incubator.
- Page 25 Refer to website for how to register. (Free 1 years gurantee in case not registerd.) Product Registration Procedures If you are a new member of Rcom, you need to log in our website at www.Rcom.co.kr 1. Click “SIGN UP” on top of the right corner.
- Page 26 Rcom USB 20, PRO 20, MAX 20 PART LIST Names of goods Names of goods Image P a rt N o Image P a rt N o (*.Compatible) (*.Compatible) H50 Hum i H50-H611-10 Hea ter C over H20-F201-10 H20 Body...
- Page 27 Rcom USB 20, PRO 20, MAX 20 PART LIST Names of goods Names of goods Image P a rt N o Image P a rt N o (*.Compatible) (*.Compatible) H20 PRO H20-F219P -10 M em brane SW ( R90-F219M -10)
- Page 28 SELLER MANUFACTURER...
Need help?
Do you have a question about the USB 20 and is the answer not in the manual?
Questions and answers