Phonak Roger Clip-On Mic User Manual
Hide thumbs
Also See for Roger Clip-On Mic:
- Quick setup manual (12 pages) ,
- Quick setup manual (12 pages)
Table of Contents
Advertisement
Advertisement
Table of Contents

Related Manuals for Phonak Roger Clip-On Mic


Summary of Contents for Phonak Roger Clip-On Mic
- Page 1 User Guide...
-
Page 2: Table Of Contents
Contents 1. Welcome 2. Getting to know your Roger Clip-On Mic 2.1 In the box 2.2 How the Roger Clip-On Mic works 2.3 Device descriptions 2.4 Indicator lights (LED status) 3. Getting started 3.1 Setting up the docking station 3.2 Charging your Roger Clip-On Mic 3.3 Switching on and off... - Page 3 5. Special functions 5.1 Mute 5.2 Disconnecting Roger devices (NewNet) 5.3 Verification mode 6. Adding additional microphones 6.1 Connect 6.2 Using additional microphones 7. Troubleshooting 8. Important information 9. Service and warranty 10. Information and explanation of symbols...
-
Page 4: Welcome
TV connectivity. It can also be used alongside other Roger Clip-On Mics and Roger Pens in a microphone network. Your Roger Clip-On Mic is a Swiss premium-quality product developed by Phonak, the world’s leading hearing healthcare company. - Page 5 Please read this User Guide thoroughly to benefit from all the possibilities your Roger Clip-On Mic offers. If you have any questions, please consult your hearing care professional or local Phonak support center. Phonak – life is on www.phonak.com...
-
Page 6: Getting To Know Your Roger Clip-On Mic
2. Getting to know your Roger Clip-On Mic 2.1 In the box Roger Clip-On Mic Docking station Power supply with country adapter and charging cable Star sticker Storage pouch Lanyard Audio cable for docking station micro-USB audio RCA / Cinch adapter... -
Page 7: How The Roger Clip-On Mic Works
2.2 How the Roger Clip-On Mic works Roger Clip-On Mic transmits the speaker’s voice directly into your ears. The system consists of three main elements: your hearing aids, Roger receivers and your Roger Clip-On Mic. Hearing aid with Roger receiver... -
Page 8: Device Descriptions
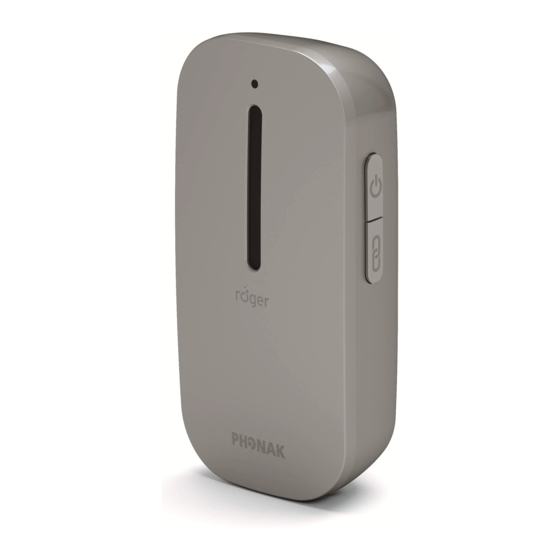
2. Getting to know your Roger Clip-On Mic 2.3 Device descriptions Roger Clip-On Mic a Indicator light (LED) b Microphones c Charging and audio input (micro-USB) d Connect e On / Off / Mute Docking station a Slot for Roger Clip-On Mic b Charger input (micro-USB) c Audio input (3.5 mm /... -
Page 9: Indicator Lights (Led Status)
2.4 Indicator lights (LED status) Indicator light Meaning Switching on Switching off Audio input detected Microphone / audio input muted Charging Fully charged Low battery – charge your Roger Clip-On Mic... -
Page 10: Getting Started
3. Getting started 3.1 Setting up the docking station The Roger Clip-On Mic docking station is used to both recharge the microphone and transmit audio from a TV or other audio device to the Roger Clip-On Mic (and into your hearing aids). - Page 11 Remove / Change: a. Pull back the tab on the universal power supply. b. Gently pull the adapter upwards to remove it. c. Start over with step 1 (above). Connecting the power supply to the docking station 1. Place the docking station next to your TV / audio device and connect the smaller end of the charging cable to the power input of the docking station 2.
- Page 12 3. Getting started Connecting the docking station to a TV / audio device 1. Plug the audio cable into the audio input of the docking station: 2. Connect the other end of the audio cable to the headphone output of your TV / audio device.
- Page 13 You can also connect via a SCART adaptor, which can be bought from an electronics store or from your Phonak dealer. Connect the other end of the audio cable to the SCART adapter. Then plug the SCART adapter into a free SCART output socket on your TV.
- Page 14 Cinch / RCA or SCART output socket as described above. The Roger Clip-On Mic docking station can also be connected to any other audio device such as an MP3 player, PC or HiFi system using the audio cable.
-
Page 15: Charging Your Roger Clip-On Mic
To charge your Roger Clip-On Mic, slot it into the docking station. The indicator light turns orange to indicate it is charging. An empty battery will reach its maximum charge in approximately 2 hours. - Page 16 3. Getting started Alternatively, you can also charge your Roger Clip-On Mic without the docking station. This may be useful when traveling. Using the micro-USB cable: 1. Plug the smaller end (micro-USB) of the charging cable into your Roger Clip-On Mic.
- Page 17 You can also charge your Roger Clip-On Mic by using the charging cable to connect your Roger Clip-On Mic to one of your computer’s USB ports. If you connect the charging cable to your computer’s USB port and the docking station at the same time, your Roger Clip-On Mic will not charge.
-
Page 18: Switching On And Off
3. Getting started 3.3 Switching on and off To switch your Roger Clip-On Mic on, press the on / off button for two seconds until the indicator light turns white. 2 secs... -
Page 19: Using Roger Receiver
3.4 Using Roger receiver Using Roger MyLink If your Roger receiver is a Roger MyLink, switch your Roger MyLink on and hang it around your neck. Make sure your hearing aids are set to T / MT / T-Coil mode. The Roger MyLink User Guide provides more detailed information on using Roger MyLink. -
Page 20: Connecting A Receiver
Clip-On Mic as follows: 1. Make sure Roger Clip-On Mic and the Roger receiver are both powered on. 2. Hold Roger Clip-On Mic within 10 cm / 4 inches of the Roger receiver. 3. Press the Connect button on your Roger Clip-On Mic. - Page 21 Connection was successful – your Roger receiver is connected to your Roger Clip-On Mic. Roger Clip-On Mic could not find a Roger receiver. Move Roger Clip-On Mic closer to your Roger receiver and make sure the Roger receiver is powered. Then try to connect again.
-
Page 22: Using Roger Clip-On Mic
4. Using Roger Clip-On Mic 4.1 Wearing Roger Clip-On Mic The easiest way to attach Roger Clip-On Mic to the person speaking is by using its clip. There are different ways of clipping Roger Clip-On Mic to the speaker’s clothes:... - Page 23 Make sure Roger Clip-On Mic points towards the speaker’s mouth. The distance between Roger Clip-On Mic and the speaker’s mouth should not be greater than 20 cm / 8 inches. max. 20 cm / 8 inches Too far away Not pointing towards...
-
Page 24: Using The Lanyard
4. Using Roger Clip-On Mic 4.2 Using the lanyard If it’s not possible to clip Roger Clip-On Mic to the speaker’s clothing, you can alternatively use the lanyard to hang Roger Clip-On Mic around their neck. Attaching the lanyard 1. Press the Roger Clip-On Mic clip and slide the plastic part of the lanyard over it. - Page 25 To remove the lanyard, open the clip and pull the lanyard out.
- Page 26 4. Using Roger Clip-On Mic Hanging it around the neck 1. Open the lanyard by pulling the magnets apart. 2. Hang the Roger Clip-On Mic around the neck of the speaker and close the lanyard. 3. Adjust the length of the lanyard to bring Roger Clip-On Mic closer to the mouth.
-
Page 27: Connecting To Multimedia Devices
4.3 Connecting to multimedia devices You can connect your Roger Clip-On Mic to an audio source – such as your TV, tablet or HiFi – to hear its audio signal directly in your hearing aids. Via docking station Make sure the docking station is powered properly connected to your audio source as described in ‘Getting... - Page 28 Roger Clip-On Mic. Roger Clip-On Mic must be switched on to transmit the audio signal to your hearing aids. After you have activated your multimedia device’s audio signal, Roger Clip-On Mic will detect this signal and will automatically mute its own microphone.
-
Page 29: Special Functions
5. Special functions 5.1 Mute Firmly press the on / off button to mute Roger Clip-On Mic’s microphone or audio input. When muted, the indicator light will turn solid violet. Press the on / off button again to re-activate the microphones or audio input. -
Page 30: Disconnecting Roger Devices (Newnet)
You can now re-start to connect Roger receivers or Roger microphones with your Roger Clip-On Mic. 5.3 Verification mode The Verification mode is used by hearing care professionals to verify a device according the Roger POP (Roger Phonak Offset Protocol). - Page 31 Indicator light Meaning Verification mode activated Verification mode can only be activated during the 60 seconds after Roger Clip-On Mic is switched on. When Roger Clip-On Mic is switched off, Verification mode is automatically deactivated. Reset If your Roger Clip-On Mic stops responding, reset...
-
Page 32: Adding Additional Microphones
6.1 Connect To connect another microphone to your Roger Clip-On Mic, follow these steps: 1. Turn on both microphones. 2. Decide which Roger Clip-On Mic will be your primary device. Mark this device by placing the star sticker on the back. - Page 33 3. Hold the two microphones close together (within 10 cm / 4 inches). 4. Press the Connect button of the microphone with the star sticker. 0-10 cm / 0-4 inches 5. The indicator lights of both microphones will turn green for two seconds to confirm a successful connection.
- Page 34 Roger Clip-On Mic, use the NewNet function (see chapter ‘Special Functions’). If you want to connect your Roger Clip-On Mic with a Roger Pen, it is recommended to press the Connect button of the Roger Pen, making that the primary microphone.
- Page 35 Connection was successful – the other Roger microphone is now connected to your Roger Clip-On Mic. Roger Clip-On Mic could not find another Roger microphone. Move Roger Clip-On Mic closer to the other Roger microphone and make sure both microphones are switched on.
-
Page 36: Using Additional Microphones
6. Adding additional microphones 6.2 Using additional microphones Hand over the Roger microphones to your speakers. Make sure they are worn properly (pointing to the mouth and within 20cm / 8 inches). Roger Clip-On Mics automatically detect when your friend or partner talks, before instantly transmitting his / her voice to your hearing aids. - Page 37 10 m / 30 feet away from the group as this may disable the other Roger microphones. If the primary Roger Clip-On Mic is turned off or moves out of range, the secondary Roger microphones will start blinking red and will stop...
- Page 38 6. Adding additional microphones Indicator light (multiple microphone status) When using multiple Roger microphones, the following feedback may be given by the indicator light: Indicator light Meaning Your Roger microphone is muted. Unmute it by pressing the on / off button.
-
Page 39: Troubleshooting
I cannot hear the speaker�s voice even though Roger Clip-On Mic is switched on J The microphone has been J Check the indicator light – if... - Page 40 I cannot hear my multimedia device J The audio source is muted J Unmute the audio source J Roger Clip-On Mic is using J Switch on Roger Clip-On Mic micro-USB audio cable but is to listen to the audio source...
- Page 41 Roger Clip-On Mic a microphone which is no standalone transmitter again longer available The Roger Clip-On Mic’s light is blinking red (double flash) J Charge Roger Clip-On Mic as J Its battery charge is low soon as possible...
-
Page 42: Important Information
8. Important information 8.1 Important Safety Information Please read the information on the following pages before using your Phonak device. This symbol on the product or its packaging means that it should not be disposed of with your other household waste. It is your responsibility to dispose of your waste equipment separately from the municipal waste stream. - Page 43 User Guide, consult your hearing care professional. Your device should only be repaired by an authorized service center. Changes or modifications to this device that were not explicitly approved by Phonak are not permitted. Please dispose of electrical components in accordance with your local regulations.
- Page 44 External devices should only be connected if they have been tested in accordance with corresponding IECXXXXX standards. Only use accessories that are approved by Phonak AG. Using your device’s cables in any way contradictory to their intended purpose (e. g., wearing the USB cable around the neck) can cause injury.
- Page 45 (washing powder, soap, etc.) or alcohol to clean the device. Only recharge your device using chargers supplied by Phonak or by stabilized chargers providing 5VDC and ≥500 mA. Do not connect an USB or audio cable to your device that exceeds 3 meters (9 ft) in length.
- Page 46 8. Important information Protect the device from excessive moisture (bathing, swimming), heat (radiator, car dashboard), and direct contact with skin when sweating (workout, fitness, sport). X-ray radiation, CT or MRI scans may destroy or adversely affect the correct functioning of the device. Do not use excessive force when connecting your device to its different cables.
- Page 47 8.4 Other important information S Persons with pacemakers or other medical devices should ALWAYS consult their physician or the manufacturer of their device BEFORE using the device. The use of the device with a pacemaker or other medical devices should ALWAYS be in accordance with the safety recommendations of the physician responsible for your pacemaker or the pacemaker manufacturer.
-
Page 48: Service And Warranty
9.2 International warranty Phonak offers a one year limited international warranty, valid as of the date of purchase. This limited warranty covers manufacturing and material defects. The warranty is valid only if proof of purchase is shown. - Page 49 9.3 Warranty limitation This warranty does not cover damage from improper handling or care, exposure to chemicals, immersion in water or undue stress. Damage caused by third parties or non-authorized service centers renders the warranty null and void. This warranty does not cover any services performed by a hearing care professional in his / her office.
-
Page 50: Information And Explanation Of Symbols
10. Information and explanation of symbols The CE symbol is confirmation by Phonak Communications AG that this Phonak product is in compliance with the essential requirements and other relevant provisions of Directive 1999/5/EC. This symbol indicates that it is important for the user to read and take into account the relevant information in these user guides. - Page 51 Operating This device is designed such that it conditions functions without problems or restrictions if used as intended, unless otherwise noted in these user guides. Australian EMC and Radiocom- munications compliance label. Temperature: –20° to +60° Celsius (–4° to +140° Fahrenheit). Humidity transportation: Up to 90% (non condensing).
- Page 52 10. Information and explanation of symbols The symbol with the crossed-out garbage bin is to make you aware that this device may not be thrown away as normal household waste. Please dispose of old or unused device, at waste disposal sites intended for electronic waste, or give your device to your hearing care professional for disposal.
- Page 53 Notice...
- Page 56 Manufacturer: Phonak Communications AG Laenggasse 17 CH-3280 Murten Switzerland www.phonak.com/phonak-roger...
Need help?
Do you have a question about the Roger Clip-On Mic and is the answer not in the manual?
Questions and answers