Phonak Roger User Manual
Touchscreen microphone
Hide thumbs
Also See for Roger:
- Quick setup manual (36 pages) ,
- Demo manual (6 pages) ,
- Faq manual (2 pages)
Table of Contents
Advertisement
Quick Links
Advertisement
Table of Contents

Subscribe to Our Youtube Channel
Related Manuals for Phonak Roger


Summary of Contents for Phonak Roger
- Page 1 Roger Touchscreen Mic User Guide...
-
Page 2: Table Of Contents
Contents Welcome Wake / Sleep System description Connecting Roger Touchscreen Mic Roger Earpiece communication system and Roger Earpiece Getting to know your Roger Touchscreen Mic 8 Connecting a Multi-talker network (MTN) Box contents Mass Connect Device description Disconnect Touchscreen display... - Page 3 Network Roger Pass-around JoinNet About Roger Touchscreen Mic NewNet 9.10 Legal List of devices Troubleshooting * Roger Touchscreen Mic may also detect Performance devices located further away. Standards applied Push-to-Talk (PTT) Important information Network compatibility 13.1 Hazard warnings Microphone modes 13.2...
-
Page 4: Welcome
Phonak Communications AG. Used with the Roger Earpiece, this compact transmitter uses adaptive wireless transmission to allow people to receive audio information discreetly. The Roger for Studio system delivers the features and performance demanded by professionals. Your Roger Earpiece is a premium-quality Swiss product developed by Phonak Communications AG, part of Sonova AG, the world’s leading hearing healthcare company. -
Page 5: Getting To Know Your Roger Touchscreen Mic
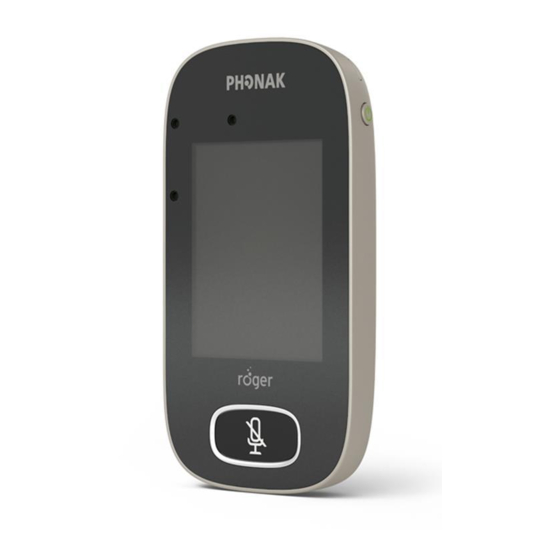
3 Getting to know your Roger Roger Touchscreen Mic 3.2 Device description 3.1 Box contents Power supply / charger Recording cable Roger Touchscreen Mic USB to micro-USB cable 1 On/Off 2 Wake/sleep 3 Indicator light 4 Microphones 5 Mute 6 Touchscreen 7 Micro-USB 8 Socket 3.5 (1/8”) -
Page 6: Touchscreen Display
Adjusts volume of a Roger Dynamic SoundField DigiMaster loudspeaker. SoundField The Roger Touchscreen Mic features two physical buttons. These switch it on and off, and control its mute function. Disconnects a device from microphone’s network. All other functions and settings are controlled by tapping Disconnect icons on the touchscreen. -
Page 7: Function Icons Status
Icon Function 3.4.3 Navigation icons Cancels the microphone’s network These are the icons you see when navigating between, (inc. SubNets). NewNet and confirming, different functions and settings. Opens the microphone’s Settings menu. Return icon (appears top left of screen) – returns Settings to previous screen. -
Page 8: Status Bar Icons
3.4.4 Status bar icons 3.5 Indicator lights (LED status)icons Located at the top of the screen, these provide The microphone has two indicator lights: one above the On/ information about your microphone. Off button, the other surrounding the large Mute button. Symbols Meaning On/Off... -
Page 9: Standard Accessories
4 Standard accessories The following accessories are included with the microphone: 2) Connect the power supply with an electrical outlet and • Charger connect the power cable to the Roger Touchscreen Mic • Lanyard micro-USB socket. • Pouch • Audio cable •... -
Page 10: Lanyard
4.2 Lanyard 4.3 Pouch Use this to protect the This is used to wear the microphone around the neck. microphone from scratches. • Distance from mouth to top of microphone should Hand wash only. be approximately 20 cm / 8 inches. •... -
Page 11: Getting Started
5 Getting started 5.1 Switching on and off 5.2 Wake / Sleep To turn the Roger Touchscreen Mic on or off, press the Sleep puts the microphone’s display to sleep, saving its On/Off button, on the right side of the device, for battery and preventing anything from happening if the 3 seconds. -
Page 12: Connecting Roger Touchscreen Mic And Roger Earpiece
0-4 inches A Roger Touchscreen Mic can be integrated in various 0-10 cm To connect a Roger Earpiece, hold it within 10 cm / 4 inches transmitter configurations, called multi-talker networks 0-4 inches of the Roger Touchscreen Mic and briefly press the Connect (MTN). - Page 13 To connect a Roger Touchscreen Mic with a Roger BaseStation network, hold the Roger Touchscreen Mic Roger Touchscreen Mic can also connect to other Roger within 10 cm / 4 inches of the Roger BaseStation and Earpieces or other Roger Touchscreen Mics within the same press either: network by following the standard procedure at section 5.3.
-
Page 14: Mass Connect
• A Spinning connecting symbol is displayed • Place the Roger receivers to be disconnected (turned on) • Move all Roger devices to be connected within 10 cm / within 10 cm / 4 inches of the microphone • Tap Disconnect 4 inches of the Roger Touchscreen Mic •... -
Page 15: Mute / Unmute
6 Using Roger Touchscreen Mic 5.8 Mute / Unmute 6.1 Setting menu Mute To mute Roger Touchscreen Mic, press the Use this menu to adjust the microphone’s settings. Some big button on the front panel: menu options appear grey until used. -
Page 16: Languages
Use this menu to adjust the microphone’s settings. Some Warnings menu options appear grey until used. • The EasyGain setting will only act on a Roger Earpiece How to use it: which is within the 10 cm / 4 inch Roger Touchscreen •... -
Page 17: Naming A Roger Earpiece
Roger Earpiece, changing the volume setting on the Roger BaseStation may have no effect. • For example, if the EasyGain of a Roger Earpiece is set The mute function can be activated by turning the rotary to +4 dB, increasing the BaseStation volume by more Adjust volume control 2.35 Exchange wax filter... -
Page 18: Display Settings
Settings > Roger receiver settings when the new Roger • Select Settings > Display > Screen saver • Select activation time required Earpiece is within 10 cm / 4 inches of the Roger • Default activation time is 30 seconds. Touchscreen Mic. -
Page 19: Roger Touchscreen Mic Network Options
Stand-alone role • Equal Talker A microphone plays the Stand-alone role when it is the only Roger microphone in the network. In this case, all its How to use it: microphone modes can be used (in fact, Pointing mode is •... -
Page 20: Network Mode - Mixing
How to use it: • Tap SubNet • Tap Connect within 10 cm / 4 inches of the Roger Earpiece to be included in the subnetwork • Talk into microphone as normal 7.2.2 Network mode – Primary Talker To stop using SubNet (return to other existing network): •... -
Page 21: Network
• Swipe screen left-right to locate JoinNet icon • Swipe screen right-left to locate List devices icon • Tap List devices (a spinning “searching” symbol will • Tap JoinNet within 10 cm / 4 inches of a Roger be displayed) Touchscreen Mic, Roger Earpiece or Roger BaseStation •... -
Page 22: Roger Touchscreen Mic May Also Detect
• Automatic (default) The time required to list all devices may vary. • Lanyard • Small Group * Roger Touchscreen Mic may also detect devices located further away. • Pointing 7.8 Push-to-Talk (PTT) How to change microphone mode: • Swipe screen left-right to locate Mic mode icon •... -
Page 23: Lanyard Mode
This automated choice is based on the microphone’s built-in How to use it? accelerometer, which analyses its orientation. • Place Roger Touchscreen Mic in the center of a table • Microphone will detect the speakers’ voices, automatically orienting its three built-in microphones towards the 8.2 Lanyard mode... -
Page 24: Other Functions Of Setting Menu
• Swipe screen until the Check icon is visible (Screen 2) out and can no longer be selected. • Move the Roger device to be checked within 10 cm / • Pointing mode icon is visible in status bar 4 inches of the microphone •... -
Page 25: Audio Settings
Roger Touchscreen Mic offers the following audio microphone jack of the recording cable connection options. • Plug other end of 3.5 mm / 1/8” cable into Roger • Input Touchscreen Mic’s 3.5 mm / 1/8”(audio) jack (see • Output (tablet) drawing below) •... -
Page 26: Power
Adjusts the microphone’s transmission power (affecting Used by professionals to verify a device according to the its operating range) in order to extend the battery’s Roger POP (Phonak Offset Protocol). When Verification operating time. mode has been activated, an orange banner will be displayed below the status bar. -
Page 27: Soundfield
• Tap Settings • Enter passcode Function available only with Roger Pass-around • Select Quick menu microphone. This device is not part of the Roger Earpiece • Select Change passcode communication system. • Enter new passcode 9.9 About Roger Touchscreen Mic How to disable Quick menu: •... -
Page 28: Legal
Font license disclaimer. In English only. turned on but I cannot hear the person speaking The Roger Earpiece is not Hold Roger Earpiece close to the connected to the Roger Roger Touchscreen Mic and press Touchscreen Mic the Connect button The Roger Touchscreen Mic Check the indicator light –... - Page 29 8 sec. a computer, and computer Wi-Fi connection seems to be slow The Roger Touchscreen Mic and Move Roger Touchscreen Mic at least computer are too close 1 meter away from the computer Roger Touchscreen Mic’s light is...
-
Page 30: Performance
11 Performance 12 Standards applied Frequency range Electrical safety: 2.402 GHz up to 2.480 GHz IEC/ EN 60950-1 Power emission Radiocom 2.4 GHz: 100 mW EN 300 328 Audio bandwidth EMC: 100 Hz - 7200 Hz EN 301.489-1,-3,-9,-17 Distortion FCC: -42 dB (<... -
Page 31: Important Information
Only supply your device using power adapters supplied Only use accessories that are approved by Phonak by Phonak Communications. Communications AG. When the device is not in use, turn it OFF and store... -
Page 32: Other Important Information
Declaration of conformity, please contact the order to check the device, as well as to help you use manufacturer or the local Phonak Communications AG your device correctly. representative whose address can be taken from the list •... - Page 33 FCC Caution: Any changes or modifications not expressly approved by the party responsible for this device must accept any interference received, compliance could void the user’s authority to operate including interference that may cause undesired the device. To comply with FCC RF exposure limits for operation.
-
Page 34: Service And Warranty
Local Phonak Communications AG representative: 14.2 International warranty Phonak Communications AG offers a 2 (two) years limited international warranty, valid as of the date of purchase. This limited warranty covers manufacturing and material defects. The warranty is valid only if proof of purchase is shown. -
Page 35: Information And Explanation Of Symbols
15 Information and explanation of symbols Important information for handling and product safety. The CE symbol is confirmation by Phonak Communications AG that this product is in Please read the information on the following compliance with the essential requirements and pages before using your Phonak other relevant provisions of Directive (2014/53/EU). -
Page 36: Homologation References
16 Homologation references Roger Touchscreen Mic FCC ID: KWCTX19 IC: 2262A-TX19... - Page 37 Manufacturer: Phonak Communications AG Laenggasse 17 CH-3280 Murten Switzerland www.phonak-communications.com...
Need help?
Do you have a question about the Roger and is the answer not in the manual?
Questions and answers