Table of Contents
Advertisement
Advertisement
Table of Contents

Related Manuals for York Fitness anniversary x201


Summary of Contents for York Fitness anniversary x201
- Page 1 VERSION II - 28/05/2007...
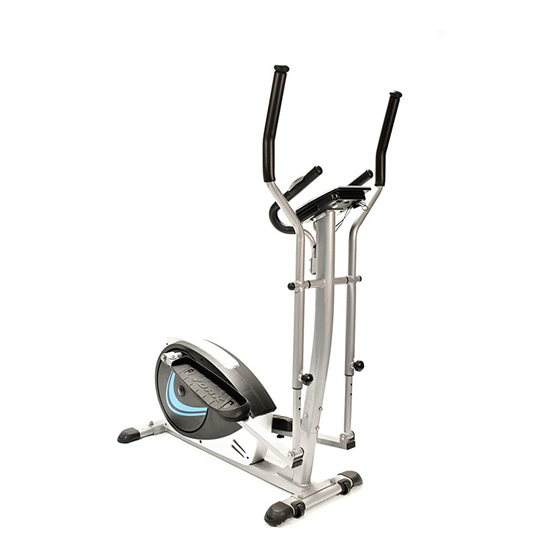
- Page 2 Congratulations on purchasing a cross trainer from York Fitness. You have chosen a high quality, safe and innovative piece of equipment as your training partner and we are certain it will keep you motivated on the way to achieving your personal fitness goals.
-
Page 3: Table Of Contents
contents safety information customer support assembly instructions user instructions - quick start - console display and feedback - button functions - using workout programs exercising with your cross trainer cross trainer features explained how to take care of your cross trainer 15 troubleshooting your warranty exploded diagrams and parts list... -
Page 4: Safety Information
safety information PLEASE READ THIS INSTRUCTION MANUAL BEFORE YOU BEGIN ASSEMBLY. GREAT CARE HAS BEEN TAKEN TO DESIGN THESE INSTRUCTIONS AND FOLLOWING THEM WILL HELP YOU WITH QUICKER ASSEMBLY AND MINIMISE THE RISK OF INJURY YOU ARE RESPONSIBLE FOR YOUR OWN SAFETY - THIS LIST IS NOT EXHAUSTIVE. -
Page 5: Customer Support
Care & Maintenance • Always place the equipment in a dry environment. • Use a warm, damp cloth to keep the product clean. • No wet cleaning of electrical components, unplug before any care and maintenance • The safety level of the equipment can be maintained only if it is regularly examined for damage and wear. This includes any ropes, pulleys, nuts, bolts, moving parts, bushes, chains, wheels, bearings &... -
Page 6: Assembly Instructions
assembly instructions 1. Before you start 1. Prepare your work area - 2. Work with a friend - 3. Open the carton - 4. Unpack the carton it is important you assemble we recommend you have checking any warnings on Make sure you have the product in a clean and someone assist you with... - Page 7 2. Attach the stabilisers FIXINGS: FIXINGS: 1. Attach the front and rear stabilisers with the nuts, bolts and washers as shown in the diagram Part 2. Be sure to fit the parts in the same order as the diagram Check the bolts are fully tightened by making Part sure they penetrate through the top of the nut Part...
- Page 8 4. Attach the upper moving handlebars FIXINGS: FIXINGS: 1. Slide the pivot rod inside the tube on the front post as shown Part 2. Slide the left and right upper moving arms over this pivot rod 3. Secure in place using the bolts and washers as shown Part Part Part...
- Page 9 6. Attach the footplates mount tube FIXINGS: FIXINGS: 1. Remove the bracket at the back of the footplate mount tube (keep these nuts and bolts safe as you’ll need them to re-attach it later on) Part 2. Attach the same bracket to the crank arm using the fixing shown 3.
- Page 10 8. Attach the front handle bar FIXINGS: FIXINGS: 1. Secure the front handle bar to the front post Part via the fixing bracket using 4 x carriage bolts, 4 x spring washers and 4 x curve washers Part Part 9. Attach the computer FIXINGS: FIXINGS: 1.
-
Page 11: User Instructions
user instructions Quick Start 1. Make sure the cross trainer is plugged in 2. Press the ‘start / stop’ button 3. Begin pedalling 4. Adjust the resistance level with the scroll wheel 5. The values of time, distance and calories will start counting upwards Console Display and Feedback Profile window Calories... -
Page 12: Using Workout Programs
Using Workout Programs When you turn the cross trainer on it will 1. From the main menu highlight ‘user’ with 9. Press down on the scroll wheel to select enter the ‘main menu’ mode, awaiting you to the scroll wheel 10. -
Page 13: Exercising With Your Cross Trainer
exercising with your cross trainer Always consult your doctor If you experience nausea, dizziness or other abnormal before undertaking a new symptoms during exercise, stop at once and consult exercise regime your doctor Starting your workout Finishing your workout • Slow your elliptical motion to a gradual stop Begin and end each workout with a Warm Up / Down session –... -
Page 14: Cross Trainer Features Explained
cross trainer features explained Monitoring your heart rate Hand Pulse Sensors This cross trainer is fitted with 2 hand pulse sensors. To obtain a pulse reading you must have both your left and right hand on the sensors at the same time. Do not grip the hand sensors too tight and allow the computer a few seconds to display the reading. -
Page 15: How To Take Care Of Your Cross Trainer
Levelling your cross trainer To help you level the cross trainer on uneven surfaces, 2 height adjusters are included on the frront stabiliser. Simply twist these around to adjust the height of the cross trainer. Transporting your cross trainer Your cross trainer has 2 transport wheels to help you move it around. To engage the wheels, tilt the cross trainer towards you with the handle bars and then using the handlebars push the cross trainer to your desired location. -
Page 16: Your Warranty
your warranty This product is supplied with a standard warranty as follows: • Lifetime frame • 12 month other parts • 12 months labour This product is warranted for use in a home, personal, family or household environment Please Note: Warranty details may vary from one market area to another Warranty Terms York Barbell Ltd. -
Page 17: Exploded Diagrams And Parts List
exploded diagram... - Page 19 parts list...
Need help?
Do you have a question about the anniversary x201 and is the answer not in the manual?
Questions and answers