Telex RadioCom BTR-700 Operating Instructions Manual
Professional wireless intercom system
Hide thumbs
Also See for RadioCom BTR-700:
- Supplementary manual (1 page) ,
- Operating instructions manual (68 pages) ,
- Operating instructions manual (63 pages)

Related Manuals for Telex RadioCom BTR-700


Summary of Contents for Telex RadioCom BTR-700
-
Page 1: Operating Instructions
Telex Operating Instructions RadioCom ™ BTR-700, TR-700 Professional Wireless Intercom System... - Page 2 Thank you for choosing RadioCom™ Telex Communications would like to take this opportunity to thank you for choosing the RadioCom™ BTR-700 Professional Wireless Intercom System. Many of the features in this product are the result of years of develop- ment work with many of the features developed from customer feedback. We hope that your experience with this product is a pleasant one and hope to provide you with a continuing line of RadioCom™...
-
Page 3: Table Of Contents
Table of Contents Introduction................General Description . - Page 4 Table of Contents (continued) Beltpack Operation............... . . 6-11 Power/Local Headset Volume .
-
Page 5: Introduction
Base station comes with rack ears for easy rack mounting. • Beltpack batteries last up to 12 hours when using standard AA alkaline batteries. RTS® and Audiocom® are registered trademarks of Telex Communications, Inc. Clear-Com® is a registered trademark of Clear-Com Intercom Systems, Inc. -
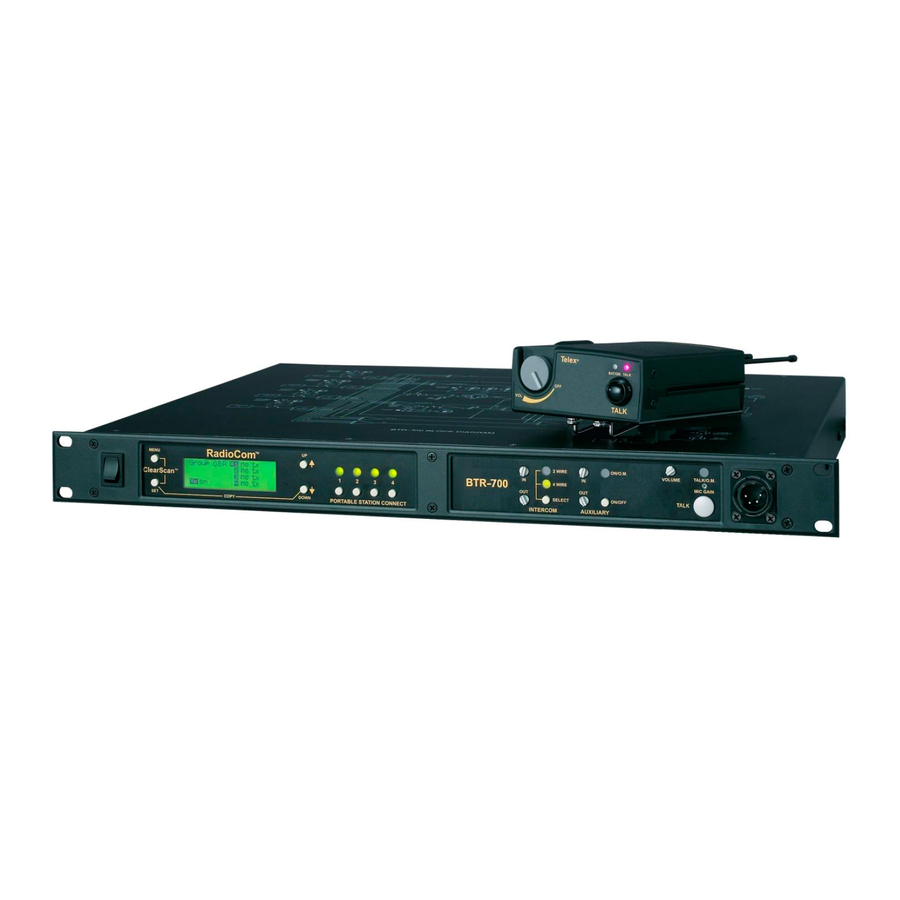
Page 7: Btr-700 Base Station
12. Local Headset Connector – Male XLR connector for 5. Portable Station Connect – Buttons used to enable or Telex units, Female XLR connector for RTS units. A dy- disable the respective receiver’s audio. GREEN LED = namic or electret headset microphone is automatically de- Audio enabled, LED OFF = Audio disabled. -
Page 8: Controls And Connections - Rear Panel
4. I/C Select Switch – Set to the appropriate 2-wire intercom 6. Auxiliary Input/Output – One 3 pin female XLR input type being interfaced to the unit. Set to either Telex, RTS connector and one 3 pin male XLR output connector. -
Page 9: Btr-700 Specifications
Four Wire Output ..........Level Adjustable (2 Vrms typical) Telex Intercom ....Input/Output Level Adjustable (1 Vrms typical), Line impedance 300ê... - Page 10 2-4 Blank...
-
Page 11: Controls And Connections - Top Panel
TR-700 Beltpack Controls and Connections - Top Panel Telex BAT/OM TALK TALK Figure 4 TR-700 Top Panel 1. On/Off & Volume Control – Turns the beltpack power 3. Talk Light – LED is on when the talk button is active. -
Page 12: Controls And Connections - Rear Panel
Controls and Connections - Rear Panel 6. Headset Connector – Male XLR connector for Telex units, Female XLR connector for RTS units. A dynamic or electret headset microphone is automatically detected by the beltpack and a bias voltage supplied if needed. -
Page 13: Tr-700 Specifications
TR-700 Specifications RF Frequency Range ..... . 518 - 608 MHz, 614 - 740 MHz in 18 MHz TX and RX bands Power Requirements . - Page 14 3-4 Blank...
-
Page 15: Initial Equipment Set-Up
Contact the shipper or your dealer immediately if anything is should come with your base station and each belt pack. damaged or missing. Fill out the registration card and return it to Telex to register the unit. Quantity Description BTR-700... -
Page 16: Antenna Connections
The antennas can be remoted for better signal path. A Telex coax assembly with remote antennas may be required. See “Accessory” section for ordering information. - Page 17 Keep the distance between the base station and the beltacks as Attempting to operate the wireless intercom system through or short as possible. The greater the distance, the weaker the sig- around walls, ceilings, metal objects, etc. will reduce system nal.
-
Page 18: Improving Reception/Increasing Range
2. Placing the BTR on top of a shelf or equipment rack un- obstructed without remoting the antennas is OK. 3. Placing BTRs in a shelf or equipment rack with the an- 1. Placing BTRs in a shelf or tennas mounted on the back equipment rack and using re- of the BTR or the side of the mote antennas is OK. -
Page 19: Base Station Set-Up
POWER CONNECTION BTR-700 RECEIVE INTERCOM AUXILLARY AUDIO 100-240 VAC 50-60 Hz FCC ID: B5DM516 2 WIRE PUSH PUSH CANADA 1321231218A TRANSMIT POWER TELEX COMMUNICATIONS INC. 4 WIRE MADE IN USA NORM TRANSMIT HIGH TELEX CLEARCOM INPUT OUTPUT POWER TRANSMIT SWITCHES... -
Page 20: Intercom Switch
The Radiocom™ wireless system can be interfaced to RTS Telex (Audiocom®) and Clearcom® intercom systems require TW, Audiocom® (Telex), Clearcom®, RTS matrix and other one cable for intercom. This interfacing is done through the intercom (I/C) systems. Set the Intercom switch on the rear of I/C 3 pin XLR connectors on the rear of the unit. -
Page 21: Auxiliary Input/Output
BP-318 BTR-700 RECEIVE INTERCOM AUXILLARY AUDIO 100-240 VAC 50-60 Hz 2 WIRE FCC ID: B5DM516 PUSH PUSH TRANSMIT CANADA 1321231218A POWER TELEX COMMUNICATIONS INC. 4 WIRE MADE IN USA TRANSMIT HIGH NORM TELEX CLEARCOM INPUT OUTPUT POWER BTR-700 HEADSET LINE... -
Page 22: Beltpack Set-Up
Beltpack Set-up Battery Installation Insure that the On/Off volume control knob is turned off. Press down and hold down the battery release latch, slide the battery pack about 1/8 inch back, toward the latch, until it stops. Then lift battery pack out. Replace batteries as follows: 1. -
Page 23: Antenna Connection
“TR-700 beltpack controls and connections” cles at the bottom of the beltpack. The color dot on the screw section if this is not a Telex headset. A dynamic or electret end of the antenna must match the color dot on antenna recep- headset microphone is automatically detected by the beltpack tacle. - Page 24 4-10 Blank...
-
Page 25: Pre-Walk-Thru Checklist
ection Pre-Walk-Thru Checklist Following the instructions fully to this point you have success- fully completed the following checklist: ❒ ❒ Located the base station properly. Connected headsets to base stations (if needed) and all beltpacks. ❒ Connected power to base station. ❒... - Page 26 5-2 Blank...
-
Page 27: System Operation
12:00 o’clock position. Check that front panel IC is in and 1B, have different base station transmit frequencies, how- 2-wire for AudioCom (Telex), RTS - TW and ClearCom wired systems, and 4-wire for RTS Matrix and stand-alone ever, they both have the same eight base station receive chan- operation. -
Page 28: Base Station Operation
If the base station is connected to a 2-wire sys- Set the base station power switch to the on position, by push- tem, such as Audiocom (Telex), RTS TW or Clearcom, ing the top of the switch.The internal cooling fan will start im- set the intercom to 2-wire. -
Page 29: Display Contrast
Display Contrast The LCD’s (Liquid Crystal Display) contrast is set from the factory to a standard level. However it is possible for the user to adjust the contrast if desired. The contrast control is inter- nal to the BTR-700 unit near the front panel. The cover must be removed for access to this control. -
Page 30: Btr-700 Menu Structure
Main Screen Flowchart The following contains the base station menu structure and references the pages in which further detail of that menu may be found. Power-Up Screen - Pg. 6-5 Telex SB20001 C60001 RadioCom [MENU] Operating Screen - Pg. 6-5... -
Page 31: Power-Up Screen
Power-Up Screen Power-Up Screen • This screen is displayed only on power-up, first use de- Telex B20001 fault, and factory default. C60001 RadioCom • The 1 upper right corner number displays the base’s soft- ware revision. The version number increments for changes in operational software. -
Page 32: Group/Channel Select
Group / Channel Select Group / Channel Select The Group/Channel select screen allows the user to change the group and select from a pre-determined number of channels on Group 14 Ch 01 each receiver. Ch 02 Ch 03 • Hit [MENU] once to enter the Group / Channel Select Ch 04 Screen from the operating screen. -
Page 33: Group/Frequency Select
Group / Frequency Select Group / Frequency Select The Group/Frequency select screen allows a user to set the group and select from a pre-determined number of frequencies Group 15 715.000 on each receiver. Each frequency displayed on the right half of 716.700 the screen corresponds to a channel number in the Group/Channel Screen. -
Page 34: Frequency Edit
Frequency Edit Frequency Edit (User-Programmed Groups Only) (User-Programmed Groups Only) This menu only occurs for user-programmable groups or when copying to a user-programable group. The Frequency Edit screen allows the user to set the group transmit frequency and receive channel frequencies of a user-programmable group. •... -
Page 35: Clearscan
ClearScan™ ClearScan™ ClearScan™ performs a frequency scan of the factory-defined and any set-up user-programmable groups in order to find the group with the highest number of clear receive channels. After about 20-30 seconds, the group with the highest number of clear receive channels will be displayed. -
Page 36: Special Key Sequences
Special Key Sequences Use Default Lockout • • Press [MENU] while turning on the base station to enter Press [UP]+[DOWN] for 3 seconds to lock or unlock the the 1 use default setup screen. This places the unit on base station. Pressing [MENU] will still function to view screens, but [SET] will no longer start any editing. -
Page 37: Beltpack Operation
Beltpack Operation POWER BATTERY LOCAL HEADSET VOLUME CHECK Telex BAT/OM TALK TALK BUTTON TALK MICROPHONE GAIN Figure 21 TR-700 - Top and Rear Panel Talk Button Power / Local Headset Volume Press the talk button to enable the audio path from the headset Turn the beltpack power on by rotating the knob CW. -
Page 38: Beltpack Menu Structure
TR-700 Menu Structure Beltpack Menu Structure The following contains the main beltpack menu structure and refer- ences the pages in which further detail of that menu may be found. All beltpack features and special key sequences can only be done from the group/channel screen. -
Page 39: Power-Up Screens
Power-Up Screens Power-Up Screens • The first screens displayed when the beltpack is powered up are the software and channel map version screens. S20001 • The 1 screen displayed indicates the beltpack’s software version number. It is displayed for about one second. •... -
Page 40: Group/Channel Screen
Group / Channel Screen Group / Channel Screen The Group/Channel screen allows the user to change the group and select from a pre-determined number of transmit channels. 03A 01 03A 01 • The screen displayed after the beltpack power-up screens. [SET] •... -
Page 41: Transmit Screen
Transmit Screen Transmit Screen The Transmit screen allows the user to set the beltpack trans- mit frequency. Factory-defined groups will allow only a set number of pre-defined frequencies to be selected. User-programmable groups will allow the user to change the frequency in 25kHz steps. -
Page 42: Receive Screen
Receive Screen Receive Screen The Receive screen allows the user to set the beltpack receive frequency. This corresponds to the base station’s transmit fre- quency. In factory-defined groups receive is not changeable. User-programable groups will allow the user to change the fre- quency in 25 KHz steps. -
Page 43: Clearscan
ClearScan™ ClearScan™ ClearScan™ performs a frequency scan of the factory-defined and any set-up user-programable groups in order to find the clearest group. After about 30 seconds, the clearest group is displayed. A group is defined by the receive frequency. The next best group and so forth may be accessed with the [DOWN] and [UP] arrow buttons. -
Page 44: Talk Button Latch On/Latch Off
Talk Button Latch on/Latch off HOLD [SET] AND PRESS [TALK] • Press and hold [SET] then press the [TALK] button to show the Talk button Latch/non-Latching screen. The cur- rent setting of the feature is displayed on the LCD display. •... -
Page 45: System Walk-Thru
❒ Check that the talk button is engaged. The talk LED In 99% of all instances you will set up your Telex Wireless In- will be illuminated. tercom System, walk it through the area of interest and achieve error-free performance. - Page 46 7-2 Blank...
-
Page 47: Troubleshooting
Make sure that all the Telex beltpack(s) are on. If there are any unused receivers at the base, turn the audio off from those receivers by deselecting the appropriate “Portable INTERFERENCE - System picks up signals other than Station Connect”... - Page 48 8-2 Blank...
-
Page 49: Tech Tips
The factory defined frequencies (Groups 01A-24) se- system is distortion on louder speech. The microphone gain lected by Telex for this RadioCom™ system are chosen to must be reduced. The same applies to a user with a powerful minimum possible interference. - Page 50 9-2 Blank...
-
Page 51: Battery Information
ection Battery Information Improper battery selection, use, installation and care are the Nickel-Metal Hydride Batteries: These batteries can save cause of numerous wireless system failures. you money in the long run, as they can be recharged. Typical battery life is 8 to 9 hours, which is about 70% of the length of Alkaline Batteries: Alkaline batteries such as Mallory’s time alkaline batteries last. - Page 52 10-2 Blank...
- Page 53 Call Signaling: AUDIO 2 Send: ........20kHz ñ100 Hz, 240 mVrms Receive: ......20kHz ñ800 Hz, 100 mVrms MALE Power Voltage: ..........28.0 VDC nominal AudioCom/Telex COMMON ê Input Impedance: ...............300 AUDIO ( - ) PLUS POWER Output Level: ..........1.0 Vrms nominal ê...
- Page 54 11-2 Blank...
-
Page 55: Accessories And Replacement Parts
Includes mounting hardware and 10 European............550024000 feet (3 meters) coaxial cable with TNC Australian ............550024018 connectors BTR Intercom Dummy Load Order No. 71147000 Telex type............PN 878935 RTS type ............PN 878990 Antenna Cables Special low loss antenna cables with TNC Connectors BP-700 Model No. Length Order No. - Page 56 12-2 Blank...
-
Page 57: Customer Service Information
Telex reserves the right to make changes in design and improvement on its product without assuming any obligation to install the same on any of its products previously manufactured. Further Telex re- serves the right to ship new and/or improved products which are similar to the form, fit and function of products originally ordered. - Page 58 13-2 Blank...
-
Page 59: Software License
® IMPORTANT - Please red this document carefully before using this product. THIS DOCUMENT STATES THE TERMS AND CONDITIONS UPON WHICH TELEX COMMUNICATIONS, INC. (the “COMPANY”) OFFERS TO LICENSE THE INSTALLED SOFTWARE OR PROGRAM (the “SOFT- WARE”) FOR USE WITH THE PRODUCT IN WHICH IT WAS INSTALLED. YOU ARE AGREEING TO BE- COME BOUND BY THE TERMS OF THIS AGREEMENT. - Page 60 14-2 Blank...
-
Page 61: Certification Information
Certification Information FCC LICENSING The Telex BTR-700 and the TR-700 Transmitter/Receiver are Type Accepted under United States Federal Communications Commission Part 74. Licensing of Telex equipment is the User’s responsibility and licensibility depends on the user’s classification, users application, and frequency selected. Telex strongly urges the user to contact the appropriate telecommunications authority for any desired clarification. - Page 62 15-2 Blank...
-
Page 63: Limited Warranty
1. Delivery of the product or parts postage prepaid to the Telex dealer, authorized service facility or factory. 2. Determination by Telex that a defect exists and is covered by limited warranty. Defects due to alteration, repair by un- authorized persons, insertion of non-Telex parts, misuse, accidental damage, use of the equipment for purposes other than those for which it was designed, and the like, are not covered by this limited warranty and repairs thereof will be subject to normal service charges. - Page 64 16-2 Blank...
- Page 65 • TELEX COMMUNICATIONS, INC. 12000 Portland Ave. South, Burnsville, MN 55337. PN 803290 OCT 2001 Made in U.S.A.
Need help?
Do you have a question about the RadioCom BTR-700 and is the answer not in the manual?
Questions and answers