
Related Manuals for JVC CA-UXQD9S


Summary of Contents for JVC CA-UXQD9S
-
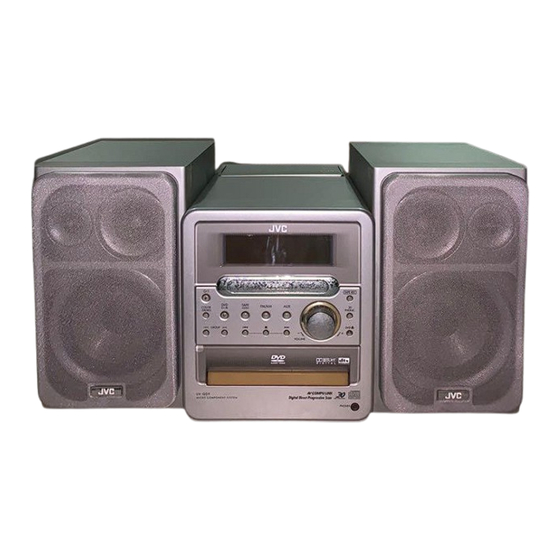
Page 1: Micro Component System
MICRO COMPONENT SYSTEM UX-QD9S Consists of CA-UXQD9S and SP-UXQD9S For hiding the demonstration display, refer to page 15. INSTRUCTIONS LVT1220-005A... -
Page 2: Warnings, Cautions And Others
Warnings, Cautions and Others Introduction CAUTION To reduce the risk of electrical shocks, fire, etc.: 1. Do not remove screws, covers or cabinet. 2. Do not expose this appliance to rain or moisture. CAUTION — F button! Disconnect the mains plug to shut the power off completely. The F button in any position does not disconnect the mains line. - Page 3 CAUTION — Proper Ventilation To avoid risk of electric shock and fire and to protect from damage, locate the apparatus as follows: Top/Front/Back/Sides: No obstructions should be placed in the areas shown by the dimensions below. Bottom: Place on the level surface. Maintain adequate air path for ventilation by placing on a stand with a height of 10 cm more.
-
Page 4: Table Of Contents
marks refer to operation used frequently. You can quickly learn the general usage of this product by reading those parts only. Introduction Notes on Operation ... 3 Suitable Locations for the Main Unit ... 3 Condensation... 3 Cleaning the Main Unit ... 3 Listener’s Etiquette ... - Page 5 Playing Back MP3/WMA and JPEG Discs ...36 Playback ...36 Repeat Playback...37 Preferences ...38 Basic Operations ...38 LANGUAGE...38 PICTURE ...38 AUDIO ...39 OTHERS...39 Country/Area Codes ...40 Language Codes ...41 Listening to Cassette Tapes Listening to Cassette Tapes Listening to Other Equipment Listening to Other Equipment ...43 Adjusting the Sound Input Level from Other Equipment ...43...
-
Page 6: Introduction
Introduction Suitable Locations for the Main Unit To minimize the need for servicing and maintain the high quality of this product, do not place the main unit in the following locations: • In a position subject to high humidity or consid- erable dust •... -
Page 7: Playable Disc Types
— shape (other than a disc of 12 cm or 8 cm in diameter) cannot be played back. • JVC do not guarantee the operation and sound — quality of discs not authorized by CD-DA, which is a CD specification. -
Page 8: Disc Structure
(Continued) Notes on Operation About MP3/WMA/JPEG discs Playable MP3/WMA/JPEG discs and files • Discs recorded in the ISO 9660 format are play- able (except discs recorded in the "packet write" format (UDF format)). • Discs recorded in the multi-session format are also playable. -
Page 9: Selecting The Color System
Selecting the Color System This product is compatible with PAL and NTSC color systems. In standby mode, select PAL or NTSC to match your TV. If the VIDEO OUT SELECT switch is switched over when the power is on, turn off the power, and then turn it on again. -
Page 10: Special Cautions
Notes on Handling ■Important cautions Installation of the system • Select a place which is level, dry and neither too hot nor too cold; between 5°C and 35°C. • Leave sufficient distance between the system and the TV. • Do not use the system in a place subject to vibration. -
Page 11: Part Description
Part Description Introcution/Preparation 42, 44 15, 18 Remote control sensor: 9 25, 30, 37, 45 * This terminal is for connecting a pair of headphones equipped with a stereo mini plug (not supplied). While the headphones are connected, the speakers do not produce any sound. The numbers refer to the pages in which the parts are explained. -
Page 12: Remote Control
Preparation 24, 42 24, 42, 47-49 25, 30, 37, 45 25 22, 25-28, 16, 47 20, 47-49 20, 31 Opening the cover The numbers refer to the pages in which the parts are explained. Inserting Batteries into the Remote Control 10, 16 24, 42, 47-49... -
Page 13: Operating The Tv Using The Remote Control
This page is for when operating your TV using the remote control of this product. Operating the TV Using the Remote Control Setting the manufacturer's code Slide the remote control mode selector to the TV side. Hold down NOTE • Hold down until step 4 is completed. -
Page 14: Connections
Connecting the Antennas Connecting the AM antenna Set up the AM antenna (supplied). Connect the antenna cord. Main unit (side view) Main unit (rear view) Connecting the antenna cord Connect the ends of the antenna cord as shown above. Turn the AM loop antenna to find the best position for radio reception. -
Page 15: Connecting The Fm Antenna
Connecting the FM antenna Main unit (rear view) FM antenna (supplied) Main unit (side view) Stretch out the FM antenna to the best position for radio reception, and then fix it with adhesive tape. When positioning the antennas, find the best position for reception while listening to an actual radio program (refer to "Listening to Radio Broadcasts"... -
Page 16: Connecting The Speakers
(Continued) Connections Connecting the Speakers Main unit (rear view) Speaker cord Speaker cord Black Right speaker (rear view) CAUTION • Do not short-circuit the nals. Doing so may damage the speakers. • Do not connect other speakers together with the supplied speakers. -
Page 17: Connecting Other Equipment
Connecting Other Equipment Read this section when connecting other audio equipment to this product. Other audio equipment Audio cord (not supplied) CAUTION • Before connecting other equipment, turn off both the main unit and the equipment. Connecting with digital equipment AV amplifier with a built-in decoder (not supplied) To an optical digital input... -
Page 18: When A Clearer Picture Is Desired
(Continued) Connections When a Clearer Picture Is Desired You can enjoy pictures of better quality using the following cord instead of the supplied video cord. Connecting by using the S-video cord S-video cord (not supplied) Connect the ends of S-video cord making sure that each end matches its compatible terminal. -
Page 19: Basic Operations
Basic Operations Preparation/Basic Operations This manual explains the operations assuming that you will use the remote control. Some buttons on the main unit are the same as those on the remote control. You can use either button in this case. Remote control mode selector Number buttons... -
Page 20: Turning On/Off The Main Unit
(Continued) Basic Operations Turning On/Off the Main Unit Press on the main unit). • With the power off, pressing either button also turns on the main unit. The function assigned to the button starts working at the same time. Remote control: Main unit: NOTE •... -
Page 21: Changing The Color Patterns For The Display Window And Disc Tray
Basic Operations Changing the Color Patterns for the Display Window and Disc Tray Press on the main unit). • Each time you press , the display tog- gles as follows. : For a rainbow-like pattern. : For a flower-image pattern. : Gradually changes the color pattern in a cycle of approximately... -
Page 22: Listening To Radio Broadcasts
Listening to Radio Broadcasts This product can receive FM and AM radio broadcasts. CAUTION • Set the remote control mode selector to AUDIO before using the number buttons. Setting the AM Tuner Spacing Some countries space AM stations 9 kHz apart, and other countries use 10 kHz spacing. -
Page 23: Selecting A Radio Station
Selecting a Radio Station Press repeatedly to select "FM" or "AM". Example: Display while an FM radio broadcast is received Preset number ( Stereo indicator Frequency Press repeatedly to select a radio station (frequency). • You can also select a radio station using the automatic tuning. -
Page 24: Basic Operations Of The Dvd Player
Listening to Discs How to read this manual • Operations are described by mainly using the remote control buttons. If there are the same marks on the main unit, the buttons on the main unit can also be used. • The following marks tell you for which type of the discs the operation can be made. - Page 25 ■Display for CD Display while a CD is being played back: CD indicator (The CD indicator lights up while the CD is stopped. The CD indicator flashes while the CD is being played back or paused.) Track number Elapsed playing time Display while the CD is stopped: Total number of tracks Total playing time...
-
Page 26: Playing Back From A Position 10 Seconds
(Continued) Listening to Discs Basic Operations of the DVD Player Messages displayed on the TV screen While a DVD is selected as the sound source, the messages shown below are dis- played, depending on the status. NOW READING The main unit is reading the disc. Wait for a while. -
Page 27: Stopping Playback
Stopping Playback ■While a disc is being played back Press Resuming Playback (RESUME) When playback is stopped in the middle, playback can be started from the stopped scene. How to suspend playback ■While a disc is being played back Perform any of the following operations during playback. -
Page 28: Slow Motion Playback
(Continued) Basic Operations of the DVD Player Slow Motion Playback (only for moving image) ■While a disc is paused Press • Each time you press , the speed increases as shown below. • Press to pause playback, and press to resume normal playback. NOTE •... -
Page 29: Convenient Functions Of The Dvd Player
Convenient Functions of the DVD Player Listening to Discs Remote control mode selector Number buttons NOTE • Set the remote control mode selector to AUDIO before using the number buttons. Selecting the Audio ■While a disc containing two or more audio is being played back AUDIO Press... -
Page 30: Selecting The Subtitle
(Continued) Convenient Functions of the DVD Player Selecting the Subtitle (only for moving image) ■While a disc containing two or more subti- tles is being played back Press Example: TV screen Selected subtitle/Total number of subtitles (When no subtitle is set in the disc, "--"... -
Page 31: Adjusting The Picture Quality (Vfp)
Adjusting the Picture Quality (VFP) ■While a disc is played back or paused Press Example: TV screen Current VFP mode USER1 Setting items GAMMA : Controls the brightness of neutral tints while maintaining the brightness of dark and light portions. (Setting range: –3 - +3) BRIGHTNESS : Controls the brightness of the display. -
Page 32: Adjusting Playback Level (Dvd Level)
(Continued) Convenient Functions of the DVD Player Adjusting Playback Level (DVD LEVEL) The audio of a DVD VIDEO and DVD AUDIO may be recorded at a lower level (volume) than for other types of disc. You can adjust the DVD level. ■While a disc is being played back Press •... -
Page 33: Playing Back The Bonus Group
Playing Back the Bonus Group There are some DVD AUDIO discs with a special group, called "bonus group", recorded. Bonus indicator • This operation can be carried out when "BONUS" is lit in the display window on the main unit. ■While a disc is being played back Set the remote control mode selector to AUDIO. -
Page 34: Playing Back The Disc In The Desired Order (Program Playback)
(Continued) Convenient Functions of the DVD Player Playing Back the Disc in the Desired Order (Program Playback) You can program a maximum of 99 chapters or tracks. You can program the same chapter or track more than once. ■While a disc is stopped Set the remote control mode selector to AUDIO. -
Page 35: Random Playback
Example: For DVD VIDEO TV screen • Refer to "Using the number buttons" page 16). • Before selecting a bonus group of a DVD AUDIO, cancel the "BONUS" display as explained in "Playing back the Bonus Group" on page 30. •... -
Page 36: Repeat Playback
(Continued) Convenient Functions of the DVD Player Repeat Playback Refer to page 37 for repeat playback of MP3/WMA and JPEG files. ■While a disc is being played back Press • Each time you press , the repeat type will be changed. For DVD VIDEO Display on the Repeat types... -
Page 37: Status Bar And Menu Bar
Status Bar and Menu Bar Remote control mode selector Number buttons You can display the status bar and menu bar on the TV screen, and can control discs with the bars. CAUTION • Set the remote control mode selector to AUDIO before using the number buttons. -
Page 38: Playing Back The Designated Part Repeatedly (A-B Repeat Playback)
(Continued) Status Bar and Menu Bar Playing Back the Designated Part Repeatedly (A-B Repeat Playback) ■While a disc is being played back Press twice. • The menu bar ( page 34) appears. Press to select Press Press to select Press at the starting point of the part to be repeated (designat- ing A point). -
Page 39: Playing Back Mp3/Wma And Jpeg Discs
Playing Back MP3/WMA and JPEG Discs NOTE • Set the remote control mode selector to AUDIO before using the number buttons. Playback Display of an MP3/WMA disc is described here as an example. For a JPEG disc, read "track" as "file". Remote control mode selector NOTE... -
Page 40: Slideshow Playback
(Continued) Playing Back MP3/WMA and JPEG Discs Press to select a track. Press Example: Display during playback Group number Elapsed playing time (This indicator is not displayed while a JPEG is loaded.) • At first, a track title (file name) is scrolled. •... -
Page 41: Preferences
Preferences Number buttons You can change the initial settings of this product according to the environment the product is used CAUTION • Set the remote control mode selector to AUDIO before using the number buttons. NOTE • The top and bottom of the preference screen may not be displayed on a wide TV. -
Page 42: Audio
(For details on the guide icons, refer to page 23) When you want to control JVC TV by using this product, select a mode that matches the terminal from the following. (For more details, refer to "Using AV COMPU LINK"... -
Page 43: Country/Area Codes
Country/Area Codes... -
Page 44: Language Codes
Code Language Code Language Afar Macedonian Abkhazian Malayalam Afrikaans Mongolian Ameharic Moldavian Arabic Marathi Assamese Malay (MAY) Aymara Maltese Azerbaijani Burmese Bashkir Nauru Byelorussian Nepali Bulgarian Dutch Bihari Norwegian Bislama Occitan Bengali, Bangla (Afan) Oromo Tibetan Oriya Breton Panjabi Catalan Polish Corsican Pashto, Pushto... -
Page 45: Listening To Cassette Tapes
Listening to Cassette Tapes Listening to Discs/Listening to Cassette Tapes Operation Stop Press Press • When a cassette tape is played back in the normal direction ( ), fast forward and Fast forward/ • When the cassette tape is played Rewind back in the opposite direction ( ), is fast forward and... -
Page 46: Recording Sound
Listening to Other Equipment/Recording Sound Press Start other equipment playback. • Refer to the operation manual for the con- nected equipment. Adjust the volume and make other necessary settings. • For adjusting the volume and making other necessary settings, refer to "Basic Opera- tions"... -
Page 47: Recording Sound To Cassette Tapes
Recording Sound to Cassette Tapes Main unit Remote control NOTE • The sound input level during recording is automati- cally adjusted. • When you record tracks from a disc, a 4-second blank is inserted between tracks in the recording. You can record tracks with no blank time. page 45) CAUTION •... -
Page 48: Quitting Recording
(Continued) Recording Sound to Cassette Tapes Select a sound source for recording. Sound source Operation Press , and then press Disc (The disc is stopped.) Select the radio station whose broad- Radio broadcast cast you want to record ( Sound from other Press and prepare playback on... -
Page 49: Using The Timers
Using the Timers Recording Sound/Convenient Functions NOTE • Set the remote control mode selector to AUDIO before using the number buttons. Set the clock beforehand ( Sleep Timer When the specified time passes, the main unit automatically turns off. Press •... -
Page 50: Recording Timer
(Continued) Using the Timers Recording Timer You can use the recording timer function to record FM/AM broadcasts or sound from other equipment to cassette tape. You can enter up to three timer settings in total for the recording timer and the playback timer page 48). -
Page 51: Playback Timer
Convenient Functions Canceling the recording timer In step 2 on page 47, select the timer number you want to cancel, and then press Even when you cancel the recording timer, the set- ting remains stored. Activating the recording timer again In step 2 on page 47, select the timer number you want to activate, and then press until all of the setting procedure finishes. - Page 52 (Continued) Using the Timers Press Press to select the sound source you want to play back. Example: When you want to listen to an AM broadcast • When you want to listen to sound from other equipment, you cannot use the playback timer function to start playback on any equipment other than this product.
-
Page 53: Auto Standby
Auto Standby If no sound is produced for 3 minutes when the disc or cassette tape is selected as a sound source, the main unit automatically turns off. ■When the disc or cassette tape is selected as a sound source Press "A. -
Page 54: Using Av Compu Link
The JVC AV COMPU LINK system allows you to enjoy video or audio with the simplest operation. If your JVC TV set supports the JVC AV COMPU LINK system, simply starting the main unit will automatically make all necessary settings on the TV to allow you to enjoy the playback. -
Page 55: Cleaning Discs
Handling Discs/Cassette Tapes Convenient Functions/Reference Handling discs • Do not put adhesive tape or stickers, or write on a disc. • Do not bend a disc. • Be sure not to use heart/flower shaped discs or other irregularly shaped discs. The use of such discs damages the main unit. -
Page 56: Disc Messages
Reference Disc message You are trying to play back an unplayable disc or CANNOT PLAY a disc that has many scratches. NO DISC No disc is loaded. NO AUDIO The disc may be an illegally copied disc. You are playing back a multi-channel track for LR ONLY which down-mix is prohibited. -
Page 57: Specifications
Specifications ■DVD receiver (CA-UXQD9S) Amplifier Output power 20 W + 20 W at 4 Ω (10% THD) Input terminals <Analog> AUX×1, 500 mV/47 kΩ:LEVEL1 250 mV/47 kΩ:LEVEL2 Output terminals <Analog> Speaker×1, 20 W/4 Ω Impedance 4 Ω - 16 Ω... - Page 58 2004 Victor Company of Japan, Limited 0904SKMMODJEM...
- Page 59 MICRO COMPONENT SYSTEM 微型组合音响 UX-QD9S Consists of CA-UXQD9S and SP-UXQD9S 由 CA-UXQD9S 和 SP-UXQD9S 组成 For hiding the demonstration display, refer to page 15. 有关隐藏演示显示的详情,请参阅 第 页。 INSTRUCTIONS 使用说明书 中 文 LVT1220-006A [US]...
- Page 60 Warnings, Cautions and Others / 警告,注意及其他须知事项 Introduction CAUTION To reduce the risk of electrical shocks, fire, etc.: 1. Do not remove screws, covers or cabinet. 2. Do not expose this appliance to rain or moisture. CAUTION — F button! Disconnect the mains plug to shut the power off completely.
- Page 61 CAUTION — Proper Ventilation To avoid risk of electric shock and fire and to protect from damage, locate the apparatus as follows: Top/Front/Back/Sides: No obstructions should be placed in the areas shown by the dimensions below. Bottom: Place on the level surface. Maintain adequate air path for ventilation by placing on a stand with a height of 10 cm or more.
- Page 62 marks refer to operation used frequently. You can quickly learn the general usage of this product by reading those parts only. Introduction Notes on Operation ... 3 Suitable Locations for the Main Unit ... 3 Condensation... 3 Cleaning the Main Unit ... 3 Listener’s Etiquette ...
- Page 63 Playing Back MP3/WMA and JPEG Discs ...36 Playback ...36 Repeat Playback...37 Preferences ...38 Basic Operations ...38 LANGUAGE...38 PICTURE ...38 AUDIO ...39 OTHERS...39 Country/Area Codes ...40 Language Codes ...41 Listening to Cassette Tapes Listening to Cassette Tapes Listening to Other Equipment Listening to Other Equipment ...43 Adjusting the Sound Input Level from Other Equipment ...43...
-
Page 64: Introduction
Introduction Suitable Locations for the Main Unit To minimize the need for servicing and maintain the high quality of this product, do not place the main unit in the following locations: • In a position subject to high humidity or consid- erable dust •... -
Page 65: Playable Disc Types
— — shape (other than a disc of 12 cm or 8 cm in diameter) cannot be played back. • JVC do not guarantee the operation and sound — — quality of discs not authorized by CD-DA, which is a CD specification. -
Page 66: Disc Structure
(Continued) Notes on Operation About MP3/WMA/JPEG discs Playable MP3/WMA/JPEG discs and files • Discs recorded in the ISO 9660 format are play- able (except discs recorded in the "packet write" format (UDF format)). • Discs recorded in the multi-session format are also playable. -
Page 67: Selecting The Color System
Selecting the Color System This product is compatible with PAL and NTSC color systems. In standby mode, select PAL or NTSC to match your TV. If the VIDEO OUT SELECT switch is switched over when the power is on, turn off the power, and then turn it on again. -
Page 68: Important Cautions
Notes on Handling ■Important cautions Installation of the system • Select a place which is level, dry and neither too hot nor too cold; between 5°C and 35°C. • Leave sufficient distance between the system and the TV. • Do not use the system in a place subject to vibration. -
Page 69: Part Description
Part Description Introcution/Preparation 42, 44 15, 18 Remote control sensor: 9 25, 30, 37, 45 * This terminal is for connecting a pair of headphones equipped with a stereo mini plug (not supplied). While the headphones are connected, the speakers do not produce any sound. The numbers refer to the pages in which the parts are explained. -
Page 70: Remote Control Operation
Preparation 24, 42 24, 42, 47-49 25, 30, 37, 45 25 22, 25-28, 16, 47 20, 47-49 20, 31 Opening the cover The numbers refer to the pages in which the parts are explained. Inserting Batteries into the Remote Control 10, 16 24, 42, 47-49... -
Page 71: Operating The Tv Using The Remote Control
This page is for when operating your TV using the remote control of this product. Operating the TV Using the Remote Control Setting the manufacturer's code Slide the remote control mode selector to the TV side. Hold down NOTE • Hold down until step 4 is completed. -
Page 72: Connecting The Am Antenna
Connecting the Antennas Connecting the AM antenna Set up the AM antenna (supplied). Connect the antenna cord. Main unit (side view) Main unit (rear view) Connecting the antenna cord Connect the ends of the antenna cord as shown above. Turn the AM loop antenna to find the best position for radio reception. -
Page 73: Connecting The Fm Antenna
Connecting the FM antenna Main unit (rear view) FM antenna (supplied) Main unit (side view) Stretch out the FM antenna to the best position for radio reception, and then fix it with adhesive tape. When positioning the antennas, find the best position for reception while listening to an actual radio program (refer to "Listening to Radio Broadcasts"... -
Page 74: Connecting The Speakers
(Continued) Connections Connecting the Speakers Main unit (rear view) Speaker cord Speaker cord Black Right speaker (rear view) CAUTION • Do not short-circuit the nals. Doing so may damage the speakers. • Do not connect other speakers together with the supplied speakers. -
Page 75: Connecting Other Equipment
Connecting Other Equipment Read this section when connecting other audio equipment to this product. Other audio equipment Audio cord (not supplied) CAUTION • Before connecting other equipment, turn off both the main unit and the equipment. Connecting with digital equipment AV amplifier with a built-in decoder (not supplied) To an optical digital input... -
Page 76: When A Clearer Picture Is Desired
(Continued) Connections When a Clearer Picture Is Desired You can enjoy pictures of better quality using the following cord instead of the supplied video cord. Connecting by using the S-video cord S-video cord (not supplied) Connect the ends of S-video cord making sure that each end matches its compatible terminal. -
Page 77: Adjusting The Clock
Basic Operations Preparation/Basic Operations This manual explains the operations assuming that you will use the remote control. Some buttons on the main unit are the same as those on the remote control. You can use either button in this case. Remote control mode selector Number buttons... -
Page 78: Selecting The Sound Mode
(Continued) Basic Operations Turning On/Off the Main Unit Press on the main unit). • With the power off, pressing either button also turns on the main unit. The function assigned to the button starts working at the same time. Remote control: Main unit: NOTE •... -
Page 79: Changing The Color Patterns For The Display Window And Disc Tray
Basic Operations Changing the Color Patterns for the Display Window and Disc Tray Press on the main unit). • Each time you press , the display tog- gles as follows. : For a rainbow-like pattern. : For a flower-image pattern. : Gradually changes the color pattern in a cycle of approximately... -
Page 80: Listening To Radio Broadcasts
Listening to Radio Broadcasts This product can receive FM and AM radio broadcasts. CAUTION • Set the remote control mode selector to AUDIO before using the number buttons. Setting the AM Tuner Spacing Some countries space AM stations 9 kHz apart, and other countries use 10 kHz spacing. -
Page 81: Selecting A Radio Station
Selecting a Radio Station Press repeatedly to select "FM" or "AM". Example: Display while an FM radio broadcast is received Stereo indicator Preset number ( Frequency Press repeatedly to select a radio station (frequency). • You can also select a radio station using the automatic tuning. -
Page 82: Basic Operations Of The Dvd Player
Listening to Discs How to read this manual • Operations are described by mainly using the remote control buttons. If there are the same marks on the main unit, the buttons on the main unit can also be used. • The following marks tell you for which type of the discs the operation can be made. - Page 83 ■Display for CD Display while a CD is being played back: CD indicator (The CD indicator lights up while the CD is stopped. The CD indicator flashes while the CD is being played back or paused.) Track number Elapsed playing time Display while the CD is stopped: Total number of tracks Total playing time...
-
Page 84: Playing Back From A Position 10 Seconds Before
(Continued) Listening to Discs Basic Operations of the DVD Player Messages displayed on the TV screen While a DVD is selected as the sound source, the messages shown below are dis- played, depending on the status. NOW READING The main unit is reading the disc. Wait for a while. -
Page 85: Stopping Playback
Stopping Playback ■While a disc is being played back Press Resuming Playback (RESUME) When playback is stopped in the middle, playback can be started from the stopped scene. How to suspend playback ■While a disc is being played back Perform any of the following operations during playback. -
Page 86: Slow Motion Playback
(Continued) Basic Operations of the DVD Player Slow Motion Playback (only for moving image) ■While a disc is paused Press • Each time you press , the speed increases as shown below. • Press to pause playback, and press to resume normal playback. NOTE •... -
Page 87: Convenient Functions Of The Dvd Player
Convenient Functions of the DVD Player Listening to Discs Remote control mode selector Number buttons NOTE • Set the remote control mode selector to AUDIO before using the number buttons. Selecting the Audio ■While a disc containing two or more audio is being played back AUDIO Press... -
Page 88: Selecting The Subtitle
(Continued) Convenient Functions of the DVD Player Selecting the Subtitle (only for moving image) ■While a disc containing two or more subti- tles is being played back Press Example: TV screen Selected subtitle/Total number of subtitles (When no subtitle is set in the disc, "--"... -
Page 89: Adjusting The Picture Quality (Vfp)
Adjusting the Picture Quality (VFP) ■While a disc is played back or paused Press Example: TV screen Current VFP mode USER1 Setting items GAMMA : Controls the brightness of neutral tints while maintaining the brightness of dark and light portions. (Setting range: –3 - +3) BRIGHTNESS : Controls the brightness of the display. -
Page 90: Adjusting Playback Level (Dvd Level)
(Continued) Convenient Functions of the DVD Player Adjusting Playback Level (DVD LEVEL) The audio of a DVD VIDEO and DVD AUDIO may be recorded at a lower level (volume) than for other types of disc. You can adjust the DVD level. ■While a disc is being played back Press •... -
Page 91: Playing Back The Bonus Group
Playing Back the Bonus Group There are some DVD AUDIO discs with a special group, called "bonus group", recorded. Bonus indicator • This operation can be carried out when "BONUS" is lit in the display window on the main unit. ■While a disc is being played back Set the remote control mode selector to AUDIO. -
Page 92: Playing Back The Disc In The Desired Order (Program Playback)
(Continued) Convenient Functions of the DVD Player Playing Back the Disc in the Desired Order (Program Playback) You can program a maximum of 99 chapters or tracks. You can program the same chapter or track more than once. ■While a disc is stopped Set the remote control mode selector to AUDIO. -
Page 93: Canceling Random Playback
Example: For DVD VIDEO TV screen • Refer to "Using the number buttons" page 16). • Before selecting a bonus group of a DVD AUDIO, cancel the "BONUS" display as explained in "Playing back the Bonus Group" on page 30. •... -
Page 94: Repeat Playback
(Continued) Convenient Functions of the DVD Player Repeat Playback Refer to page 37 for repeat playback of MP3/WMA and JPEG files. ■While a disc is being played back Press • Each time you press , the repeat type will be changed. For DVD VIDEO Display on the Repeat types... -
Page 95: Function List
Status Bar and Menu Bar You can display the status bar and menu bar on the TV screen, and can control discs with the bars. CAUTION • Set the remote control mode selector to AUDIO before using the number buttons. Using the Status Bar and Menu Bar ■While a disc is being played back... -
Page 96: Playing Back The Designated Part Repeatedly (A-B Repeat Playback)
(Continued) Status Bar and Menu Bar Playing Back the Designated Part Repeatedly (A-B Repeat Playback) ■While a disc is being played back Press twice. • The menu bar ( page 34) appears. Press to select Press Press to select Press at the starting point of the part to be repeated (designat- ing A point). -
Page 97: Playing Back Mp3/Wma And Jpeg Discs
Playing Back MP3/WMA and JPEG Discs NOTE • Set the remote control mode selector to AUDIO before using the number buttons. Playback Display of an MP3/WMA disc is described here as an example. For a JPEG disc, read "track" as "file". Remote control mode selector NOTE... -
Page 98: Slideshow Playback
(Continued) Playing Back MP3/WMA and JPEG Discs Press to select a track. Press Example: Display during playback Group number Track number Elapsed playing time (This indicator is not displayed while a JPEG is loaded.) • At first, a track title (file name) is scrolled. •... - Page 99 Preferences You can change the initial settings of this product according to the environment the product is used CAUTION • Set the remote control mode selector to AUDIO before using the number buttons. NOTE • The top and bottom of the preference screen may not be displayed on a wide TV.
-
Page 100: Audio
(For details on the guide icons, refer to page 23) AV COMPU When you want to control JVC TV by using LINK MODE this product, select a mode that matches the terminal from the following. (For more details, refer to "Using AV COMPU LINK"... -
Page 101: Country/Area Codes
Country/Area Codes... -
Page 102: Language Codes
Code Language Code Language Afar Macedonian Abkhazian Malayalam Afrikaans Mongolian Ameharic Moldavian Arabic Marathi Assamese Malay (MAY) Aymara Maltese Azerbaijani Burmese Bashkir Nauru Byelorussian Nepali Bulgarian Dutch Bihari Norwegian Bislama Occitan Bengali, Bangla (Afan) Oromo Tibetan Oriya Breton Panjabi Catalan Polish Corsican Pashto, Pushto... -
Page 103: Listening To Cassette Tapes
Listening to Cassette Tapes Listening to Discs/Listening to Cassette Tapes Operation Stop Press Press • When a cassette tape is played back in the normal direction ( ), fast forward and Fast forward/ • When the cassette tape is played Rewind back in the opposite direction ( ), is fast forward and... -
Page 104: Listening To Other Equipment
Listening to Other Equipment/Recording Sound Press Start other equipment playback. • Refer to the operation manual for the con- nected equipment. Adjust the volume and make other necessary settings. • For adjusting the volume and making other necessary settings, refer to "Basic Opera- tions"... -
Page 105: Recording Sound To Cassette Tapes
Recording Sound to Cassette Tapes Main unit Remote control NOTE • The sound input level during recording is automati- cally adjusted. • When you record tracks from a disc, a 4-second blank is inserted between tracks in the recording. You can record tracks with no blank time. page 45) CAUTION •... -
Page 106: Quitting Recording
(Continued) Recording Sound to Cassette Tapes Select a sound source for recording. Sound source Operation Press , and then press Disc (The disc is stopped.) Select the radio station whose broad- Radio broadcast cast you want to record ( Sound from other Press and prepare playback on... -
Page 107: Using The Timers
Using the Timers Recording Sound/Convenient Functions NOTE • Set the remote control mode selector to AUDIO before using the number buttons. Set the clock beforehand ( Sleep Timer When the specified time passes, the main unit automatically turns off. Press •... -
Page 108: Recording Timer
(Continued) Using the Timers Recording Timer You can use the recording timer function to record FM/AM broadcasts or sound from other equipment to cassette tape. You can enter up to three timer settings in total for the recording timer and the playback timer page 48). -
Page 109: Playback Timer
Convenient Functions Canceling the recording timer In step 2 on page 47, select the timer number you want to cancel, and then press Even when you cancel the recording timer, the set- ting remains stored. Activating the recording timer again In step 2 on page 47, select the timer number you want to activate, and then press until all of the setting procedure finishes. - Page 110 (Continued) Using the Timers Press Press to select the sound source you want to play back. Example: When you want to listen to an AM broadcast • When you want to listen to sound from other equipment, you cannot use the playback timer function to start playback on any equipment other than this product.
-
Page 111: The Main Unit
Auto Standby If no sound is produced for 3 minutes when the disc or cassette tape is selected as a sound source, the main unit automatically turns off. ■When the disc or cassette tape is selected as a sound source Press "A. -
Page 112: Using Av Compu Link
The JVC AV COMPU LINK system allows you to enjoy video or audio with the simplest operation. If your JVC TV set supports the JVC AV COMPU LINK system, simply starting the main unit will automatically make all necessary settings on the TV to allow you to enjoy the playback. -
Page 113: Handling Discs/Cassette Tapes
Handling Discs/Cassette Tapes Convenient Functions/Reference Handling discs • Do not put adhesive tape or stickers, or write on a disc. • Do not bend a disc. • Be sure not to use heart/flower shaped discs or other irregularly shaped discs. The use of such discs damages the main unit. -
Page 114: Disc Messages
Reference Disc message You are trying to play back an unplayable disc or CANNOT PLAY a disc that has many scratches. NO DISC No disc is loaded. NO AUDIO The disc may be an illegally copied disc. You are playing back a multi-channel track for LR ONLY which down-mix is prohibited. -
Page 115: Specifications
Specifications ■DVD receiver (CA-UXQD9S) Amplifier Output power 20 W + 20 W at 4 Ω (10% THD) Input terminals <Analog> AUX×1, 500 mV/47 kΩ:LEVEL1 250 mV/47 kΩ:LEVEL2 Output terminals <Analog> Speaker×1, 20 W/4 Ω Impedance 4 Ω - 16 Ω... - Page 116 EN, CS 2004 Victor Company of Japan, Limited 1004SKMMODJEM...
- Page 117 MICRO COMPONENT SYSTEM 微型组合音响 UX-QD9S Consists of CA-UXQD9S and SP-UXQD9S 由 CA-UXQD9S 和 SP-UXQD9S 组成 For hiding the demonstration display, refer to page 15. 有关隐藏演示显示的详情,请参阅 第 页。 INSTRUCTIONS 使用说明书 中 文 LVT1220-004A [UN]...
- Page 118 Warnings, Cautions and Others / 警告,注意及其他须知事项 Introduction CAUTION To reduce the risk of electrical shocks, fire, etc.: 1. Do not remove screws, covers or cabinet. 2. Do not expose this appliance to rain or moisture. CAUTION — F button! Disconnect the mains plug to shut the power off completely.
- Page 119 CAUTION — Proper Ventilation To avoid risk of electric shock and fire and to protect from damage, locate the apparatus as follows: Top/Front/Back/Sides: No obstructions should be placed in the areas shown by the dimensions below. Bottom: Place on the level surface. Maintain adequate air path for ventilation by placing on a stand with a height of 10 cm or more.
- Page 120 marks refer to operation used frequently. You can quickly learn the general usage of this product by reading those parts only. Introduction Notes on Operation ... 3 Suitable Locations for the Main Unit ... 3 Condensation... 3 Cleaning the Main Unit ... 3 Listener’s Etiquette ...
- Page 121 Playing Back MP3/WMA and JPEG Discs ...36 Playback ...36 Repeat Playback...37 Preferences ...38 Basic Operations ...38 LANGUAGE...38 PICTURE ...38 AUDIO ...39 OTHERS...39 Country/Area Codes ...40 Language Codes ...41 Listening to Cassette Tapes Listening to Cassette Tapes Listening to Other Equipment Listening to Other Equipment ...43 Adjusting the Sound Input Level from Other Equipment ...43...
-
Page 122: Notes On Operation
Introduction Suitable Locations for the Main Unit To minimize the need for servicing and maintain the high quality of this product, do not place the main unit in the following locations: • In a position subject to high humidity or consid- erable dust •... -
Page 123: Playable Disc Types
— — shape (other than a disc of 12 cm or 8 cm in diameter) cannot be played back. • JVC do not guarantee the operation and sound — — quality of discs not authorized by CD-DA, which is a CD specification. -
Page 124: Disc Structure
(Continued) Notes on Operation About MP3/WMA/JPEG discs Playable MP3/WMA/JPEG discs and files • Discs recorded in the ISO 9660 format are play- able (except discs recorded in the "packet write" format (UDF format)). • Discs recorded in the multi-session format are also playable. -
Page 125: Selecting The Color System
Selecting the Color System This product is compatible with PAL and NTSC color systems. In standby mode, select PAL or NTSC to match your TV. If the VIDEO OUT SELECT switch is switched over when the power is on, turn off the power, and then turn it on again. -
Page 126: Special Cautions
Notes on Handling ■Important cautions Installation of the system • Select a place which is level, dry and neither too hot nor too cold; between 5°C and 35°C. • Leave sufficient distance between the system and the TV. • Do not use the system in a place subject to vibration. -
Page 127: Part Description
Part Description Introcution/Preparation 42, 44 15, 18 Remote control sensor: 9 25, 30, 37, 45 * This terminal is for connecting a pair of headphones equipped with a stereo mini plug (not supplied). While the headphones are connected, the speakers do not produce any sound. The numbers refer to the pages in which the parts are explained. -
Page 128: Remote Control
Preparation 24, 42 24, 42, 47-49 25, 30, 37, 45 25 22, 25-28, 16, 47 20, 47-49 20, 31 Opening the cover The numbers refer to the pages in which the parts are explained. Inserting Batteries into the Remote Control 10, 16 24, 42, 47-49... -
Page 129: Operating The Tv Using The Remote Control
This page is for when operating your TV using the remote control of this product. Operating the TV Using the Remote Control Setting the manufacturer's code Slide the remote control mode selector to the TV side. Hold down NOTE • Hold down until step 4 is completed. -
Page 130: Connections
Connecting the Antennas Connecting the AM antenna Set up the AM antenna (supplied). Connect the antenna cord. Main unit (side view) Main unit (rear view) Connecting the antenna cord Connect the ends of the antenna cord as shown above. Turn the AM loop antenna to find the best position for radio reception. - Page 131 Connecting the FM antenna Main unit (rear view) FM antenna (supplied) Main unit (side view) Stretch out the FM antenna to the best position for radio reception, and then fix it with adhesive tape. When positioning the antennas, find the best position for reception while listening to an actual radio program (refer to "Listening to Radio Broadcasts"...
-
Page 132: Connecting The Speakers
(Continued) Connections Connecting the Speakers Main unit (rear view) Speaker cord Speaker cord Black Right speaker (rear view) CAUTION • Do not short-circuit the nals. Doing so may damage the speakers. • Do not connect other speakers together with the supplied speakers. -
Page 133: Connecting Other Equipment
Connecting Other Equipment Read this section when connecting other audio equipment to this product. Other audio equipment Audio cord (not supplied) CAUTION • Before connecting other equipment, turn off both the main unit and the equipment. Connecting with digital equipment AV amplifier with a built-in decoder (not supplied) To an optical digital input... -
Page 134: When A Clearer Picture Is Desired
(Continued) Connections When a Clearer Picture Is Desired You can enjoy pictures of better quality using the following cord instead of the supplied video cord. Connecting by using the S-video cord S-video cord (not supplied) Connect the ends of S-video cord making sure that each end matches its compatible terminal. -
Page 135: Basic Operations
Basic Operations Preparation/Basic Operations This manual explains the operations assuming that you will use the remote control. Some buttons on the main unit are the same as those on the remote control. You can use either button in this case. Number buttons CAUTION •... -
Page 136: Turning On/Off The Main Unit
(Continued) Basic Operations Turning On/Off the Main Unit Press on the main unit). • With the power off, pressing either button also turns on the main unit. The function assigned to the button starts working at the same time. Remote control: Main unit: NOTE •... -
Page 137: Changing The Color Patterns For The Display Window And Disc Tray
Basic Operations Changing the Color Patterns for the Display Window and Disc Tray Press on the main unit). • Each time you press , the display tog- gles as follows. : For a rainbow-like pattern. : For a flower-image pattern. : Gradually changes the color pattern in a cycle of approximately... -
Page 138: Listening To Radio Broadcasts
Listening to Radio Broadcasts This product can receive FM and AM radio broadcasts. CAUTION • Set the remote control mode selector to AUDIO before using the number buttons. Setting the AM Tuner Spacing Some countries space AM stations 9 kHz apart, and other countries use 10 kHz spacing. -
Page 139: Selecting A Radio Station
Selecting a Radio Station Press repeatedly to select "FM" or "AM". Example: Display while an FM radio broadcast is received Preset number ( Stereo indicator Frequency Press repeatedly to select a radio station (frequency). • You can also select a radio station using the automatic tuning. -
Page 140: Basic Operations Of The Dvd Player
Listening to Discs How to read this manual • Operations are described by mainly using the remote control buttons. If there are the same marks on the main unit, the buttons on the main unit can also be used. • The following marks tell you for which type of the discs the operation can be made. - Page 141 ■Display for CD Display while a CD is being played back: CD indicator (The CD indicator lights up while the CD is stopped. The CD indicator flashes while the CD is being played back or paused.) Track number Elapsed playing time Display while the CD is stopped: Total number of tracks Total playing time...
- Page 142 (Continued) Listening to Discs Basic Operations of the DVD Player Messages displayed on the TV screen While a DVD is selected as the sound source, the messages shown below are dis- played, depending on the status. NOW READING The main unit is reading the disc. Wait for a while.
-
Page 143: Stopping Playback
Stopping Playback ■While a disc is being played back Press Resuming Playback (RESUME) When playback is stopped in the middle, playback can be started from the stopped scene. How to suspend playback ■While a disc is being played back Perform any of the following operations during playback. -
Page 144: Slow Motion Playback
(Continued) Basic Operations of the DVD Player Slow Motion Playback (only for moving image) ■While a disc is paused Press • Each time you press , the speed increases as shown below. • Press to pause playback, and press to resume normal playback. NOTE •... -
Page 145: Convenient Functions Of The Dvd Player
Convenient Functions of the DVD Player Listening to Discs NOTE • Set the remote control mode selector to AUDIO before using the number buttons. Selecting the Audio ■While a disc containing two or more audio is being played back Remote control Press mode selector Example: TV screen... -
Page 146: Selecting The Subtitle
(Continued) Convenient Functions of the DVD Player Selecting the Subtitle (only for moving image) ■While a disc containing two or more subti- tles is being played back Press Example: TV screen Selected subtitle/Total number of subtitles (When no subtitle is set in the disc, "--"... -
Page 147: Adjusting The Picture Quality (Vfp)
Adjusting the Picture Quality (VFP) ■While a disc is played back or paused Press Example: TV screen Current VFP mode USER1 Setting items GAMMA : Controls the brightness of neutral tints while maintaining the brightness of dark and light portions. (Setting range: –3 - +3) BRIGHTNESS : Controls the brightness of the display. -
Page 148: Adjusting Playback Level (Dvd Level)
(Continued) Convenient Functions of the DVD Player Adjusting Playback Level (DVD LEVEL) The audio of a DVD VIDEO and DVD AUDIO may be recorded at a lower level (volume) than for other types of disc. You can adjust the DVD level. ■While a disc is being played back Press •... -
Page 149: Playing Back The Bonus Group
Playing Back the Bonus Group There are some DVD AUDIO discs with a special group, called "bonus group", recorded. Bonus indicator • This operation can be carried out when "BONUS" is lit in the display window on the main unit. ■While a disc is being played back Set the remote control mode selector to AUDIO. -
Page 150: Playing Back The Disc In The Desired Order (Program Playback)
(Continued) Convenient Functions of the DVD Player Playing Back the Disc in the Desired Order (Program Playback) You can program a maximum of 99 chapters or tracks. You can program the same chapter or track more than once. ■While a disc is stopped Set the remote control mode selector to AUDIO. -
Page 151: Random Playback
Example: For DVD VIDEO TV screen • Refer to "Using the number buttons" page 16). • Before selecting a bonus group of a DVD AUDIO, cancel the "BONUS" display as explained in "Playing back the Bonus Group" on page 30. •... -
Page 152: Repeat Playback
(Continued) Convenient Functions of the DVD Player Repeat Playback Refer to page 37 for repeat playback of MP3/WMA and JPEG files. ■While a disc is being played back Press • Each time you press , the repeat type will be changed. For DVD VIDEO Display on the Repeat types... -
Page 153: Status Bar And Menu Bar
Status Bar and Menu Bar You can display the status bar and menu bar on the TV screen, and can control discs with the bars. CAUTION • Set the remote control mode selector to AUDIO before using the number buttons. Using the Status Bar and Menu Bar ■While a disc is being played back... -
Page 154: Playing Back The Designated Part Repeatedly (A-B Repeat Playback)
(Continued) Status Bar and Menu Bar Playing Back the Designated Part Repeatedly (A-B Repeat Playback) ■While a disc is being played back Press twice. • The menu bar ( page 34) appears. Press to select Press Press to select Press at the starting point of the part to be repeated (designat- ing A point). -
Page 155: Playing Back Mp3/Wma And Jpeg Discs
Playing Back MP3/WMA and JPEG Discs NOTE • Set the remote control mode selector to AUDIO before using the number buttons. Playback Display of an MP3/WMA disc is described here as an example. For a JPEG disc, read "track" as "file". Remote control mode selector NOTE... -
Page 156: Repeat Playback
(Continued) Playing Back MP3/WMA and JPEG Discs Press to select a track. Press Example: Display during playback Group number Elapsed playing time (This indicator is not displayed while a JPEG is loaded.) • At first, a track title (file name) is scrolled. •... - Page 157 Preferences You can change the initial settings of this product according to the environment the product is used CAUTION • Set the remote control mode selector to AUDIO before using the number buttons. NOTE • The top and bottom of the preference screen may not be displayed on a wide TV.
-
Page 158: Audio
(For details on the guide icons, refer to page 23) When you want to control JVC TV by using this product, select a mode that matches the terminal from the following. (For more details, refer to "Using AV COMPU LINK"... -
Page 159: Country/Area Codes
Country/Area Codes... -
Page 160: Language Codes
Code Language Code Language Afar Macedonian Abkhazian Malayalam Afrikaans Mongolian Ameharic Moldavian Arabic Marathi Assamese Malay (MAY) Aymara Maltese Azerbaijani Burmese Bashkir Nauru Byelorussian Nepali Bulgarian Dutch Bihari Norwegian Bislama Occitan Bengali, Bangla (Afan) Oromo Tibetan Oriya Breton Panjabi Catalan Polish Corsican Pashto, Pushto... -
Page 161: Listening To Cassette Tapes
Listening to Cassette Tapes Listening to Discs/Listening to Cassette Tapes Operation Stop Press Press • When a cassette tape is played back in the normal direction ( ), fast forward and Fast forward/ • When the cassette tape is played Rewind back in the opposite direction ( ), is fast forward and... -
Page 162: Listening To Other Equipment
Listening to Other Equipment/Recording Sound Press Start other equipment playback. • Refer to the operation manual for the con- nected equipment. Adjust the volume and make other necessary settings. • For adjusting the volume and making other necessary settings, refer to "Basic Opera- tions"... -
Page 163: Recording Sound To Cassette Tapes
Recording Sound to Cassette Tapes Main unit Remote control NOTE • The sound input level during recording is automati- cally adjusted. • When you record tracks from a disc, a 4-second blank is inserted between tracks in the recording. You can record tracks with no blank time. page 45) CAUTION •... -
Page 164: Quitting Recording
(Continued) Recording Sound to Cassette Tapes Select a sound source for recording. Sound source Operation Press , and then press Disc (The disc is stopped.) Select the radio station whose broad- Radio broadcast cast you want to record ( Sound from other Press and prepare playback on... -
Page 165: Using The Timers
Using the Timers Recording Sound/Convenient Functions NOTE • Set the remote control mode selector to AUDIO before using the number buttons. Set the clock beforehand ( Sleep Timer When the specified time passes, the main unit automatically turns off. Press •... -
Page 166: Recording Timer
(Continued) Using the Timers Recording Timer You can use the recording timer function to record FM/AM broadcasts or sound from other equipment to cassette tape. You can enter up to three timer settings in total for the recording timer and the playback timer page 48). -
Page 167: Playback Timer
Convenient Functions Canceling the recording timer In step 2 on page 47, select the timer number you want to cancel, and then press Even when you cancel the recording timer, the set- ting remains stored. Activating the recording timer again In step 2 on page 47, select the timer number you want to activate, and then press until all of the setting procedure finishes. - Page 168 (Continued) Using the Timers Press Press to select the sound source you want to play back. Example: When you want to listen to an AM broadcast • When you want to listen to sound from other equipment, you cannot use the playback timer function to start playback on any equipment other than this product.
-
Page 169: Auto Standby
Auto Standby If no sound is produced for 3 minutes when the disc or cassette tape is selected as a sound source, the main unit automatically turns off. ■When the disc or cassette tape is selected as a sound source Press "A. -
Page 170: Using Av Compu Link
The JVC AV COMPU LINK system allows you to enjoy video or audio with the simplest operation. If your JVC TV set supports the JVC AV COMPU LINK system, simply starting the main unit will automatically make all necessary settings on the TV to allow you to enjoy the playback. -
Page 171: Handling Discs/Cassette Tapes
Handling Discs/Cassette Tapes Convenient Functions/Reference Handling discs • Do not put adhesive tape or stickers, or write on a disc. • Do not bend a disc. • Be sure not to use heart/flower shaped discs or other irregularly shaped discs. The use of such discs damages the main unit. -
Page 172: Disc Messages
Reference Disc message You are trying to play back an unplayable disc or CANNOT PLAY a disc that has many scratches. NO DISC No disc is loaded. NO AUDIO The disc may be an illegally copied disc. You are playing back a multi-channel track for LR ONLY which down-mix is prohibited. -
Page 173: Specifications
Specifications ■DVD receiver (CA-UXQD9S) Amplifier Output power 20 W + 20 W at 4 Ω (10% THD) Input terminals <Analog> AUX×1, 500 mV/47 kΩ:LEVEL1 250 mV/47 kΩ:LEVEL2 Output terminals <Analog> Speaker×1, 20 W/4 Ω Impedance 4 Ω - 16 Ω... - Page 174 EN, CS 2004 Victor Company of Japan, Limited 1004SKMMODJEM...
Need help?
Do you have a question about the CA-UXQD9S and is the answer not in the manual?
Questions and answers