GRASS VALLEY KARRERA K-FRAME User Manual
Video production center
Hide thumbs
Also See for KARRERA K-FRAME:
- Installation & service manua (290 pages) ,
- Installation & service manual (278 pages)

Related Manuals for GRASS VALLEY KARRERA K-FRAME


Summary of Contents for GRASS VALLEY KARRERA K-FRAME
- Page 1 KARRERA K-FRAME VIDEO PRODUCTION CENTER User Manual Software Version 7.0 071887604 JULY 2014...
- Page 2 CERTIFICATE Certificate Number: 510040.001 The Quality System of: Grass Valley USA, LLC and its Grass Valley Affiliates Headquarters: 400 Providence Mine Road 15655 SW Greystone Ct. Nevada City, CA 95945 Beaverton, OR 97006 United States United States Kapittelweg 10 2300 So. Decker Lake Blvd.
-
Page 3: User Manual
KARRERA K-FRAME VIDEO PRODUCTION CENTER User Manual Software Version 7.0 071887604 JULY 2014... - Page 4 Benelux/Belgium: +32 (0) 2 334 90 30 Benelux/Netherlands: +31 (0) 35 62 38 42 1 N. Europe: +45 45 96 88 70 Germany, Austria, Eastern Europe: +49 6150 104 444 UK, Ireland, Israel: +44 118 923 0499 Copyright © Grass Valley USA, LLC. All rights reserved. This product may be covered by one or more U.S. and foreign patents.
-
Page 5: Table Of Contents
Preview Prefs ............KARRERA K-FRAME — User Manual... - Page 6 Reshaping Chroma Key ..........Applying Chroma Key Secondary Color Suppression ....KARRERA K-FRAME — User Manual...
- Page 7 Splits Pane............KARRERA K-FRAME — User Manual...
- Page 8 Macro Recording ..........KARRERA K-FRAME — User Manual...
- Page 9 Device Control with the Menu ........KARRERA K-FRAME — User Manual...
- Page 10 Soft Knobs ............KARRERA K-FRAME — User Manual...
- Page 11 General Curve Tips ........... KARRERA K-FRAME — User Manual...
- Page 12 Multiple Feed ........... . . KARRERA K-FRAME — User Manual...
- Page 13 About the Image Store Movies Option ........Image Store Movie File Formats Supported ......KARRERA K-FRAME — User Manual...
- Page 14 ..............KARRERA K-FRAME — User Manual...
-
Page 15: Preface
Preface About This Manual The Karrera K-Frame User Manual is designed for operators of Karrera sys- tems. Standard Documentation Set The standard Karrera K-Frame documentation set consists of a: • User Manual, • Installation & Service Manual, • Release Notes, •... - Page 16 Preface available to approved vendors who need to interface with the Ethernet Tally system of the K-Frame. Contact Grass Valley Product Management for more information on this SDK. The KSP Graphical User Interface Instruction Manual provides information, requirements, and instructions for operating the 1-ME switcher Soft Panel GUI on a touch screen or regular PC, including the optional customized keyboard.
-
Page 17: Section 1 - Introduction
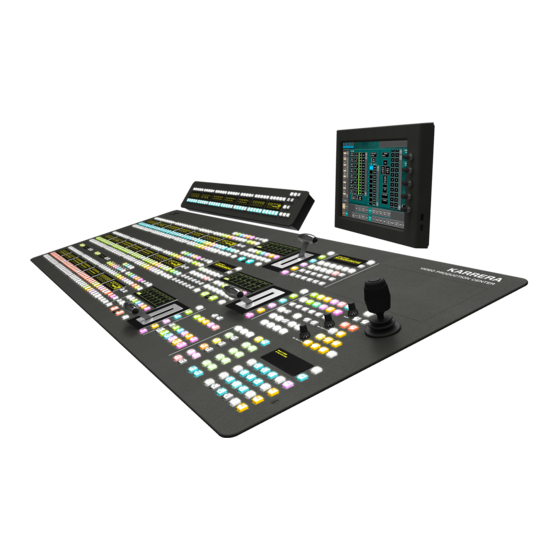
Section Introduction Overview The Grass Valley K-Frame family of multi-format digital production switchers provides powerful, ground-breaking features designed to meet the widest range of requirements for live studio, mobile, and post-produc- tion applications. The K-Frame Video Processor is the heart of the system, providing exten- sive video switching and signal processing capabilities. -
Page 18: K-Frame Video Processor
K-Frame Video Processor The K-Frame Video Processor is available in two sizes (Figure 1). The number of licensed boards present in the frame determines the number of KARRERA K-FRAME — User Manual... -
Page 19: K-Frame Control Surfaces
Karrera 3-ME 35 Control Panel Menu Panel Articulated Optional Touch Screen Karrera Menu Panel with Fanless PC Figure 3. Karrera 2-ME 25 Control Surface Karrera Menu on PC Karrera 2-ME 25 Control Panel (Customer Supplied PC) KARRERA K-FRAME — User Manual... -
Page 20: Touch Screen Menu Panel Option
USB ports, two on the right side edge of the panel and two on the back for keyboard and mouse (wired or wireless are supported). A fanless PC, running Windows OS, is available which mounts behind the Menu Panel. KARRERA K-FRAME — User Manual... -
Page 21: Soft Panel (Ksp) Option
The Menu application software provided with every K-Frame system can be run on a standard PC. This software accesses all the system’s function- ality, permitting mouse and keyboard control from a laptop, or remote control from any location on the network. KARRERA K-FRAME — User Manual... -
Page 22: K-Frame System Examples
A K-Frame system can be subdivided into two suites, if desired, each of which can have two control surfaces. Hardware resources in the Video Pro- cessor Frame can be assigned to an individual suite during configuration, essentially creating two separate switchers sharing one K-Frame (Figure KARRERA K-FRAME — User Manual... -
Page 23: Supported Control Protocols
• Serial BVW-75 for VTR control • Odetics protocol for VTR control • AMP (advanced media protocol) for Profile PVS, Profile XP Media Plat- form, K2, M-Series, Turbo iDDR, and T2 iDDR systems over Ethernet KARRERA K-FRAME — User Manual... - Page 24 (Trinix/Trinix NXT, Venus™, Triton™, and third-party routers; Jupiter and Encore router control systems) • Tally (contact closure) • K-Frame Ethernet Tally protocol • Ethernet CPL to control Grass Valley external remote AUX Panels • Grass Valley Editor protocol • SNMP system monitoring • Serial and Ethernet VDCP •...
-
Page 25: Section 2 - Setting Panel Preferences
Aux buses to delegation buttons, referred to as “Aux Delegate Button Map- ping”. Source Select buttons on the Grass Valley Video Production Control Panel and Local Aux can be changed from the defaults to best suit how you work. Technical Directors often map groups of sources together, like cameras,... -
Page 26: The Button Mapping Menu
Banks buttons toggled to on in the Banks button row. • Whichever Bank buttons are on when a Logical or Fixed Source is selected for assignment, the source select buttons for those banks are assigned that selection. KARRERA K-FRAME — User Manual... - Page 27 None When a Special Button is selected as a mapped source for a Source Select button, that assignment will be given to each level of that bus; each can be changed individually afterward. KARRERA K-FRAME — User Manual...
- Page 28 Logical or Fixed sources. • button displays all sources in the scrolling list. Show All • button locks the scrolling list; helpful for selecting multiple, Lock adjacent sources. KARRERA K-FRAME — User Manual...
-
Page 29: Default Control Panel Source Select Button Mapping
Table 4. 2-ME/25 Factory Configured Source to Button Mapping 1st and 2nd Levels Panel Button (25) (Unshifted) Button 1-18 Source 1 - 18 Source 19 - 36 Buttons 19-22 M1 A - M4 A M1 C- M4 C KARRERA K-FRAME — User Manual... -
Page 30: Setting Control Panel Source Select Button Mapping Preferences
Before setting Control Panel source select button mapping preferences, Source Names have been defined in the Eng Setup, Source Definition menu and Image Store channels are assigned to Aux Busses. 1. Touch (Figure 10). User Setups Panel Prefs Button Mapping KARRERA K-FRAME — User Manual... -
Page 31: Assigning Colors To Control Panel Source Select Buttons
Control Panel color scheme to display user- defined colors (red, green, blue, light red, light green, cyan, magenta, etc.). 1. Touch (Figure 11). User Setups Panel Prefs Source Colors KARRERA K-FRAME — User Manual... -
Page 32: Assigning User-Defined Colors
User 1-User 5 4. Adjust the User Color by turning the Red, Blue, and Green Menu Panel soft knobs or by touching their data pads and entering a value in the pop-up keypad (Figure 11, right). KARRERA K-FRAME — User Manual... -
Page 33: Mapping Remote Aux Panel Source Select Buttons On The Control Panel
Node Multi Select Settings menu. 3. Map the source buttons for the selected Aux panel(s) by selecting the Aux source button in the central pane, then selecting the source in the right pane. KARRERA K-FRAME — User Manual... -
Page 34: Mapping Remote Aux Panel Delegation Buttons
2. In the Panel Delegation area, touch a Remote Aux Panel button. 3. In the Logical Aux Buses area, touch an Aux Bus delegation button. Note Button mapping settings for Remote Aux Panels are saved to the Eng Setup configuration file. KARRERA K-FRAME — User Manual... -
Page 35: Section 3 - Setting Suite Preferences
The Source Patch menu (Figure 14) scrolling list has more Logical IDs than physical inputs. These can be used to permit alternative processing of the same incoming signal. For example, the same camera input can be assigned KARRERA K-FRAME — User Manual... -
Page 36: Engineering Names, Eng Ids, And Logical Ids
Alternative names can be assigned to sources for the convenience of pro- duction personnel. For example, you may give the cameras menu names that include the operator (C1 Bob, C2 Phil, and C3 Bill), but remove the KARRERA K-FRAME — User Manual... -
Page 37: Multiple Suites And Source Names
(first name to its left). If names are entered in all three alter- native name columns, each area of the system displays the name entered in each column of the Source Patch menu (Figure 15). KARRERA K-FRAME — User Manual... -
Page 38: Source Patching And Effects Portability
Engineering source. You can then build your effects and verify that they run properly. When you are satisfied with the effects, save the Suite Prefs and E-MEM KARRERA K-FRAME — User Manual... -
Page 39: Patching Engineering And Fixed Sources To Logical Ids
Patching Engineering and Fixed Sources to Logical IDs 1. Touch (Figure 16). User Setup Suite Prefs Source Patch Figure 16. Source Patch Menu 2. Touch the button to select a source type. Eng Sources Fixed Sources KARRERA K-FRAME — User Manual... -
Page 40: Enable Source Correction On Any Source (Globally)
2. Adjust the parameters for Video Processing and RGB Color Correction in the Source Correction menu. Note The same Engineering source can have Source Correction enabled or dis- abled by patching the source to a different logical ID. KARRERA K-FRAME — User Manual... -
Page 41: Patching A Key Input From One Source To A Different Source Using Patch Key
RED LOGO, BLU LOGO, and GRN LOGO in the menus and as RLGO, BLGO, and GLGO in the Panel Name which will be displayed on the OLEDs of the keyer source select buttons when assigned to the Control Panel. KARRERA K-FRAME — User Manual... -
Page 42: Default Keyframe
Individual settings for each ME are stored in the Default Keyframe, so different states can be saved for different MEs, if desired. Note Individual Default Keyframe settings are saved for each GV Switcher ME. KARRERA K-FRAME — User Manual... -
Page 43: Learning A Default Keyframe
3. Press the button in the Default Keyframe pane. Learn Pressing the button overwrites the Default Keyframe with factory defaults. Note Save your current Suite Prefs, which includes the Default Keyframe settings before resetting to factory defaults. KARRERA K-FRAME — User Manual... -
Page 44: Preview Prefs
• data pad displays knob controls on the right used to move Set Safe Area the Safe Area borders. • buttons sets the safe area borders to those Action, SMPTE Title, EBU Title standards. KARRERA K-FRAME — User Manual... -
Page 45: Crosshair
(ME = 1-4 or Pg). This (ME) pM source can be assigned one of six multiple signal arrangements, in User Setups/Suite Prefs. Assigning this source to a physical output connector permits viewing that arrangement of signals on a monitor. KARRERA K-FRAME — User Manual... -
Page 46: About Multiviewer Preferences
Suite Prefs and can be loaded or excluded as part of the Load Granularity in the File Ops, Eng Setup menu. Prerequisite: Multiviewer resources have been allocated and configured, see the Installation & Servicie Manual for your switcher model. KARRERA K-FRAME — User Manual... -
Page 47: Set Multiviewer Layout Preferences
7. Scroll or filter to an input and select that input to assign it to the selected window. The window name is taken by default from the Eng Sources name but will take the Menu name if entered in the User Setups, Suite Prefs, Source Patch menu for the selected source. KARRERA K-FRAME — User Manual... -
Page 48: File Operations
The GV Switcher system has a file browser from which you can browse through folders on the local GV Switcher menu hard disk, the GV Switcher Video Processor Frame, and the entire network file hierarchy of mapped drives. KARRERA K-FRAME — User Manual... -
Page 49: Features
The file browser gives you great flexibility for choosing and creating storage locations for your files. Any number of folders can be created in various locations. File folders and the files themselves can be named in any KARRERA K-FRAME — User Manual... -
Page 50: Managing Files Using The Utilities Pane Buttons In The File Ops Menus
Ops Menus Each File Ops menu category (Show Files, All Files, User Setups, etc.) has a Utilities Pane, with buttons to perform Copy, Paste, Delete and Create Folder operations and a toggle button (Figure 22). Multi-Select KARRERA K-FRAME — User Manual... -
Page 51: Copy/Pasting Files
Note Use clear naming conventions and logical directory structures when creating folders and renaming files so you can reliably reload the correct versions of these files when you need them. KARRERA K-FRAME — User Manual... -
Page 52: Deleting Files
2. Touch the file icon to highlight it (only one file can be renamed at a time). 3. Touch the button. Rename 4. Enter the new file name in the pop-up keyboard. 5. Touch Enter KARRERA K-FRAME — User Manual... -
Page 53: Gv Switcher File Type Extensions
Files menu. Show File Buttons : opens a create show pane. In this pane you enter the name of Create Show the Show (touch the data pad), and if you choose, select which Show Name KARRERA K-FRAME — User Manual... - Page 54 A best practice is to set the E-MEM range from 0-999 each time there is an update, this will ensure that new registers are included (the same practice can be applied to other file types). KARRERA K-FRAME — User Manual...
-
Page 55: Creating A Show File
A best practice is to set the E-MEM range from 0-999 each time there is an update, this will ensure that new registers are included (the same practice can be applied to other file types). KARRERA K-FRAME — User Manual... -
Page 56: Loading A Show File
2. Navigate to and touch the Show file you wish to load in the Directory pane (left side of menu). 3. To load all files saved in a Show file, touch the button in the Load Show Show Create & Load pane. KARRERA K-FRAME — User Manual... -
Page 57: Updating A Show File
Load button as this will load the entire Show file without your Load Show File Type selections). Updating a Show File 1. Touch (Figure 24). File Ops Show Files Figure 25. Update Show File Operations KARRERA K-FRAME — User Manual... - Page 58 A best practice is to set the E-MEM range from 0-999 each time there is an update, this will ensure that new registers are included (the same practice can be applied to other file types). 6. Touch the button in the Create Show pane to update the Show Update file. KARRERA K-FRAME — User Manual...
-
Page 59: All File Type And Directory Management
System Storage and Remote Storage directories. Use the Utilities pane buttons to perform file operations. The menu is accessed from (Figure 26). File Ops, All Files Figure 26. All Files Menu KARRERA K-FRAME — User Manual... -
Page 60: Saving Panel Prefs And Suite Prefs Files
Create a new file by touching the File Name button, typing a name, and touching Enter 4. In the Load Granularity pane, touch to select/deselect file types, or touch the button. Select All 5. Touch the button in the File Operations pane. Save KARRERA K-FRAME — User Manual... -
Page 61: Loading Panel Prefs And Suite Prefs Files
Load CAUTION The Load button immediately replaces information the GV Switcher system is currently using with the selected file information. When configuration files are loaded, significant changes to GV Switcher system operation are pos- sible. KARRERA K-FRAME — User Manual... -
Page 62: Saving Source Tables
Navigating to the desired destination directory and touching a file to select it, or b. Creating a new file by touching the button, typing a name, File Name and touching Enter 3. Touch Save KARRERA K-FRAME — User Manual... -
Page 63: Loading Source Tables
Register file menus all function similarly and are used to save and load their corresponding register files. Each menu is accessed by touching, then the menu category: , or File Ops, Panel MEM E-MEM Macros Cues e-DPM Router MEM KARRERA K-FRAME — User Manual... -
Page 64: Saving Register Files
The Panel MEM, E-MEM, Macros, Cues, e-DPM, and Router MEM menus provide controls for saving and loading register files. 1. Access the Panel MEM, E-MEM, Macros, Cues, e-DPM, or Router MEM menu by touching, and then the menu button as shown in File Ops, Figure KARRERA K-FRAME — User Manual... - Page 65 Touch the button then select register files in the file Select Reg(s) display panel (touch button for multiple selections). Multi-Select 4. Touch Save Result: The register or range of registers is saved to the target directory. KARRERA K-FRAME — User Manual...
-
Page 66: Loading Register Files
Enter Reg(s) registers in the data pad (right), for example 1-5,10,12, or Register c. Touch the button then select register files in the file Select Reg(s) display panel (touch button for multiple selections). Multi-Select KARRERA K-FRAME — User Manual... -
Page 67: Loading To A Different Set Of Registers
4. Enter the number of the first register into which you wish to load the selected range of registers, then touch Enter 5. Touch the button. Load Result: The range of registers will be loaded to the specified register number shown in the data pad. Register KARRERA K-FRAME — User Manual... -
Page 68: Saving Source Rules Files
Navigating to the desired destination directory and touching a file to select it, or b. Creating a new file by touching the button, typing a name, File Name and touching Enter 3. Touch Save KARRERA K-FRAME — User Manual... -
Page 69: Loading Source Rules Files
Navigating to the desired destination directory and touching a file to select it, or b. Creating a new file by touching the button, typing a name, File Name and touching Enter 3. Touch Load KARRERA K-FRAME — User Manual... -
Page 70: Saving Eng Setup Files
Create a new file by touching the File Name button, typing a name, and touching Enter 3. In the Load Granularity pane, touch to select/deselect file types, or touch the button. Select All 4. Touch the button. Save KARRERA K-FRAME — User Manual... -
Page 71: Loading Eng Setup Files
CAUTION The Load button immediately replaces information the GV Switcher system is currently using with the selected file information. When configuration files are loaded, significant changes to GV Switcher system operation are pos- sible. 4. Touch the button. Load KARRERA K-FRAME — User Manual... -
Page 72: File Translation From Kayenne
C and D. The U1 and U2 buses are not used for this in K-Frame. • Aux Delegate Mapping for the two Image Store and six eDPM inputs are adjusted in the Aux Delegate Mapping menu. KARRERA K-FRAME — User Manual... - Page 73 Logical Source 201 to Eng Source M1 A to make that K-Frame fixed source match Kayenne’s. This allows sources that were selected using E-MEMs and Macros on the Kayenne frame systems to be selected using K-Frame E-MEMs and Macros. KARRERA K-FRAME — User Manual...
- Page 74 The timeline of the definable level will be OK. Only the enable will need to be modified. Two Outputs on K-Frame eDPM The K-Frame eDPM has two outputs. Each K-Frame suite can have an eDPM if the K-Frame system is licensed for two. KARRERA K-FRAME — User Manual...
-
Page 75: Importing Kalypso Image Store File Types Into K-Frame
Kalypso NTSC Still Store images contain 486 lines, while the Kayenne K-Frame Image Store supports 487 lines. A Kayenne K-Frame system will display one black line at the bottom of the image raster of converted Kalypso NTSC stills. KARRERA K-FRAME — User Manual... - Page 76 Section 3 — Setting Suite Preferences KARRERA K-FRAME — User Manual...
-
Page 77: Section 4 - Video Mix/Effects
The GV Switcher system features the chroma keyers option with powerful controls. These controls offer subtle adjustments to allow successful keying of difficult subject matter (fine hair, smoke, translucent objects, etc.), and to overcome some problems resulting from imperfect chroma key set coloring KARRERA K-FRAME — User Manual... -
Page 78: Chroma Key Auto Setup
The menu buttons can be used to remove extraneous picture FG Only BG Only information, allowing you to view only those areas of the composite. KARRERA K-FRAME — User Manual... -
Page 79: Access Keyer Menu And Delegate Keyer
Auto Setup should take care of this, but manual adjustments can be made if desired. If primary suppression is set wrong, however, it will be impossible to achieve a good chroma key with the other controls. KARRERA K-FRAME — User Manual... - Page 80 Another potential artifact of chroma keying is a tinting of the overall fore- ground subject due to lighting splash from the backing color or lens flare. adds a small amount of color to the entire foreground Flare Suppression KARRERA K-FRAME — User Manual...
-
Page 81: Extra Chroma Key Controls
This control is only active when secondary suppression is on. provides controls of shadows that fall on the backing. Shdw Shadow Clip allow selecting the range of the luminance portion of the fore- Shadow Gain KARRERA K-FRAME — User Manual... -
Page 82: Setting Up A Chroma Key
Keyer 1-Keyer 6 keyer in the Keyer Transition area) and make sure is off for the Reshape keyer you are using (Figure 39). Figure 39. Keyer Menu, Chroma Key Reshape Off Reshape Off KARRERA K-FRAME — User Manual... -
Page 83: Reshaping A Chroma Key Using Auto Setup
All areas of the backing color should be full back- ground while all areas of the foreground should make the background completely invisible. The easiest way to do this is to observe the key signal while making your adjustments. KARRERA K-FRAME — User Manual... - Page 84 Note When adjusting clip levels, remember that areas on the edge of the fore- ground subject should show as shades of gray. Gray indicates areas of trans- lucency, which is desirable in chroma keying. KARRERA K-FRAME — User Manual...
-
Page 85: Reshaping Chroma Key
Because there is a mixture of backing color and fore- ground color, the secondary suppression Hue and the direction (Angle) will be different from primary suppression. Primary suppression removes the backing color, while secondary suppression corrects the color in trans- lucent areas. KARRERA K-FRAME — User Manual... - Page 86 3. Adjust the secondary so that changing secondary Angle Chroma suppression moves the color in the desired direction. You are trying to match the color of the translucent areas to an opaque (uncorrupted) area of the foreground subject. KARRERA K-FRAME — User Manual...
-
Page 87: Generating Background Mattes
3. If not already selected, touch the data pad of the desired Base Color Background (1 or 2). Use the top three soft knobs to adjust Base Hue , and of the base fill color (Figure 42). Base Saturation Base Brightness KARRERA K-FRAME — User Manual... -
Page 88: Splitting A Key
Character Generator creating matte filled characters, but wish to use a dif- ferent signal to fill the characters. A split key is used to accomplish this. Note On GV Switcher systems, the source select buses by default tally the key fill signal. KARRERA K-FRAME — User Manual... - Page 89 1. Touch Source Ops, MEs (Figure 43). Figure 43. Split Key—Source Ops, MEs Menu 2. Touch an ME button (left). 3. Touch the Cut signal data pad for the Keyer you wish to split (highlights blue). KARRERA K-FRAME — User Manual...
-
Page 90: Setting Keyer Priority
2. If not already set up, turn on the desired keys and arrange them so they overlap, observing the Program monitor. This will make the changes in key priority visible. For demonstration purposes, you can use four preset pattern keys. KARRERA K-FRAME — User Manual... -
Page 91: Transitioning Between Different Keyer Priorities
4. Go to the Keyer, Priority menu in the Menu Panel by pressing Keyer Priority 5. The current stack in the menu is automatically set to what is currently being output. You can change the Current priority stacking order if desired, as described on page KARRERA K-FRAME — User Manual... -
Page 92: Key Store
Image Store channel or another keyer, you could store a station ID or a replay graphic (still) for a sports show in a Key Store and switch the image within the keyer. KARRERA K-FRAME — User Manual... - Page 93 On power cycle or reboot, Key Stores will have to be reloaded with the correct video. They default to black keyed with black which will not show up on a monitor. Key Store is E-MEMable and keyframeable. KARRERA K-FRAME — User Manual...
-
Page 94: Grabbing A Key Store Image
Use FS 1 V&K Use FS2 V&K Video and Key source image (Figure 47), or a. Touch the Keyer Video Source you want as fill. b. Touch the Keyer Cutout Source you want as the key cut. KARRERA K-FRAME — User Manual... -
Page 95: Setting A Pattern Mix
5. Delegate that ME for preview in the System Bar. 6. Press the button in the Transition area, and move the lever Trans PVW arm part way. This will display the P1 pattern on preview. KARRERA K-FRAME — User Manual... -
Page 96: About Source Memory
Source Memory settings are explicitly learned and deleted, using the Source button. Memory The following are NOT affected by Source Memory: • Split keys • Keyer Borderline settings • Keystore settings • Background sources • Aux sources KARRERA K-FRAME — User Manual... -
Page 97: Learning Source Memory For A Keyer
ME’s keyer bus. When a keyer source with settings saved to Source Memory is selected on a keyer bus, the button is highlighted when that keyer is Source Memory selected in the Keyer Mode menu. KARRERA K-FRAME — User Manual... -
Page 98: Deleting Source Memory From A Keyer
The Source Memory window appears Source Memory (Figure 50). Figure 50. Source Memory Window 4. Touch the button. The Source Memory delete options window Delete appears (Figure 51). Figure 51. Source Memory Delete Options KARRERA K-FRAME — User Manual... -
Page 99: Acquiring Dpms
DPM Chns Note 2D DPMs are available on all MEs including the Controller ME and eDPM. To move resources between suites, refer to the Karrera K-Frame Installation & Service Manual, version 5.1 or newer. Acquire an ME Resource for eDPM A full ME used as an eDPM logical resource will be dedicated and unavail- able for use as an ME until released. -
Page 100: Release/Acquire Dpm Resources Between Edpms/Idpms
• Release channels by moving them from (up to six for Channels Available acquisition by eDPM) using the button in the Right Arrow eDPM iDPM acquisition groups. Channels • Acquire available DPMs using the Left Arrow buttons. KARRERA K-FRAME — User Manual... -
Page 101: Enable/Delegate Dpm Channels
DPM functions and features. Enable an iDPM on a Keyer at the Control Panel 1. From the Karrera K-Frame Control Panel, in the Modifier Area press an ME button. 2. Press a Key button 1-6 or hold and press for multiple channel control. -
Page 102: Enable A 2D Dpm On A Keyer At The Control Panel
Section 4 — Video Mix/Effects Enable a 2D DPM on a Keyer at the Control Panel 1. From the Karrera K-Frame Control Panel, in the Modifier Area, press an ME button. 2. Press a Key button 1-6 or hold and press for multiple channel control. -
Page 103: About Dpms
16 physical DPMs (four DPMs per dual ME board). DPMs are licensed in pairs. Karrera K-Frame provides three DPM options: • iDPM—Full DPM including transform engine for complex effect manipulation, up to 16 iDPMs can be licensed in pairs, •... -
Page 104: Tally And Dpm
The menu is accessed by touching iDPM Trans- (Figure 57). form Figure 57. Transform Menu The Joystick ( ) can be controlled from the menu with the soft Size knobs or keypad entry. KARRERA K-FRAME — User Manual... -
Page 105: Enable Dpm Transforms In The Menu
Some functions (Crop, Reverse, Skew, Aspect, and Post Transform) are inactive for these Global Channels so they are grayed out. Global Channel assignment information will appear in the ME/Keyer data pad ( PRI Glb SEC Glb KARRERA K-FRAME — User Manual... - Page 106 Global channel to each of the three keyers for that ME, select those keyers, and apply a Spin transform. All three keyers would spin around the global axis (Figure 59, lower graphic). KARRERA K-FRAME — User Manual...
-
Page 107: Key Off Control
For example, suppose you want to fly a graphic that is normally accompa- nied by a key signal. Turning the key off forces the graphic to full raster, ignoring the key. The button is inactive for Global channels. Key Off KARRERA K-FRAME — User Manual... -
Page 108: Easy Cube Control
Primary Partition by touching Key 2 and Key 3 in the Secondary Keyers Visible on Primary Partition pane. The keyers will be visible in the Primary Partition but are controlled only by the Secondary. Figure 60. Mode Menu, Secondary Partition Visible on Primary Partition KARRERA K-FRAME — User Manual... -
Page 109: Transform Controls
Curve Curve soft knob controls for , and soft knob become available. Tension Continuity Bias You can also turn off transform interpolation and hold each keyframe’s values with the touch button. Path Hold KARRERA K-FRAME — User Manual... -
Page 110: Clear Transforms
This means that when a border is added it does not crop into the original image so a border can be added to a full-sized image and it will not be visible until the image size is slightly reduced. KARRERA K-FRAME — User Manual... -
Page 111: Idpm Borderline Menu
Figure 61. Borderline Menu Shadow Controls The Shadow feature is turned on with the button in the lower left Shadow On pane. When turned on, soft knob controls become available on the right. KARRERA K-FRAME — User Manual... -
Page 112: Idpm Shadow Crop Controls
(Top, Bottom, Left, and Right). Glow Pane Controls Touch the data pad button to access the Glow controls (Figure 62) in Glow the Borderline menu. Figure 62. Glow Pane KARRERA K-FRAME — User Manual... -
Page 113: Glow Color
Figure 63. Glow Color Glow Path Control Pane Controls for glow path, using the standard , and Hold S Linear Linear Curve parameters, can be applied when the button is on (top right of Adjust Path Borderline menu). KARRERA K-FRAME — User Manual... -
Page 114: Idpm Film Look Menu
Kurl Menu The Kurl effects are grouped into modes, each of which has its own set of menu panes and related soft knob controls. To access the Kurl menu, touch (Figure 65). iDPM Kurl KARRERA K-FRAME — User Manual... -
Page 115: Kurl Position/Size Modulation Mode
Each of the two wave trains (horizontal, vertical) may be selected independently from a set of modulation patterns. Touch the Kurl Mode button to access the position and size Pos/Size Mod modulation controls (Figure 65). KARRERA K-FRAME — User Manual... -
Page 116: Modulation Pane
Speed motion. Negative values can be entered to reverse the direction of the motion. — defines the angle of the Position Modulation with respect to H/V Angle the source X and Y axes. KARRERA K-FRAME — User Manual... -
Page 117: Mod Type Pane
— activates the Cycles soft knob. This control can be used Cycle Limiting to limit the number of wave pattern cycles. — selects only the positive portion of the wave cycle. Cycles + ve Only Representative wave shapes are shown in Figure KARRERA K-FRAME — User Manual... -
Page 118: Page Turn/Roll Mode
Page Turn and Roll are parallel projections to the target screen with no perspective. Touch the Kurl Mode button to access the Page Turn and Roll Page Turn/Roll controls (Figure 68). KARRERA K-FRAME — User Manual... -
Page 119: Page Turn Pane
Offset plane and, when interpolated between keyframes, causes the page to turn. The offset would typically change from one edge or corner of the source raster to the opposite edge or corner for the turn. KARRERA K-FRAME — User Manual... -
Page 120: Show Sides Pane
68). The effect can be split horizontally, verti- cally, or both ways using the labeled buttons ( Horiz Split Vertical Split Selecting the data pad brings up soft Split Axis Position Horizontal Vertical knobs that control the location of the split. KARRERA K-FRAME — User Manual... -
Page 121: Ripple Mode
This is a parallel projection to the target screen with no perspective. Touch the Kurl Mode button to access the Ripple controls. Ripple When the Modulation data pad is selected in the Ripple pane appears (lower left, Figure 69). Figure 69. Kurl Menu, Ripple Modulation KARRERA K-FRAME — User Manual... - Page 122 H Position — controls the vertical position of the center of the ripple. V Position stretches the ripple horizontally or vertically. Aspect — adjusts the angle of the ripple, horizontally and vertically. H/V Angle — KARRERA K-FRAME — User Manual...
-
Page 123: Slits Mode
— defines the number of slits. # of Slits — determines the starting point or phase of the modulation to occur Phase at the center point. — defines the degree of randomization of slit width. Random KARRERA K-FRAME — User Manual... -
Page 124: Sphere Mode
Sphere pane, the fol- Position/Wrap lowing soft knob controls are available: — controls where the image is mapped onto the sphere Horizontal Position by moving the image horizontally on the sphere’s surface. KARRERA K-FRAME — User Manual... -
Page 125: Idpm Splits Mirrors Menu
Splits and Mirrors con- iDPM, Splits & Mirrors trols (Figure 73). Figure 73. Splits/Mirrors Menu Splits Pane Touch the button in the Splits Enable pane (bottom right) to bring Splits On up the Splits controls: KARRERA K-FRAME — User Manual... -
Page 126: Splits & Mirrors Modifiers Pane
At large separation values the picture will be doubled about the axis. This control only has an effect when separation exists between the splits. KARRERA K-FRAME — User Manual... -
Page 127: Idpm Defocus Menu
When the Defocus pane is activated, soft knob controls for Video Defocus , and are available. Video Aspect NAM Ratio — adjusts the total amount of defocus applied to the image. Video Defocus KARRERA K-FRAME — User Manual... -
Page 128: Nam Matte Pane
For this reason, values that might cause aliasing are allowed. If a lighting effect looks bad, adjust the settings to correct its appearance. KARRERA K-FRAME — User Manual... -
Page 129: Shadow Control Pane
The Light Type pane is used to turn on or off the delegated light source and provides various other controls of that light source. Soft knobs are activated when appropriate to control the various lighting parameters. KARRERA K-FRAME — User Manual... -
Page 130: Light Type
100% is all primary light, 0% all flare light. Independent Flare Intensity This button allows independent control of the primary and flare compo- nents of the light. When Off, changing the value of one control will alter the KARRERA K-FRAME — User Manual... -
Page 131: Lighting Path Controls
The Output Recursive menu is used to select the keyers you wish to control (delegation), the desired type of output recursive control, and then adjust the parameters associated with the chosen control using the soft knobs or pop-up keypads. KARRERA K-FRAME — User Manual... -
Page 132: Output Recursive Presets
The Output Recursive system has a set of presets that can be selected to simplify creating effects with Output Recursive. effect buttons are provided, the Rain Wind Smoke Fire Paint, Erase Fire button has been touched in the example in Figure KARRERA K-FRAME — User Manual... -
Page 133: Output Recursive Modes
Erase Output Recursive Modes Touch any of the four modes in the Output Recursive Mode pane to create keyer special effects. Each mode displays specific controls for parameters when touched (Figure 77 on page 133). KARRERA K-FRAME — User Manual... -
Page 134: Motion Decay Mode
Note Additive effect with Star Decay. Star Decay — causes random pixels of the frozen image in the Output Recursive to fade away over time. Note Additive effect with Picture Decay. KARRERA K-FRAME — User Manual... -
Page 135: Montage Mode
— causes the frozen image in the Output Recursive to fade Picture Decay away evenly over time. Note Additive effect with Star Decay. — causes random pixels of the frozen image in the Output Star Decay Recursive to fade away over time. KARRERA K-FRAME — User Manual... - Page 136 — No action is taken. buttons — Mode • — places the image over the remnant or “montage”. Over • — places the image under the remnant. Under • Erase — erases the image and remnant. KARRERA K-FRAME — User Manual...
- Page 137 — located bottom left of the menu, displays the “Pic” Appearance or Picture Decay value from the soft knob data pad. button— displays the Direction and Velocity (speed) values from Wind the soft knob data pads. KARRERA K-FRAME — User Manual...
- Page 138 — erases the image and remnant. Erase Show Picture Parameter • — (default) displays the live video image in addition to the still mon- tage. • — displays only the montage without the live video image. KARRERA K-FRAME — User Manual...
-
Page 139: Dpm Global Channel Control Over Multiple Mes
(or SEC Global if configured with Split ME) PRI Global button data pad for each ME (Figure 78). All keyers on PGM and ME-3 execute the same transform. Figure 78. Transform Menu, Multiple ME Global Channel Control KARRERA K-FRAME — User Manual... -
Page 140: Set Up A Dpm Secondary Global Channel
4. Select and touch the keys you wish to assign to the Secondary Global Channel in the Secondary Assign pane. 5. Repeat Steps 2-4 for each ME you wish to split and assign keyers to the Secondary Partition. 6. Touch to go to the Transform menu. iDPM Transform KARRERA K-FRAME — User Manual... -
Page 141: Adjust Idpm/2D Dpm Border Edges
DPMs selected for borders using the Multi select button will each have the same border values. 3. Turn on DPM Borders by touching either the Square Border Round Border button in the menu pane (Figure 80). Border Enable KARRERA K-FRAME — User Manual... -
Page 142: Idpm/2D Dpm Border Color
(Figure 81). 1. Access the Borders Menu by touching iDPM Borders 2. In the iDPM (or eDPM in eDPM mode), Border menu, touch the Square button to enable Borders (Figure 81). Border Round Border KARRERA K-FRAME — User Manual... - Page 143 Left Bottom up keypads to adjust the edges independently of the others. Note The Border Size All/Softness All data pads allow you to adjust the relative values for size or softness of all edges simultaneously. KARRERA K-FRAME — User Manual...
-
Page 144: About Edpms
For E-MEMs learned using versions earlier than 2.0 to work properly, you must reconstruct a timeline for the proxy sublevels to run. The proxy sublevel register has been created but is limited to a single keyframe. KARRERA K-FRAME — User Manual... -
Page 145: Edpm Partitioning
Primary and cannot be enabled unless eDPM Primary is also enabled. Figure 82. eDPM Partitions In the Control Panel, the eDPM Primary and Secondary partitions are avail- able via the buttons in the Master E-MEM area. eDPM Pri eDPM Sec KARRERA K-FRAME — User Manual... -
Page 146: Edpm Definable Sub-Levels
E-MEM. For example, effects created for ME 1 can have the eDPM definable sub-levels and will then run eDPM effects. Assign Sources Assigning sources for eDPM transform is done in the eDPM Mode Source Ops, eDPM menu. KARRERA K-FRAME — User Manual... -
Page 147: Button Mapping Edpms To An Me
Button Mapping eDPMs to an ME Map the eDPM outputs to the source select buttons on the MEs in the User Setups, Panel Prefs, Button Mapping menu (see Control Panel Source Select Button Mapping on page 25). KARRERA K-FRAME — User Manual... -
Page 148: Edpm Mode Menus
Mode Menus Touching the button (bottom left) changes the menu to the eDPM Mode eDPM Mode (Figure 85). Figure 85. eDPM Mode & Menus KARRERA K-FRAME — User Manual... -
Page 149: Edpm 2Dpm Menu
104) in all ways except the ME/Keyer selection matrix (upper left pane) is replaced with the six channels of the eDPM (Figure 85), however the functionality is the same in regard to selecting channels and Global Channels. KARRERA K-FRAME — User Manual... -
Page 150: Edpm Category Menus
To access the eDPM File Ops menu, touch , and either the File Ops eDPM menu button. The eDPM File menu controls are identical to the Files Switcher Mode file operations (File Operations on page 48). KARRERA K-FRAME — User Manual... -
Page 151: E-Mem & Timeline Menu
270) features. Note Define E-MEM for eDPM partitions are enabled in the E-MEM Prefs, ME Par- tition menu. To access the eDPM Timeline Edit menu, touch E-MEM & Timeline Timeline Edit (Figure 88). KARRERA K-FRAME — User Manual... -
Page 152: Source Ops Menu
261) and Near and Far side (see the Switcher Concepts Manual for more information) source selection for eDPM Channels 1-6 using the scrolling list with button at the right of the menu. Lock KARRERA K-FRAME — User Manual... -
Page 153: Picture Menu
Partition. Also, as with iDPM, the eDPM channel on the Primary Partition can be made visible on the Secondary Partition and vice versa (see Keyer Partition Visibility on page 108). To access the eDPM Combiner menu, touch eDPM Combiner KARRERA K-FRAME — User Manual... - Page 154 Section 4 — Video Mix/Effects Figure 90. Picture, Combiner Menu The process for assigning a Global Channel to eDPMs is the same as assigning Global Channels to iDPMs (see DPM Global Channel Assignments on page 105). KARRERA K-FRAME — User Manual...
-
Page 155: Section 5 - Switcher Control
1 second is input by pressing: • Enter An odd field is input by pressing as the last entry. For example, a time of one second 15 frames and one field is input by pressing: KARRERA K-FRAME — User Manual... -
Page 156: Learning E-Mem Registers From The Control Panel
3. Press the keypad number of the desired register. Learn a Register to a Different Bank To learn registers in a different bank from the Control Panel: 1. Create the effect. 2. Press the button. KARRERA K-FRAME — User Manual... -
Page 157: Copying E-Mem Timeline Information With Get And Put
If recalling effects from the Master E-MEM area with off, you first Auto Recall need to specify which levels you wish to control with the Enable buttons in the E-MEM & Timeline, Register Ops menu. KARRERA K-FRAME — User Manual... -
Page 158: Clearing E-Mem Registers
Alternatively, you can perform the Bank, then Page selections, then press the desired register button. Clearing E-MEM Registers Both currently selected and different registers can be cleared from the E-MEM & Timeline, Register Ops menu (Figure 91). Figure 91. E-MEM and Timeline, Register Ops menu KARRERA K-FRAME — User Manual... -
Page 159: Running An E-Mem Effect And Auto Run
2. Press the page, bank, and register keypad button of the starting register. To Break a Sequence: 1. Press 2. Press the page, bank, and register keypad button of the register to end the sequence. Press the same page, bank, and register button a second time. KARRERA K-FRAME — User Manual... -
Page 160: Macros
Macros are recorded into macro registers. The GV Switcher system has 999 macro registers. The number of steps in any specific macro or the total number of macro steps across all macros is limited only by the amount of available memory in the Video Processor Frame. KARRERA K-FRAME — User Manual... -
Page 161: Macro Playback
Macros are low tally when a macro has been recorded and OFF when no content exists. When a macro is executed, the button turns high tally orange KARRERA K-FRAME — User Manual... -
Page 162: Macro Attachments
The Macro Control Button group on the System Bar area has eight buttons. These controls are located above the PGM PST stripe, at the far right of the System Bar area, as shown in (Figure 92). Pressing the (Control) Macro Ctrl KARRERA K-FRAME — User Manual... - Page 163 Sho w Repl ace Post Del et e I ns Del ay Recor d A1 A1 PVWPri M E 1 M E 2 M E 3 M E 4 eDPM PVW Pr i KARRERA K-FRAME — User Manual...
-
Page 164: Macro Button Function Summary
The Macro menus provide access to many, but not all, GV Switcher system macro functions. The Macro menus are useful to access and use Macro reg- isters not available on the Control Panel (registers 25 or 33 through 50). KARRERA K-FRAME — User Manual... -
Page 165: Accessing Shifted Macros
Playing Back a Macro Register 1. Turn on Macro mode with the button. If not already on, you may Macro also want to press the (Attach) button to display the macro names Show on the source name displays. KARRERA K-FRAME — User Manual... -
Page 166: Pre-Attaching A Macro
Up to three macros (one of each type) can be attached to the same button. 1. Select an attach mode. 2. Select the macro register of the additional macro. 3. Press the button to which you wish to attach the additional macro. KARRERA K-FRAME — User Manual... -
Page 167: Removing A Macro Attachment
4. Complete the append by pressing the blinking button, or Record pressing the blinking keyer row macro register button. Performing Macro Operations from the Menu Recording a Macro Access the Macros menu be touching Macros KARRERA K-FRAME — User Manual... -
Page 168: Enter A Macro Panel Name
Macro List pane; four characters maximum. GV Switcher displays that name in place of the Macro Register Number in the Local E-MEM area (when the Macro menu is delegated by pressing the button in that Macro ME). 1. Select Macros, Catalog in the menu. KARRERA K-FRAME — User Manual... -
Page 169: Attaching A Macro
Post 4. Touch the menu button for the macro register to be attached. 5. If desired, name the macro by touching the Name data pad and entering the name in the pop-up keyboard. Press Enter KARRERA K-FRAME — User Manual... -
Page 170: Playing An Attached Macro
2. Press the Save button in the File Operations pane. 3. Navigate to the folder (System Storage or Remote Storage tab) into which you wish to save the Macro files (left pane). You can create a new folder if you wish. KARRERA K-FRAME — User Manual... -
Page 171: Loading Macro Registers
E-MEMs and macros. E-MEM Recalls in a Macro The state of the buttons are sent as part of each E-MEM Effects Dis recall command. When recording E-MEM recalls to a Macro, make sure KARRERA K-FRAME — User Manual... -
Page 172: About Macros, Suites, And Surfaces
Also, you can define and associate one of the 15 new definable Source Substitution Tables to a bus (each bus link can be associated with any source table), and save bus links as part of an E-MEM. Bus links are E-MEMable and their enables are Keyframeable. KARRERA K-FRAME — User Manual... -
Page 173: Bus Linking Examples
The Bus Links menu is divided into two tabs, the Links Setup menu and the Source Tables menu. The Links Setup menu has the Current Link pane (Figure 95, left) and the Table Setup menu (Figure 95, right). KARRERA K-FRAME — User Manual... - Page 174 Table Setup pane (Figure 96, right). The Source Tables menu is used to select source substitutions within source tables and create a named rela- tionship between the source table and the links to which they are assigned. KARRERA K-FRAME — User Manual...
-
Page 175: Bus Linking Source Substitution Tables
The Standard Table All Sources 1-to-1 Source Table is the default. One of the other 15 configurable Source Tables can be assigned once configured. Linked Source Buttons —Sets all sources one-to-one. Set All One to One Set to None —Sets selected source’s Linked Source to none (blank). KARRERA K-FRAME — User Manual... -
Page 176: Configuring A Source Table With Source Substitutions
3. Touch a source in the Linked Source column of the Source/Link Source scrolling list the Table Setup pane. 4. Touch the substitute source in the scrolling Source List. 5. Repeat the first two steps for all source substitutions. KARRERA K-FRAME — User Manual... -
Page 177: Storing (Copying) Source Table Substitutions To Another Source Table
Linked in the Link Setup menu, Current Link pane, to change the Source Table for that bus link. The Source Tables column becomes available. Touch another source table for the bus link. KARRERA K-FRAME — User Manual... -
Page 178: Source Table File Operations
(Source Tables are grayed out). You can disable or break the link using the buttons in the Enable Break Current Link pane (the button in the Table Setup pane will also Enable enable/disable the selected link). KARRERA K-FRAME — User Manual... -
Page 179: Creating Parallel Bus Links
Linked Bus link to the controlling bus. 6. If desired, assign different source tables to the bus links: a. Touch a Bus data pad in the Current Link pane. Linked KARRERA K-FRAME — User Manual... -
Page 180: Creating Cascading Bus Links
—Controlled and controls: Aux 1 Bus and Aux 2 Bus although Green controllers, are also controlled so they are green in color. • —Aux 3 Bus is controlled but is not a controller therefore it is blue. Blue KARRERA K-FRAME — User Manual... - Page 181 6. Touch the data pad again in the Table Setup pane and select Linked Bus another linked bus. Repeat this process for each controlling and linked bus you wish to add to the cascading links. KARRERA K-FRAME — User Manual...
-
Page 182: Bus Linking Rules And Restrictions
A video-only bus behaves as if it is the A side of a bus pair. Bus Linking Management Individual bus links are enabled and disabled with the button in Link Enable the Controlling bus pane. When enabled, commands will be sent from the KARRERA K-FRAME — User Manual... - Page 183 Inhibit All Links Link Enable links. This does not change the individual settings, however. Link Enable Turning off will re-enable any bus links with Disable All Links Link Enable KARRERA K-FRAME — User Manual...
- Page 184 Section 5 — Switcher Control KARRERA K-FRAME — User Manual...
-
Page 185: Section 6 - Device Control
3-ME the right-most group can be assigned to a device associated with a source select button. Note Off Air Advance and Auto Start buttons are accessed from the GV Switcher menu. KARRERA K-FRAME — User Manual... -
Page 186: E-Mem Control Of External Devices
The space between keyframes allows the device to respond to the first set of instructions. For example, a DDR or VTR takes time to load and cue before it can play. The effect must be built so that KARRERA K-FRAME — User Manual... -
Page 187: Configuration
• Recalling and running the effect. When the effect register is recalled, the first keyframe can, for example, command the device to load and cue. When the effect runs, the device can KARRERA K-FRAME — User Manual... -
Page 188: Timecode Entry
Load which will load and cue the device to the entered timecode. Both Play Stop cannot be specified on the same keyframe, however. Turning one on automatically turns the other off. KARRERA K-FRAME — User Manual... -
Page 189: Device Control With The Menu
In general, clips are loaded from the Devices Control menu by touching the data pad in a device control pane, and then selecting the clip Program Clip from the list displayed. KARRERA K-FRAME — User Manual... -
Page 190: Clip Directory (Amp Protocol)
Device Summaries Current Device state of the work buffer. This indicates two things. First, it shows what events exist on each keyframe as it is encountered during effect run or time KARRERA K-FRAME — User Manual... -
Page 191: Operating An External Device From The Gv Switcher
2. Go to the Devices, Enables menu, and touch the device you wish to enable in the Device Enables pane (left), and touch the Enable Selected button (or enable all using the button) in the Enables pane Enable All (Figure 104). KARRERA K-FRAME — User Manual... -
Page 192: Controlling An External Device (Example)
This ensures only that device’s events will be specified in the keyframe. 2. Go to the Timeline Events menu and touch the button of the desired device to delegate the menu to that device (Figure 105). KARRERA K-FRAME — User Manual... -
Page 193: Controlling An External Device Using Timeline Events And E-Mem
For example, go to three seconds by pressing GoTm • 4. Touch the button in the Events pane to deselect the old Clear Events commands. This helps prevents accidental multiple load and cue commands in the same effect. KARRERA K-FRAME — User Manual... -
Page 194: Playing A Video And Key Pair Of Sources In Sync From An External Device
For example, press GoTm • Enter 7. Select PGM PST in the Next Transition area so it will mix on, and Key 1 setup a split key with the two DDR channels. KARRERA K-FRAME — User Manual... -
Page 195: Loading A Clip To Play On Air Later With Auto Start
DDR models), take the DDR on-air. The clip will play automatically. Because a Stop command was not entered, the clip will continue to play till it reaches its end or it is stopped. KARRERA K-FRAME — User Manual... -
Page 196: Building An Event List
• Server Ganging—Channel Ganging on AMP servers, supports up to 32 channels for improved video key synchronization (Ethernet and Serial Port protocols are supported), and • Switcher Side Ganging—Gangs multiple non-AMP channel machine control channels together. KARRERA K-FRAME — User Manual... - Page 197 Devices not available for ganging are grayed out and inactive. Touching one of the active buttons in the right pane illuminates its indicator, and that device’s KARRERA K-FRAME — User Manual...
-
Page 198: Router Interface Operation
• Adding a story is simply an Insert operation. Router Interface Operation Introduction The GV Switcher system can interface with an external routing system. A routing system connects a router source (router input) to a router destination KARRERA K-FRAME — User Manual... - Page 199 The GV Switcher system can be considered a type of router control panel, and so the GV Switcher system can protect router destina- tions. GV Switcher system router protect commands are applied to all router levels. KARRERA K-FRAME — User Manual...
-
Page 200: Features
(which can occur during bootup), No Src appears. Features • Interfaces to the Grass Valley SMS 7000 routing system. • GV Switcher system configuration of routed sources. • Names of router sources are shown on GV Switcher Control Panel source name displays. - Page 201 Touching this data pad opens an alphanumeric keypad, into which you can enter the name of the desired router source. The Router Source list will then scroll to and select that router source, KARRERA K-FRAME — User Manual...
-
Page 202: Router Control Of Aux Buses
Router Control System. If an Aux bus is enabled for router control, then the source can be changed by a configured Router Control Panel. Note Prelude Control Systems are limited to selecting the first 128 switcher sources. KARRERA K-FRAME — User Manual... -
Page 203: Controlling Aux Bus Source Selections From A Router
The router must have the switcher sources defined and the 46 Aux Busses defined as destinations, with four levels each (see the documentation that came with your router): Level 1: Suite 1 Video, Level 2: Suite 1 Key, Level 3: Suite 2 Video, and KARRERA K-FRAME — User Manual... -
Page 204: R-Mem
• Select 1 or more switcher sources for R-MEM control. • Instantaneous Learn and Recall. • Save To and Load From Disk. • Auto Recall. • Preview of R-MEM register source and destination names. • E-MEM control of R-MEM, if desired. KARRERA K-FRAME — User Manual... -
Page 205: R-Mem Menu Operation
R-MEM Auto Recall automatically changes only the switcher sources that were enabled when the register was learned. Preview When mode is turned on, recalling a register will only display the Preview R-MEM settings stored in that register. No switcher sources will change. KARRERA K-FRAME — User Manual... - Page 206 A switcher source that is currently on-air with an On Air protection status cannot be changed by an R-MEM recall. Either place the source off-air or select a different protection status to change the switcher source selection. KARRERA K-FRAME — User Manual...
-
Page 207: E-Mem Control Of R-Mem
Auto Recall switcher sources enabled on the R-MEM menu will be affected by the recall. Disabling all the switcher sources on the menu makes the E-MEM recall use the currently selected router sources, with no changes. KARRERA K-FRAME — User Manual... -
Page 208: E-Mem Prefs Assignment
Go to the R-MEM menu (touch the category selection button) R-MEM and enable the desired switcher sources. Select if you Auto Recall want the ability to recall R-MEM settings for only the selected switcher sources. KARRERA K-FRAME — User Manual... -
Page 209: Changing R-Mem On An Existing E-Mem Register
Go to the R-MEM menu (touch the R-MEM category selection button) and enable the desired switcher sources. Select l if you Auto Recal want the ability to recall R-MEM settings for only the selected switcher sources. KARRERA K-FRAME — User Manual... -
Page 210: Loading R-Mem Registers
R-MEM keyframes containing effectively no data will also be added to the effect and appear on the Timeline menu. These keyframes are only system artifacts and do not influence the running of the effect. KARRERA K-FRAME — User Manual... -
Page 211: Camera Control With Ethernet Camera Tally
GV Switcher Camera Integration provides the ability to place cameras into a usable but not fully shaded setup/rehearsal mode. The GV Switcher can connect to up to 99 cameras via the Grass Valley LDK Connect Gateway. Cameras can be acquired by multiple suites. - Page 212 When installed and configured, the GV Switcher sends tally over Ethernet to cameras. This is described in the Installation & Service Manual for your switcher model. In addition, the , and buttons in the Source Yellow Green KARRERA K-FRAME — User Manual...
- Page 213 1. Touch a camera source or sources in the Camera Sources list. 2. In the Scene Files menu, touch the numbered Scene File in E-MEM button for the scene file you wish to save as part of an E-MEM. KARRERA K-FRAME — User Manual...
- Page 214 5. Touch the level to which you wish to assign the Camera’s sub-level. 6. Touch Done 7. Build an E-MEM recalling the level with the camera sub-level assigned. The enabled Scene File will be recalled for the selected cameras. KARRERA K-FRAME — User Manual...
-
Page 215: Newton Modular Control
Grass Valley modular products. Some Newton functionality has been incorporated into the GV Switcher menu applica- tion. This makes it possible to control Grass Valley Gecko and Kameleon frame modular products from a GV Switcher menu. The modular frames... -
Page 216: Newton Controls Configuration
Newton tab on the top menu bar (Figure 115). Figure 115. NetConfig Newton Configurator Plug-in The Configurator tool is used to define the functionality of Newton con- trols by creating a Newton configuration file. The Newton configuration KARRERA K-FRAME — User Manual... -
Page 217: External Device Newton Menu Description
GV Switcher system. Refer to the separate Newton Instruction Manual and NetConfig Instruction Manual for specific information about how to configure the Newton con- trols. These manuals are available for download from the Grass Valley web- site. External Device Newton Menu Description... -
Page 218: Delegation Pvw Bus
– Selecting this button accelerates knob adjustments by a Accelerate Knobs factor of 10, providing coarse and fine knob control. Refer to the separate Newton Instruction Manual for specific information about Newton controls. KARRERA K-FRAME — User Manual... -
Page 219: Section 7 - Switching Basics
Delegation permits a single group of buttons and knobs to control a large number of identical system functional areas, or objects. Delegation connects a group of controls, to a particular object. Delegation makes it possible to KARRERA K-FRAME — User Manual... -
Page 220: Me Delegation
Modifier area will be based on the first keyer selected. For example, if Key 1 is a Chroma Key and Key 2 is a Preset Pattern, adjusting Clip should change the clip for both Key 1 and KARRERA K-FRAME — User Manual... -
Page 221: Karrera Control Panel Dpop And Spop Menu Delegation
ME Mode ME Mode Source Select Row 1, 2, 3 Defined in: User Setups, Panel Prefs, Bus DPOP Prefs Wipe 1, 2 Transition/Modifier Wipe Pattern User 1-6 and Key Prior Keyer/Priority Transition Key 1-6 Keyer Mode KARRERA K-FRAME — User Manual... - Page 222 All Keyer MEs (Source Ops menu), Video Source Select Proc and RGB Color Correct (ME menu) K1-K6 Transition All Keyer ME 1-4, PGM Modifier All ME K1-6 All Keyer All Buttons Control Panel Macros, Attach KARRERA K-FRAME — User Manual...
-
Page 223: Menu Panel Overview
(Figure 117, left). The Data Soft parameter can be adjusted by turning the knob, or the data pad can Knob be touched to bring up a numeric keypad. KARRERA K-FRAME — User Manual... -
Page 224: Menu Screen Organization And Components
• Light Brown for e-DPM (optional) A representative menu screen (Keyer Mode menu) is shown in Figure 118 Figure 119. For clarity, the menu screen examples are divided into two areas: • Navigation and • Content and Messaging KARRERA K-FRAME — User Manual... - Page 225 Menu Panel Overview Figure 118. Keyer Mode Navigation Menu Example Quick-Link Tabs Scrolling Menu Menu History and Touch Category Favorites Buttons Touch Buttons KARRERA K-FRAME — User Manual...
- Page 226 Mode Selection Touch Label and Operations Status Notification Area (6 x 5 = 30) Button Group Data Pad Selected Selected Selected Additional Pattern Delegation Mode Function Parameter Data Pad Data Pad Touch Touch Touch Button Button Buttons KARRERA K-FRAME — User Manual...
-
Page 227: History Mode
History selected, then change to blue. Menu Icon Touch Use the scroll bar to see more History menu icon choices Buttons (Figure 120, left). Clear History Touch Button History Mode Touch Button KARRERA K-FRAME — User Manual... -
Page 228: Favorites Mode
(a previously learned icon can Arrows be overwritten). History Mode 4. Touch the button. Learn Touch Button To clear a Favorites page, select the button Clear Page (Figure 121, bottom-left). Clear Page Touch Button Favorites Mode Touch Button KARRERA K-FRAME — User Manual... -
Page 229: Creating A Last Menu Assignment In Favorites Mode
Favorites mode. Each tab with a label provides a semi-transparent, pre- determined menu that appears over the current menu when touched (Figure 123), to allow fast access when performing operations like setting parameters, selecting delegations, choosing functions, etc. KARRERA K-FRAME — User Manual... -
Page 230: Data Pads And Touch Buttons
A special pattern data pad also exists, which displays the shape of the current pattern (the square shape in Figure 119). Touching this data pad brings up a wipes palette, from which wipe pattern generator shapes are selected. KARRERA K-FRAME — User Manual... -
Page 231: Menu Top Line
Touching one of these buttons displays that category. The category button turns green when selected. Some menus have additional subcategory touch button menu tabs avail- able at the bottom edge of the menu (Figure 124). KARRERA K-FRAME — User Manual... -
Page 232: Delegation Group
Function selection touch buttons either toggle on and off or are part of an interlocked group.The soft knob pads on the right allow individual parameter adjustments, as described earlier. KARRERA K-FRAME — User Manual... -
Page 233: Numeric Keypad
Touching a soft knob pad or other single numeric parameter pad brings up a numeric keypad that can be used to enter exact values (Figure 125). You can also use a standard computer keyboard to enter information while this display is active. Figure 125. Numeric Keypad KARRERA K-FRAME — User Manual... -
Page 234: Alphanumeric Keypad
You can also drag the white handle to quickly scroll through the entire list on some menus. KARRERA K-FRAME — User Manual... -
Page 235: Menu And Panel Interactions
Once that menu is displayed, delegation changes affecting that menu that are made on the Control Panel will be tracked on the Menu Panel. For example, if ME 3 Key 1 is selected on a menu, and then ME 3 Key 2 is KARRERA K-FRAME — User Manual... -
Page 236: Transitions
Any element not selected in the next transition element group retains its current state. Combinations of ele- ments can be included in the same transition by selecting more than one transition element button. KARRERA K-FRAME — User Manual... -
Page 237: Setting Up A Lever Arm Transition
4. If desired, select a transition modifier ( Trans PVW Preset Black Performing a Lever Arm Transition 1. Move the transition lever arm. The picture will transition only the elements selected. Other elements will remain unchanged. KARRERA K-FRAME — User Manual... -
Page 238: Performing An Auto Transition
4. Go to the ME, UserTrans menu and select the User Trans Mix Through Matte (1-6) button. 5. In the ME, UserTrans menu, touch the button under Full Screen ‘Intermediate Video Appears’ to create a full raster effect. KARRERA K-FRAME — User Manual... -
Page 239: Nam And Fam Mixed Transitions
You can experiment with various different programmed values to vary the appearance and timing of the effect. NAM and FAM Mixed Transitions Non Additive Mix (NAM) and Full Additive Mix (FAM) are special mix transitions in the GV Switcher system. KARRERA K-FRAME — User Manual... -
Page 240: Transitions From The Master Keyer Transition Area
The Master Keyer Transition area, located on the lower part of the Control Panel between the Transition and Master E-MEM areas, is provided on the Karrera Control Panel to allow cut and auto cut keyer transitions of any delegated ME (Figure 132), from one convenient location. KARRERA K-FRAME — User Manual... -
Page 241: Transitions Using E-Mem
“Controller MEs”). To perform a mix, a wipe, or a mixture of both transition types for a show, you will need to allocate ME resources in the User Setups, Suite Prefs, Resource Allocation menu (Figure 133). KARRERA K-FRAME — User Manual... -
Page 242: Trans Lock Button
Trans Lock until it is deselected. With the button off, a mix or wipe will only Trans Lock transition once and then reset to a cut (cut is the default setting for an aux bus). KARRERA K-FRAME — User Manual... -
Page 243: Setting Wipe Transition Parameters
The DoubleTake option is required for Aux bus transitions. Aux bus transitions use the allocated resources only during the transition. Any Aux bus can then use the resource as it frees the resource after the tran- sition. KARRERA K-FRAME — User Manual... -
Page 244: Performing Aux Bus Transitions
Aux bus would ‘cut’ to the selected source (it would not mix or wipe). KARRERA K-FRAME — User Manual... -
Page 245: Section 8 - Advanced Operations
(see page 250). The edit cursor also moves to the start of the new keyframe. This operation will increase the duration of the effect by the duration of the inserted keyframe. (Figure 135). KARRERA K-FRAME — User Manual... -
Page 246: Insert On A Keyframe With Insert Before
In the example, what was keyframe #1 becomes keyframe #2 (Figure 136). Figure 136. Insert Before Edit Cursor On Keyframe 0.00 1.00 1.15 3.00 Insert Before 0.00 1.00 2.00 2.15 4.00 Keyframe Effect Duration Increased Keyframe Duration KARRERA K-FRAME — User Manual... -
Page 247: Insert After Or Insert Before On A Keyframe
In this situation, because the cursor is not on a keyframe the Insert operation inserts on the path. This is why either Insert button can be pressed to create the first keyframe in a new effect. KARRERA K-FRAME — User Manual... -
Page 248: Building An Effect By Inserting A Keyframe On The Path
After a delete operation, any keyframes following the deleted keyframe are renumbered accordingly (Figure 138). KARRERA K-FRAME — User Manual... -
Page 249: Keyframe Durations
When the cursor is moved between keyframes, the duration shown is the distance from the current time to the next numbered Master Timeline key- frame. The time value displayed is used by default when a new keyframe is inserted into an effect. KARRERA K-FRAME — User Manual... -
Page 250: Changing The Duration Of A New Keyframe
KF Duration 3. Type a duration value on the keypad and press to change the Enter value displayed on the readout. 4. Press to apply the new duration value to the keyframe. Modify KARRERA K-FRAME — User Manual... -
Page 251: Restoring Kf Duration Default To The Keypad
. Entering a single value defaults to frames, and the third Field Enter value is optional. Entering a for the Field value specifies odd field. For example, indicates 1 second, 0 frames, 1 field. 1.0.1 KARRERA K-FRAME — User Manual... -
Page 252: Editing Effect Duration With The Menu Panel
Duration box at the top of the Timeline View pane. Editing Effect Durations of Individual Levels You can apply Forced Duration to individual levels by selecting only those levels for modification. In the example shown in Figure 142 the first three KARRERA K-FRAME — User Manual... -
Page 253: E-Mem Modify All Operations
Modify All function will also add a keyframe to the effect at that location. Modifications to the work buffer are made by pressing a button, turning a knob, or entering a value with the key pad. KARRERA K-FRAME — User Manual... -
Page 254: Performing A Modify All Operation
Note When using the Modify All Absolute feature, it is recommended that only one parameter at a time is modified to prevent, for example, all keyframes being moved to the same position. KARRERA K-FRAME — User Manual... -
Page 255: E-Mem Learn Auto Recall
S-Linear, Linear, and Curve path types are supported, in addition to Path Hold. These path types provide fine control of the dynamics of the effect. See for background information. 1. Move to the location in the effect that you wish to change. KARRERA K-FRAME — User Manual... -
Page 256: General Curve Tips
• Tension in the minus direction (up to -1.0) creates bigger, looser curves. • Continuity at +1.0 is the same as S-Linear motion. KARRERA K-FRAME — User Manual... -
Page 257: About Cutting And Pasting Path Values
• Change the Path Type on the function keyframe to S-Linear. • Set the Curve path Tension value on the function keyframe to 100. • Set a Path Control menu Hold for the function on the previous key- frame. KARRERA K-FRAME — User Manual... -
Page 258: E-Mem Transitions
Building Background E-MEM Transitions When building background transitions make sure the A and B background bus selections are consistent through out the effect. Otherwise the back- ground video may cut to different sources when keyframes are encoun- KARRERA K-FRAME — User Manual... -
Page 259: Building Keyer E-Mem Transitions
Individual keyers transition on or off (there is no keyer preset bus). To cross fade between keys, use two keyers and have one key transition in while the other transitions out. You can include any combination of keys in a single KARRERA K-FRAME — User Manual... -
Page 260: Changing The Length Of An E-Mem Transition
A change of state in a keyer is required for a transition to occur when the effect runs. KARRERA K-FRAME — User Manual... -
Page 261: Return To Normal Technique
This form of hold is keyframeable, and so can be applied to specific por- tions of an effect. Setting a Source Hold in a New Effect 1. Go to the Source Holds menu ( E-MEM & Timeline Source Holds KARRERA K-FRAME — User Manual... -
Page 262: Setting A Source Hold In An Existing Effect
2. Select the buses you wish to hold by touching their labeled buttons on the Source Holds menu so their green indicators illuminate. 3. Press to add the Source Hold to the effect. Modify KF Insert Before/After KARRERA K-FRAME — User Manual... -
Page 263: Reusing Effects
Note that User Prefs settings will not change how an effect runs, but will reproduce the control surface as it was when the effect was built so, for example, all the source buttons are arranged exactly where you want them. KARRERA K-FRAME — User Manual... -
Page 264: E-Mem And Macro Interaction
E-MEM Prefs Macro Sublevel Assignment A Macro sublevel can be assigned to any E-MEM level (default is Misc 8 MCRO This assignment is accomplished with the E-MEM Prefs menu, accessed via (Figure 145). Suite Prefs E-MEM Prefs Macros KARRERA K-FRAME — User Manual... -
Page 265: Preventing Assigned Macros From Running
The Macro Catalog menu is used to add a macro register number and its Enabled state to an E-MEM effect. You can control a macro from this menu including: append, record, delete, or insert a delay (in seconds or frames) KARRERA K-FRAME — User Manual... - Page 266 Section 8 — Advanced Operations using the Macro Catalog buttons. The menu is accessed via Macros Catalog (Figure 146). Figure 146. Macro Catalog Menu KARRERA K-FRAME — User Manual...
-
Page 267: Partial Keyframing
Partial Keyframing can include definable sub-levels as available resources using the Define E-MEM feature which is discussed later in this section. Note Partial Keyframing is available in the Menu only. KARRERA K-FRAME — User Manual... -
Page 268: Excluding Sub-Levels In A Level
2. Go to the E-MEM & Timeline, Timeline Edit menu and touch the button to the left of the level you wish to edit Show Sub Levels (Figure 148). The Enables menu is displayed for that level. Figure 148. Timeline & Edit Menu, Show Sub Levels KARRERA K-FRAME — User Manual... -
Page 269: Rules And Options For Excluding Sublevels
Partial Keyframes to be part of that E-MEM. If the cyan button is not held when a register button is pressed, any Partial Keyframes will not be part of that E-MEM register and they will no longer exist. The KARRERA K-FRAME — User Manual... -
Page 270: Define E-Mem
2. Touch the sub-level you wish to make definable (Figure 150). 3. Touch the button, lower right in the menu (Figure 150). Definable 4. Repeat steps 1 and 2 for each sub-level you wish to make definable. KARRERA K-FRAME — User Manual... - Page 271 For a new register, press and hold the cyan (light blue) button in the Local or Master E-MEM area, and press a register button. b. To edit an existing register, touch the button. Update Sub Levels KARRERA K-FRAME — User Manual...
-
Page 272: About Moving Currently Defined Sub-Levels
(Figure 152) if the sub-level is assigned to another level. If you touch the enable button for that sub-level, it will be redefined to the current level and undefined from the previous level. If you KARRERA K-FRAME — User Manual... - Page 273 Partial Keyframing then touch the button, the current E-MEM register will be Update Sub Levels modified. Figure 152. Timeline Edit Menu, Define E-MEM, Sub-level Conflict KARRERA K-FRAME — User Manual...
-
Page 274: About Additive Keyers
Fixed and Additive Key Super Add Adjusted Linear and Luma keys so you can override the video shape selected in the Source Definition menu (changes from Auto to On or Off) for that source. KARRERA K-FRAME — User Manual... -
Page 275: Super Additive
The opacity of the fine and semi-transparent video is greatly increased based on its luminance. This is very much a “fashion-statement” kind of keying which has been KARRERA K-FRAME — User Manual... -
Page 276: Using Additive Keyer From The Control Panel
In the Modifier area of the Control Panel, the button is provided. Addv Key For Super Add, DPOP the button ( button changes from Addv Key Addv Key high tally white to high tally orange). KARRERA K-FRAME — User Manual... -
Page 277: About The Macro Editor
• The Macro Panel Name can be edited, and • Comments can be edited. Simply select the field and edit with the pop-up keyboard. Figure 156. Macro Editor Menu OLED Name Panel Name Comment Macro Builder KARRERA K-FRAME — User Manual... -
Page 278: About The Macro Editor Columns And Rows
—Component value set by the macro Value About Macro Line Editing The Macro Editor line editing buttons in the Macro Build/Edit menu can be used to edit and organize macro lines for Macro Builder supported KARRERA K-FRAME — User Manual... -
Page 279: Build A New Macro With Macro Builder
The Macro Builder Insert New Line menus guide you step-by-step through building a macro. The following is an example of building a new macro line for a wipe transition. Breadcrumb style menu navigation is displayed above and to the left of the menu. KARRERA K-FRAME — User Manual... - Page 280 Section 8 — Advanced Operations Figure 159. Macro Builder—Final Selection, Transition 1. Select then select the button in the Macro Edit/Build Macros Catalog Edit pane (lower right). KARRERA K-FRAME — User Manual...
-
Page 281: Edit Macro Builder Created Macros
Edit Line example, the Wipe 1 transition in this macro will be changed to Wipe 2. The button located at the top right of the menu is provided to step Single Step through each line. KARRERA K-FRAME — User Manual... - Page 282 Macro Edit/Build pane (lower right). Edit 3. Select a line to be edited; in this example a Wipe 1 transition. 4. Select the button of the Macro Builder button pane. Edit Line Figure 161. Macro Builder—Final Selection, Transition KARRERA K-FRAME — User Manual...
-
Page 283: Insert A Macro Delay
1. Touch the button. Insert Delay 2. Touch the data pad and enter the value in the pop-up Enter Delay numeric keypad, for Fields or Frames or Seconds. 3. Touch Enter Figure 163. Enter Delay Dialog KARRERA K-FRAME — User Manual... -
Page 284: Creating A New Complex Macro
Each group contains a set of compo- nents which share the same set of locations. So when editing it is essential to select a group which contains the locations and components you wish the macro to act on. KARRERA K-FRAME — User Manual... -
Page 285: Edit Values
Changing component values is a very useful feature of line editing. For example you could change the value for the “Safe Area Top” component of Line 23 shown in Figure 164: 1. Touch the button, the Enter Value dialog is displayed. Edit Value KARRERA K-FRAME — User Manual... - Page 286 Value Menu’s data pad. Edit Value Note It is very important to use a real show file data set, for instance if you were choosing from a list of sources. 3. Touch the button. Apply KARRERA K-FRAME — User Manual...
-
Page 287: About The Frame Simulator And Macro Editing/Building
(default). The GV Switcher Frame Simulator will be installed automatically in the Grass Valley directory, during the software installation (see the Release Notes for your switcher model) for a standalone PC. In order to run the Frame Simulator properly, the line rate will have to be configured once (as it affects all transition, timeline, and macro pause durations) and the main.exe file will need to be running simultaneously with the Menu on PC. -
Page 288: Offline Macro Editing With The Frame Simulator
Configure the Frame Simulator To configure the Frame Simulator line rate using a Windows shortcut: 1. Navigate to C:\Program Files\Grass Valley\GV Switcher\GVSwitcherSystem_Vx.x.x \Frame Simulator. 2. Right-click select Create Shortcut. 3. Right-click on the shortcut and select Properties. -
Page 289: Configuring The Gv Switcher Menu
At this time, you may want to load a real Show file if the macros you will be editing/creating affect sources or other variables. Macros can now be edited, created, and saved offline from a PC. KARRERA K-FRAME — User Manual... -
Page 290: Transition Chaining
These features can be used separately or together, and in combination with bus links to provide for example multiple feeds or 3D productions. To access the Transition Chaining menu, touch User Setups Suite Prefs Transi- (Figure 172). tion Chaining Figure 168. Transition Chaining Menu KARRERA K-FRAME — User Manual... -
Page 291: Key Chaining
Figure 169) to select it (turns blue), and touch the keys you wish to add to the chain. Touch another Chain parameter data pad and repeat the process (for the same ME in this case). KARRERA K-FRAME — User Manual... -
Page 292: Using Key Cut/Auto Buttons
• Chained keyers on the same or different MEs all transition simultane- ously, • The transition rate of the button that is pressed (controlling keyer) is applied to all the other (controlled) keyers in the chain. KARRERA K-FRAME — User Manual... -
Page 293: Key Chaining On A Single Me
(Source Select area). The same is true for selections made in the secondary partition with controlled keys in the pri- mary; they always delegate whether or not the button (Source Select KARRERA K-FRAME — User Manual... -
Page 294: Key Chaining Across Mes
You can also use the Cut/Auto keys as described in Using Key Cut/Auto Buttons on page 292. If a Cut button is pressed on the initiating ME, then all the MEs with chained keyers, cut. If an Auto button is pressed, then simi- KARRERA K-FRAME — User Manual... -
Page 295: Background Transition Chaining
The primary ME’s transition type and rate are not copied into the other MEs with Background Chaining. To access the Background Chaining menu, touch User Setups Suite Prefs Tran- (Figure 172). sition Chaining Bkgd Chains KARRERA K-FRAME — User Manual... -
Page 296: Partition Sync Mode
Primary and Secondary transition without Partition Sync on for a split ME, the two outputs may be slightly offset. Turning on a button (Figure 172) precisely synchronizes the backgrounds for SyncPri/Sec transition. KARRERA K-FRAME — User Manual... -
Page 297: Partition Sync Locks Primary/Secondary Mode On
“follow” ME 1. 1. In the Transition Chaining, Bkgd Chains menu, touch to assign it ME 1 to the chain. 2. Touch to assign it as the secondary or “controlled” ME. ME 2 KARRERA K-FRAME — User Manual... -
Page 298: Multiple Feed
Secondary ME in the Away team’s dugout using the source substi- tution (see Bus Linking Source Substitution Tables on page 175). Source substitutions could also be used across multiple feeds for different languages or for paid cable verses network feeds and so on. KARRERA K-FRAME — User Manual... -
Page 299: File Ops
Secondary partition of an ME by assigning all six keyers to that partition. The Primary partition of that ME is then used only for background transitions between the A and B buses. KARRERA K-FRAME — User Manual... - Page 300 E-MEM recalls and transitions only affect part of the ME. If you want an alternate output from the same ME but wish to have the effects and transitions track on both outputs, Programmable Clean Feed mode is probably the better choice. KARRERA K-FRAME — User Manual...
-
Page 301: Me Split Mode
Secondary partition outputs. Unselected items remain assigned to the Primary partition. Note that keyers can be activated or deactivated (green button indicators on or off) on the individual outputs if desired, the same as in Programmable Clean Feed mode. KARRERA K-FRAME — User Manual... -
Page 302: Control Panel Me Partition Delegation
You can preview ME primary and secondary ME partitions on switched preview using the System Bar. Press the button and select an ME for Sw PVW primary, select the ALT button (next to Sw PVW) to see the secondary. KARRERA K-FRAME — User Manual... -
Page 303: Transition Area
The Transition Lever Arm will need to be re-synced (by moving the lever arm to a limit) before it can be used to finish the transition or start a new one. KARRERA K-FRAME — User Manual... -
Page 304: Local E-Mem Area
ME is split and the destination ME is not, after a copy both MEs will be split. Swaps behave in a similar manner, with the split setting and resource assignments being swapped between the MEs. KARRERA K-FRAME — User Manual... -
Page 305: Split Mes And E-Mem Control
PART Level and becomes enabled when the ME is placed into Split Mode. These settings affect how each split ME’s Local E-MEM area and how the Master E-MEM area is used to enact E-MEM control of the MEs. KARRERA K-FRAME — User Manual... -
Page 306: Me Partitions Menu
The partition control information can be assigned to an E-MEM level, or not be assigned (Not Assigned). Which level the partition control is associated with controls the amount of isolation between Primary and Secondary par- tition E-MEM behavior. KARRERA K-FRAME — User Manual... - Page 307 • If a Secondary partition is enabled, then E-MEM control of that Sec- ondary partition will be available from the Master E-MEM area. Control continues to be available from that ME’s individual Local E-MEM area when it is delegated to its Secondary partition. KARRERA K-FRAME — User Manual...
-
Page 308: Split Layered Mode
Split Mode pane (Figure 176). Selecting , then selecting the button Split Primary sets the Primary partition to Layered mode. Likewise, selecting the Sec- button sets the Secondary partition to Layered mode. ondary KARRERA K-FRAME — User Manual... - Page 309 Split Layered Mode Figure 176. ME Mode, Split Layered KARRERA K-FRAME — User Manual...
-
Page 310: Corner Pinning
180 degrees (Figure 178), all vertices point outwards and all diagonals lie entirely inside the quadrilateral. Results from adjusting a corner beyond the limits are undefined. Figure 178. Convex Quadrilateral—Corner Adjust Limits 180 Degrees KARRERA K-FRAME — User Manual... -
Page 311: Corner Pinning And Cropping
This will result in the person being centered in the video and the effect can be flown around the screen. Figure 179. Corner Pinned Cropped Object Note Toggling Corner Pinning on and off will reset the corners to the current crop values and change the pinned corners. KARRERA K-FRAME — User Manual... -
Page 312: Corner Pinning Menu
Corner Pinning Menu The Corner Pinning menu (Figure 180) is available in both the SWR (Switcher) (iDPM, Corner Pinning) and the eDPM (option) mode (eDPM, Corner Pinning). The menus function identically. Figure 180. iDPM, Corner Pinning Menu KARRERA K-FRAME — User Manual... -
Page 313: Create A Corner Pinning Effect (Example)
Corner Pinning. This understanding of Corner Pinning func- tionality will allow you to create Corner Pinning effects for your own show. 1. Select a background source. 2. Select a source for a keyer, and cut on the key over the background. KARRERA K-FRAME — User Manual... - Page 314 Use the soft knob to Corner All adjust the size of the key; in this case to the approximate size of the shot clock. 9. Turn off All Corner Adjust. KARRERA K-FRAME — User Manual...
- Page 315 Figure 183. Crop Pan and Scan 1. Touch the data pad. Crop Edge 2. Touch the button. Scan 3. Use the soft knob to pan or scan until the Crop Edge Pan Crop Edge Scan image is re-centered. KARRERA K-FRAME — User Manual...
-
Page 316: Copy/Swap
Choose a source in the From pane, choose a destination in the To pane, and an action in the Operations pane. After performing a Copy or Swap, one level of Undo is available until another button on the menu is touched. KARRERA K-FRAME — User Manual... - Page 317 Copy/Swap Figure 184. Copy Swap Menu KARRERA K-FRAME — User Manual...
-
Page 318: Copy Swap Me Menu
Transition or complex wipes can be copied to Transition Wipes and Keyer Wipes can be copied to keyer wipes directly. Transition Wipes can be copied to Keyer wipes and vice versa. Mattes can be included or excluded when copying wipes. KARRERA K-FRAME — User Manual... - Page 319 ) wipe button in the From panel. Wipe 1 Sec Wipe 2 2. Turn on or off the Mattes button: On highlights green. 3. Touch an ME and Primary Wipe button in the To pane. 4. Touch the button. Copy KARRERA K-FRAME — User Manual...
- Page 320 ) with the parameters you wish to CH 1 CH 4 copy from or to, and if desired, choose a , or Preset Patt Inhibit Mask Force button to copy parameters from/to. Mask 3. Touch the button. Copy KARRERA K-FRAME — User Manual...
-
Page 321: Copy Swap Mattes Menu
Wipe. Pst Ptn Border, and Fill are grayed out because they only apply to keyer mattes. Similarly, if Bkgd 1 had been chosen, no further delegation would be needed, so all of the keyer related selections would be grayed out. KARRERA K-FRAME — User Manual... -
Page 322: Copy Swap Keyer Menu
Wipes, Mattes, and iDPM resources can be included/excluded using the buttons in the Include section of the Operations pane (Figure 188). Copy Swap Macro Menu The Copy Swap Macro menu (Figure 189) is accessed by touching Copy Swap Macro KARRERA K-FRAME — User Manual... -
Page 323: Copy Swap Timeline Menu
189). The soft knobs and data pads on the upper right can be used to quickly select specific register numbers in each pane. Copy Swap Timeline Menu The Copy Swap Timeline menu (Figure 190) is accessed by touching Copy Swap Timeline KARRERA K-FRAME — User Manual... - Page 324 ME to another ME or the eDPM and vice versa. All sub-level information can be included using the button Include All Sublevels (Figure 190) or with this button off, sub-levels can be excluded from being copied by touching the sub-level’s enable button (Figure 191). KARRERA K-FRAME — User Manual...
- Page 325 The result is that only Keyer 3, Keyer 4, iDPM 3, and iDPM 4 are copied to Register 0, on ME1 Pri. All other effect parameter settings are the same. Definable sub-levels can also be part of the copied register. KARRERA K-FRAME — User Manual...
-
Page 326: About The Image Store Options
Image Store Images Menus The four Image Store Images menus are selected using the Stills Movies , and tabs. The three Movies menu tabs are grayed out Movie Record Movie Edit if the option is not licensed. KARRERA K-FRAME — User Manual... -
Page 327: Image Store Quick Tabs
Image Store Quick Tabs There are three Quick Tabs (top-left) in the Image Store menus (Figure 193): (Source Operations), Catalog (Macro Catalog), and T-Line (Timeline Src Ops Edit for the Master E-MEM). KARRERA K-FRAME — User Manual... -
Page 328: About Image Store Stills
Kayenne K-Frame Menu or Control Panel. Local Still File Format Locally, still images are stored as .eif file format. KARRERA K-FRAME — User Manual... -
Page 329: Imported Still File Formats
Suite 2, do the following: 1. Go to Eng Setups and log into Suite 1. 2. Release one or more Image Store channels. 3. Login to Suite 2 and acquire one or more Image Store channels. KARRERA K-FRAME — User Manual... -
Page 330: Release/Acquire Image Store Memory For Suites
Resources pane on the top left of the Acquire Resources menu. Figure 194. Image Store Acquire Resources 2. Release Units of Memory from the current suite by moving them from using the button in the Units Available Right Arrow Image Store Memory acquisition group. KARRERA K-FRAME — User Manual... -
Page 331: Map Image Store Input Delegates
Aux Delegate Mapping 2. Select a Local Aux Module button in the Button/Delegation scrolling list (Figure 196). 3. Select an Image Store input ( ) in the Internal Destination IS A IS B scrolling list (Figure 196). KARRERA K-FRAME — User Manual... -
Page 332: Capture A Still From Input Video
Input Source c. Select the input from the Inputs scrolling list. 2. Go to the Images menu by touching menu tab. Image Store Images 3. Select an Image Store channel 1-10 by touching it. KARRERA K-FRAME — User Manual... - Page 333 Capture a Still from Input Video 4. Optionally, select the Record Elements button to capture a video- only still. Figure 197. Capture Still Menu KARRERA K-FRAME — User Manual...
- Page 334 198) (or select the desired source from the Aux panel). Figure 198. Input Source Button/Menu 6. Touch the button. The button becomes the button Show E-E Show E-E Grab (Figure 199). Figure 199. Capture Still, Grab Button KARRERA K-FRAME — User Manual...
-
Page 335: Create A Split Key For A Still Store Still
Split Key allows you to change the key signal source. 1. Navigate to the Source Ops, Image Store menu by touching the Src Ops Quick Tab or the menu buttons. Source Ops Image Store KARRERA K-FRAME — User Manual... -
Page 336: Create An Image Store Still With Another Video (Not Key)
Source Ops, Image Store menu. 1. Navigate to the Source Ops, Image Store menu by touching the Src Ops Quick Tab from the Image Store, Images, Stills menu or the Source Ops menu buttons. Image Store KARRERA K-FRAME — User Manual... -
Page 337: Still Playback From The Menu
Still Playback from the Menu Load a still Still playback is performed in the Image Store, Images, Stills menu tab. Stills are loaded directly to Program or they can be modified without being loaded. KARRERA K-FRAME — User Manual... -
Page 338: Modify A Still
Auto Load 2. Touch the soft knob button data pad to display the Enter Scroll Image List an Image ID to go to keypad (Figure 204). 3. Enter an image number, then touch Enter KARRERA K-FRAME — User Manual... -
Page 339: Set Freeze Mode
Frame Field 1 Field 2 eliminate motion flicker or artifacts from an interlaced still. To set the Freeze Mode: 1. Touch a still from the scrolling list. 2. Touch the button (Figure 205). Freeze Mode KARRERA K-FRAME — User Manual... -
Page 340: System Bar Control
Group (alternatively, you can press and hold down the PREV NEXT buttons and then press a source button). 3. Press the buttons for that Device Control Group until the Prev Next desired still is displayed. KARRERA K-FRAME — User Manual... -
Page 341: About The Image Store Movies Option
• MOV • Mp4 • KayakHD (xtendd) • Kalypso (gvi, gva) • PNG sequences (load a series of still images and create a single ID movie from them) • TGA (Targa) sequences (create as above) KARRERA K-FRAME — User Manual... -
Page 342: Recording Image Store Movies Longer Than Maximum Lengths
Total Frames 525i 30Hz 49.16 1486 12013 1080i 30Hz 8.12 2029 720p 60Hz 9.28 4589 1080p 60Hz 4.12 2029 625i 25Hz 50.06 1256 10221 720p 50Hz 11.18 4589 1080i 50Hz 5.02 2029 1080p 50Hz 5.02 2029 KARRERA K-FRAME — User Manual... -
Page 343: About Image Store Movies Feature Configuration
Bounce —Sets the movie to run to its end, reverse playback to its beginning, then play forward, and repeat (only available when Loop is active). —Sets the movie to play when taken On-Air. Auto Start KARRERA K-FRAME — User Manual... -
Page 344: Movie Playback With The System Bar
Movie Replay with E-MEM (KF Trigs) replay can be controlled with E-MEMs. Keyframe triggers that are Movie E-MEMable are: • Load (Movie), • Loop Enable/Disable, • Bounce (when Loop is On) • Cue (to in), and Motion control buttons. KARRERA K-FRAME — User Manual... - Page 345 The selected Image Store channel has a blue outline. If that Image Store channel is On-Air, it has a red outline. The Stills, Movies, and Movie Record menus also allow directly loading movies and stills to acquired Image Store channels (Figure 208). KARRERA K-FRAME — User Manual...
-
Page 346: Load A Movie
• Create an E-MEM Trigger 1. Touch the button in the Image Store, Images/Movies menu KF Trigs (Figure 209). The motion control buttons become jeweled toggle buttons, and buttons are displayed. Loop Enable Loop Disable KARRERA K-FRAME — User Manual... -
Page 347: Create An E-Mem Trigger Cue
Mark In and Mark Out points. 1. With enabled, touch the button. A data pad will appear KF Trigger next to the button (Figure 210). KARRERA K-FRAME — User Manual... -
Page 348: Record A Movie
Movies are recorded by selecting an Image Store channel, selecting a video source, specifying any recording options, making the recording, inspecting the recording (optional), and then committing that recording to the cache with the button. Keep 1. Touch to select an Image Store channel for recording. KARRERA K-FRAME — User Manual... - Page 349 The incoming video will be displayed on the output of that Image Store channel. The button legend also changes to (Figure 212). Show E-E Record KARRERA K-FRAME — User Manual...
- Page 350 A key pad opens with a default new image number. You can use that number, or specify another, and then touch Enter Note Specifying the number of an existing Image Store item will overwrite that existing item with the new recording. KARRERA K-FRAME — User Manual...
-
Page 351: Name A Movie
Doing so deletes that video, conserves space in the cache, and ensures that unwanted material will not be aired. 1. In the Image Store, Images, Movie Edit menu, touch the Image Store, Images, Movie Edit menu. KARRERA K-FRAME — User Manual... - Page 352 GoTo In GoTo Out it to ensure those points are correct. 8. When satisfied, touch . A prompt will appear indicating the Trim Move operation is not reversible. Touch . The extra video will be discarded. KARRERA K-FRAME — User Manual...
-
Page 353: Split An Image Store Movie
3. Touch the button. Split Movie The New Image 1 pop-up keyboard is displayed. 4. Enter a name (select ) or accept the default (the existing ID) for the Name first movie and select Enter KARRERA K-FRAME — User Manual... -
Page 354: Join Image Store Movies And Stills
4. Touch the button. Join Images The new movie is created and appears in the movie lists in the Movies menus. KARRERA K-FRAME — User Manual... -
Page 355: About Still Sequenced Movies
(i.e, 0001, 0002, 0101, 0102, 0103 is valid), but the presen- tation order is always ascending. Procedure 1. Go to the Image Store/Library menu. 2. Select on the left and navigate to the folder holding the From Disk/Folders stills. KARRERA K-FRAME — User Manual... - Page 356 The Sequence Image Operations button will To Cache appear. Touch so it highlights. Sequence Figure 216. Movie Sequence Selected. 4. Click in the center and enter the sequence of stills in the pop up Images menu. KARRERA K-FRAME — User Manual...
-
Page 357: About Image Store Library
Image Store. About Image Store Library The Image Store Library menu allows you to perform file operations. Save image files from Image Store Cache to the internal Image Store Disk or from KARRERA K-FRAME — User Manual... - Page 358 Section 8 — Advanced Operations external Menu disk/folders or Network and USB Memory Stick drives, to Image Store. The output files are native Karrera K-Frame (.eif). , and buttons are available in the Image Store Library Copy Swap Move Delete menu.
-
Page 359: Conversion Requirements For Transferring External Image Files
About Image Store Library Conversion Requirements for Transferring External Image Files Importing files into Karrera K-Frame either from a folder on the network or USB Memory Stick, requires that certain conditions be met for proper con- version. CAUTION When importing files into Image Store cache, existing files with the same ID can be overwritten so check if the ID already exists in the cache. -
Page 360: Importing Kalypso File Types
Image Store Library menu screen. Note Kalypso NTSC Still Store images contain 486 lines, while the Kayenne K-Frame Image Store supports 487 lines. A Karrera K-Frame system will display one black line at the bottom of the image raster of converted Kalypso NTSC stills. -
Page 361: Transfer Files
5. Enter an Image ID number or a range of images: a. Enter a start ID. b. Touch the button. Thru- c. Enter an ending range. Note Alternatively, use the Next, button in the pop-up keypad to enter non-sequen- tial Image IDs. 6. Touch Enter KARRERA K-FRAME — User Manual... -
Page 362: Backup & Restore
Backup & Restore menu, touch Image Store, Backup & Restore. Figure 221. Backup & Restore Menu Manual Backup To manually backup the Image Store Cache locally (Figure 221): 1. Touch the data pad. Local Backup Path KARRERA K-FRAME — User Manual... - Page 363 To access the Backup & Restore menu scheduling controls, touch Image Store, Backup & Restore (Figure 222). Note The backup schedule is based on the Current Date & Time of the Karrera K-Frame system. KARRERA K-FRAME — User Manual...
- Page 364 Navigate to the desired directory in the navigation pane. b. Touch the button. Create Folder c. Enter a folder name in the pop-up keyboard. d. Touch the Accept button. 6. Touch to toggle on the button (highlights green). Enable Schedule KARRERA K-FRAME — User Manual...
-
Page 365: Device Control From The System Bar
3. Click on the tab. Sharing 4. In the Network sharing and security pane, click in the Share this folder on check boxes to select the network Allow network users to change my files them. KARRERA K-FRAME — User Manual... - Page 366 Sharing and Security 6. Click on the tab. Sharing 7. Click on and click in the , and Share Permissions Full Control Change Read check boxes to select them and give everyone full control. 8. Click on KARRERA K-FRAME — User Manual...
-
Page 367: Create An Images Directory And Configure It For Sharing Windows 7
Choose homegroup and sharing options 4. Click Change advanced sharing settings.. 5. Click the radio button next to Turn off network discovery 6. Click the radio button next to Turn off password protected sharing Click Save Changes KARRERA K-FRAME — User Manual... -
Page 368: Clipstore
CAUTION Do not use AppCenter Elite software for ClipStore from the Summit/Solo server web site as it may not be compatible. For more information about installing and updating AppCenter Elite soft- ware, see the Summit/Solo manuals. KARRERA K-FRAME — User Manual... -
Page 369: Clipstore As An External Device
196. Figure 224. ClipStore in Device Menu Karrera Control Panel Operation As with other external devices, device control is possible through the Modifier area and the System Bar. Engineering names (CS-1, CS-2, etc.) KARRERA K-FRAME — User Manual... -
Page 370: Clipstore Menu Operations
Record Time Remaining indicator in HH:MM:SS format is provided in Clip- Store as a reminder to maintain enough storage space for recording or adding clips. The indicator displays the available storage remaining in the ClipStore Summit/Solo server (Figure 225). Figure 225. Clips Menu KARRERA K-FRAME — User Manual... - Page 371 • Touching the Current Folders data pad and then touching a clip in the Current Clip scrolling list (Figure 226). With the button selected (highlighted green), the clip will be Auto Load loaded into the selected ClipStore channel. KARRERA K-FRAME — User Manual...
- Page 372 225). Touching Search Clip the button displays the Search Clip keyboard. Type letters and/or numbers (minimum 1 character) and touch to execute the Enter search. The found clips will be listed in the scrolling clip list. KARRERA K-FRAME — User Manual...
- Page 373 Start of Clip • Reverse Play • Stop • Play • End of Clip (The button is described in Replay with E-MEMs.) KF Trigs Note All the functions listed above can be controlled by macros. KARRERA K-FRAME — User Manual...
- Page 374 229). The motion control buttons become jeweled toggle buttons, and buttons are displayed Loop Enable Loop Disable (Figure 229). When a , or motion control button Loop Enable Loop Disable is touched, that operation will be learned by E-MEM. KARRERA K-FRAME — User Manual...
-
Page 375: Recording Clips
ClipStore Figure 229. Clip Replay with E-MEM Control Recording Clips Clips are recorded with embedded audio in the Image Store, ClipStore, Clip Record menu (Figure 230). Figure 230. Clip Record KARRERA K-FRAME — User Manual... - Page 376 5. Enter a new clip name or an existing clip name if you wish to overwrite that clip. 6. Touch Enter 7. Touch the device control button. Record 8. Touch the device control button when the desired length of the clip Stop is reached. KARRERA K-FRAME — User Manual...
-
Page 377: Editing Clips
• Cut Edit while recording a clip (Cut Editing while Recording on page 381). For Cut Edit, touch and touch the button in Image Store ClipStore Clip Edit the Edit Type mode group (Figure 234). KARRERA K-FRAME — User Manual... - Page 378 Figure 231. Cut Edit Mode Mark a thumbnail The Cut Edit menu displays the currently loaded clip in the thumbnail view. If you wish to change the clip, touch the button before Change Clip editing (Figure 232). KARRERA K-FRAME — User Manual...
- Page 379 Material can be removed from the head of a clip to a mark-in point and from a mark-out point to the end of a clip. Both operations can be per- formed on a single clip. KARRERA K-FRAME — User Manual...
- Page 380 233), or Mark Split 2. Touch the data pad (below button) and enter the Mark Split Mark Split value for the split point in the Mark Split Point pop-up keypad, and touch (Figure 233). Enter KARRERA K-FRAME — User Manual...
- Page 381 The two new sub-clips are created. Cut Editing while Recording A key advantage to using a ClipStore server is you can record and replay simultaneously. This allows you to create sub-clips from the currently recording clip. KARRERA K-FRAME — User Manual...
- Page 382 • Video (with embedded audio) and Key, or • Video, Audio (audio from a clip or .WAV file), and Key. 48kHz/.WAV file format CAUTION Audio files must be , other file types will not be rec- ognized by ClipStore. KARRERA K-FRAME — User Manual...
- Page 383 If an audio element from another clip is used, and starts past the mark-in point of the video track, there will be no audio until the start of the audio timecode when the composite clip is played. KARRERA K-FRAME — User Manual...
- Page 384 The Use Audio From buttons are enabled (highlighted green) which Video Use Key From Video means only the video track will be edited and a new clip made with those changes: KARRERA K-FRAME — User Manual...
- Page 385 1. Jog, shuttle, or play to where you want to mark thumbnail and touch data pad, or Mark Thumbnail 2. Touch the data pad and enter the mark-thumbnail point Mark Thumbnail in the pop-up keypad, and touch Enter KARRERA K-FRAME — User Manual...
- Page 386 1. Unless the desired clip is loaded, touch the Video Thumbnail Viewer (Figure 237). Figure 237. Build Edit Mode—Audio Track Edit 2. Touch the button for the Video and touch the desired clip Change Clip (Figure 237). KARRERA K-FRAME — User Manual...
- Page 387 The button is enabled (highlighted Use Audio From Video green): 1. Unless the desired clip is loaded, touch the thumbnail viewer Video (Figure 238). KARRERA K-FRAME — User Manual...
- Page 388 With the Video Thumbnail Viewer selected, you can test the composite ele- ments using the motion control buttons. Make the sub-clip 1. Touch the button. Make Clip 2. Enter the name of the new clip and touch Enter KARRERA K-FRAME — User Manual...
- Page 389 Thumbnail b. Enter the mark-thumbnail point in the pop-up keypad and touch Enter 4. Touch the button. Make Subclip(s) The new clip is created and appears in the clip lists in the ClipStore menus. KARRERA K-FRAME — User Manual...
-
Page 390: File Operations
From and To Disk/Folders menu tabs however first a shared folder is needed on the device (see Creating a Shared Folder for External USB Disk Drives on page 391). Figure 240. ClipStore Library Menu—File Transfer KARRERA K-FRAME — User Manual... -
Page 391: Device Control
The folder is now shared. The new folder will be available in the Image Store, Library, From/To Disk Folders menu tabs. Device Control Images can be controlled from the System Bar on the Control Panel, see Device Control on page 185. KARRERA K-FRAME — User Manual... - Page 392 Section 8 — Advanced Operations KARRERA K-FRAME — User Manual...
-
Page 393: Glossary
Complex Wipe Pattern Generator A wipe pattern generator with additional ca- pabilities (for example, matrix wipes). KARRERA K-FRAME — User Manual... - Page 394 A feature that permits control panel setups to VDR (Video Disk Recorder) be stored for later recall. A video recorder and playback device using hard disk storage in place of video tape. KARRERA K-FRAME — User Manual...
- Page 395 Joystick tion consists of two fields. A hardware positioner with control of multi- ple axes. KARRERA K-FRAME — User Manual...
- Page 396 Default keyframe values can Matte Fill be set for a suite. Using matte video to fill the hole of a key ef- Learn fect. To save a panel setup using E-MEM. KARRERA K-FRAME — User Manual...
- Page 397 Model name of a Video Disk Recorder. The process of clocking the data with a re- generated clock to remove jitter. Resource A capability of the system, typically consist- ing of a set of circuitry. KARRERA K-FRAME — User Manual...
- Page 398 A collection of settings used to configure a A pattern edge between two video signals in suite to create a consistent working environ- which the signals are mixed for a soft effect. ment for all involved. KARRERA K-FRAME — User Manual...
- Page 399 Transition A change from one picture to another. Cut, mix, and wipe are transitions. User Preference A collection of control surface configuration settings available to a user that allows cus- tomizing of the working environment. KARRERA K-FRAME — User Manual...
- Page 400 Glossary KARRERA K-FRAME — User Manual...
-
Page 401: Index
Cache Remaining data field mix and wipe transitions camera control with ethernet camera tally Aux Deleg Mapping menu description aux delegate mapping camera control with Ethernet tally image store Ethernet tally operations KARRERA K-FRAME — User Manual... - Page 402 Menu Panel affect on delete with Menu Panel Control Panel Device Enables menu source colors devices control protocols KARRERA K-FRAME — User Manual...
- Page 403 External Device Gangs menu E-MEM building background transition building keyer transition changing R-MEM on register FAM (Full Additive Mix) changing transition length explained and illustrated clip store FAQ database KARRERA K-FRAME — User Manual...
- Page 404 Image Store insert on path general menu description definition input delegates location of insert local still file format interaction memory description menu and panel movie file formats movie storage capacity KARRERA K-FRAME — User Manual...
- Page 405 Loop button insert after on a keyframe insert before on a keyframe insert on path inserting macro 165, 167, modify all and control surfaces modify all procedure and suites modifying duration KARRERA K-FRAME — User Manual...
- Page 406 Menu Panel secondary assign top line split Control Panel controls touch button split layered mode split mode Full Additive (FAM) ME partition Non Additive (NAM) defined KARRERA K-FRAME — User Manual...
- Page 407 Pos/Mod menu (Kurl) setup selector Post (Attach macro) button Newton Configurator plug-in Pre (Attach macro) button installation preference file newton configurator plug-in load procedure Newton menu save procedure KARRERA K-FRAME — User Manual...
- Page 408 R-MEM touch (Menu Panel) Auto Recall Scroll Image List data pad auto recall scroll lock changing on E-MEM register scrolling list controlled by E-MEM KARRERA K-FRAME — User Manual...
- Page 409 Menu Panel multiple suites Karrera OLED transform engine panel crop controls source name display drop shadow controls KARRERA K-FRAME — User Manual...
- Page 410 Non Additive Mix (NAM) preventing in E-MEM return to normal transition chaining explained Update Show button Var Play Speed button web site documentation web site FAQ database web site Grass Valley web site software download KARRERA K-FRAME — User Manual...
Need help?
Do you have a question about the KARRERA K-FRAME and is the answer not in the manual?
Questions and answers