Teeter Hang Ups EP-950 Assembly Instructions Manual
Inversion table
Hide thumbs
Also See for EP-950:
- Assembly instructions manual (20 pages) ,
- Assembly instructions manual (22 pages) ,
- Owner's manual (5 pages)
Advertisement
Quick Links
Advertisement

Related Manuals for Teeter Hang Ups EP-950


Summary of Contents for Teeter Hang Ups EP-950
- Page 1 EP-950 Inversion Table Assembly Instructions...
- Page 2 PRE-ASSEMBLY Before you begin: Review all steps before beginning assembly and read all precautions before using the inversion table. Carefully adhere to the Assembly Instructions and Owner’s Manual to help ensure user safety and product integrity. WARNING 1. It is your responsibility to familiarize yourself with the proper use of the equipment and the inherent risks of inversion, such as falling on your head or neck, pinching, entrapment or equipment failure.
-
Page 3: Items For Assembly
(F5-1088) Right Handle (GL-9522) Threaded Bolts (4) (GL-9523) Bolts will Shrouds (GL-9524) come pre- assembled 1/4” Bolts (4) (GL-9525) (EP-1150) in handles Roller Hinges (2) (TR-1001) (GL-9524) shrouds. Wrenches (2) (F5-1088) (GL-9525) (TR-1001) Allen Wrench (EP-1150) Teeter Hang Ups EP-950... -
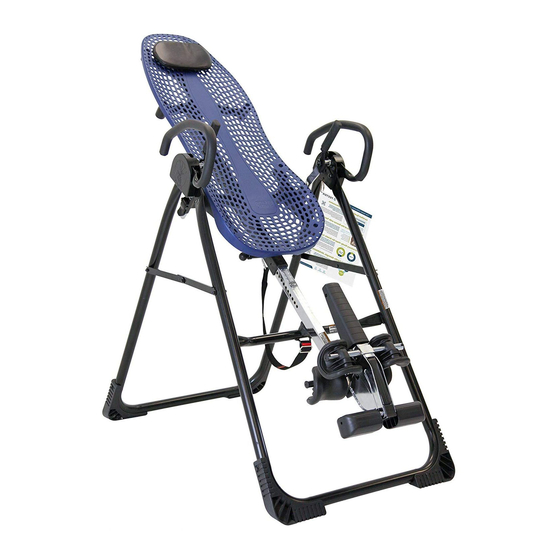
Page 4: Overview
ASSEMBLY Before Beginning Before reading further, study the drawing below to familiarize yourself with the important components of your new Teeter Hang Ups inversion table. Table Bed Traction Handles A-frame Crossbar Rear and Over EZ-Handles Front Ankle Clamps Adjustable Foot Platform... - Page 5 Line up and insert the shroud bolts (GL-9525) through the smaller 1/4” holes in the hinge plate (See Figure 2). Use the wrenches provided to tighten the nuts, being careful not to over tighten. Teeter Hang Ups EP-950...
- Page 6 • Fasten each bolt with a nut. • Use the Allen Wrench to steady Figure 4 (EP-1150) the bolts, tighten the nut onto the bolt with the larger wrench (F5-1088) (Figure 4). Repeat with the second bolt. Teeter Hang Ups EP-950...
- Page 7 • Push down on the Cam Locks (Figure 6A) to secure the hinges. NOTE: Refer to the Owner’s Manual for an explanation of the Figure 6 hole settings. If you are unsure, use setting C to start. Figure 6A Teeter Hang Ups EP-950...
- Page 8 Pivot Pins (Figure 9), and the table rotates smoothly. Figure 9 WARNING Failure of the self-locking hooks to close over both Pivot Pins is indication of improper assembly and if not corrected, could result in serious injury or death! Teeter Hang Ups EP-950...
- Page 9 Foot Platform. If the Main Shaft does not rest on the Crossbar as shown in Figure 11 then the Table Bed has been assembled Figure 11 backwards onto the A-frame and this must be corrected before use. Teeter Hang Ups EP-950...
- Page 10 Sleeve to tighten. • Slide the Foam Rollers over each Allen Wrench side of the Ankle Bar (Figure 14). Figure 13 • Insert the Black Plugs into both ends of the Ankle Bar (Figure 14). Figure 14 Teeter Hang Ups EP-950...
- Page 11 (F5- 1088) provided (Figure 16). • Slip the other Heel Cup (rounded corners down) onto the Rear Bar and push the Rubber Plug (F5-1056) into the Rear Bar (Figure 17). Figure 17 Teeter Hang Ups EP-950...
- Page 12 • Hook the clip at the end of the tether strap to the loop at the base of the table bed (Figure 20) to limit your degree of rotation. • See the Owner’s Manual insert for further instructions on adjusting the strap. Figure 20 Teeter Hang Ups EP-950...
-
Page 13: Maintenance
A-frame (Figure 23). WARNING: This operation may pinch fi ngers if not done slowly and carefully. WARNING Read the Owner’s Manual thoroughly before using your Teeter Hang Ups Inversion Table. Improper settings could result in serious injury or death! Teeter Hang Ups... - Page 14 International: Inversion International, Ltd. PO Box: AP 59245 U.S. patents apply. New Providence Island, Bahamas Teeter Hang Ups is a registered trademark of Teeter (Phone) +1-242-362-1001 (Fax) +1-242-362-1002 Specifi cations subject to change without notice. mail@InversionInternational.com © COPYRIGHT 2008, Teeter www.InversionInternational.com...
Need help?
Do you have a question about the EP-950 and is the answer not in the manual?
Questions and answers