Table of Contents
Advertisement
Quick Links
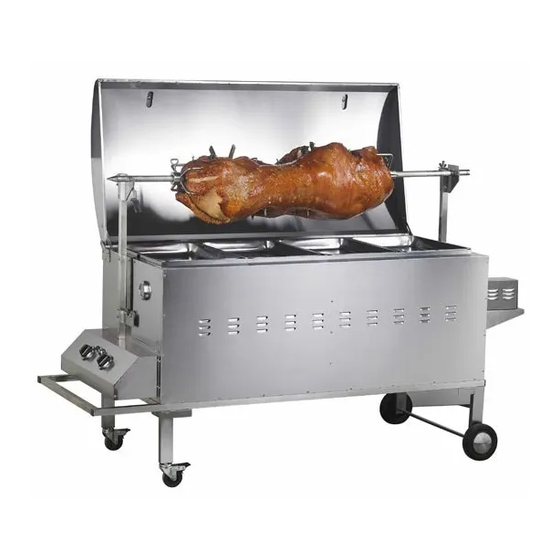
FEATURES
• Stainless steel body
• Robust design with wheels for
easy moving
• Includes 240V rotisserie motor
rated at 70kg, one piece stainless
steel shaft, two prongs, neck brace,
front leg brace, rear leg brace and
rotisserie baskets
Gasmate
®
is a registered trademark of: Sitro Group Australia Pty Ltd www.gasmate.com.au
Important: Retain these instructions for future use.
3050-07/10
Deluxe Spit Roaster
GSB300
Aber – Hamilton, N.Z.
• Electronic ignition for easy lighting
• Complete with hose & regulator
• Use with LPG
• For outdoor use only
• AGA certified
www.gasmate.co.nz
Advertisement
Table of Contents

Related Manuals for Gasmate GSB300


Summary of Contents for Gasmate GSB300
- Page 1 Gasmate ® is a registered trademark of: Sitro Group Australia Pty Ltd www.gasmate.com.au Aber – Hamilton, N.Z. www.gasmate.co.nz Important: Retain these instructions for future use. 3050-07/10...
- Page 2 CONTENTS GENERAL INFORMATION Gas Installation Codes Section Page • Spit roaster must be used in accordance with General Information New Zealand Standard 5261 “Gas Installations”. • Spit roaster for use with bottled gas are Operating & Lighting Procedure labelled ‘LPG’. •...
-
Page 3: Tools You Will Need
Gas Cylinder Use & Safety FOR YOUR SAFETY This is a low pressure spit roaster and must only be used with the hose and regulator supplied. Your spit roaster is designed for use with 9Kg • Do not store or use petrol or other LPG cylinders. - Page 4 • Do not test for gas leaks with an open flame. Overall Spit roaster Dimensions GSB300 Length Width Height Hooded 2050mm 655mm 1060mm Nominal Hourly Gas Consumption - GSB300 series Spit Roaster Total Gas Number of Gas Type Injector Size consumption Consumption Pressure Burners per burner 1.20mm...
-
Page 5: Burner Operation
GENERAL ASSEMBLY LIGHTING PROCEDURE Assembly will require 2 people due to the Spit Burner Operation Roaster size. & Ignition System Check Connecting & Disconnecting 1. With cylinder valve in OFF position press the to Gas Source electronic igniter button. Check for sparking to the burners. -
Page 6: Operating Procedure
BURNER OPERATION & IGNITION SYSTEM CHECK Problem Possible Reason Solution Valve on cylinder is closed Open valve on cylinder Burner will Control knob is closed Turn knob to high when lighting not ignite Electronic igniter is faulty Use a long spit roaster match. Burner has gone out Check that the gas bottle is not empty and re-ignite the burner... -
Page 7: Important Safeguards
• DO NOT clean the spit motor while it is on or plugged into the mains power supply. Deluxe Spit Roaster GSB300 • Always switch ‘OFF’ and un-plug before cleaning. Deluxe Spit Motor GRT7 • DO NOT spray water or any liquid into the... - Page 8 • Ensure the ‘outdoor’ extension cord is not placed Flash-Back accross walkways so that it is not a trip hazard. Spiders and small insects occasionally spin • Do not use in damp or wet conditions. webs or make nests in the burner tubes during warehousing and transit.
- Page 9 How to maintain your deluxe spit roaster 1. Wipe over the outside stainless steel surface with a light water repellent oil, wipe the inside with a vegetable oil or similar edible oil. 2. If stored outside, fit a rainproof cover over the spit roaster when it is not in use.
- Page 10 EXPLODED DIAGRAM...
- Page 11 Type&Qty Type&Qty Description Description KYQ-6320 KYQ-6320 Hood assembly Flat pad Hood handle Wheel support-back right Hood hinge axis Wheel-6” no brake Hood restrict piece Whee axis Dish Wheel support-back left Roasting Basket Hood support R Pin Roller Roasting Basket Support Roller bolt Manually locking screw Rotisserie shaft restrict piece-front...
- Page 12 ASSEMBLY Step 1 Before assembly, turn the spit roaster over, NOTE: put some soft cushions or protective mat or similar on the floor to protect the spit roaster body and hood. Attach the locking castor wheels using 8x M8x15 hex bolt. Attach the rear wheel brackets using 8x M8x15 hex bolt.
- Page 13 Step 2 Before assembling the motor and its support, first loosen and remove the four pre-assembly M5 x 8 screws on the base of the motor Ref #69, then put the motor on its support Ref #70, install and tighten the same M5 x 8 screws. Attach ref #69 + #70 to the spit body using M6 x 12 screws.
- Page 14 Step 3 To install uprights ref#49 and #50 use the M6 x 35 screws with washers and nuts. To install motor heat shield ref#65 use the M5 X 10 screws. Install the rollers ref#44 using shoulder screws ref#55.
- Page 15 Step 4 Use the above diagram to install the roasting clamps, prongs and leg supports. NOTE: You can only use either the clamps, prongs etc or the roasting baskets, see step 5.
- Page 16 Step 5 Use the above diagram to install the roasting baskets. Slide both rack supports ref #8 onto the rotisserie shaft ref #10. Push each of the racks ref #6 into the holes in the supports ref #8. Secure with the ‘R’ clip ref #7. When all 4 racks are fitted tighten the 2 supports to the shaft using the screws.
- Page 17 Step 6 To cook vegetables or small amounts of meat you can also use the supplied trays. If using the trays with the roasting baskets or the pig clamps only use a maximum of 2 trays evenly spaced along the cooking length. Step 7 To fit the fat tray slide the tray ref#5 into the grooves under the spit roaster on the same end as...
-
Page 18: Important Points
Step 8 Battery Insert Take out the ignition button, inserting 1 pc of AA battery. IMPORTANT POINTS PLEASE NOTE Upon receipt, your spit roaster will be covered in a thin layer of oil which is used in the manufacturing process, this needs removing prior to first use with either hot soapy water or a remover such as white spirit. - Page 19 COOKING TIMES ROTISSERIE COOKING This will vary according to the type and weight of Rotisserie cooking produces foods that are moist, food you are cooking. Insert a meat thermometer flavourful and attractive, as the turning food self into the centre of the meat (avoiding bone) which bastes.
- Page 20 (see Example 1). Within a partial enclosure that includes an overhead cover and no more than two walls (see Example 2 & 3). ® Gasmate is a registered trademark of: Sitro Group Australia Pty Ltd www.sitro.com.au Aber, Hamilton, N.Z. www.gasmate.co.nz...
Need help?
Do you have a question about the GSB300 and is the answer not in the manual?
Questions and answers