Table of Contents
Advertisement
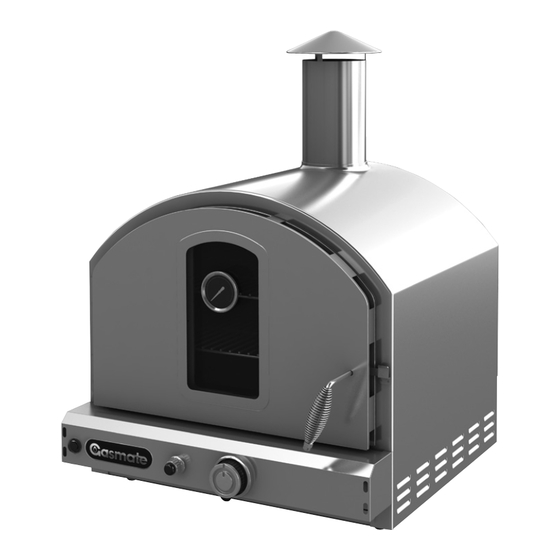
Pizza Oven with Light
• Deluxe outdoor oven for versatile cooking -
from cooking pizzas with a delicious wood fired
flavour to a beautifully cooked roast dinner
• Cooks up to 3 pizzas at a time
• Convenient electronic ignition
• Cool touch heat resistant handle
• Includes food safe ceramic pizza stone
Model No. PO110
Gasmate
is a registered trademark of: Sitro Group Australia Pty Ltd www.gasmate.com.au
®
Important: Retain these instructions for future use.
02696 06/10
P0100 Series
FOR OUTDOOR USE ONLY
Aber Ltd - Hamilton, N.Z.
• Powerful 22MJ/h stainless steel burner
• Large viewing window with temperature gauge
• Easy clean vitreous enamel interior
• AGA certified
• Propane gas
• Certified for conversion to natural gas
Model No. PO106
www.gasmate.co.nz
Advertisement
Table of Contents

Related Manuals for Gasmate P0100 Series


Summary of Contents for Gasmate P0100 Series
- Page 1 • Includes food safe ceramic pizza stone Model No. PO110 Model No. PO106 FOR OUTDOOR USE ONLY Gasmate is a registered trademark of: Sitro Group Australia Pty Ltd www.gasmate.com.au ® Aber Ltd - Hamilton, N.Z. www.gasmate.co.nz Important: Retain these instructions for future use.
-
Page 2: Table Of Contents
CONTENTS GENERAL INFORMATION Gas Installation Codes Section Page • Appliances must be used in accordance with the General information installation requirements of your gas supply authority, or the Australian Standard AS 5601. General assembly • Appliances for use with bottled gas are labelled ‘propane gas’. - Page 3 Always close the cylinder valve when the appliance Location of your Appliance is not in use. Do not subject the cylinder to DO NOT use in garages, porches, sheds, excessive heat. breezeways or other enclosed areas. Your appliance is to be used OUTDOORS and is not Specifications intended to be installed in or on recreational Specifications can be found on the data label...
-
Page 4: General Assembly
GENERAL ASSEMBLY Disconnecting: 1. Ensure burner control is in the ‘OFF’ position. Connecting & Disconnecting to Gas Source 2. Ensure cylinder valve is in the full off position. Familiarise yourself with the general information For storage and cylinder exchange, disconnect and safety guidelines located at the front of this hose at the cylinder only, DO NOT disconnect hose manual. -
Page 5: Operating Procedure
Burner Operation & Ignition system check Problem Possible Reason Solution Valve on cylinder is closed Open valve on cylinder Burner will not ignite Control knob is closed Turn knob to high when lighting Igniter is faulty Use a long barbecue match Burner has gone out Check that the gas bottle is not empty and re-ignite the burner... -
Page 6: Important Safeguards
OVEN LIGHT To reduce the risk of personal injury or damage to property, follow basic safety precautions when using this product, IMPORTANT SAFEGUARDS including the following: • When storing the Product, gently wind the Cord around the Cord Wrap if provided, otherwise READ THESE INSTRUCTIONS loosely coil the cord. -
Page 7: Service And Safety
SERVICE & SAFETY OPERATING INSTRUCTIONS • This Product is shipped to you in a factory 1. Plug the Power Cord into a Power Outlet and sealed carton. Should the Product be damaged, turn ON. To avoid damage to the Power cord, dropped, or malfunctions in any way, or its make sure it is kept away from the Product Flexible Cord is damaged, return the complete... -
Page 8: Assembly Instructions
ASSEMBLY INSTRUCTIONS Tools Needed for Assembly • Phillips screwdriver • Adjustable wrench Note: Remove any transit protection material STEP 1 Lay the Pizza Oven on it’s back and attach the washers and rubber feet by using 4*M5 screws 30mm long. STEP 2 Stand the Pizza Oven on it’s feet and attach the chimney to... - Page 9 STEP 3 Attach the rear heat shield to the Pizza Oven using 4*M5 screws 30mm long and the spacers plus washers as shown. STEP 4 Position the wire racks ensuring the folded down tabs locate into the holes of the front of the rack supports.
- Page 10 STEP 6 Connect the end of electrical wire to the oven to the outlet of the transformer and tighten by screwing it clockwise. OPTIONAL If you have an oven stand attach the transformer onto the back panel using 4*M4 screws 12mm long and nuts with the plug down, then connect the end of the electrical wire from the oven to the outlet of the transformer and tighten by screwing it clockwise.
-
Page 11: Natural Gas Conversion
NATURAL GAS CONVERSION Conversion ONLY to be done by an authorised person. TO BE INSTALLED ONLY ON OR IN A SERVICING INSTRUCTIONS NON-COMBUSTIBLE ENCLOSURE Appliances should be serviced at least annually Note: Recommended clearances must be maintained. and servicing must only be carried out by a Licensed Plumber or Authorised Person. -
Page 12: Safe Appliance Locations
SAFE APPLIANCE LOCATIONS Within a partial enclosure that includes an overhead cover and more than two walls, the This appliance shall only be used in an above following will apply: ground open-air situation with natural ventilation, at least 25% of the total wall area is completely without stagnant areas, where gas leakage and open, and at least 30% of the remaining wall area products of combustion are rapidly dispersed by...
Need help?
Do you have a question about the P0100 Series and is the answer not in the manual?
Questions and answers