Multiplex COCKPIT SX Instructions Manual
Hide thumbs
Also See for COCKPIT SX:
- Instruction manual (36 pages) ,
- Supplement to the operating instructions (11 pages) ,
- Supplementary information (14 pages)

Related Manuals for Multiplex COCKPIT SX


Summary of Contents for Multiplex COCKPIT SX
- Page 1 I n s t r u c t i o n s B e d i e n u n g s a n l e i t u n g M a n u e l d ' u t i l i s a t i o n...
-
Page 3: Table Of Contents
Operating Instructions 12.1.5. Version information Contents (SETUP, TRANSM) Menu: -VER- 12.2. The INFO displays ..........18 Contents Setting up a new model Model type: EASY Introduction 13.1. What does EASY mean ? .........19 Safety Notes 13.2. Preparing the model .........19 3.1. General Safety Notes .........6 13.3. - Page 4 OCKPIT Setting up a new model 14.9.2. Setting the Exponential function ) EXP Model type: GLIDER CONTRL Menu: ( 14.10.Activating flight phases ........42 14.1. What is GLIDER ? ..........31 14.10.1. What is possible with flight phases? 14.2. Preparing the model .........31 14.10.2.
-
Page 5: The Free Mixers Mix 1, 2 And
Operating Instructions 15.7.3. V-tail compensation inputs 16.6.3. Throttle for electric helicopters Menus: TH -CO, SP -CO 16.6.4. Setting up the throttle curve ) TH CONTRL 15.8. Transmitter control settings Menu: ( Dual-Rate and Exponential 16.6.5. Setting throttle minimum (idle) ) TH MIN for AILERON, ELEVATOR and RUDDER..54 CONTRL Menu: (... - Page 6 OCKPIT 19.2. Timer 2..............77 19.2.1. Assigning a timer switch ) T2 SW TIMER Menu: ( 19.2.2. Stopping Timer 2, or resetting it to 00:00 19.3. Additional timer switches ........78 19.3.1. Switches 1 to 3 CS / A-ROT, D-R, SNAP / DTC 19.3.2.
-
Page 7: Introduction
Operating Instructions Introduction Safety Notes Congratulations on your choice of the MULTIPLEX These operating instructions are an essential SX radio control system. OCKPIT part of the product, and contain important informa- You are now the owner of a radio control transmitter tion and safety notes. -
Page 8: General Safety Notes
OCKPIT Capacity ≥ servos × rapid changes in temperature (e.g. warm car : cold environment) can result in condensation inside the transmitter. Damp has an adverse effect on the Always select the next larger battery size if weight or working of the transmitter, and on all other elec- space restrictions do not prevent you doing so. -
Page 9: Range Checking
Operating Instructions When operating the model: 3.2. Range checking • If you are a beginner at controlling models, please Regular range checks are important, as they enable ask an experienced model pilot for help initially. A you to ensure that the radio control system is working Trainer (buddy-box) system is very useful for the first properly, and to detect any changes in the system’s few flights... -
Page 10: Liability Exclusion
OCKPIT Standard receivers (without IPD or similar): MULTIPLEX Modellsport GmbH & Co. KG therefore If your receiver does not feature signal checking / cor- accepts no liability for losses, damage or costs which rection (e.g. Pico 3/4, Pico 5/6), slight jitter close to the arise as a result of the improper use and operation of range limit is acceptable. -
Page 11: Specification
Operating Instructions 7.2. Channel / Frequency Tables Specification Channel count 7 Servo channels 35 MHz 40/41 MHz 72 MHz 36 MHz Model memories [MHz] [MHz] [MHz] [MHz] Transmission FM PPM, 10 kHz channel spacing process 34 950 40 MHz 72 MHz 36 MHz 34.960 40.575... -
Page 12: The Transmitter Battery
0.5 to 1 C. For the 1500 mAh bat- (normal charge) tery in the Cockpit SX transmitter this means charge currents between 750 mA and 1.5 A. Since the currents Never connect the transmitter to the charger... -
Page 13: The Transmitter
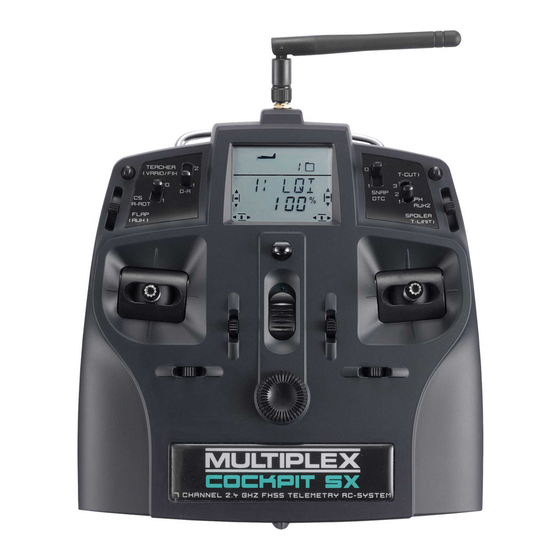
Operating Instructions Sliding cover The transmitter SNAP/DTC for multi-function socket Switch for snap-flap / direct throttle, switch 3 for mixer / timer Dual-Rate switch, PH/AUX 2 switch 2 for mixer / timer Switch for flight phases 1-3, CS / A-ROT AUX 2 (free control), Switch for Combi-Switch / switch 4 for mixer / timer... -
Page 14: The Screen
OCKPIT 9.2. The screen Adjustor screws for the left-hand stick unit a. Disable stick centring (neutralising) spring The picture below shows all the symbols and charac- b. Set stick ratchet ters which can be displayed on the screen (never visi- c. -
Page 15: Inside The Transmitter
Operating Instructions 9.5.2. Multi-function socket with sliding cover 9.4. Inside the transmitter The multi-function socket of the C SX is used for OCKPIT the following purposes: • Charging / discharging the transmitter battery (max. 1.5 A) • Connecting the Trainer lead •... -
Page 16: First Use
OCKPIT the RF section; the blue LED starts to flash, and the 10. First use transmitter is ready for use. • Switch on the transmitter 10.2.2. Moving to the menus without transmitting • Check the set frequency channel an RF signal •... -
Page 17: Setting The Frequency / Channel
Operating Instructions Key to the signal strength display: Confirming the channel no signal weak moderate strong very A brief press on the 3-D digi-adjustor con- measurable strong firms your choice, and this display appears: 4. Activating the frequency / channel You can now use the 3-D digi-adjustor to select a dif- Switch the transmitter off, then on again. -
Page 18: The 3-D Digi-Adjustor
OCKPIT This is the procedure for selecting the menu text 11. The 3-D digi-adjustor language: Switch the transmitter on. 11.1. Basic function The screen displays the last set RF The 3-D digi-adjustor is a key feature of the C OCKPIT channel and the associated fre- SX, making it very simple, fast and convenient to oper- quency. -
Page 19: Transmitter Settings And Info Displays17
Operating Instructions Moving to the BAT AL alarm: In Chapter 13., which covers the EASY model type, the to MENU procedure is presented again more concisely in a table. (SETUP appears) to SENDER (MODEL appears) The same procedure “Changing the menu text lan- (BAT AL appears) guage”... -
Page 20: Complete Transmitter Reset Menu
OCKPIT 12.1.4. Complete transmitter reset 12.2. The INFO displays RESET SETUP, TRANSM) Menu: ( The following table shows the seven INFO displays and In this menu you can reset the transmitter to the state what they show. in which it was delivered. This means: You can “leaf through”... -
Page 21: Setting Up A New Model Model Type: Easy
Operating Instructions 13.2. Preparing the model 13. Setting up a new model Model type: EASY Connect the servos to the receiver in the model in the sequence stated in the table below. This chapter describes in turn all the steps which you The C SX is only capable of controlling your OCKPIT... -
Page 22: Preparing The Transmitter
OCKPIT Confirm the selected memory with a brief press the 3-D digi-adjustor. This takes you to the menu where you can enter the model name. SPOILER/ THR-LIMIT Note: interrupting (without a new model) If you end up at this menu point accidentally, or if you AUX 2 have selected the wrong model type, you can interrupt Delta... -
Page 23: Transmitter Controls For The Easy Type
Operating Instructions Stick mode table: 13.3.4. Selecting idle forward / back ) TH R SETUP, MODEL Menu: ( Mode left stick right stick right The idle position of the transmitter control for throttle slider (stick or slider) can be set to forward (towards the ae- Rudder Elevator Aileron Throttle rial) or back (towards the pilot). -
Page 24: Adjusting Servos
OCKPIT TIP: carry out mechanical adjustments first It is always advisable to set up the mechanical systems in the model as accurately as you can before carrying out any (electronic) adjustments at the transmitter. • Set the output arm on the servo output shaft at right- angles to the case. -
Page 25: Adjusting The Servo Centre Menu: ( Servo ) Centr
Operating Instructions It is not possible to state a defined direction of rotation This is the procedure: (left or right), as different servo types respond dif- ferently to control signals. Action Effect A brief press on the 3-D digi-adjustor concludes the Left to MENU process. -
Page 26: Mixers Operating On Elevator
OCKPIT This is the procedure: into the throttle channel. In this example the elevator is operated by the transmitter controls THROTTLE and Action Effect ELEVATOR. In the C SX we use the term THR- OCKPIT CO (CO = compensation) for the mixer input coming Left to MENU from the transmitter control THROTTLE. -
Page 27: Adjusting The Spoiler/Flap / Elevator Mixer Menus: Sp -Co, F -Co
Operating Instructions whether the throttle stick has to be forward or back for Setting the FLAP compensation input: this in 13.3.4. Action Effect A brief press on the 3-D digi-adjustor concludes the setting process. The flashing ceases, and the value is Left to MENU stored. -
Page 28: Setting The Exponential Function Menu: ( Contrl ) Exp
OCKPIT You can set any value you like within the range 100% 13.6.2. Setting the exponential function ) EXP CONTRL to 25% for the forward or back position of the switch Menu: ( (D-R ON). The smaller value can be assigned to either What is EXP (Exponential)? of the two switch positions. -
Page 29: More Features Which Can Be Exploited With The Easy Model Type
Operating Instructions Note: making the EXP effect visible on the model The current setting for the V-TAIL mixer flashes in the EXP does not affect the centre point or end-points of bottom line of the screen. the control surfaces. If you wish to see the effect of Now proceed as follows: your settings on the model, you must hold the stick at Pull the ELEVATOR stick back, and hold it there. -
Page 30: Changing The Default Assignment Of Receiver Output
OCKPIT Activating the DELTA mixer and setting the ELE- 13.8. Additional mixer functions VATOR travel: 13.8.1. Combi-Switch mixer ) COMBI MIXER Menu: ( Action Effect Just like their full-size counterparts, many models - Left to MENU especially gliders - are only able to fly smooth turns SETUP appears Confirm with co-ordinated use of ailerons and rudder. -
Page 31: Ailerons Raised" As Landing Aid (Mixing Spoiler Into Aileron) Menu: ( Mixer ) Sp ->Ai
Operating Instructions What is differential, and why is it necessary? The landing aid is controlled by the SPOILER transmit- When you give an aileron command, one aileron ter control. In modes 1 to 4 ( MODE in the SETUP moves up, the other down. Depending on the camber menu) this is the right-hand slider. -
Page 32: Changing Wing Camber Using The Ailerons (Flap, Speed / Thermal Setting) Menu: ( Mixer ) F ->Ai
OCKPIT Moving to the SP ->Q menu: A brief press on the 3-D digi-adjustor concludes the to MENU, (SETUP appears), process. The value is stored. to MIXER, (TH >S4 appears), to SP->AI, 13.8.5. Electronic Y-lead ) Y-LEAD Menu: ( MIXER The electronic Y-lead generates the same function for servo 7 as is already generated for one of the servos 1 to 6. -
Page 33: Setting Up A New Model Model Type: Glider
Operating Instructions If your model has a four-flap wing: 14. Setting up a new model • Set up the inboard flap mixers Model type: GLIDER (camber change, aileron support with differential, butterfly (crow), snap-flap) 14.7. 14.1. What is GLIDER ? If your model has a V-tail: •... -
Page 34: Preparing The Transmitter
OCKPIT 14.3. Preparing the transmitter Changing the model name Use the 3-D digi-adjustor to search for the first charac- The following steps must be carried out in order to pre- ter. The following characters are available: pare the transmitter for the new model: 0 to 9, :, /, <, -, >, ?, space, A to Z •... -
Page 35: Transmitter Controls For The Glider Type
Operating Instructions Note: idle trim Selecting the throttle idle setting: to MENU, The trim button adjacent to the THROTTLE / SPOILER (SETUP appears), stick is always used for throttle idle trim, even if the (MODEL appears), (MODE appears), to TH right-hand slider is used to control the throttle function, (0 or 1 flashes) as in modes 5 to 8. -
Page 36: Setting Up Throttle Check Menu: ( Setup Model ) Thchk
OCKPIT 14.3.6. Setting up Throttle Check 14.4. Adjusting servos ) THCHK SETUP MODEL Menu: ( TIP: carry out mechanical adjustments first What is Throttle Check? It is always advisable to set up the mechanical systems Throttle Check is a safety query of the throttle control. in the model as accurately as you can before carrying This function avoids the danger of power systems out any (electronic) adjustments at the transmitter. -
Page 37: Adjusting The Servo Centre
Operating Instructions Moving to the TRAVL menu: Check (and correct if necessary) the direction of rota- to MENU, tion of the servos for all control functions. (SETUP appears), to SERVO, A brief press on the 3-D digi-adjustor concludes the (SERVO1 appears), setting process. -
Page 38: The Components Of The Mixer
OCKPIT Moving to the AI->AI menu: 14.5.1. The components of the mixer to MENU, (SETUP appears), to MIXER, Aileron mixer (TH->S4 appears, e.g.), to Q ->Q, (outboard wing (current value flashes) control surfaces) Stick left: Stick right: Glider with two ailerons right aileron right aileron down... -
Page 39: Changing Wing Camber (Flaperon)
Operating Instructions Moving to the H ->Q menu: Note: suppressing aileron differential to MENU, If the ailerons are raised as a landing aid (or for a But- (SETUP appears), to MIXER, terfly (crow) system), usually only the aileron on the (TH->S4 appears, e.g.), to EL->AI, outside of the turn deflects (down) when an aileron... -
Page 40: Setting Compensation Inputs For Throttle And Spoiler
OCKPIT Input: Throttle TH -CO A brief press on the 3-D digi-adjustor concludes the This input can be used to compensate for an unwanted process. The flashing ceases, and the values are tendency to climb when the throttle is opened. stored. -
Page 41: Changing Wing Camber Using The Inboard Flaps
Operating Instructions Input: Spoiler SP->F Caution: if the control surfaces don’t respond, ... If you wish to raise the inboard flaps to help the model you may have set a fixed value for the FLAP control in the mixer menu FIX F ( descend, or lower them for a Butterfly (crow) system, 14.11.2.). -
Page 42: Snap-Flap (Elevator To Inboard Flaps) Menu: ( Mixer ) El->F
OCKPIT Moving to the SP->F menu: A brief press on the 3-D digi-adjustor concludes the to MENU, (SETUP appears), process. The flashing ceases, and the values are to MIXER, (TH->S4 appears, e.g.), stored. to SP->F, (current value flashes) 14.8. V-tail If your model features a V-tail, the two servos must be connected to receiver outputs 2 and 3. -
Page 43: Setting The V-Tail Travels
Operating Instructions 14.8.2. Setting the V-tail travels adjustor to select the desired value within the range 100% to 25%. The minimum value of 25% avoids the The control surface travels are set using the Dual Rate danger of switching off one control completely (0%). values for RUDDER (DR R) and ELEVATOR (DR E) 14.9.1.). -
Page 44: Activating Flight Phases
OCKPIT Moving to the PHASEN menu: Note: observing the effect of EXP on the model EXP does not influence the centre position or end- to MENU, (SETUP appears), points of the control surfaces. If you want to see the (MODEL appears), (MODE appears), effect of this setting on the model itself, you have to to PHASEN,... -
Page 45: Copying Flight Phases Menu: ( Phases ) Copy
Operating Instructions Moving to the SPEED menu: 14.10.4. Copying flight phases ) COPY Menu: ( PHASES to MENU, (SETUP appears), (MODEL appears), (MODE appears), What is copied? to PHASEN, , • The current trim settings for AILERON, ELEVATOR to SPEED, and RUDDER •... -
Page 46: Menu: ( Mixer ) Fix F
OCKPIT Moving to the TH >S4 menu: 14.11.2. Fixed value for FLAP (Speed, Thermal or Launch setting) to MENU, (SETUP appears), ) FIX F MIXER Menu: ( to MIXER, This function is used to move your model’s camber- changing flaps (inboard flaps) to a fixed position. The left-hand FLAP slider then has no effect. -
Page 47: Servos 6 And 7 As Spoilers / Landing Flaps
Operating Instructions Since this switch has three positions, you can use it to Activating FIX: set a speed controller to the following settings: OFF / to MENU, (SETUP appears), ½-throttle / full-throttle, for example. to CONTRL, Q appears), to FIX, The value for ½-throttle can be adjusted by offsetting the centre position for servo 4. -
Page 48: Exploiting Full Butterfly Servo Travels (Offset For Inboard / Outboard Flaps) Menu: ( Mixer ) Ofs Ai And Ofs F
OCKPIT 14.11.6. Exploiting full Butterfly servo travels Example for Flaps (Offset for inboard / outboard flaps) Flap at neutral position, ) OFS AI and OFS F MIXER Menu: ( servo offset by"Offset" If the Butterfly (crow) system is used as landing aid on a four-flap wing, special requirements are placed on the servo travels for the inboard and outboard pairs of flaps (ailerons, camber-changing flaps). -
Page 49: Setting Up A New Model Model Type: Acro
Operating Instructions 15.2. Preparing the model 15. Setting up a new model Model type: ACRO Connect the servos in the model to the receiver in the sequence stated in the table below. The C SX can only operate your model correctly OCKPIT 15.1. -
Page 50: Preparing The Transmitter
OCKPIT 15.3. Preparing the transmitter Changing the model name Use the 3-D digi-adjustor to search for the desired The following steps must be carried out in order to pre- character. The following characters are available: pare the transmitter for the new model: 0 to 9, :, /, <, -, >, ?, space, A to Z •... -
Page 51: Transmitter Controls For The Acro Type
Operating Instructions 15.3.3. Transmitter controls for the ACRO type “0” or “1” flashes in the bottom line. The picture below shows which functions are operated THR R = “0”: idle back (default) by the individual transmitter controls in the ACRO THR R = “1”: idle forward model type. -
Page 52: Adjusting Servos
OCKPIT For each of the seven servos you can adjust the follow- ing parameters: - the centre - the travel, separately in both directions - the direction of rotation (REVerse) These settings are used to adjust the control surface When you set up a new model, Throttle Check is al- travels and the neutral position to suit the requirements ways active (THRCHK = 1). -
Page 53: Adjusting The Servo Centre Menu: ( Servo ) Centr
Operating Instructions This is where you set the travel separately for both Note for V-tail models: directions of rotation. It is not necessary to check the direction of rotation Move the transmitter control which operates this If your model features a V-tail, do not check the direc- servo (e.g. -
Page 54: Aileron Travel And Differential Menu: ( Mixer ) Ai->Ai
OCKPIT Moving to the SP->AI menu: Input: Elevator to MENU, This input alters the position of the ailerons when the (SETUP appears), to MIXER, elevator stick is operated, and it can be switched on (TH->4 appears, e.g.), to SP->AI, and off using the S3 switch (SNAP). The default setting (current value flashes) is 0% for both values. -
Page 55: The Components Of The Mixer
Operating Instructions Moving to the EL->AI menu: Input: Throttle TH -CO to MENU, (SETUP appears), This input can be used to compensate for an unwanted to MIXER, (TH ->4 appears, e.g.), tendency to climb when the throttle is opened. to EL->AI, (current value flashes) Input: Spoiler SP -CO If you raise the ailerons or extend the landing flaps as a... -
Page 56: Activating The V-Tail Menu
OCKPIT 15.7.1. Activating the V-tail 15.8. Transmitter control settings ) V-TAIL MIXER Menu: ( Dual-Rate and Exponential for AILERON, ELEVATOR and RUD- Activating the V-LEIT mixer: to MENU, (SETUP appears), to MIXER, (TH >S4 appears, e.g.), to V-TAIL, 15.8.1. Dual-Rate for AILERON, ELEVATOR, RUDDER ) DR CONTRL... -
Page 57: Activating Flight Phases
Operating Instructions contrast to Dual-Rate the servo travel remains un- 15.9.1. What is possible with flight phases? changed at maximum stick travel. Flight phases 1, 2 and 3 are equal-value phases. You can freely select which flight phase to use for normal The following graph shows how Exponential works. - Page 58 OCKPIT Moving to the COPY menu: 15.9.3. On-screen display of the active flight phase to MENU, (SETUP appears), The top section of the screen displays the flight phases (MODEL appears), (MODE appears), to PHASES, in the form of three figures. to COPY, When you are flying (INFO display visible) this applies: The number 0 flashes in the bottom line.
-
Page 59: Further Possible Functions With The Acro Model Type
Operating Instructions The function is programmed in two stages: 15.10. Further possible functions • Activating the FIX function with the ACRO model type • Setting the values for aileron, elevator and rudder 15.10.1. Combi-Switch Notes: Just like their full-size counterparts, many models - Caution with flight phases especially gliders - are only able to fly smooth turns If you have activated flight phases (... - Page 60 OCKPIT 15.10.3. Deltas and flying wings Setting up optional differential aileron travel: Menu: DELTA It is possible to set up aileron differential if it is neces- sary for your model. All you need to do is set the ap- To control a delta or flying wing model aircraft the AI- propriate up and down travels for each direction of LERON and ELEVATOR functions have to be super- travel (...
-
Page 61: What Is Possible With The Heli Type
Operating Instructions 16. Setting up a new model for the appears Model type: HELI function: Dual-Rate Expo Mix-Def. This chapter describes in detail the steps required to EXP AI Roll (aileron) set up your C SX for a helicopter, and to prepare OCKPIT Pitch-axis the model for flying. -
Page 62: Preparing The Transmitter
OCKPIT FLAP Throttle / ESC Collective AUX 1 pitch Pitch axis Gyro FLAP AUX 1 Roll Tail rotor Gyro 300° Throttle 60° 180°. Tail rotor Fig. 16.1.: Helicopter with separate actuation of collective Fig. 16.2.: CCPM head with 3-point 120° linkage pitch, roll and pitch-axis (mechanical rotor head mixing) 16.2.2. - Page 63 Operating Instructions 16.3.2. Setting the stick mode (which stick controls which function?) ) MODE SETUP MODEL Menu: ( The stick mode determines which transmitter controls operate the functions ROLL (aileron), PITCH-AXIS (elevator), YAW (rudder), and COLLECTIVE PITCH. Four modes are available: In the bottom line the “0”...
- Page 64 OCKPIT Moving to the TYPE menu: 16.3.6. Throttle trim and the collective pitch stick to MENU, The trim button adjacent to the collective pitch stick (SETUP appears), to MIXER, affects the value set as THRMIN ( 16.6.5.). (TAIL appears), to ROTOR, (V-ROT appears), The trim is only effective if the throttle curve is com- to TYPE,...
-
Page 65: Setting Up The Swashplate Servos
Operating Instructions 16.3.8. Setting up Throttle Check You can change the setting using the 3-D digi-adjustor: Warning: “TH >0” THRCHK = “0”: no Throttle Check What is Throttle Check? THRCHK = “1”: Throttle Check active Throttle Check is a safety query of the throttle control. A brief press on the 3-D digi-adjustor concludes the This function avoids the danger of power systems... -
Page 66: Setting Up The Swashplate For Rotor Head Types 1 To 4
OCKPIT PITCH-AXIS stick forward (towards aerial) = Move the collective pitch stick to COLLECTIVE Swashplate tilts forward PITCH minimum. (in direction of flight) Check that the swashplate is horizontal. If not, correct it by adjusting the servo travels. If this is not the case, then either you have selected the wrong rotor head type ( 16.2.) or you have not con- Brief instructions: setting servo centre and travel... -
Page 67: The Meaning Of Limiter, Curve, Minimum, Trim, Dtc And Throttle Cut
Operating Instructions … Throttle Minimum and Throttle Trim (idle) THRMIN (Throttle Minimum) is used to set the motor’s idle speed. If you set the throttle limiter to minimum, you can adjust the idle characteristics of a glow motor using the trim to suit the operating situation (ambient temperature, hu- A brief press on the 3-D digi-adjustor opens the midity). - Page 68 OCKPIT 16.6.3. Throttle for electric helicopters For electric helicopters you can generally leave the servo travels at -100% / 100%. This setting corre- sponds to the UNI signal format, and works with most speed controllers. However, it is important to check the working of the A brief press on the 3-D digi-adjustor opens the THR-CUT button (emergency motor OFF): if the motor parameter, and you can set the desired value.
-
Page 69: Setting Up The Tail Rotor Menu: Tail
Operating Instructions Moving to the TH MIN menu: A brief press on the 3-D digi-adjustor concludes the process. The flashing ceases, and the value is stored. to MENU, , to CONTRL, , to TH , , to TH MIN, Note: throttle with electric helicopters Set the auto-rotation throttle value to 0% and move the collective pitch stick trim fully to the idle end-point. - Page 70 OCKPIT Moving to the P NULL menu: Check that the lever on the tail rotor is at right- to MENU, (SETUP appears), angles to the helicopter’s longitudinal axis. If that to MIXER, (HECK appears), is not the case, adjust the pushrod. to P NULL, Check at both end-points of the yaw stick that the adjustment range is adequate, and that the servo...
-
Page 71: The Helicopter Gyro ) Gyro
Operating Instructions Setting an OFFSET for the tail rotor 16.7.5. Important: use of flight phases If you have activated flight phases ( 16.10.2.), you The base setting for the tail rotor (pitch angle of the tail rotor blades) is determined by the helicopter’s me- can set different values for each flight phase. - Page 72 OCKPIT Moving to the DR menu: 16.8.3. Checking the heading function to MENU, You can check that the gyro in your model switches to (SETUP appears), to CONTRL, Q appears), heading mode using this procedure: Requirements: GYRO = -50% (gain 16.8.1.) HEADG = 1 (heading activated...
- Page 73 Operating Instructions Moving to the EXP menu: 16.10.2. Activating flight phases Menu: PHASES to MENU, (SETUP appears), to CONTRL, Q appears), Moving to the PHASEN menu: to EXP AI, to MENU, (SETUP appears), (MODEL appears), (MODE appears), to PHASEN, The current setting flashes. Our example shows the EXP setting for AI = ROLL.
- Page 74 OCKPIT Exception: Auto-rotation If you switch to auto-rotation from flight phase 1, 2 or 3 A-ROT Display the transition is always immediate, regardless of the switch switch transition SPEED you have set. The code number of Moving to the SPEED menu: the active phase is displayed con- forward...
-
Page 75: Adjusting The Mixer Effect
Operating Instructions Example: offset four-point swashplate Press the 3-D digi-adjustor again briefly to open the menu for defining the mixer. 90° arrangement: Rotated through 45° Source Switch Target You can set the C SX to the arrangement shown OCKPIT on the right if you are using swashplate type 4 and set In the right-hand picture AILERON is selected as the V-DREH to 45. -
Page 76: Erasing The Free Mixers
OCKPIT Starting from the INFO display, carry out the follow- 18. Managing model memories ing steps to move to the mixer effect adjust menu: Menu: MEMO to MENU, (SETUP appears), to MIXER, (TH >S4 appears, e.g.), The model memories of the C SX are managed OCKPIT to MIX1,... -
Page 77: Setting Up A New Model ) New
Operating Instructions 18.2. Setting up a new model 18.4. Copying model memories ) NEW ) COPY Menu: ( Menu: ( MEMO MEMO There are two reasons for copying model memories: Moving to the NEW menu: to MENU, 1. You may wish to set up a new model, and already (SETUP appears), to MEMO, (GO TO appears),... -
Page 78: Erasing Model Memories ) Delete
OCKPIT 18.5. Erasing model memories 19.1. Timer 1 ) DELETE Menu: ( MEMO Probably the most common use of timers is for re- cording the length of the motor run. In the C OCKPIT A model memory can only be used for setting up a new Timer 1 can be used for this, controlled by the model, or as destination for a copy, if its contents are THROTTLE control (stick or slider). -
Page 79: Assigning A Timer Switch Menu
Operating Instructions Moving to the START1 menu: Moving to the T2 SW menu: to MENU, to MENU, (SETUP appears), (SETUP appears), to TIMER, to TIMER, (START1 appears), (START1 appears), to T2 SW Start time for Timer 1 in minutes : seconds No switch Switch 4 The first number of the current start time flashes. -
Page 80: Helicopter Timers
OCKPIT Note: SP+L R reverses the direction of effect Important: Changing the idle position for SPOILER in the SP+L R Timer 2 resumes running if you switch on again. menu also reverses the position for TIMER OFF. The current time of Timer 2 is stored when you switch the transmitter off. -
Page 81: Trainer Mode Operations
Operating Instructions Moving to the RES OP menu: 20.2. The C SX as Pupil transmitter OCKPIT to MENU, (SETUP appears), As Pupil transmitter, the C SX can be connected OCKPIT to TIMER, (START1 appears), to the following MULTIPLEX transmitters: to RES OP OCKPIT PROFI mc 4000, PROFI mc 3010 / 3030 ROYALevo 7 / 9 / 12... -
Page 82: Activate Teacher Mode
OCKPIT 2. Connect the Teacher and Pupil transmitters tions may occur with centre settings, particularly with Locate the plug marked TEACHER and connect it older Pupil transmitters, or those with mechanical trims. to the multi-function socket of the C OCKPIT Moving to the ANPASS menu: Locate the plug marked PUPIL and connect it to the to MENU,... -
Page 83: Notes On Trainer Mode Operations
Operating Instructions You can only check the assignments using the 3-D 20.3.5. Notes on Trainer mode operations digi-adjustor . The meaning of the displays is ! The TEACHER button must be held pressed in as follows: all the time the Pupil has control! 0 = function cannot be transferred to the Pupil ! Check all the working systems before take-off! 1 to 5 = channel used by Pupil transmitter... -
Page 84: Pc Interface For Flight Simulator
OCKPIT How diagnosis mode works: 24. Disposal Connect the transmitter to the model using the diagnosis lead, and switch the transmitter on. The Electrical equipment which bears the cancelled message DSC (Direct Signal Control) should flash refuse bin symbol must not be discarded in the on the screen.
Need help?
Do you have a question about the COCKPIT SX and is the answer not in the manual?
Questions and answers