
Subscribe to Our Youtube Channel
Related Manuals for Multiplex PROFI TX 9


Summary of Contents for Multiplex PROFI TX 9
- Page 1 Instructions MULTIPLEX Modellsport Gmbh & Co.KG • Westliche Gewerbestraße 1 • Bretten • Germany © MULTIPLEX 2013 • Printed in Germany www.multiplex-rc.de...
-
Page 3: Table Of Contents
Contents Contents Contents ........................1 Introduction .......................7 Concept of the PROFI TX ................7 Contact .....................9 About these operating instructions ............10 Change history ..................11 Safety instructions..................12 Basic safety instructions ................ 13 Safety instructions for the transmitter battery ........15 ESD notes for electronic sub-assemblies .......... - Page 4 Contents 3.3.5 Installing additional modules ............40 Transmitter battery ................41 3.4.1 Charging the battery ..............41 3.4.1.1 Charging the battery via the PC ..........42 3.4.1.2 Charging the battery using the plug-in charger ......43 3.4.2 Removing the battery ..............43 3.4.3 Inserting the battery ..............
- Page 5 Contents 4.3.3 TRACKED V. model template ............83 Menus ......................86 Status displays ..................86 5.1.1 Status display #1 ................86 5.1.2 Status display #2 ................87 5.1.2.1 Battery status ................87 5.1.3 Status display #3 ................89 5.1.4 Status displays #4 to #8..............90 Menu structure ..................
- Page 6 Contents 5.4.4 Spoiler, Flap, Retract.Gear, Speed, Aux-1 to Aux-4 ....121 5.4.5 Gyro .................... 122 5.4.6 Collective (only helicopters) ............125 5.4.7 Thr.Limiter (only helicopters) ............125 Mixer main menu ................. 126 5.5.1 Fixed-wing models ..............126 5.5.1.1 Combi-Switch ................. 127 5.5.1.2 Differnt.Ail ................
- Page 7 Contents 5.8.6 Safety check ................159 Error messages ................... 159 Operating the transmitter ................160 Operation using the keypad ..............160 6.1.1 Direct access buttons for menus ..........160 6.1.2 Buttons for special functions ............161 6.1.3 Text input ..................162 Operation using the wheel ..............
- Page 8 Contents 8.1.3.5 Adjusting flaps ................ 187 8.1.3.6 Adjusting the power system ........... 187 8.1.4 Using ailerons as spoilers ............187 8.1.5 Using camber-changing flaps as spoilers ........188 8.1.6 Optimisation ................188 Helicopter models ................190 8.2.1 The procedure in principle ............190 8.2.2 Creating a new model in the transmitter ........
-
Page 9: Introduction
Introduction Introduction PROFI TX We are pleased that you have decided to purchase the radio control system. PROFI TX M- The new tray-type transmitter offers numerous innovative and pioneering features and 2.4 GHz transmission technology: Integrated aerial technology (IOAT) ... - Page 10 Introduction Transmitter battery monitor with display of residual charge in mAh Calculated display of remaining operating time (time to empty) in hours Servo monitor with graphical or numerical display for checking settings without the model Code lock PIN (4-digit) for protecting the transmitter against unauthorised data access Hardware ...
-
Page 11: Contact
Model templates and extensive help functions to facilitate the creation of new models Comprehensive setup and mixer options for fixed-wing model aircraft and helicopters Differences between transmitter versions PROFI TX 9 PROFI TX 12 PROFI TX 16 Channels Model memories Contact We have made every effort to design these operating instructions in such a way that you can find an answer to each question quickly and easily. -
Page 12: About These Operating Instructions
Introduction About these operating instructions PROFI TX These operating instructions describe the tray-type transmitter and contain the following chapters: Chapter 1 "Introduction" provides an overview of the PROFI TX concept. Chapter 2 "Safety instructions" contains important information concerning safety, intended use and warranty. -
Page 13: Change History
Introduction Chapter 8 "Creating and customising models" describes step by step using two examples how to create and configure your own fixed-wing and helicopter models. Chapter 9 "Maintenance and care" describes briefly how to maintain your transmitter. Chapter Fehler! Verweisquelle konnte nicht gefunden werden. -
Page 14: Safety Instructions
Safety instructions Safety instructions Make s ure to read and o bs e rve the fo llo wing o pe rating and s afety ins tructio ns ! Knowledge of these operating instructions and their observance are a prerequisite for safe use as well as safe operation and maintenance. The following basic safety instructions and warnings are an essential component of these operating instructions and are fundamentally important for product handling. -
Page 15: Basic Safety Instructions
First identify the error and troubleshoot it. In particular, have the radio control transmitter and the receiver inspected at an authorised MULTIPLEX Service Centre (see section 10.1 "Specifications" on page 212) at regular intervals (every 2 to 3 years). - Page 16 (up to a few days). Thereafter, perform a careful functional test. In case of major condensation, have the device inspected at an authorised MULTIPLEX Service Centre (see section 1.2 "Contact" on page 9).
-
Page 17: Safety Instructions For The Transmitter Battery
Safety instructions Safety instructions for the transmitter battery The transmitter battery is responsible for the power supply to this device, and plays an important role in operational safety. The charging circuit integrated in the transmitter matches the battery. Do not charge the battery outside the device. Batteries are not toys and must be stored out of the reach of children. -
Page 18: Esd Notes For Electronic Sub-Assemblies
Safety instructions ESD notes for electronic sub-assemblies The sub-assemblies of radio control transmitters (main circuit board, RF module, Channel-Check module, Scanner module) are fitted with electrostatically sensitive components. These parts can be destroyed, suffer imperceptible damage or have their useful life shortened if static discharges take place (potential equalisation through electro-static discharge) when the sub-assembly is touched. -
Page 19: Intended Use
Safety instructions Intended use The PROFI TX transmitter is intended exclusively for operation of models by radio control. Always follow the switching on/off sequence in order to avoid any uncontrolled, dangerous start-up of the power system: Switching on 1. Transmitter 2. - Page 20 Safety instructions Use cables with sufficient cross-section. Do not coil up or shorten the receiver aerial. Do not lay the aerial on or close to electrically conductive components. Deploy aerials outside of fuselages with a shielding effect (carbon fibre, metallic painted finish). Observe also the advice included in the relevant receiver operating instructions! ...
- Page 21 Safety instructions Pre-flight checks Charge the transmitter, receiver and flight batteries carefully, and verify their state of charge at regular intervals. Ensure that the correct model memory is active. Carry out a range check (see section 3.6 "Range check" on page 47). ...
-
Page 22: Liability And Indemnification
MULTIPLEX goods that were directly affected by whatever incident gave rise to the damage. This does not apply if MULTIPLEX is obliged to accept unlimited liability in accordance with mandatory law for deliberate or gross negligence. -
Page 23: Warranty
The detailed declaration of conformity can be downloaded from our website: www.multiplex-rc.de under DOWNLOADS / Product Information If required, you may also request us for the declaration of conformity: MULTIPLEX Modellsport GmbH & Co.KG Customer Service Westliche Gewerbestraße 1 D-75015 Bretten-Gölshausen Germany... -
Page 24: Disposal
Safety instructions Disposal Do not dispose of electrical equipment marked with the crossed-out wheelie bin symbol in the standard household waste, but take them to a suitable disposal system. WEEE - Waste of Electrical and Electronic Equipment, directive 2002/96/EC: In the countries of the EU (European Union), electrical equipment must not be disposed of via the household or residual waste system. -
Page 25: Transmitter
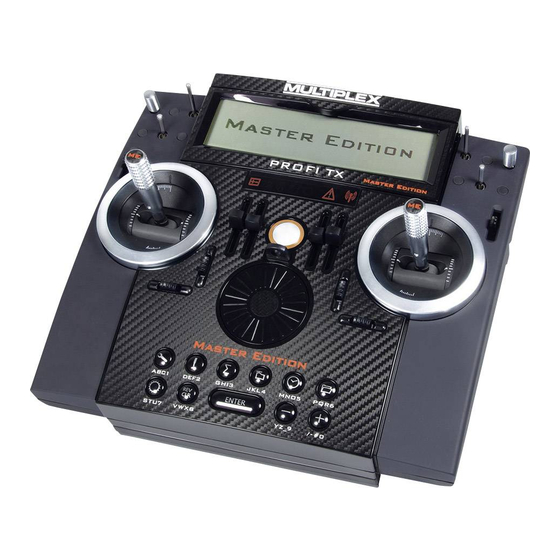
Transmitter Transmitter Transmitter overview 3.1.1 Top view Fig. 1: Top view of the transmitter Power button with annular light (see section 0 "Switching on" on page 44). The annular light indicates the status of the RF module during operation (see section "Annular light" on page 25). UV-stable, anti-glare graphic LCD unit (256 x 64 dots) featuring high contrast. - Page 26 Transmitter Warning lights for sensors used on the model. The warning lights indicate whether the alarm values for certain sensor groups have been exceeded (see section "Warning lights" on page 25). Two extremely low-friction, ball-raced stick units for controlling the four primary axes.
- Page 27 Transmitter Annular light The annular light indicates the status of the RF module during operation: Yellow flashing light: Normal mode, full RF power. Red flashing light: Reduced transmitting power for the range check (see page 47). Rapidly flashing orange light: Device in binding mode (see page 48).
-
Page 28: Underside View
Transmitter 3.1.2 Underside view Fig. 2: Underside view of the transmitter Recessed control for the sliding latch for USB sockets (see section 3.1.5 "Connections" on page 29) Fasteners for opening the case (see section 3.3.1 "Opening and closing the case" on page 31) Carry bars PROFI TX Page 26... -
Page 29: Carry Handle / Bars
Transmitter 3.1.3 Carry handle / bars The carry bars are located inside a drawer which also serves as a handle to carry the transmitter. 3.1.3.1 Carry handle If you want to use the drawer as a carry handle, pull it out completely (figure). The carry bars are locked in this position. -
Page 30: The Interior
Transmitter 3.1.4 The interior Fig. 3: The interior of the transmitter RF module with aerial IOAT Transmitter battery (see section 3.4 "Transmitter battery" on page 41) Control units microSD card Covers for the sockets for controls installable on the front 4 sockets for additional modules (see section 3.3.4 "Installing additional controls"... -
Page 31: Connections
Transmitter 3.1.5 Connections Fig. 4: Connections on the transmitter Connection for headset (stereo jack); when a headset is connected, the PROFI TX loudspeaker of the is switched off PROFI TX Mini USB socket for connecting the to a PC and for charging the battery via the charging socket (see section 3.4.1 "Charging the battery"... -
Page 32: Initial Setup
Transmitter Initial setup PROFI TX The following steps should be performed during initial set up of your Refer to the relevant sections listed below for a detailed description. Briefly charge the battery. It is sufficient to charge the battery for one hour on the PC (500mA) or for 20 minutes via the charging socket (1.5A): Refer to section 3.4 "Transmitter battery"... -
Page 33: Mechanical Operations On The Transmitter
Transmitter Mechanical operations on the transmitter 3.3.1 Opening and closing the case Danger of short-circuit! Switch off the transmitter before opening the case. Opening the case Switch off the transmitter. 2. Remove the USB and headset cable. 3. Place the transmitter upside down on a soft surface. 4. - Page 34 Transmitter Closing the case 6. Remove the USB and headset cable. 7. Place the transmitter upside down on a soft surface. 8. Move the controls on the side to the centre position. 9. Place the lower edge of the back cover vertically onto the case. 10.
-
Page 35: Adjusting Stick Units
Transmitter 3.3.2 Adjusting stick units 3.3.2.1 Swivelling stick units The "natural working axis" of your hands is at a more or less pronounced angle. PROFI TX The stick units of the can be swivelled to perfectly suit your ergonomic preferences. The swivelling range is approx. 15°. Fig. -
Page 36: Adjusting Ratchet, Friction And Centring Spring Force
Transmitter 3.3.2.2 Adjusting ratchet, friction and centring spring force (2) Springs for adjusting ratchet or friction (1) Deactivate centring action (4) Centring force right / left (4) Centring force forward / backward (3) Level of ratchet or friction Fig. 6: Adjuster screws on the stick unit Ratchet and friction PROFI TX... -
Page 37: Installing Stick Tops With A Switch Or Button
3.3.3 Installing stick tops with a switch or button ® PROFI TX MULTIPLEX offers three different stick tops with switch or button for the (see section 10.2 "Accessories" on page 213). To install a new stick top, proceed as follows: Switch off the transmitter and open it. - Page 38 Transmitter 6. Gently pull on the wire until you can grab the flexible wire with your fingers. This will be easier if you turn the stick shaft on the side opposite the point where the wire exits. 7. Slide the stick top onto the stick shaft, simultaneously pulling the flexible wire completely through.
-
Page 39: Installing Additional Controls
Transmitter 3.3.4 Installing additional controls PROFI TX You can install 7 controls on each side of the (see section 3.1 "Transmitter overview" on page 23). Controls can be buttons, 2- or 3-position dip-switches, or rotary potentiometers in any arrangement. ... - Page 40 Transmitter Install the controls. Observe the installation direction for dip-switches: The red cable must face the transmitter front. Replace the switch tray and secure it using the screws. Replace the circuit boards and secure them using the screws. Replace the cover over the headset socket and make sure that the clips snap into place.
- Page 41 Transmitter Additional controls PROFI TX The following additional controls can be installed in the (see also section 10.2 "Accessories" on page 213): 2-position switch (micro), short Item No. 75750 2-position switch (micro), long Item No. 75751 3-position switch (micro), short Item No.
-
Page 42: Installing Additional Modules
Transmitter 3.3.5 Installing additional modules PROFI TX You can add four modules to the Never install two identical modules! When these operating instructions were released for print, only the COPILOT module (item no. 45184) was available (see section 10.2 "Accessories" on page 213). To install a module proceed as follows: Switch off the transmitter. -
Page 43: Transmitter Battery
The following options are available for charging the Via your PC or laptop Via the MULTIPLEX USB car plug-in charger 12V DC (item no. 145533) Via the MULTIPLEX USB plug-in charger 100-240V AC (item no. 145534, see section 10.2, "Accessories" on page 213) The trans mitter mus t not be connected to a charg er when no battery is ins talled! Without a consumer, the charger can provide unacceptably high output voltages. -
Page 44: Charging The Battery Via The Pc
Transmitter 3.4.1.1 Charging the battery via the PC Proceed as follows: PROFI TX Switch off the 2. Lift the device. The recessed control for the sliding latch is located on the underside of the case. 3. Slide the sliding latch towards the device centre. 4. -
Page 45: Charging The Battery Using The Plug-In Charger
Transmitter 3.4.1.2 Charging the battery using the plug-in charger Proceed as follows: Lift the device (the recessed control for the sliding latch is located on the underside of the case). 2. Slide the sliding latch towards the device centre. 3. Connect the supplied USB cable to the plug-in charger and to the mini USB PROFI TX socket on the 4. -
Page 46: Battery Management
Transmitter 3.4.4 Battery management PROFI TX records the current during transmitter operation and while loading the transmitter battery. The available battery charge is calculated on the basis of the power meter reading, the temperature and the voltage. The remaining operating time (time to empty) is calculated from charge and current and is shown on status display #2 (see page 87). -
Page 47: Switching The Transmitter On / Off
Transmitter Switching the transmitter on / off Charge the transmitter battery! PROFI TX is supplied with a partially charged transmitter battery. You should charge the battery prior to setup. Observe the notes on charging (see section 3.4 "Transmitter battery" on page 41). 3.5.1 Switching on To switch on the device proceed as follows:... -
Page 48: Switching Off
Transmitter Switching on in Binding mode Press and hold the ¡ button until the status display is shown (see section "Binding" on page 48). Switching on for range check Press and hold the § button until the status display is shown. The device starts up with reduced transmitting power when the range check is performed (see section 3.6 "Range check"... -
Page 49: Range Check
Transmitter Range check Regular range checks are necessary for ensuring the reliable functioning of the radio control system and for timely detection of changes in transmission properties. Always perform a range check after: installing, modifying or rearranging components in the model, ... - Page 50 Transmitter Procedure If the model is fitted with a power system, switch it off! Press and hold the ¡ button on the transmitter as you switch the transmitter on. Switch on the receiver. 4. In the Servo > Test run menu, activate the test run for a control function, e.g.
- Page 51 Transmitter For "spread spectrum", every data bit is coded in 64 bits (spread). This procedure provides a high level of interference resistance. During binding, the transmitter passes "hopping sequence“, "spreading code", and "response time" to the receiver. Procedure Press and hold the tool button and switch the transmitter on. Once activated, the safety check display is shown.
-
Page 52: Trainer Mode
M-LINK to the teacher transmitter (without trim and travel settings). PROFI TX A second with COPILOT module or another MULTIPLEX transmitter with trainer stick can be used as the teacher transmitter. Refer to "Training" on page 96 for details. Teacher mode A free switch on the teacher transmitter and the COPILOT module are required for the Teacher mode (see section 10.2 "Accessories"... -
Page 53: Digital Trim
Transmitter Digital trim 3.8.1 Overview "Trimming" refers to the adjustment of the model aircraft to fly straight and level when you leave the sticks exactly at centre. Digital trim has two essential advantages: The physical position of a conventional trim with trim slider corresponds to the actual trim value, while digital trim buttons do not. -
Page 54: On-Screen Trim Display
Transmitter about 0.8 sec., the trim value changes continuously until you release the button again (AUTO-REPEAT function). When the trim reaches centre, the AUTO- REPEAT function stops briefly. Each trim increment is accompanied by an acoustic signal. On reaching the trim centre and on reaching the maximum trim range, specific acoustic signals are emitted to alert the user. -
Page 55: Model Templates
Model templates Model templates PROFI TX provides the following model templates: Templates for fixed-wing models BASIC, see page 57 ACRO, see page 59 GLIDER+, see page 59 DELTA WING, see page 64 FLYING WING, see page 66 BIG SCALE, see page 68 ... -
Page 56: Templates For Fixed-Wing Models
Model templates Templates for fixed-wing models All the templates for fixed-wing models use similar names for the 15 control functions. Only the Throttle and Spoiler assignments differ: For power models, Throttle is assigned to the stick and Spoiler to slider <E. ... - Page 57 Model templates Control Control Setting Parameter function Trim Throttle BASIC, ACRO, DELTA WING, BIG SCALE: Step size 1.5% stick Mode HALF GLIDER+: <E Expo Slow 0.0s BASIC, ACRO, DELTA Spoiler Slow 0.0s WING, BIG SCALE: <E Fixed value GLIDER+: stick Flap F>...
- Page 58 Model templates Control Control Setting Parameter function Aux-2 Slow 0.0s Fixed value Aux-3 Slow 0.0s Fixed value Aux-4 Slow 0.0s Fixed value = 4 flight phases PROFI TX Page 56...
-
Page 59: Basic Model Template
Model templates 4.1.1 BASIC model template This model template is designed for simple power or glider-type models and for models without aileron. On account of its simplicity this model template is ideally suited to model flying simulators. Servo assignment Function Aileron Elevator Rudder... - Page 60 Model templates Pre-defined mixers on the servo side in the BASIC template Name Mixer inputs Options & settings Value Compensation: š ELEVATOR+ Elevator Up and down travels 100% 100% are asymmetrical ›- Throttle-T Single-sided travel, (untrimmed) with deadband Spoiler Single-sided travel, with intermediate point Do you use a V-tail model? Reset the control functions "Rudder"...
-
Page 61: Acro Model Template
Model templates 4.1.2 ACRO model template The ACRO model template is suitable for power models with up to 4 flaps, optionally with snap flap. Function AILERONS+ ELEVATOR+ Rudder Power system AILERONS+ Fig. 9: ACRO servo assignment Pre-defined mixers on the control side, with 2 more that can be defined by the operator. - Page 62 Model templates Name Mixer inputs Options & settings Value (%) œ Single-sided travel, Landing flaps with intermediate point œ Spoiler Single-sided travel, with intermediate point š Up and down travels V-TAIL+ Elevator are asymmetrical š 2 Right and left travels Rudder are asymmetrical, 2 directions...
- Page 63 Model templates ›+ FLAPS+ Flaps Single-sided 100% (increase in lift) travel, with offset š 2 Up and down Aileron travels are asymmetrical, 2 directions œ Single-sided Spoiler (airbrake) travel, with intermediate point š Elevator-T Up and down (snap flap) travels are asymmetrical PROFI TX Page 61...
-
Page 64: Glider+ Model Template
Model templates 4.1.3 GLIDER+ model template The model template is suitable for glider-type models with up to 8 flaps, optionally with snap flap. Function AILERONS+ ELEVATOR+ Rudder Throttle FLAP_INNR+ Fig. 10: GLIDER+ servo assignments Spoiler Servo assignment Pre-defined mixers on the control side, with 2 more that can be defined by the operator. - Page 65 Model templates Name Mixer inputs Options & settings Value ›- Single-sided travel, Throttle-T (without trim) with deadband š V-TAIL+ Elevator Up and down travels are asymmetrical š 2 Rudder Right and left travels are asymmetrical ›+ Single-sided travel, Spoiler with offset ›- Throttle-T Single-sided travel,...
-
Page 66: Delta Wing Model Template
Model templates 4.1.4 DELTA WING model template This model template is suitable for delta models. Function DELTA+ Rudder Throttle Fig. 11: DELTA WING servo assignment Pre-defined mixers on the control side, with 2 more that can be defined by the operator. Name Mixer inputs Options &... - Page 67 Model templates Name Mixer inputs Options & settings Value š V-TAIL+ Elevator Up and down travels 70% 70% are asymmetrical š 2 Right and left travels Rudder 70% 70% are asymmetrical ›- Single-sided travel, Throttle-T OFF OFF with deadband PROFI TX Page 65...
-
Page 68: Flying Wing Model Template
Model templates 4.1.5 FLYING WING model template This model template is suitable for models with up to 4 flaps. Servo assignment Function FLAP_INNR+ FLAP_OUTR+ Throttle Fig. 12: FLYING WING servo assignment Pre-defined mixers on the control side, with 2 more that can be defined by the operator. - Page 69 Model templates Pre-defined mixers on the servo side Name Mixer inputs Options & settings Value š 2 Up and down FLAP_INNR+ Aileron travels are Inboard flap pair asymmetrical š Elevator Up and down travels are asymmetrical š Up and down Flap travels are (camber-changing...
-
Page 70: Big Scale Model Template
Model templates 4.1.6 BIG SCALE model template This model template is suitable for large-scale power models with 2 elevator servos and landing flaps. Servo assignment Function AILERONS+ FLAPS+ ELEVATOR+ Rudder Throttle Fig. 13: BIG SCALE servo assignment Pre-defined mixers on the control side, with 2 more that can be defined by the operator. - Page 71 Model templates Throttle-T Single-sided travel, ›- (untrimmed) with deadband Up and down V-TAIL+ Elevator š travels are asymmetrical Rudder Right and left š 2 travels are asymmetrical, 2 directions Spoiler Single-sided travel, ›+ with offset Single-sided travel, Throttle-T ›- (untrimmed) with deadband AILERONS+ Aileron...
-
Page 72: Templates For Helicopter Models
Model templates Templates for helicopter models Model templates are provided for 4 helicopter types: FUNCOPTER for throttle-controlled electric helicopters eHELI FBL for flybarless helicopters eHELIccpm for electric helicopters with electronic main rotor mixer HELIccpm for I.C. helicopters with electronic main rotor mixer HELImech for I.C. - Page 73 Model templates Aux-2 Slow 0.0s Fixed value Retract.Gear Slow 0.0s Fixed value Switch-1 Switch-2 Gyro <E Type of Gyro Heading Heading Control: <E Damping/Control Suppression Switch-3 Mixture Aux-3 Slow 0.0s Fixed value Aux-4 Slow 0.0s Fixed value Collective same as Throttle Slow 0.0s Fixed value...
- Page 74 Model templates All the model templates contain the same set of mixers: Four free, flight phase-enabled control mixers; e.g. to mix Aileron, Elevator, Rudder in Throttle. Tail rotor mixer Main rotor mixer Name Mixer inputs Settings Value TAIL ROTOR Rudder, Collective Offset...
-
Page 75: Funcopter Model Template
Model templates 4.2.1 FUNCOPTER model template This model template is suitable for throttle-controlled helicopters with electric motor. This template cannot be adapted to the other helicopter templates as the collective pitch channel is not available. Servo assignment Servo FUNCOPTER assignment Aileron Elevator Rudder... -
Page 76: Eheli Fbl Model Template
Model templates 4.2.2 eHeli FBL model template In the basic configuration, this model template is optimised for helicopters with flybarless controller. The classic configuration can easily be restored by assigning tail rotor mixers and main rotor mixers on the servo side. The template is equally suited to collective pitch-controlled electric helicopters with mechanical main rotor mixer. -
Page 77: Eheliccpm Model Template
Model templates 4.2.3 eHeliccpm model template For collective pitch-controlled electric helicopters with rotor head for electronic mixing (Collective Cyclic Pitch Mixer). The "Governor mode" option is activated for Throttle. Switch off this option if you prefer to work with throttle curves (see "Throttle (helicopter)", page 118). Function MAINROTOR-FB MAINROTOR-L. -
Page 78: Heliccpm Model Template
Model templates 4.2.4 HELIccpm model template For collective pitch-controlled I.C. helicopters with rotor head for electronic mixing (Collective Cyclic Pitch Mixer). Governor mode is switched off in the throttle channel. The Switch-3 control function was replaced by Mixture for mixture configuration. If you are using a speed controller, switch on the Governor mode to switch off the throttle curve (page 118). -
Page 79: Helimech. Model Template
Model templates 4.2.5 HELImech. model template This template is intended for collective pitch-controlled I.C. helicopters with mechanically mixed rotor head. Governor mode is switched off in the throttle channel. The Switch-3 control function was replaced by Mixture for mixture configuration. Function Aileron Elevator... -
Page 80: Templates For Land- Or Water-Based Models And Tracked Vehicles
Model templates Templates for land- or water-based models and tracked vehicles 4.3.1 CAR / TRUCK model template This model template is suitable for all types of vehicle models. The control functions Support Legs, Ramp, Light, and Aux-1 to Aux-4 provide the Slow function. - Page 81 Model templates Throttle ¢ Trim 1,5% Step size CNTR Mode Expo 0.0s Slow Support Legs Slow 0.0s Fixed value Ramp Slow 0.0s Fixed value Light Slow 0.0s Fixed value Headlight Horn Gear Sound Aux-1 Slow 0.0s Fixed value Aux-2 Slow 0.0s Fixed value Aux-3...
-
Page 82: Ship / Boat Model Template
Model templates 4.3.2 SHIP / BOAT model template This model template is suitable for all types of water-based models. The control functions Spoiler, Flap, Light, and Aux-1 to Aux-3 provide the Slow function. This allows operating support legs and ramp at a realistically slow speed. - Page 83 Model templates Control Control Setting Parameter function Mode HALF Expo Slow 0.0s Flap Slow 0.0s Fixed value Spoiler Slow 0.0s Fixed value Light Slow 0.0s Fixed value Headlight Horn Gear Sound Mixture Slow 0.0s Fixed value Aux-1 Slow 0.0s Fixed value Aux-2 Slow 0.0s...
- Page 84 Model templates Servo assignment Servo Control function / mixer Curve points Rudder Throttle 3 - 16 not assigned PROFI TX Page 82...
-
Page 85: Tracked V. Model Template
Model templates 4.3.3 TRACKED V. model template This model template is suitable for tracked vehicles. Control function assignments and names can be changed as required. Completed tracked vehicle models typically contain a functional building block that combines "Throttle" and "Steering" for the two power systems. If you are using 2 separate speed controllers, it is recommended to change the servo assignment for Steering and Throttle to TRACK+ (page 142). - Page 86 Model templates Throttle ¢ Trim 1.5% Step size CNTR Mode Expo 0.0s Slow Weapon sel. Slow 0.0s Fixed value Gear Slow 0.0s Fixed value Aux-1 Slow 0.0s Fixed value Light Headlight Gyro Type of Gyro Heading Damping/Heading Control Suppression Horn Aux-2 Slow 0.0s...
- Page 87 Model templates Servo assignment Servo Control function / mixer Curve point Steering optional TRACK+ Throttle optional TRACK+ Turret turn Gun up/down Weapon sel. unused 6 - 16 Mixer Name Mixer inputs Options & settings Value ™-2 TRACK+ Steering Travel is symmetrical, 2 directions, with deadband š...
-
Page 88: Menus
Menus Menus PROFI TX software is divided into status displays and menus that are structured in several levels. Status displays Eight status displays provide information about transmitter, model and sensors. The status display is shown after transmitter start-up or when exiting the main menus. -
Page 89: Status Display #2
Menus 5.1.2 Status display #2 Digi-adjuster Set values and their names, which can be edited using the retro-fittable digi-adjusters. The padlock icon in the centre opens when the values are unlocked for editing (see section 6.3 "Digi-adjuster" on page 164). 5.1.2.1 Battery status ... - Page 90 Menus Current time Flashing warnings and notifications in capital letters. Warnings contain an exclamation mark. Displayed when errors occur while loading MEMORY ERROR! a model memory (page 159). RANGE! Transmitting power is reduced for the range check (page 93). RF ERROR! The RF component is defective.
-
Page 91: Status Display #3
Menus 5.1.3 Status display #3 Status display #3 provides an overview of the timers (see section 5.7 "Timer main menu" on page 145). The other elements are identical to status display #2. Battery status (see section 5.1.2 "Status display #2" on page 87) Timers: ... -
Page 92: Status Displays #4 To #8
Menus 5.1.4 Status displays #4 to #8 The status displays #4 to #8 show three sensor values each. Sensors: Sensor address Sensor name Sensor value Unit The inverted display of a line indicates that the sensor reports an alarm. The value is shown crossed out if no sensor signal is received for several seconds. -
Page 93: Menu Structure
Menus Menu structure PROFI TX menus are structured in several levels: Main menus The 6 main menus are opened via the 6 direct menu access buttons (see section 6.1.1 "Direct access buttons for menus" on page 160). The main menus only provide links leading to the menus themselves. Each link is always indicated by a succeeding series of four full stops. -
Page 94: Setup Main Menu
Menus Setup main menu Overview Opening the main menu To open the main menu: button PROFI TX Page 92... -
Page 95: M-Link
Menus 5.3.1 M-LINK The radio link functions are set in the M-LINK menu. Range check When performing a range check, the transmitting power is significantly reduced to allow shorter distances between transmitter and model (see section 3.6 "Range check" on page 47). Set Failsafe The current servo positions are stored in the receiver. -
Page 96: Flight Phases
Menus Binding Activates the binding procedure and displays the current binding status (see section "Binding" on page 48). RX-ID: The binding procedure is completed. If the receiver has an ID, this ID number is displayed. The device is locating the receiver, the binding procedure is seeking ... - Page 97 Menus Flight phase name (e.g. SPEED1) You can select the designations for the flight phases from a list of 13 pre-set names (see section 8.2.10.5 "Changing flight phase names" on page 210). After activating the input field for the name, select a suitable name by pressing the + / –...
-
Page 98: Training (Principle)
5.3.3.1 Student mode Set Training to ON. This activates the training system. Set "Format" to MPX if the teacher uses an older Multiplex transmitter that does not support the UNI format. Set Mode to Student. Now, the student transmitter must be bound to the receiving device of the teacher transmitter. -
Page 99: Teacher Mode
Menus The message STUDENT MODE flashes on the status displays #2 to #8 while the Student mode is active. Both transmitters must use the same Format setting; otherwise, the centre positions of the control signals will differ. Remember to set "Training" to OFF if you wish to control the model directly. 5.3.3.2 Teacher mode For Teacher mode, a COPILOT module and an assigned switch are required (see... - Page 100 Menus The servo channel used by the student transmitter for transmitting the elevator signal is displayed next to Elevator, usually Ch2. Check on the model if the rotation direction of the student signal is correct. You can reverse the direction by pressing the REV/CLR button.
-
Page 101: Sensors
Menus 5.3.4 Sensors You can use the Sensors menu to define or edit sensor names, to configure the setting and sensor address of the variometer and to switch the vibration alarm on or off. Overview 5.3.4.1 Variometer Sink rate Sink rate of your model. Possible range: -0.1 m/s to -2.0 m/s How the variometer tones change from climbing to descending is adjusted accordingly:... -
Page 102: Vibra.alarm
Menus Address Sensor address of the variometer. 5.3.4.2 Vibra.Alarm Vibra.Alarm Activates/deactivates device vibration to report sensor alarms. 5.3.4.3 Edit name Used to define new sensor names or edit existing sensor names: Select a name or an empty line. 2. Confirm your selection. The sub-menu is opened. 3. -
Page 103: Assign.controls
Menus 5.3.5 Assign.Controls You can use the Assign.Controls menu to assign controls (actuators) to control functions, set the actuation direction, and define or edit the name of control functions. Ctrl Mode The controls mode defines how the main control functions are assigned to the sticks (see section "Controls mode"... -
Page 104: Assign.switches
Menus To assign a control function proceed as follows: Open the desired input field. Assign a control by pressing the + / – buttons, by using the central wheel or by operating the control. To set the actuation direction keep the control in the desired zero position and close the input field. - Page 105 Menus down / up Upper or lower switching threshold, respectively ‡, E, F, G, H Sticks and sliders for which the thresholds are set. The arrow points to the side on which the control is installed: left (<) or right (>). To set a switching threshold proceed as follows: Select the desired control.
-
Page 106: Magicswitch
Menus 5.3.6.2 MagicSwitch You can use the MagicSwitch sub-menu to change the configuration and settings for the two MagicSwitches MS1 and MS2 (see section "MagicSwitch" on page 173). The following settings are available for both MagicSwitches: Switch Switch assignment and combinations. ON delay, OFF delay Delay time for switching the MagicSwitch output;... -
Page 107: Define Mixer
Menus 5.3.7 Define mixer You can use the Define mixer menu to define how the mixers on the servo side are construed. The parameters are configured in the Mixer menu (see section 5.5 "Mixer main menu" on page 126). The mixer definition determines the structural design of the mixer. Each mixer can combine up to eight control functions (mixer inputs). - Page 108 Menus Control function You select the mixer input in the first field simply by operating the desired control function. Naturally, this only works if the control (actuator) has a control function assigned. Alternatively, you can use the + / – buttons or the central wheel to select a control function as mixer input.
- Page 109 Menus œ The neutral position is located on one side (end-point) of the control. The control travel is set at half and at full travel. The input control function (usually aileron) changes direction upon each assignment of this mixer to a servo. Example: The aileron moves up on one wing panel and down on the other.
- Page 110 Menus The input passes through a 7-point curve before mixing. You can choose from 8 curves. The same curve can be used for multiple inputs in different mixers. This eliminates extra configuration effort. When scrolling through the 3rd column of the mixer definition you will see any combination of the icons described above in the following order: Icon Effect...
-
Page 111: Transmitter
Menus 5.3.8 Transmitter You can use the Transmitter menu to configure transmitter-related settings such as audible signals, battery warning threshold, contrast, etc. The settings in this sub-menu only apply to the transmitter. They are not stored in the respective active model memory on the SD card, but in a dedicated memory area. Volume The volume of audible signals can be configured and switched off in groups. -
Page 112: User Data
Menus Screen Screen settings: Contrast Optimise the contrast. Possible values: +8 to -8 Factory setting: 0 Visualisation of the stick trim positions in the lower Trim graph corners of the screen. Possible values: 0 to 5 (6 designs) Factory settings: 0 Menu direction Direction of menu navigation (see chapter 6 "Operating the transmitter"... - Page 113 Menus After PIN entry, the code lock is activated when the device is switched on again. With active code lock, the user is prompted for the PIN when opening an input field. Upon entry of the correct PIN, all input fields remain unlocked until the device is switched off again.
-
Page 114: Controlfunctions Main Menu
Menus ControlFunctions main menu You can use this menu to adjust the settings for control functions, e.g. trims, travels, control curves, etc. The menu is dynamic: It lists only the control functions that are actually used, i.e. the control function must control at least one servo—either directly or indirectly using mixers. - Page 115 Menus Opening the main menu To open the main menu: button Fixed-wing models: Helicopter models: PROFI TX Page 113...
- Page 116 Menus The general screen layout is identical for all menus. This example shows the screen for the Aileron control function: Designation of control function and active flight phase At the top, the designation of the control function is shown followed by the name of the activated flight phase (in the example: NORMAL).
-
Page 117: Aileron, Elevator, Rudder
Menus 5.4.1 Aileron, Elevator, Rudder The following control functions operate identically: Aileron, Elevator, and Rudder for fixed-wing models Aileron, Elevator, and Rudder for helicopter models Trim Current trim setting of the control in the respective flight phase (only display). Step size Trim increment: 0.5%, 1.5%, 2.5%, 3.5% Step size defines the trim change (in %) per trim increment (see section 3.8... - Page 118 Menus Travel Setting for the control travel (flight phase specific): 0% to 100% You can influence the control sensitivity of a control during a specific flight phase using the Travel parameter. That means you can configure a different value for each flight phase, e.g. in the flight phase NORMAL = 100% for maximum control surface effectiveness, in the flight phase SPEED1 = 60% for finer control.
-
Page 119: Throttle (Fixed-Wing Models, Vehicles, Boats, And Funcopters)
Menus 5.4.2 Throttle (fixed-wing models, vehicles, boats, and funcopters) The Throttle control function provides the following functions for fixed-wing models: Throttle-Cut Throttle cut switch for the motor (only display) Trim Current trim setting of the control in the respective flight phase (only display). Step size Trim increment: 0.5%, 1.5%, 2.5%, see page 115. -
Page 120: Throttle (Helicopter)
Menus 5.4.3 Throttle (helicopter) The Throttle control function provides the following functions for the templates eHELI FBL, eHELIccpm, HELIccpm, and HELImech.: Governor Choose between throttle curve or controller with active Governor mode (speed controller). The throttle curve is used. Individual curves are used for each flight phase. -
Page 121: Throttle Curves (Governor Off)
Menus Trim Display of the throttle trim value Lower limit Defines the lower limit for the throttle curve to ensure safe idle speed. This setting is overridden in the auto-rotation flight phase (AUTOROT). Not required for models with electric power system: Thus, set to 0%. The flight phase-dependent throttle trim is added to the lower limit and thus increases the lower limit by the trim value. - Page 122 Menus Special case: auto-rotation In the AUTOROT flight phase the throttle curve is switched off. All curve points have the same value: You can set the throttle position for auto-rotation at every curve point. The lower limit is switched off. For training with an internal-combustion engine, set a value at which the motor does not yet stop.
-
Page 123: Spoiler, Flap, Retract.gear, Speed, Aux-1 To Aux-4
Menus Go ve rno r ON fo r electric helico pte rs with brus hles s mo to rs in Go ve rno r mo de In Governor mode, the speed controller (governor) provides for a constant system speed. It merely requires a fixed value for the required system speed in the respective flight phase. -
Page 124: Gyro
Menus Open the Controls > Flap menu item. To begin with, set estimated values for the Fixed value of the flight phases SPEED1 and THERMAL1. Retain the value OFF for the NORMAL flight phase. Allocate a digi-adjuster (see page 164). The allocation applies to all flight phases. - Page 125 Menus covers the entire setting range. the setting for the rotational speed around this axis. In neutral position the rotational speed is maintained at zero: The model always points in the same direction. The sensitivity setting ranges from The sensitivity setting ranges from 0% ...
- Page 126 Menus Suppression In Damping mode, the gyro also counteracts intentional control commands. For improved control, the gyro sensitivity can be suppressed proportionally to stick travel using this parameter. This function is already integrated in many gyros. In this case, retain the value OFF. Adjustment range: OFF to 200% The setting 200% reduces damping to 0% at half stick travel.
-
Page 127: Collective (Only Helicopters)
Menus 5.4.6 Collective (only helicopters) The Collective control function is only available for helicopter models that are controlled using collective pitch. The curve for the "Collective" control function is set here. A separate collective pitch curve with 7 curve points is provided for each flight phase. Refer to section 8.2.9 "Setting the collective pitch curve"... -
Page 128: Mixer Main Menu
Menus Mixer main menu You configure the mixers in this menu. The menu is partially dynamic: The menu content differs for fixed-wing models and helicopter models. Mixers on the servo side are only listed if they are in use, i.e. they are assigned to a servo. -
Page 129: Combi-Switch
Menus 5.5.1.1 Combi-Switch The Combi-Switch couples aileron and rudder in a way that allows both of the control functions to be controlled by either of the functions. This makes it easier to fly accurate turns. The Combi-Switch can be configured for specific flight phases. You define the associated switch in the Setup >... -
Page 130: Ctrl.mix
Menus Mode Possible values: Differnt.Ail off Differnt.Ail on The +SPOILER mode should be selected if the ailerons are +SPOILER raised to use them as additional landing aid. This suppresses the differential when operating the landing aid (Spoiler control function). As a result, the aileron travels are not reduced in the downward direction, enhancing aileron response during landing. - Page 131 Menus Switch Switch for deactivating the mixer. Without the switch the mixer is switched on. All three components Source, Target, and Switch can be selected by operating a switch, using the central wheel or pressing the + or - button. Press the REV/CLR button to erase Source and Target.
-
Page 132: Mixers On The Servo Side
Menus 5.5.1.4 Mixers on the servo side "Mixers on the servo side" combine up to 8 control functions in one common output signal. You can assign a unique name to each mixer. It is possible to assign the output signal to one or more servos using the name of the mixer. For safety reasons, the mixers are defined and configured in separate main menus. -
Page 133: Helicopter Models
Menus 5.5.2 Helicopter models Overview The 4 Ctrl.Mix mixers are always shown. The other mixers are only displayed if at least one servo is assigned. In the model templates HELImech., HELIccpm, and eHeli FBL, the TAIL ROTOR mixer is assigned to a rotor and is, therefore, shown here. ... - Page 134 Menus A 2-point calibration is sufficient for TAIL ROTOR. Take care that the servo is not stalled (mechanically obstructed) at its end-points (P1, P5)! All settings for throttle and collective pitch must be completed before the TAIL ROTOR mixer is configured. Subsequent changes usually require a correction. The TAIL ROTOR mixer is only activated in the Damping mode of the gyro.
-
Page 135: Mainrotor
Menus 5.5.2.2 MAINROTOR You control the main rotor of your helicopter model with the MAINROTOR mixer. The PROFI TX features a universal swashplate mixer (CCPM) which can be used to control all types of swashplate fitted with three or four linkage points / servos. Refer to section 8.2.5 "Checking and adjusting the main rotor"... - Page 136 Menus Example 1: 3-point 120º swashplate +120 Geometry +0 Rotation MAINROTOR-R. MAINROTOR-L. 120 Flight direction MAINROTOR-FB Example 2: 4-point 90º swashplate -90 Geometry +0 Rotation MAINROTOR-FB 90 MAINROTOR-L. MAINROTOR-R. Flight direction MAINROTOR-4 Rotation Virtual swashplate rotation; the parameter is required in the following cases: The swashplate is physically installed in the model in such a way that the MAINROTOR-FB servo is not located on the centreline.
- Page 137 Menus If virtual rotation is required in the clockwise direction (when swashplate is viewed from above): negative values for rotation If virtual rotation is required in the anti-clockwise direction (when swashplate is viewed from above): positive values for rotation Lever +/- Only required for 3-point swashplates whose linkage points are not equi- distant from the rotor shaft centre for mechanical reasons.
- Page 138 Menus Once you have entered the mechanical values of the swashplate as parameters for the MAINROTOR mixer, the next step is to carry out a careful and thorough calibration of the head servos in the Servo > Calibrate menu (see section 5.6.1 "Calibrate"...
-
Page 139: Ctrl.mix
Menus 5.5.2.3 Ctrl.Mix These "mixers on the control side" mix the signal of any second (Source) control function into any (Target) control function. The mixer takes effect on all servos that are connected to the target control function either directly or via mixer. In helicopters, these mixers are typically used for throttle compensation. -
Page 140: Servo Main Menu
Menus Servo main menu You can use this menu to configure, manage and monitor servos. Overview Opening the main menu To open the main menu: button PROFI TX Page 138... -
Page 141: Calibrate
Menus 5.6.1 Calibrate You can use the Calibrate menu to adjust the travels, centre and any intermediate points for all servos so that they move evenly and run to the end- points required. The menu shows a list of all the servos which can be used with your transmitter type (9, 12, or 16 servos). - Page 142 Menus TRM must only be used for corrections during operation! Use the TRM servo trim only to compensate for deviations from the neutral position of a servo that are identified during operation. When configuring a new model it is better to define the points separately. P1 to P5 The number of configurable servo calibration points (min.
- Page 143 Menus Procedure Adjust the direction of servo rotation. Servos controlled by basic functions (e.g. Aileron, Elevator, Rudder, ...): First, check that the rotation direction of the controlled surface correlates to the control movement. If required, change the rotation direction in the REV/TRM parameter (REV/CLR button).
-
Page 144: Assignment
Menus 5.6.2 Assignment You can use the Assignment menu to assign a control function or a mixer to your servos. The menu shows a table of all the servos which can be used with your transmitter type (9, 12, or 16 servos). The following information is displayed for each servo: Servo number Number of the servo;... -
Page 145: Monitor
Menus 6. Press the wheel or the ENTER button. The input cursor returns to the servo number. This completes the assignment procedure for one receiver output. Procedure for erasing an assignment Select the servo. 2. Press the wheel or the ENTER button. 3. -
Page 146: Test Run
Menus 5.6.4 Test run This function triggers an automatic servo run that can be used for testing or demonstration purposes or as an aid in range checks. While the test run is activated the selected control function cannot be controlled manually! ControlFunction Here, you select the control function intended for continuous operation. -
Page 147: Timer Main Menu
Menus Timer main menu PROFI TX You can use this menu to set the current time and manage the timers. Overview Opening the main menu To open the main menu: button PROFI TX Page 145... -
Page 148: Model Uptime Count
Menus 5.7.1 Model uptime count The Model timer is available for each model memory. It records the operating time (uptime count) for each model. The timer only runs when the transmitter emits RF signals. Time Displays the summed up operating time (uptime) in hours and minutes. Range: 1000 h 00 m Resetting the timer to 0h00 Press the wheel or the ENTER button to open the input field. -
Page 149: Sum
Menus Frame time elapsed Once started the timer runs until the frame time has elapsed, regardless of the position of the assigned switch. Only then, the switch becomes effective again. Usage as a sum timer If no alarm time is set (0:00:00), it works like a sum timer: It sums up the times during which the assigned switch is set to ON. -
Page 150: Interval
Menus Starting 10 seconds before the alarm time elapses, one double beep per second () When the alarm time has elapsed, one long double beep (╒═╕╒═╕) The double beep identifies the timer as the sum timer. No alarm is issued when the alarm time is set to 0:00:00. Refer to "Configuring timers"... -
Page 151: Configuring Timers
Menus 5.7.5 Configuring timers Time This field indicates the time that has elapsed since timer start. After selecting this field you can reset the timer to zero by pressing the REV/CLR button. Further down in the menu, you see the Show difference field. When you set this field to OFF, this time is displayed in status display #3. -
Page 152: Alarm Clock
Menus The difference between timer time minus alarm time. Identified by the preceding up / down arrow. The displayed time is counted down to the alarm time and then counted up. The timer time (always counted up). Save value You select whether or not the timer time is stored in the model memory when the transmitter is switched off or the memory changes: The timer time is stored in the model. -
Page 153: Date & Time
Menus 5.7.7 Date & Time PROFI TX features a clock with calendar that continues to run when the device is switched off. The clock (RTC) is used for the alarm clock function and for the file system on the SD card. In line 1, the date and time are displayed on the right. -
Page 154: Memory Main Menu
Menus Memory main menu PROFI TX You can use this menu to manage the model memory in your Overview Opening the main menu To open the main menu: button PROFI TX Page 152... -
Page 155: Selecting The Model Memory
Menus 5.8.1 Selecting the model memory You can switch to a different model memory in this menu. The menu shows a list of all the available model memories. The name of the current model memory is bolded. Move the input cursor to the desired model memory. The change takes effect when you press the wheel or the ENTER button. - Page 156 Menus The name of the transmitter you have selected for copying is shown inverted and in parentheses. 3. Move the memory to the target memory cell using the central wheel. 4. Copy is initiated by pressing the wheel or the ENTER button. Now, either of the following cases is possible: a.
-
Page 157: Creating New Model Memories
Menus 5.8.3 Creating new model memories You can use the New model menu to create new model memories. All the settings in this menu are retained, so, you do not have to re-enter the full set of information for every new model memory. Memory No. - Page 158 Menus As the active model Here you specify the setting areas to be inherited from the current model. If the current model and the template are incompatible, not all areas are inherited. All fixed-wing models are compatible with each other; the same applies to all helicopters.
-
Page 159: Editing Names
Menus Sensor names The names of the sensors are Names as defined by the inherited from the current model. template. When you have selected all options mentioned above move the input cursor to OK. You create a new model memory with the settings selected above by pressing the wheel or the ENTER button. -
Page 160: Erasing Model Memories
Menus 5.8.5 Erasing model memories You can use the Erase menu to erase one or more model memories. The menu shows a list of all the available model memories. The current model is bolded. The current model memory cannot be erased. Select a model memory. -
Page 161: Safety Check
Menus 5.8.6 Safety check The Safety check parameter switches the confirmation prompt on or off. This function is always activated for newly created model memories. The safety check allows you to check the position of all the controls before establishing a wireless connection. Pay special attention to the controls for throttle and landing gear. -
Page 162: Operating The Transmitter
Operating the transmitter Operating the transmitter PROFI TX is operated using the keypad and the central wheel. Operation using the keypad Fig. 17: Keypad 6.1.1 Direct access buttons for menus The keypad is arranged in two rows. The upper rows has six buttons for accessing the main menus directly. -
Page 163: Buttons For Special Functions
Operating the transmitter 6.1.2 Buttons for special functions The lower keypad row provides the following functions: Button Function Allocation button: Activation button for the digi-adjusters (see section 6.3 "Digi- adjuster" on page 164). In the menu: Servo > Calibrate: The servo—and all the other servos to which the same control function or mixer is assigned—automatically assume the position corresponding to the percentage figure at the selected calibration... -
Page 164: Text Input
Operating the transmitter Up (plus) button; pressing the button has the same effect as turning the wheel in the clockwise direction: In the status displays: Every time you press the button the screen cycles to the next status display. ... -
Page 165: Operation Using The Wheel
Operating the transmitter Operation using the wheel You can use the central wheel to navigate through the menus and to edit set values. The wheel can be turned in increments to the left or to the right and it can be pressed. Turning the wheel ... -
Page 166: Digi-Adjuster
Operating the transmitter Digi-adjuster A digi-adjuster can be installed in each of the two installation slots on the right and left side at the transmitter front (see section 3.3.4 "Installing additional controls" on page 37). A digi-adjuster of this type can be allocated to most of the set values. This allows you to change two set values directly. -
Page 167: Setting A Value
Operating the transmitter 6.3.2 Setting a value Initially, the digi-adjusters are locked after switching the device on. The padlock icon in the middle of the first line is closed. Press the allocation button to open the input. In the status displays #2 to #8, the button activates / deactivates the optional digi-adjusters. -
Page 168: Erasing The Allocation
Operating the transmitter 6.3.3 Erasing the allocation Allocations can only be erased in status display #2 (see page 87). § Press the allocation button to open the padlock icon. Press and hold the REV/CLR button and turn the digi-adjuster for which you wish to erase the allocation. -
Page 169: Assigning Controls To Control Functions
Operating the transmitter Assigning controls to control functions The assignment for controls and switches defines which functions in the transmitter or model are controlled by which control. Controls, i.e. actuators, are: Sticks Slide potentiometers Rotary potentiometers Switches and their designated buttons Controls can be assigned to control functions and/or switched functions. - Page 170 Operating the transmitter Controls mode Ailerons, elevators and rudders are controlled by the stick units. The stick units are assigned to the individual axes using the standardised controls mode (1 to 4). You configure the controls mode in the Setup > Assign.Controls > Ctrl Mode menu (see section 5.3.5 "Assign.Controls"...
- Page 171 Operating the transmitter Assignment list To assign a control function proceed as follows: Move the input cursor to the control function you wish to assign a control to. Open the input field. 3. Assign a control by pressing the + / – buttons, by using the central wheel or by operating the control.
- Page 172 Operating the transmitter Control functions of the model templates PROFI TX The following control functions are defined in the model templates. The control functions 1 to 3 are assigned using the controls mode. Fixed-wing Vehicles Ships / boats Tanks Helicopters models Aileron Gimbal h...
-
Page 173: Assigning Switches
Operating the transmitter 6.4.2 Assigning switches Switches are controls that toggle functions or switch functions on/off. Switches are assigned in the Setup > Assign.Switches menu (see section 5.3.6 "Assign.Switches" on page 102). This menu includes a list of the switchable functions provided in the software. - Page 174 Operating the transmitter Switch Description Frame Frame timer Sum timer Interval Interval timer Variometer Tone of the variometer Teacher For transferring control functions to the student Phase 4 Switches from every flight phase to phase 4 Phases 1-3 For switching between the flight phases. Sensor Alarm For clearing the warning bar and for switching the sensor alarm tone off.
- Page 175 Operating the transmitter MagicSwitch The PROFI TX features 2 MagicSwitches. A MagicSwitch is a logical switch which can be assigned and inverted like a real control. It combines up to three switches (including the second MagicSwitch and flight phases) in an AND function. Unused inputs are considered switched on. The MagicSwitch is switched on when all switches that are assigned to it are switched on.
-
Page 176: Operating The Transmitter Using The Pc
Operating the transmitter using the PC Operating the transmitter using the PC PROFI TX You can use the supplied USB cable to connect the to any PC or tablet featuring an operating system that supports USB mass storage and an USB port that is compliant with the USB standard (4.5-5.5V / 500mA). -
Page 177: Editing Model Memories
Operating the transmitter using the PC PROFI TX switches on automatically when it is supplied with charging voltage. The USB icon is shown on the right side of the screen and the state of charge and the charging current are displayed on the left. PROFI TX logs into the PC as mass storage (drive) with the name "PROFI TX". -
Page 178: Software Update
Operating the transmitter using the PC Software update The "Update" folder on the PC is used for updating the software on your PROFI TX and for changing the language pair. Connect the transmitter to the PC. Open the "PROFI TX" mass storage. 3. -
Page 179: Model Flying Simulator
Operating the transmitter using the PC Model flying simulator PROFI TX You can use the to control a model flying simulator in two ways: Via USB cable Via M-LINK in conjunction with the MULTIFlight stick In both cases, you have the following options: ... -
Page 180: Via Usb Cable
Operating the transmitter using the PC 7.5.1 Via USB cable If the PROFI TX transmitter is operating in normal mode and is connected to the PC via USB cable, it logs into the PC as a game controller. Upon first time use, Windows automatically installs the required drivers. -
Page 181: Using The Multiflight Stick
Operating the transmitter using the PC 7.5.2 Using the MULTIFlight stick Insert the MULTIFlight stick in a free USB socket on your PC. Wait until the driver installation process, which starts automatically, is completed. Now, you have to bind stick and transmitter. Press and hold the MULTIFlight stick button until the yellow LED starts to flash. -
Page 182: Multiflight Simulator
Operating the transmitter using the PC 7.5.3 MULTIFlight simulator The simulator is available as freeware download on our website: www.multiplex-rc.de Two options are available for configuring the PROFI TX transmitter for simulator mode: Would you like to use "Trim", "D/R", "Expo", "Combi-Switch" and "Ctrl.Mix"? Create a new model using the BASIC template (page 155) and change the model name (page 157), e.g. -
Page 183: Creating And Customising Models
Creating and customising models Creating and customising models The following chapters contain detailed descriptions of the menus and how the transmitter is operated using the keypad or central wheel: "Menus", see page 86 "Operating the transmitter", see page 160 Fixed-wing models 8.1.1 The procedure in principle... - Page 184 Creating and customising models 5. Open the Memory > Edit name main menu and enter a unique and descriptive name for the model (see section 5.8.4 "Editing names" on page 157). 6. Assign the desired controls (actuators) to the control functions in the Setup > Assign.Controls menu (see section 5.3.5 "Assign.Controls"...
-
Page 185: Adjusting Rotation Direction And Maximum Travels For The Servos / Control Surfaces
Creating and customising models 8.1.3 Adjusting rotation direction and maximum travels for the servos / control surfaces Use electronic means as little as possible to reduce the servo travels. Otherwise, you will forfeit servo resolution! If possible, implement major changes using control surface linkages. 8.1.3.1 Configuring aileron differential Open the Mixer >... - Page 186 Creating and customising models 2. Open the REV/TRM parameter and set aileron travel to the left. If the left aileron does not move up, reverse the servo using the REV/CLR button. 3. Move the aileron stick to the centre position. Move the control surface to the neutral position using the central wheel or the + / –...
- Page 187 Creating and customising models 14. Choose a P1 and P5 setting so that control surface travels on the right aileron are identical to those on the left aileron: Open the input field P1. Press the button. Both ailerons move to the negative maximum. Use P1 to align the negative travel of the right aileron with that of the left aileron.
-
Page 188: Adjusting Elevators
Creating and customising models 8.1.3.3 Adjusting elevators Open the Servo > Calibrate > 2: ELEVATOR+ menu. 2. Open the REV/TRM parameter and apply up-elevator. If the elevator moves down, reverse the servo using the REV/CLR button. 3. Move the control surface to the neutral position using the central wheel or the + / –... -
Page 189: Adjusting Flaps
Creating and customising models 8.1.3.5 Adjusting flaps If your model has inboard flaps perform step 1 to 4 in section 8.1.3.1 "Configuring aileron differential" on page 183 for the inboard flaps. 2. If your model features mechanical airbrakes, extend them using the assigned controls. -
Page 190: Using Camber-Changing Flaps As Spoilers
Creating and customising models 8.1.5 Using camber-changing flaps as spoilers If your model has inboard flaps, you should use the camber-changing flaps also as airbrakes (spoilers): Open the Mixer > FLAPS+ menu. Set the value for the Spoiler > Travel parameter to 100%. Move the control for the Spoiler control function to maximum. - Page 191 Creating and customising models Other control functions: If required, assign other control functions to unused servo channels in the Servo > Assignment menu (see section 5.6.2 "Assignment" on page 142). V-TAIL+: In the Servo > Assignment menu, reassign servo channels 2 and 3 from ELEVATOR+ / Rudder to V-TAIL+.
-
Page 192: Helicopter Models
Creating and customising models Helicopter models 8.2.1 The procedure in principle A model memory for a helicopter with 120° CCPM rotor head and electric power system is created in this example. The following steps are required to ensure correct operation of the basic model functions: Creating a new model in the transmitter, see page 190 2. - Page 193 Creating and customising models Selecting a template Thanks to pre-defined model templates (see page 53) new models can be created more easily and quickly since the basic configuration is more or less completed by selecting the template. You can use the Memory > Edit name menu to find out which template was used for model creation.
- Page 194 Creating and customising models Editing the model name The new model that is created has the same name as the template used: HELIccpm. For easier reference, you should change the name to the actual model name: 7. Open the Memory > Edit name menu. 8.
-
Page 195: Preparing Controls And Switches
Creating and customising models Switch assignment The Setup > Assign.Switches menu contains: Function Switch You can use this switch to alternate from the CS/DTC throttle curve to direct throttle control using the throttle limiter. Useful for configuring I.C. engines. Throttle-cut Do not use any button here! Switch for the sum timer, controlled by control F>... - Page 196 Creating and customising models 4. Operate the throttle stick vigorously. Leave it in idle position. The direction arrow points to the current position of the stick. Never change the assignments and/or rotation direction of controls and switches when the model is switched on. Power systems and servos may start up unexpectedly and cause damage.
-
Page 197: Checking And Changing Servo Assignment
Creating and customising models 8.2.4 Checking and changing servo assignment The servo assignment defines: The receiver output controlling the servo The number of curve points (2, 3, or 5) used for adjusting the servo travel Defaults The rotor head servos and the servo gyro have 3 curve points (the centre can also be set). - Page 198 Creating and customising models 8. Set the number of curve points to 2P. Only the end positions then require setting. This always yields a straight line between the points. 9. Confirm the change by pressing ENTER. Servo 3 and servo 4 are now swapped. All the head servos are in sequence. PROFI TX Page 196...
-
Page 199: Checking And Adjusting The Main Rotor
Creating and customising models 8.2.5 Checking and adjusting the main rotor Secure the model when you set the rotation direction, centre, and travels for the servos to prevent danger or damage due to unexpected reactions. 8.2.5.1 Checking / changing direction of servo rotation on the rotor head The directions of travel for the servos must be checked and changed (if required) before centre and travel are set. -
Page 200: Calibrating Servos: Setting Centre And Maximum Travel
Creating and customising models If you move the collective pitch stick slightly from the neutral position before pressing the REV/CLR button, the servo will jump to the new position when you reverse it. This is an easy way to check that you have selected the "correct" servo. 6. - Page 201 Creating and customising models First, perform a hardware calibration: Press the button. This generates the "true" centre, without the influence of the trim or mixer inputs on the servo. If the servo is not in the desired centre position at this stage, it is essential to correct the control surface position mechanically (by re-positioning the output arm on the servo, or otherwise adjusting the linkage).
- Page 202 Creating and customising models Setting the maximum servo travel (control surface travel) At this point, set the maximum required value for blade deflection; this is generally the auto-rotation value. The smaller values required for normal flying can be set for the individual flight phases in the ControlFunctions menu under Collective.
-
Page 203: Checking And Adjusting The Tail Rotor
Creating and customising models 8.2.6 Checking and adjusting the tail rotor 8.2.6.1 Checking / changing the direction of servo rotation for the tail rotor The direction of servo travel must be checked and changed (if required) before centre and travel are set. When entering the basic settings do not connect the tail rotor servo via the gyro, but directly to the respective receiver output. - Page 204 Creating and customising models Coll.+ / Coll.- (REVO-MIX) You can use the Coll.+ / Coll.- parameters to set the collective pitch mixers for the tail rotor separately for climb and descent, and for each flight phase: Coll.+: correction for climbing ...
-
Page 205: Gyro
Creating and customising models 8.2.7 Gyro The Gyro control function is intended for gyro systems which allow radio-controlled configuration of the sensitivity via a servo channel. If Gyro is not assigned to a servo channel, this function is not available in the Controls menu. -
Page 206: Setting Gyro Suppression
Creating and customising models In controls mode, gyro sensitivity can only be set manually using the Gyro control function (factory setting: slider E). To this end, Fixval.Sense must be set to OFF. The next line now shows the position (50%) and control (<E): 8.2.7.1 Setting gyro suppression Many gyros reduce their effect (sensitivity) when the pilot gives a deliberate... -
Page 207: Throttle
Creating and customising models 8.2.8 Throttle Does not apply to the FUNCOPTER template! For throttle-controlled helicopters, the simple throttle setting of fixed-wing models is used. See chapter 5.4.2 on page 117. The Throttle control function can be adjusted using 7 curve points or using a fixed value when the electric power system operates in Governor mode. -
Page 208: Setting The Collective Pitch Curve
Creating and customising models Sometimes, it can be useful to operate the throttle directly without any restrictions. To do so, assign a switch to the CS/DTC switched function as described on page 104. When this switch is in ON position, the limiter controls the throttle directly. -
Page 209: Working With Flight Phases
Creating and customising models 8.2.10 Working with flight phases Requirement To allow working with flight phases, at least one switch must be assigned in the Setup > Assign.Switches menu (either for Phase 4 or Phases 1-3). Otherwise, the transmitter always operates in Phase 1. For each flight phase, you can customise the control characteristics on the transmitter according to the requirements of the model (e.g. -
Page 210: Assigning Switches For Flight Phases
Creating and customising models Names are pre-assigned to all four possible flight phases. However, those can be edited using the + / – button or the central wheel. 8.2.10.2 Assigning switches for flight phases At least one of the two switches must be assigned before you can use different control settings in the flight phases: Open the Setup main menu. -
Page 211: Copying Flight Phases
Creating and customising models Open the Setup main menu. 2. Open the Flight phases menu. 3. Select the respective flight phase in the menu. 4. Every time you press the REV/CLR button, the flight phase toggles between locked and unlocked. 5. -
Page 212: Changing Flight Phase Names
Creating and customising models 8.2.10.5 Changing flight phase names You can select any of the 13 pre-set names for the flight phases: NORMAL SPEED1 HOVER START1 SPEED2 START2 CRUISE ACRO THERMAL1 LANDING THERMAL2 AUTOROT After activating the input field for the name, select a suitable name by pressing the + / –... -
Page 213: Maintenance And Care
The transmitter does not require any special maintenance or care. However, we strongly recommend that you have the transmitter checked by an authorised MULTIPLEX Service Centre at regular intervals (every two or three years), depending on the intensity of use. Regular functional and range checks are mandatory (see section 3.6 "Range check"... -
Page 214: Appendix
Appendix Appendix 10.1 Specifications PROFI TX 9 PROFI TX 12 PROFI TX 16 Channels Model memories Transmission type M-LINK 2.4GHz spread spectrum + frequency hopping Servo pulse width at UNI 1.5 ± 0.55ms +/- 100% servo travel Power supply 3.3V LiFePO4 4000mAh Current consumption approx. -
Page 215: Accessories
Appendix 10.2 Accessories 2-position ON/OFF switch, long Item No.: 75750 2-position ON/OFF switch, long Item No.: 75751 3-position ON/OFF/ON switch, short Item No.: 75752 3-position ON/OFF/ON switch, short Item No.: 75753 COPILOT Item No.: 45184 Digi-adjuster Item No.: 75755 Rotary knob Item No.: 75756 PROFI TX hand-rest Item No.: 85701... - Page 216 Appendix Aluminium stick unit, long, with 2-position switch Item No.: 85940 Aluminium stick unit, long, with 3-position switch Item No.: 85941 Aluminium stick unit, long, with push-button Item No.: 85942 Transmitter case Item No.: 763323 Lanyard transmitter neckstrap Item No.: 85710 Standard transmitter neckstrap Item No.: 85711 Push-button...
-
Page 217: Glossary Of Technical Terms
Glossary of technical terms Glossary of technical terms Allocation Permanently assigning a set value to a digi-adjuster. Assignment Defines which functions in the transmitter or model are controlled by which control. Battery management Determines the remaining operating time (time to empty), the capacity and other battery data from the current and voltage characteristics. - Page 218 Glossary of technical terms Differential Indicates the percentage by which the travel distance of the control surface down is reduced relative to the travel distance up; if the differential is set to 50%, the travel distance down is half as great as the travel distance up. The higher the % value, the shorter the travel distance of the control surface down.
- Page 219 Glossary of technical terms Expo Generates a non-linear control function. For Expo = 0%, the control works in a linear fashion. The effect of negative values is that smaller control surface travels are generated around the centre position with the same stick travel, thus providing finer control.
- Page 220 Glossary of technical terms Mode Defines the assignment of the main control functions Aileron, Elevator, and Rudder to the stick units. Model template Template for creating new models; thanks to model templates, new models can be created more easily and quickly since the basic configuration is more or less completed by selecting the template.
- Page 221 Glossary of technical terms Throttle curve PROFI TX Only used for helicopters. The throttle curve of the has 7 points and determines how much throttle is assigned to the various individual positions of the collective pitch stick. The aim is a constant speed, i.e. the higher the collective pitch, the more the throttle is advanced.
-
Page 222: Index
Index Index Binding ........49, 216 Accessories ......... 214 (parameter) ........ 95 ACRO ..........60 procedure ........50 Address (parameter) ....101 Buttons ........161 Adjusting control surface travel allocation button ....... 162 fixed-wing model ...... 184 ENTER ........162 Adjusting elevators main menus ...... - Page 223 Index Flap .......... 122 Elevator (menu) ......116 Gyro ......... 123 ENTER button ......162 helicopter models ..... 114 Erase model memory (menu) ..159 Retract.Gear......122 Error messages ......160 Rudder ........116 ESD notes ........16 Speed ........122 Expo ..........
- Page 224 Index create new........ 191 Memory ........153 flight phases ......208 Mixer ........127 Gyro mixer ........ 204 Setup .......... 93 gyro suppression ...... 205 Timer ........146 lock flight phases ..... 209 Main rotor main rotor ......... 198 helicopter model ....... 198 model name ......
- Page 225 Index Model template ...... 54, 219 Retract.Gear (menu)....122 ACRO ......... 60 REV/TRM (parameter) ....140 BASIC ........58 RF module ........29 BIG SCALE ........ 69 Rotation (parameter) ....135 CAR / TRUCK ......79 Rotation direction DELTA WING ......65 main rotor, helicopter model ..
- Page 226 Index Slow (parameter) .. 96, 118, 120, 122, Target (parameter) ...... 129 Teacher mode ....... 51 Snap flap ........219 Template (parameter) ....156 Software update ......177 Test run ........145 Sounds (parameter) ..... 110 Text input ........163 Source (parameter) .....
- Page 227 Index stick units ......24, 34 Student mode ......51 Update ......... 177 switch off ........47 USB sockets ......27, 30 switch on ........46 User data (menu) ......111 Teacher mode ......51 trim buttons ........ 24 Variometer ........220 USB sockets.......
Need help?
Do you have a question about the PROFI TX 9 and is the answer not in the manual?
Questions and answers