Advertisement
Quick Links
DO NOT
RETURN THIS PRODUCT
TO THE STORE
NE PAS
RETOURNER CE PRODUIT
AU MAGASIN
Need Assistance? Please contact us!
If you encounter any di culty with this product please email us
service@nuvatek.com
or call us, Monday to Friday 9:00 AM to 5:00 PM EST
1-888-840-9999 or 514-631-7799
Our representatives are ready to help you with any questions.
We can guide you through rst time use and product features.
Just give us a call or send us an email.
Manuals can be downloaded at : www.nuvatek.com
Vous avez besoin d'aide? Contactez nous!
Si vous éprouvez des di cultés avec cet appareil, veuillez nous contacter
service@nuvatek.com
ou par téléphone, lundi au vendredi 9h -17h HNE
1-888-840-9999 ou 514-631-7799
Nos représentants sont à votre disposition pour répondre à toutes les questions.
Nous pouvons vous guider lors de la première utilisation
et vous fournir des explications sur toutes les caractéristiques.
Appelez-nous ou envoyer un courriel.
Les manuels peuvent êtres téléchargés à : www.nuvatek.com
Advertisement

Related Manuals for Frigidaire Oslo OWF-1/0303


Summary of Contents for Frigidaire Oslo OWF-1/0303
- Page 1 DO NOT RETURN THIS PRODUCT TO THE STORE NE PAS RETOURNER CE PRODUIT AU MAGASIN Need Assistance? Please contact us! If you encounter any di culty with this product please email us service@nuvatek.com or call us, Monday to Friday 9:00 AM to 5:00 PM EST 1-888-840-9999 or 514-631-7799 Our representatives are ready to help you with any questions.
-
Page 2: Year Limited Warranty
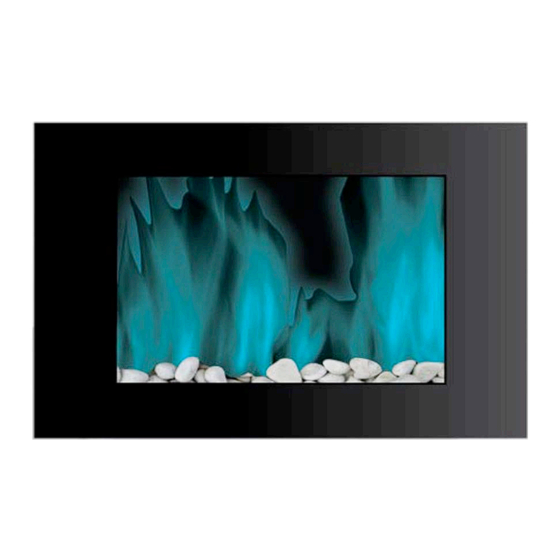
1 Year Limited Warranty WARRANTY ELECTRIC FIREPLACE LIMITED WARRANTY: This manufacturer’s product warranty extends to the original con- sumer purchaser of the product. Neither the retailer nor any other company involved in the sale or promotion of this product is a co-warrantor of this manufacturer warranty. WARRANTY DURATION: All materials and workmanship are warranted to the original consumer purchaser for a period of one (1) year from the original purchase date. - Page 3 IMPORTANT INSTRUCTIONS & OPERATING MANUAL Oslo Wall Mount Color Changing LED Fireplace Item No: OWF-1/0303 Read these instructions carefully before attempting to assemble, install, operate or maintain the product. Protect yourself and others by observing all safety information. Failure to comply with instructions could result in personal injury and / or property damage.
-
Page 4: General Safety Information
GENERAL SAFETY INFORMATION When using this fireplace, basic precautions should always be taken to reduce the risk of fire, electric shock and injury to persons, including the following: CAUTION – Due to the high temperature, keep electrical cords, drapery and other furnishings at least 3 feet from the front, side and rear of the fireplace. - Page 5 remove from the outlet. 26. This fireplace is intended for supplemental heat and / or decorative purposes. Continuous use for several hours can impact the performance and life of the fireplace. 27. It is not intended to be used in commercial, industrial or agricultural settings. 28.
- Page 6 Sr. No Item Description Quantity Carton Screws ( 4 x 8 mm) Screws ( 4 x 35mm) Fixed Angle Plastic Plug ( 8 mm) Foam Protection (Left) Electric Fireplace Bracket Plastic Plug ( 8 mm) Screws ( 4x35 mm) Remote Control Foam Protection (Right) Power Cord Helpful Advice Before Installation...
- Page 7 Installation Do not connect the fireplace to the power supply until properly fixed to the wall and the • instructions are carefully read. Make sure the area to be drilled does not have any hidden electrical wires or water and •...
- Page 8 Step Two • Make sure the area to be drilled does not have any hidden electrical wires or water and gas pipes. • The screws provided is for concrete walls only; please use suitable fixings for your wall type. If in doubt, contact a qualified hardware expert. Drill holes into the wall with respect to the four markings and then insert the screw •...
- Page 9 Step Four Unpack the pebbles from the bag and place them along the light unit in the desired • position. Please note the pebbles are located in the side of the polystyrene packaging. Step Five Place the front frame over the front of the fireplace aligning the slots in the bracket at •...
-
Page 10: Troubleshooting
buttons on the remote control more than once within two seconds in order for the fireplace to operate properly. • Press the standby button on the remote control once to turn on the fireplace with flame effect. Press the “750W” button once for low heat setting. Press the button again to switch off •... - Page 11 Cleaning & Maintenance Disconnect from the power supply before attempting any maintenance or cleaning in • order to reduce the risk of fire, electric shock to persons or damage to property. Warning - Always disconnect from the power supply before cleaning fireplace. •...
Need help?
Do you have a question about the Oslo OWF-1/0303 and is the answer not in the manual?
Questions and answers