Table of Contents
Advertisement
Advertisement
Table of Contents

Related Manuals for Geemarc PhotoDECT


Summary of Contents for Geemarc PhotoDECT
- Page 1 PhotoDECT Amplified Digital Cordless Telephone With Large Buttons English...
-
Page 2: Table Of Contents
CONTENTS CONTENTS CONTENTS INTRODUCTION Unpacking the Telephone DESCRIPTION General Description INSTALLATION Location Setting Up Battery Use On/Off Settings HANDSET SETTINGS Alarm Setting Audio Setup Ringer Setup Tone Setup Range Alarm Language Setting HS Label Auto Answer LCD Settings Date & Time Setting Select Base Handset Default BASE SETTINGS... - Page 3 CONTENTS Flash Time Setting Modify PIN Base Default USING THE TELEPHONE Making a Call Receiving a Call Hands Free Mute Function Receiving Volume Last Number Redial Recalling Recent Numbers Adding Recent Numbers to the Phone Book Deleting Recent Numbers Flash Signal Paging the Handset Call Timer Key Lock...
- Page 4 CONTENTS Dialling using a Phone Book Entry Modify a Phone Book Entry Delete a Phone Book Entry Delete all Phone Book Entries Phone Book Status PHOTO DIAL Storing a Number to Photo Dial Memory Dialling a Photo Dial Number Delete and Replace a Photo Dial Number Delete all Photo Dial Numbers ADDITIONAL HANDSETS &...
-
Page 5: Introduction
This telephone is hearing aid compatible. Its is important that you read the instructions below in order to use your Geemarc telephone to its full potential. Keep this user guide in a safe place for future reference. This guide explains how to use the following telephone: PhotoDECT This guide applies to single and multiple handset systems. -
Page 6: Unpacking The Telephone
INTRODUCTION Unpacking the Telephone When unpacking the telephone, you should find the following in the box: • 1 PhotoDECT handset • 1 PhotoDECT base • 1 Mains power adaptor • 1 Telephone line cord • 2 x AAA Ni-MH rechargeable batteries •... -
Page 7: Description
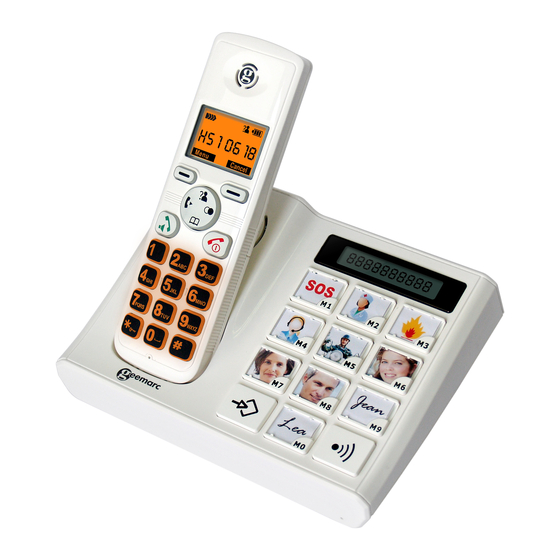
DESCRIPTION General Description Handset Description (front) Earpiece LCD Display Cancel / Menu / Mute Key OK Key Redial Key Scroll up / Caller ID Key Scroll down / Phonebook Key Intercom Key Dial / End / Power Key Speaker Key Numerical Keypad Microphone... - Page 8 DESCRIPTION Handset Description (Rear) Speaker Battery Compartment Cover Charging Contacts...
- Page 9 DESCRIPTION Base Description (Top) Charging Pins Base Display Direct Picture Memory Buttons Page Button MEMO Button Base Description (Rear) Power Jack Phone Line Jack...
- Page 10 DESCRIPTION Speaker Dial/ Make/Answer a call Activates the speakerphone if pressed during a call End/Power key End a call. Long press to power the telephone on and off Navigation Button Up/CID key Scroll up through lists and menu options. Increase the earpiece/speakerphone volume during a call.
- Page 11 DESCRIPTION Menu key (left) Enter the menu functions in standby mode. Confirm selections & actions. Performs "Flash" function. Menu key (right) Return to the previous menu. Activate mute during a call. Delete an incorrect character/digit Star key Press and hold to turn on/off keypad lock function.
- Page 12 DESCRIPTION LCD Screen Description The LCD screen is split into two distinct areas: The icon area. This is found at the top of the screen. This displays the various system icons which help you to use the telephone. The main area. This is found across the centre of the screen. It displays the following: •...
- Page 13 DESCRIPTION Battery Status icon This is always displayed when your telephone is switched on. It shows the level of battery charge. More bars indicate more battery charge Alarm Icon This indicates that the alarm has been set to ring at a specified time (left side) key is used to activate the menu.
- Page 14 DESCRIPTION Menu Map Caller ID Book Phone Book Edit Delete Delete All PB Status BS Setting Terminate HS Dial Mode Flash Time Modify PIN BS Reset HS Setting Alarm Audio Setup Ring Setup Tone Setup Language HS Name Auto Answer LCD Contrast Date &...
-
Page 15: Installation
INSTALLATION Location Ensure you situate the telephone close enough to the power socket so that the cable will reach safely without stretching. Also, the mains power needs to be easily accessible in case you need to disconnect the power. Make sure the telephone is at least 1 metre away from other electrical products e.g.TV, radio and monitors so as to avoid interference. -
Page 16: Setting Up
INSTALLATION Setting Up Plug the power cable into the power socket on the base. Plug the adaptor end of the power cable into the mains supply and switch the supply on. (*) Connect the line cord plug to the line socket on the base. Connect the other end of the line cord to the PTT socket. -
Page 17: Battery Use
The telephone has an automatic charging control to avoid excessive charging. Before the handset can be used, the handset batteries must be charged for a minimum of 15 hours on the PhotoDECT base. Battery Use icon is continuously displayed at the top right corner of the LCD display. -
Page 18: On/Off Settings
HANDSET SETTINGS On/Off Settings When the handset is placed on the charger it automatically switches on. Alternatively, press for about 5 seconds. The telephone will enter subscription mode in which the handset is searching for a registered base. On successfully finding a base, the LCD window will display the time (either set by yourself –... -
Page 19: Handset Settings
HANDSET SETTINGS HANDSET SETTINGS Alarm Setting You are able to set an alarm and adjust the settings using the handset. will be displayed if you set the alarm to ring. Press (left side) to activate the menu to scroll through the menu to select ‘HS SETTING’... -
Page 20: Audio Setup
HANDSET SETTINGS Audio Setup The hands free speaker volume can be adjusted. Likewise, if using an earpiece, the volume heard through the earpiece can be adjusted. Press (left side) to activate the menu to scroll through the menu to select ‘HS SETTING’... -
Page 21: Ringer Setup
HANDSET SETTINGS Ringer Setup Ringer Tones There is a choice of 10 handset ringer tones to notify you of incoming calls. You can select different tones to notify you if the call is internal (from other handsets registered to the same base) or external (from the telephone network). - Page 22 HANDSET SETTINGS Ringer Volume There is a choice of five handset ringer volumes. The handset ringer can also be turned off. Press (left side) to activate the menu to scroll through the menu to select ‘HS SETTING’ Press (left side) to confirm to scroll through the menu to select ‘RING SETUP’...
-
Page 23: Tone Setup
HANDSET SETTINGS Tone Setup A key tone is heard every time you press a key on the handset. This can be switched to silent. Note: Warning tones will still be emitted when an incorrect key is pressed. Press (left side) to activate the menu to scroll through the menu to select ‘HS SETTING’... -
Page 24: Range Alarm
HANDSET SETTINGS Range Alarm A beep will emit a sound when the handset is out of range from the base. You are able to enable/disable this audible warning. Press (left side) to activate the menu to scroll through the menu to select ‘HS SETTING’... -
Page 25: Language Setting
HANDSET SETTINGS Language Settings The handset supports nine languages. You can select the language used to display menu options. Press (left side) to activate the menu to scroll through the menu to select ‘HS SETTING’ Press (left side) to confirm to scroll through the menu to select ‘LANGUAGE’... -
Page 26: Hs Label
HANDSET SETTINGS HS Label The handset has a name - “HS n” (where n is either 1,2,3,4 or 5). This number indicates that the handset is the nth handset registered to the base i..e. HS 1 is the 1 handset registered to the base. -
Page 27: Auto Answer
HANDSET SETTINGS Auto Answer Auto answer allows you to answer a call by simply picking up the handset from the base without pressing any key. Press (left side) to activate the menu to scroll through the menu to select ‘HS SETTING’ Press (left side) to confirm to scroll through the menu to select... -
Page 28: Lcd Settings
HANDSET SETTINGS LCD Settings There are 17 LCD contrast settings available. Press (left side) to activate the menu to scroll through the menu to select ‘HS SETTING’ Press (left side) to confirm to scroll through the menu to select ‘CONTRAST’ Press (left side) to confirm to scroll through the 17 available... -
Page 29: Date And Time Setting
HANDSET SETTINGS Date and Time Setting Date Format The date format displayed on the handset can be changed. The format can be either dd//mm or mm/dd. Press (left side) to activate the menu to scroll through the menu to select ‘HS SETTING’... - Page 30 HANDSET SETTINGS Time Format The time format displayed on the handset can be changed. The format can be either 12 hour or 24 hour. Press (left side) to activate the menu to scroll through the menu to select ‘HS SETTING’ Press (left side) to confirm to scroll through the menu to select...
- Page 31 HANDSET SETTINGS Date & Time Setting Press (left side) to activate the menu to scroll through the menu to select ‘HS SETTING’ Press (left side) to confirm to scroll through the menu to select ‘DATE & TIME’ Press (left side) to confirm to scroll through the menu to select ‘SET DATE’...
-
Page 32: Select Base
HANDSET SETTINGS Select Base You can select a base from those already registered to the handset Press (left side) to activate the menu to scroll through the menu to select ‘HS SETTING’ Press (left side) to confirm to scroll through the menu to select ‘SELECT BS’... -
Page 33: Handset Default
HANDSET SETTINGS Handset Default You can reset the handset settings to the factory default. Press (left side) to activate the menu to scroll through the menu to select ‘HS SETTING’ Press (left side) to confirm to scroll through the menu to select ‘HS RESET’... -
Page 34: Base Settings
BASE SETTINGS Terminate Handset You can delete a handset registration from a base. Press (left side) to activate the menu to scroll through the menu to select ‘BS SETTING’ Press (left side) to confirm Press (left side) again to select ‘TERMINATE HS’... -
Page 35: Dial Mode Setting
BASE SETTINGS Dial Mode Setting In the UK, all telephone exchanges now use Tone dialling. The dial mode setting is pre-set to Tone. If your telephone does not dial out, it is probably being used from an older private switchboard (PBX). In this case, the dial mode must be changed to Pulse. -
Page 36: Flash Time Setting
BASE SETTINGS Flash Time Setting The flash time setting can be changed. Press (left side) to activate the menu to scroll through the menu to select ‘BS SETTING’ Press (left side) to confirm to scroll through the menu to select ‘FLASH TIME’... -
Page 37: Modify Pin
BASE SETTINGS Modify PIN The PIN is pre-set to ‘0000’. This can be changed – this is recommended for confidentiality. Press (left side) to activate the menu to scroll through the menu to select ‘BS SETTING’ Press (left side) to confirm to scroll through the menu to select ‘MODIFY PIN’... -
Page 38: Base Default
BASE SETTINGS Base Default You can reset the base settings to the factory default. Press (left side) to activate the menu to scroll through the menu to select ‘BS SETTING’ Press (left side) to confirm to scroll through the menu to select ‘BS RESET’... -
Page 39: Using The Telephone
USING THE TELEPHONE Making a Call Pick up handset. Press will be displayed on the LCD When you hear dialing tone, dial the number on the keypad. To end the call simply press or place the handset on the base Pre-Dialling Pick up handset. -
Page 40: Receiving A Call
USING THE TELEPHONE Receiving a Call When an incoming call is received the telephone rings. If the caller can be identified (due to subscription to a Caller ID service), the caller’s telephone number will be displayed. If this caller’s number is stored on the Phonebook, the associated name will be displayed. -
Page 41: Mute Function
USING THE TELEPHONE Mute Function If you wish, you can speak privately to someone else in the room with you without your caller overhearing. You will still be able to hear the caller but they cannot hear you during the mute operation. During a call, press (right side) The LCD will show‘CALL MUTED’... -
Page 42: Last Number Redial
USING THE TELEPHONE Last Number Redial To redial the last number dialled: Pick up handset. Press in standby mode Press to dial the number Recalling Recent Numbers You can call back any of the last 10 numbers dialled as follows: Pick up handset. -
Page 43: Adding Recent Numbers To The Phone Book
USING THE TELEPHONE Adding Recent Numbers to the Phone Book Pick up handset. Press in standby mode to scroll through the dialled numbers until you find the number you wish to add to phone book Press (left side) to confirm Press (left side) again to select ‘ADD TO PB’... - Page 44 USING THE TELEPHONE Press (left side) to confirm. Press to return to standby or wait 30 seconds...
-
Page 45: Deleting Recent Numbers
USING THE TELEPHONE Deleting Recent Numbers To delete a specific number in the redial memory Pick up handset. Press in standby mode to scroll through the dialled numbers until you find the number you wish to delete Press (left side) to select to scroll through the menu to select ‘DELETE’... - Page 46 USING THE TELEPHONE To delete all numbers in the redial memory Pick up handset. Press in standby mode Press (left side) to select to scroll through the menu to select ‘DELETE ALL’ Press (left side) to select You will be prompted to confirm, press (left side) again to confirm...
-
Page 47: Flash Signal
USING THE TELEPHONE USING THE TELEPHONE Flash Signal (left side) key can also be used with special services such as Call Waiting (if provided by your service provider) or transferring external calls to another extension within a private switchboard. The LCD will display ‘R’. Paging the Handset If you wish to locate the handset simply follow the instructions below: Press... -
Page 48: Caller Id
CALLER ID The features described in this section are only available if you subscribe to a Caller ID service from your network provider. Caller ID means you can see who is calling on your handset display (provided the number is not withheld, unavailable or is an international call). -
Page 49: View Caller Id Book
CALLER ID View Caller ID Book Press (left side) to activate the menu Press (left side) to select ‘CID BOOK’ The list of numbers in the Caller ID book will be displayed to scroll through the list Alternatively, you can access the book by pressing key whilst in standby mode. -
Page 50: Add A Number From The Caller Id Book To The Phone Book
CALLER ID Add a Number from the Caller ID Book to the Phone Book Pick up handset and press MENU Press (left side) to chose MORE in standby mode The list of numbers in the Caller ID book will be displayed to scroll through the list until you find the required number Press... -
Page 51: Delete A Number From The Caller Id Book
CALLER ID Delete a Number from the Caller ID Book Pick up handset and Press MENU Press (left side) to chose More in standby mode to scroll through the list until you find the number you wish delete Press (left side) to select to scroll through the menu to select ‘DELETE’... -
Page 52: Phone Book
PHONE BOOK Telephone numbers can be stored in the phone book. It allows you to store frequently used numbers so that you can easily make a call without having to remember or enter the telephone number The phone book can contain 50 entries. Each phone number can contain up to 20 digits and have a name of up to 12 characters. - Page 53 PHONE BOOK Press (left side) to confirm. You can then repeat the process again and add another entry to the phonebook or press to return to standby or wait 30 seconds Note: Press (right side) to clear the last digit and then enter the correct number Press (right side) for more than one second to clear all...
-
Page 54: View Phone Book Entries
PHONE BOOK View Phone Book Entries Pick up handset. Press in standby mode The list of names in the phone book will be displayed to scroll through the list to find the required name Press (left side) to view the telephone number Dialling using a Phone Book Entry Pick up handset. -
Page 55: Modify A Phone Book Entry
PHONE BOOK Modify a Phone Book Entry Press (left side) to activate the menu to scroll through the menu to select ‘PHONE BOOK’ Press (left side) to select to scroll through the menu to select ‘EDIT’ Press (left side) to select to scroll through the list to find the required phone book entry to be modified Press... -
Page 56: Delete A Phone Book Entry
PHONE BOOK Press (left side) to confirm to scroll through the melody menu to select desired ringer tone. As you scroll through, the telephone demonstrates the selected melody. If you want to set a VIP number, you should select a special ring tone for it. -
Page 57: Delete All Phone Book Entries
PHONE BOOK Press (left side) to select You will be prompted to confirm, press (left side) again to confirm Delete All Phone Book Entries Press (left side) to activate the menu to scroll through the menu to select ‘PHONE BOOK’ Press (left side) to select to scroll through the menu to select... -
Page 58: Phone Book Status
PHONE BOOK Phone book Status The phone book status shows the number of entries already stored in the phone book e.g. 05/50 Press (left side) to activate the menu to scroll through the menu to select ‘PHONE BOOK’ Press (left side) to select to scroll through the menu to select ‘PB STATUS’... -
Page 59: Photo Dial
PHOTO DIAL Storing a Number to Photo Dial Memory There are 10 photo dial memory buttons. You can slip your contact’s photograph under the perspex of the button. This is very useful if you tend to forget telephone numbers or names. MEMO Press (found on the base) whilst the telephone is... -
Page 60: Additional Handsets & Bases
ADDITIONAL HANDSETS & BASES The handset that came with your base is already registered to the base (factory setting). This is registered as handset 1. Each additional handset you purchase must be registered to the base. Up to 5 handsets can be registered to one base unit. This means you can make internal calls between registered handsets, transfer an incoming call between handsets and answer a call anywhere in the office/home at any time as all the handsets will call at the... -
Page 61: Register A New Handset
ADDITIONAL HANDSETS & BASES Register a new Handset Before registering a handset to the base, you should press and hold the key on the bottom of the base for about 5 seconds and then release it. Press (left side) to activate the menu to scroll through the menu to select ‘REGISTRATION’... -
Page 62: Select A Base
ADDITIONAL HANDSETS & BASES Select a Base Your handset can be used with up to 4 bases. See Select Base in Handset Settings. Note: In order to use the handset with more than one base unit, the handset must be registered with each base (see Register a New Handset section). -
Page 63: Internal Calls
ADDITIONAL HANDSETS & BASES Internal Calls When using several handsets registered to the same base unit, you can make internal calls and transfer external calls between handsets. Make an Internal Call Press Enter the handset number you wish to page (1-5) Notes: If an incorrect handset number is entered i.e. -
Page 64: Call Transfer Between Handsets
ADDITIONAL HANDSETS & BASES Call Transfer between Handsets An external call can be transferred from one handset to another. During an external call, when you wish to transfer the call. press . Your external caller will be placed on hold Enter the handset number you wish to transfer to (1-5) The paged handset will ring. -
Page 65: Three Way Conference Call
ADDITIONAL HANDSETS & BASES Three Way Conference Call When you have both an external call and an intercom call in progress, you can set up a three way conference call During an external call. press . Your external caller will be placed on hold Enter the handset number you wish to join the three way conference call (1-5) The paged handset will ring. -
Page 66: Call Waiting
CALL WAITING Caller ID on Call Waiting When you subscribe to a Call Waiting service from your local telephone service provider, the LCD will display the name and number of the second caller while you are having a conversation with the first caller. Press (left side) + the number 2 to answer the second caller... -
Page 67: Troubleshooting
TROUBLESHOOTING General Checks • Make sure that the telephone line cord and adaptor are correctly plugged in and they are not damaged. • Make sure the batteries are inserted correctly. • Make sure that the batteries are fully charged. • Connect another telephone to the telephone PTT socket or move your telephone to another socket to track if the failure is coming from your telephone or your PTT socket. - Page 68 TROUBLESHOOTING A warning tone is heard during a call: • The batteries are empty. The handset needs to be replaced in the base in order to recharge. • You are out of the base coverage area. No number is displayed when the telephone rings: •...
-
Page 69: Safety Information
SAFETY INFORMATION General Only use the power supply included with the product. Only use the approved rechargeable batteries supplied. Do not open the handset (except to replace the handset batteries) or base. Contact the helpline for all repairs. Never dispose of batteries in a fire. There is a serious risk of explosion and/ or the release of toxic chemicals. -
Page 70: Guarantee
GUARANTEE From the moment your Geemarc product is purchased, Geemarc guarantee it for the period of one year. During this time, all repairs or replacements (at our discretion) are free of charge. Should you experience a problem then contact our help line or visit our website at www.geemarc.com. - Page 71 GUARANTEE Electrical connection: The apparatus is designed to operate from a 230V 50Hz supply only. (Classified as ‘hazardous voltage’ according to EN60950 standard). The apparatus does not incorporate an integral power on/off switch. To disconnect the power, either switch off supply at the mains power socket or unplug the AC adaptor.
-
Page 72: Recycling Directives
- Or, hand the old product to the retailer. If you purchase a new one, they should accept it. Thus if you respect these instructions you ensure human health and environmental protection. For product support and help visit our website at www.geemarc.com Telephone 01707 384438 Or fax 01707 832529 UGPhotoDECT_En_v1.2... - Page 73 UGPhotoDECT_En_Ver 1.2...
Need help?
Do you have a question about the PhotoDECT and is the answer not in the manual?
Questions and answers