Advertisement
Quick Links
QUICK USER GUIDE
!!! Please refer to our website: www.geemarc.com for an up
to date user guide, as there may be important updates and
changes you need to be aware of !!!
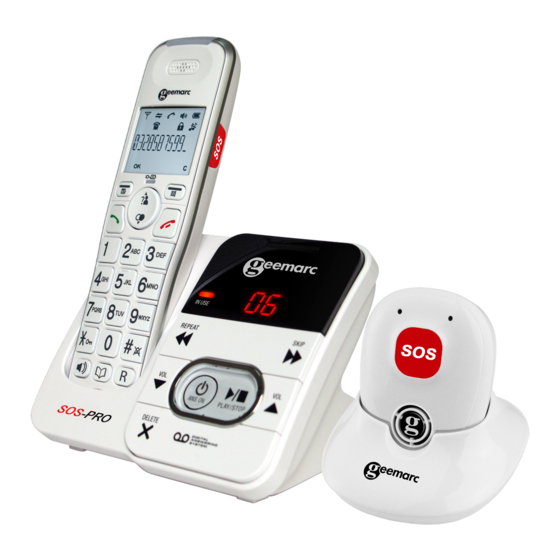
Base
Handset
Alarm pendant (SOS-PRO295)
1 2 3 4
Connection
PACKAGE CONTENTS
1 Telephone base, 1 cordless Handset, 1 power adapter, 1 Alarm pendant,
1 pendant charger, 1 lanyard with breakout clip, 1 Telephone line cord, 1
NiMh battery pack, 1 Quick user guide.
INSTALLATION
Connecting the telephone
Connect the telephone cable to the telephone line socket (A) and to the
telephone wall socket (B).
Connect the power adapter jack to base (C) then connect the power
adapter plug in mains power (D).
Note: Use only the power adapters supplied with the phone.
Charger: Connect the power adaptor of the pendant in main power (D)
Connecting the battery
Plug the battery connector securely
into the socket inside the handset
battery compartment.
Insert the supplied battery as indicated.
Align the cover flat against the battery
compartment, and then slide it upwards
until it clicks into place.
Charging the batteries
Charge the batteries for at least 12 hours when charging for the first time
for the handset and the alarm pendant.
OVERVIEW
Base
1-
/HANDSET LOCATOR
While the phone is idle, press to page all handsets.
2- IN USE
ON when handsets are in use, or when the answering system
is answering an incoming call.
ON when a handset is being registered.
Flashes when there is an incoming call or when handsets are
being deregistered.
Flashes when another telephone is in use on the same line.
3- MESSAGE COUNTER
Flashes when there is an incoming call.
4-
/SKIP
Press to skip a message.
5- VOL (
)
During message playback, press to increase the listening volume. While
in idle mode, press to increase the base ringer volume.
6-
/PLAY/STOP
Press to start or stop message playback.
7-
/ANS ON
Press to turn the built-in answering system on or off.
8-
/DELETE
Press to delete the message currently playing.
Long press to delete all old messages when the phone is not in use.
9- VOL (
)
During message playback, press to decrease the listening volume. While in
idle mode, press to decrease the base ringer volume.
10-
/REPEAT
Press to repeat a message.
Press twice to play the previous message.
Handset
1. EARPIECE
2. LCD DISPLAY
3. CHARGE LIGHT (
)
Steadily on when the handset is charging in the charger.
4. MENU/OK (
)
In idle mode: Press to access the main menu.
In sub-menu mode: Press to confirm the selection.
During a call: Press to access Intercom / Phonebook / Redial list / Call list.
5. UP/CALL LIST (
)
In idle mode: Press to access the call list.
In menu mode: Press to scroll up the menu items.
In phonebook list/redial list/call list: Press to scroll up the list.
In editing mode: Press to move the cursor one character to the left.
During a call: Press to increase the listening volume.
During ringing: Press to increase the ringer volume.
6. TALK ON (
)
In idle/pre-dial mode: Press to make a call in earpiece mode.
In phonebook/redial list/call list: Press to make a call to the selected entry
in the list in earpiece mode.
During ringing: Press to answer a call in earpiece mode.
7. DOWN/REDIAL LIST (
)
In idle mode: Press to access the redial list.
In menu mode: Press to scroll down the menu items.
In phonebook list/redial list/call list: Press to scroll down the list.
In editing mode: Press to move the cursor one character to the right.
During a call: Press to decrease the listening volume.
During ringing: Press to decrease the ringer volume.
8. SPEAKERPHONE (
)
In idle/pre-dial mode: Press to make a call in speakerphone mode. Press
again to switch to earpiece mode.
In phonebook list/redial list/call list: Press to make a call to the selected
entry in the list in speakerphone mode. Press again to switch to earpiece
mode.
During ringing: Press to answer a call in speakerphone mode. Press again
to switch to earpiece mode.
9. MICROPHONE
10. SOS
In idle mode: Press and hold for a second to enter the emergency calling
sequence set in your handset.
In call mode: press and hold for 2 seconds to stop the emergency call.
11. CANCEL/MUTE (
)
In main menu mode: Press to go back to idle screen.
In sub-menu mode: Press to go back to previous menu.
In sub-menu mode: Press and hold to go back to idle screen.
In editing/pre-dial mode: Press to delete a character/digit.
In editing/pre-dial mode: Press and hold to delete all the characters/digits.
During a call: Press to mute/resume the microphone.
During ringing: Press to silence the handset ringer.
In idle mode: Press to intercom another handset.
12. TALK OFF (
)
During a call: Press to end a call and go back to idle screen In
menu/editing mode: Press to go back to previous menu.
In menu/editing mode: Press and hold to go back to idle screen.
In idle mode: Press and hold to power off the handset.
Press and hold to power on when it is off.
13. ALPHANUMERIC KEYPAD, STAR (
), HASH (
In predial or editing mode: Press to insert a digit / character / / .
key in idle mode: Press and hold to enable or disable the keypad
lock.
key in idle mode: Press and hold to turn on/off the ringer.
0
key in idle/pre-dial mode/number editing mode: Press and hold to
insert a pause.
14. R
During a call: Press to answer a new call if you subscribed to Call Waiting
service from your service provider.
15. PHONEBOOK (
)
In idle mode: Press to access the phonebook.
ALARM PENDANT
1. SOS:
In idle mode, press to enter the emergency calling sequence set
on your handset.
In call mode: press and hold for 2 seconds to stop the emergency call.
2.
/
During a call: increase or increase the receiving volume
:
level, during ringing: increase or decrease the ringer level.
Press and hold
for 2 sec to do a flash ® to answer a second
incoming call ringing.
3. M1
dial the direct memory 1
4. M2
dial the direct memory 2
5. RESET
6. Microphone
7. Led indicator
(Purple)
- Steady On: Un-register.
- Slow Flash: registered but the base is not available. Searching or out
of range.
(Blue)
- Steady On: Seated in the base and fully charged.
- Steady on 3s and emit a long beep: Successfully registered.
- Double flashing: Off hook.
- Double flashing and on for 2s when just off hook: Off hook but the
signal is weak. Hear 3 rapid beeps in every 10s.
- Short flashing: idle mode and off the charger, the pendant is in
Standby mode.
- Long flashing: idle mode and off the charger. Continuously flashing:
ringing and can be heard.
(Red)
- In continue on the charger: The pendant charges.
- Long flashing: The battery is low in using and we hear a short double
beeps.
(Red/Bleu)
- Pairing mode after to hold and press the leys Vol(+) and Vol(-) during
10sec.
8. LOUDSPEAKER
9. CHARGER CONTACTS
MENU SETTING
The phone settings are always set in the same manner:
Press Menu/OK
button to open the main menu. Then use the
▼▲buttons to select an entry and confirm it by pressing the Menu/OK
button.
The factory preset PIN code is 0000
Example: Set the language on the handset
Press MENU / OK
, then select ▼▲HS settings, press MENU /
OK
, then select ▼▲language, press MENU / OK
select ▼▲desired language and then press MENU / OK
confirm.
Handset
PHONEBOOK
►VIEW LIST
under an entry: ►ADD ►VIEW ►EDIT ►DELETE ►DELETE ALL ►PB
STATUS ►FASTDIAL
CALL LIST
►VIEW LIST
under an entry: ►ADD TO PB ►DELETE ►DELETE ALL ►DETAILS
►CATEGORY
)
BS SETTINGS
►BS RINGER ►RING VOLUME ►DELETE HS ►DIAL MODE ►FLASH
TIME ►CHANGE PIN
, than
to
Advertisement

Subscribe to Our Youtube Channel
Related Manuals for Geemarc Amplidect 295 SOS-Pro


Summary of Contents for Geemarc Amplidect 295 SOS-Pro
- Page 1 During a call: Press to answer a new call if you subscribed to Call Waiting Handset !!! Please refer to our website: www.geemarc.com for an up service from your service provider. to date user guide, as there may be important updates and 1.
- Page 2 , enter number then OK. records unanswered calls when it is on. The answering machine can The Geemarc guarantee in no way limits your legal rights. store up to 59 messages within the maximum recording time of IMPORTANT: YOUR RECEIPT IS PART OF YOUR GUARANTEE AND Registration the Alarm pendant approximately 15 minutes.
Need help?
Do you have a question about the Amplidect 295 SOS-Pro and is the answer not in the manual?
Questions and answers