Blaupunkt TravelPilot RNS 149 Operating Instructions Manual
Radio/navigation
Hide thumbs
Also See for TravelPilot RNS 149:
- Operating instructions manual (86 pages) ,
- Installation instructions manual (8 pages) ,
- Circuit diagrams (24 pages)
Table of Contents
Advertisement
Quick Links
Advertisement
Table of Contents

Related Manuals for Blaupunkt TravelPilot RNS 149


Summary of Contents for Blaupunkt TravelPilot RNS 149
- Page 1 Radio/Navigation TravelPilot RNS 149 Operating instructions...
-
Page 2: Equipment Illustration
Equipment illustration... -
Page 3: Equipment Illustration
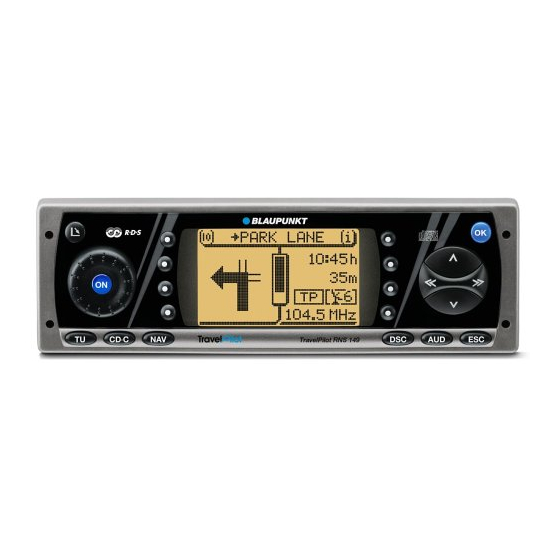
Equipment illustration Open button, opens the operating panel. Volume control. ON button. Hotkey, programmable function key. Refer to the section on “Pro- gramming the hotkey” in the chapter on "Set-up" Dot-matrix display. Info key. During route guidance press the Info key to have the last voice output for navigation repeated and the active destination dis- played. -
Page 4: Menu Overview
Menu overview Tuner operation CD player, CDC operation Navigation operation Main tuner menu Main navigation menu Main CD menu Tuner functions menu Route guidance menu CD function menu Tuner DSC menu CD DSC menu Nav DSC menu... -
Page 5: Safety Notes
Safety notes The TravelPilot has been designed for use in cars. The special information required by navigation systems for lorries or busses, such as height restrictions or maximum permissible loads, is not included on the navigation CDs. Operating the system while driving If you do not focus your full attention on the traffic situation at all times, you could cause serious accidents. -
Page 6: Table Of Contents
Contents Equipment illustration ....2 Radio operation ......16 Scan seek tuning ........ 21 Starting Scan seek tuning ..... 21 General operating instructions .. 10 Starting radio operation ....16 Ending Scan seek tuning ....22 Selecting the waveband or Storing radio stations ...... - Page 7 Contents CD operation ........ 24 Naming CDs ........28 Navigation ........32 Entering the name ......28 Starting CD playback ......24 How navigation works ....... 32 Deleting characters ......29 Inserting a CD ......... 24 Deleting the current name ..... 29 Starting navigation ......
- Page 8 Contents Special destinations in the destination Destination memory ......51 CD changer operation ....60 town, surrounding the destination, Storing a destination in the Inserting CDs into the CD changer ... 60 surrounding your current location destination memory ....... 51 Starting CD changer operation ..
- Page 9 Contents Track programming ......66 Mute ............. 71 Altering the clock ....... 78 Creating the track program .... 66 Cancelling the mute function ..71 Selecting the time format ....78 Deleting tracks from the track Selecting the time zone ....78 Selecting the waveband or memory program ...........
-
Page 10: General Operating Instructions
General operating instructions Switching the system on/off To switch your TravelPilot on press the blue ON button 3 in the centre of the volume control 2. The system will begin to play the audio source which was active last at the power-on volume level. -
Page 11: Selecting The Operating Mode
General operating instructions Selecting the operating mode To select the operating mode, press: TU @ for radio operation, CD.C ? to activate CD-player or CD-changer operation (optional), NAV > to activate navigation. When you use one of these buttons to switch between the audio sources, you will access the main menu for the audio source selected. -
Page 12: Switching Between The Main And The Route Guidance Menus For Navigation
General operating instructions Switching between the main and the route guidance menus for navigation If you want to switch between the main and the route guidance menus when route guidance is active, Press NAV >. Activating the DSC menu To access the DSC menu in the individual operating modes press DSC ; once briefly. -
Page 13: Display
General operating instructions Display The TravelPilot display provides you with all of the information required for nav- igation, such as the visual driving recommendations and the menus and lists for the radio, CD-player and CD-changer audio sources. If the system has been installed accordingly, it will automatically switch to night display when the vehicle headlights are switched on. -
Page 14: Adjusting The Tone And The Balance/Fader
General operating instructions Adjusting the tone and the balance/fader The TravelPilot allows you to make separate adjustments to the bass and treble for each audio source. The settings selected for the balance, the fader and the Loudness are the same for all of the audio sources. -
Page 15: Switching On Coded Systems After They Have Been Disconnected From The Vehicle Battery
General operating instructions Switching on coded systems after they have been discon- nected from the vehicle battery f you attempt to switch on a coded system after it has been disconnected from the vehicle battery, e.g. after a repair has been made to the vehicle, a code inquiry will appear in the display. -
Page 16: Radio Operation
Radio operation Starting radio operation Press TU @. Radio operation will begin and the main menu will appear in the display. The station you last tuned into will begin to play. The six softkeys located at the sides of the display are used to recall the radio stations which have been stored as well as to store the radio stations. -
Page 17: Activating/Deactivating Rds-Reg
Radio operation You will access the DSC menu for radio operation and find the menu item for RDS in the bottom line on the left. Here you can choose between the following options: VAR , FIX and OFF . VAR is the default setting. Press the softkey marked RDS repeatedly until the desired option is dis- played next to RDS . -
Page 18: Switching Pty On/Off
Radio operation Press the softkey marked REG repeatedly until the desired option ap- pears next to REG . OFF is the default setting. Switching PTY on/off PTY (Program Type) is also an RDS service. With PTY, the radio stations indi- cate the contents of the program they are broadcasting. -
Page 19: Activating/Deactivating The Ta Function For Radio Operation
Radio operation If the TravelPilot TA function is active, traffic announcements will be broadcast at the minimum volume selected in the Set-up Volume. If the TA function is activated for the other sources, (CD player and CD changer as well as navigation), playback will be interrupted for an incoming traffic an- nouncement and the message will be broadcast. -
Page 20: Selecting A Station, Fm
Radio operation Selecting a station, FM There are several ways in which you can select radio stations with the TravelPilot. Automatic station seek tuning To select radio stations automatically, on the rocker switch 7 to start station seek tuning upwards or Press on the rocker switch 7 to start station seek tuning downwards. -
Page 21: Selecting Radio Stations, Am (Mw)
Radio operation Selecting radio stations, AM (MW) In AM radio operation, you can select stations both automatically and manually. Automatic station seek tuning To select stations automatically, on the rocker switch 7 to start seek tuning up or Press on the rocker switch 7 to start seek tuning down. The system will tune into the next available station. -
Page 22: Ending Scan Seek Tuning
Radio operation If you want to end Scan seek tuning or continue listening to the station currently being scanned, Press ESC 9. Scan seek tuning will end, the station selected last will continue to play. Storing radio stations The TravelPilot is able to store 18 FM stations in three memory banks and six AM stations (MW) in one memory bank. -
Page 23: Storing Stations Automatically With "Travelstore
Radio operation The system is able to store the six stations within reception range with the strong- est reception signals in the FMT memory bank. This function is particularly use- ful on longer trips. Please note that all of the stations previously stored in the FMT memory bank will be replaced by the new stations. -
Page 24: Cd Operation
CD operation You can use the TravelPilot’s integrated CD drive to play audio CDs. When you play audio CDs, your access to navigation is limited to NO MAP route guidance. Use only audio CDs bearing this label: During CD playback, the display will indicate the track number and the playing time or only the track number in the top line of the main CD menu. -
Page 25: Starting Cd Playback For The Integrated Cd Player (No Cd Changer Connected)
CD operation Starting CD playback for the integrated CD player (no CD changer connected) If an audio CD has been inserted and there is no CD changer connected, Press CD.C ?. The system will switch to the main CD menu and CD playback will begin. If there is no audio CD inserted, a corresponding message will appear in the display. -
Page 26: Traffic Announcements During Cd Operation
CD operation Traffic announcements during CD operation To switch the standby function for traffic information (see the chapter on “Traffic Announcement TA”) on or off during CD operation, Press DSC ;, This will activate the DSC menu for CD operation. Press the softkey marked TA . -
Page 27: Random Play (Mix)
CD operation Random play (MIX) You can have the tracks on a CD played in random order. Press CD.C ? to switch to the CD function menu and Press the softkey marked MIX . To end the MIX function, repeat these steps. The MIX function will end automat- ically if you activate the SCAN function. -
Page 28: Ending The Repeat Function
CD operation Ending the Repeat function If you want to end the Repeat function, Press ESC 9. Naming CDs The TravelPilot also allows you to name your CDs. The name can consist of up to seven characters. The name you give to the CD will not be deleted when you remove the CD from the CD player. -
Page 29: Deleting Characters
CD operation Press OK 8, or Press down OK 8 for longer than two seconds. After the name has been stored, the system will switch to the CD function menu. The name will now appear in the functional display area of the main CD menu. Deleting characters If you want to delete a letter, Mark the... -
Page 30: Track Programming
CD operation Track programming You can also program the tracks you would like to listen to on a CD. This allows you to omit the tracks you do not want to play. Creating the track program To create the track program, Press CD.C ? to switch to the CD function menu, Press the softkey marked PROGRAM . -
Page 31: Deleting Tracks From The Track Program
CD operation Deleting tracks from the track program To delete tracks from the track program, Activate the Program menu, to select the track you want to delete, and Press the softkey marked SKIP . Starting/stopping the track program Once you have programmed all of the tracks you want to have played, Press the softkey marked RUN . -
Page 32: Navigation
Navigation RNS 149 navigation enables you to find destinations quickly and easily without having to study a lot of road maps. When the navigation function is active, the voice output from the RNS 149 will guide you along the best route. The system will warn you well in advance when you are required to make a turn. -
Page 33: Destinations
Navigation Destinations The destinations available include: • the town centre or a special part of the city in large cities, • a street, • a junction of two or more streets • a house or a block of houses, • Special destinations such as train stations, airports, restaurants and public facilities. -
Page 34: Selecting Letters
Navigation Selecting letters If you want to enter a name in the edit menu, proceed as follows: and << >> on the rocker switch 7 to move the cursor to the character you want to select, As you move the cursor, the character which it marks will be magnified in the zoom window. -
Page 35: Selecting Entries From Lists
Navigation Selecting entries from lists Press OK 8 to select the entry. Paging in lists Because the number of lines in the display is limited to five, lists which have more than five entries require more than one “page”. Lists with more than five entries are marked with arrows on the right-hand side. -
Page 36: Destination Entry - Town
Navigation Destination entry - Town If you want to drive to a destination in another town, you must first enter the town. Select DEST. ENTRY in the main navigation menu The destination entry menu will appear. Select TOWN The editing menu for entering the town name will appear. and <<... -
Page 37: Destination Entry - Street, Intersection And House Number
Navigation Once you have selected the place, you will be prompted to continue with DEST. ENTRY . Now select from among STREET , entry of the destination street. Whether or not you can enter a street as your destination depends on the size of the city/town selected and the data stored on your navigation CD. -
Page 38: Destination Entry - House Number
Navigation If the street name is listed more than once for the destination town, a submenu will appear so that you can select the correct street. After you have selected the street, you will access the destination entry menu. Select one of the following options: CONTINUE , you have completed entering your destination. -
Page 39: Destination Entry - Intersection
Navigation Destination entry - Intersection If you select INTERSECTION in the destination entry menu, a list of the availa- ble intersecting streets for the destination street will appear. If there are more than twenty intersections, an editing menu will appear so that you can find the intersection you are looking for more easily. -
Page 40: Special Destinations In The Destination Town, Surrounding The Destination, Surrounding Your Current Location And National Destinations
Navigation Special destinations in the destination town, surrounding the destination, surrounding your current location and na- tional destinations Special destinations which you can enter as destinations are divided into cate- gories. The categories are stored in alphabetical order. Categories for special destinations include e.g. -
Page 41: Special Destinations - In The Destination Town
Navigation Special destinations - In the destination town To be able to select special destinations at your destination town, you must first enter at least a town or town centre as your destination. Enter a town or town centre as your destination. After you have entered the town centre, select CONTINUE in the ad- dress entry menu . -
Page 42: Special Destinations - National Destinations
Navigation Special destinations - Supraregional destinations As special destinations, you can also select motorway access points or service points, airports or border crossings. Here you are not required to enter a destination first. All you have to know is the name of the special destination you are looking for. Switch to the destination entry menu. -
Page 43: Special Destinations - Surrounding The Current Location
Navigation A list displaying all of the available special destination categories will appear. Select the category you are looking for. If there are fewer than 20 entries available in the category selected, a list will appear. The special destinations available will appear in alphabetical order, in- dicating the distance to the destination selected. -
Page 44: Destination Entry - From The Destination Memory
Navigation If there are more than 20 entries available in the category selected, you will first see an edit menu. Enter the name of the special destination, Switch to the list and Select the destination you are looking for from the list. Once you have selected and confirmed the desired destination, the main navi- gation menu will appear. -
Page 45: Destination Entry - For A Position Marker
Navigation A list displaying the destinations available will appear. Select the destination you are looking for. The main navigation menu will appear. Now you can start route guidance. For more information, refer to the section on “Route guidance”. Destination entry - for a position marker You can also enter the destination in the form of a position marker you have set. -
Page 46: Route Guidance
Navigation Route guidance Starting route guidance After you have entered your destination and selected route options, if desired, you can start route guidance. on the rocker switch to select the menu item ROUTE GUIDANCE. Press OK 8 to confirm your selection. You can also activate the route guidance menu with the hotkey. -
Page 47: Switching The Audio Source
Navigation The status line includes symbols indicating the status of TA, the traffic announce- ment function, and the number of satellites the system is currently able to re- ceive. For more information on the TA function, read the section on “Traffic announcements during route guidance”. -
Page 48: Cancelling Route Guidance
Navigation Cancelling route guidance To cancel active route guidance, Press ESC 9 or start new route guidance or activate the locating mode. When you press ESC 9, you will be prompted to confirm your selection. If you really want to cancel route guidance, Select YES and Press OK 8. -
Page 49: Travel Guide
Navigation Travel guide If you use a navigation CD with a travel guide, you can access travel information on the destinations and select destinations for route guidance. As a rule, the information is divided into categories. These categories can include: Accommodation Food and Drink Tourist information... -
Page 50: Displaying The Route List
Navigation Displaying the route list It is possible to have the route list calculated by the navigation system displayed. Press NAV > to switch from the route guidance menu to the main nav- igation menu. Select the menu item ROUTE LIST from the main navigation menu. The route list which has been calculated will appear. -
Page 51: Destination Memory
Navigation Destination memory You can use the destination memory to store destinations and identify them with short names. You can view the contents of the destination memory sorted either alphabetically or according to the criteria you have chosen. Storing a destination in the destination memory You can store the currently active destination, or after route guidance has end- ed, the destination last entered for route guidance in the destination memory. -
Page 52: Sorting Destinations Manually
Navigation Select the destination whose name you want to change. An edit menu will appear. Enter a short name for the destination, symbol and press OK 8, or Select the Press OK 8 for longer than two seconds. Sorting destinations manually You can also sort the destinations in the destination memory manually. -
Page 53: Gps Status
Navigation SINGLE DEST. , you can select and delete individual destinations from the list of stored destinations. ALL DESTS. , all of the destinations in the list will be deleted. After you have selected the option you want, you will be prompted to confirm your selection. -
Page 54: Avoiding Traffic Congestion During Route Guidance
Navigation Avoiding traffic congestion during route guidance The TravelPilot allows you to avoid traffic congestion or closed portions of the road during active route guidance. To detour traffic congestion, proceed as fol- lows: Entering a detour of traffic congestion Press DSC ; to switch to the DSC menu for navigation. Select the menu item TAILBK AHEAD The detour of traffic congestion menu will appear. -
Page 55: Selecting Route Options
Navigation Selecting route options You can adapt the route to your specific needs at any time, even during active route guidance. The parameters which can be adjusted include: ROUTE , choose between the quickest and the shortest route. MOTORWAY , here you can determine whether or not route guidance will use motorways. -
Page 56: Setting A Position Marker
Navigation Setting a position marker You can store your current vehicle position at any time, even during active route guidance. To store your current vehicle position, Mark the menu item POSITION MARK in the DSC menu. Note: You can also activate the position marker with the hotkey by allocating the position marker function to the hotkey. -
Page 57: Traffic Announcements During Route Guidance
Navigation Traffic announcements during route guidance During route guidance, you can switch traffic information standby on or off, re- gardless of which audio source is active: radio or CD changer (optional). Activate the DSC menu for navigation, Select the menu item TA and Press OK 8. -
Page 58: Selecting Time Info
Navigation Selecting time info To switch between the display for remaining driving time to your destination and the arrival time, Press DSC ; to access the DSC menu and Mark the menu item TIME INFO. The option selected will appear in symbol form behind ZEITINFO. The clock symbol stands for the display of the remaining driving time and the finish-line flag for the time of arrival. -
Page 59: Simulating Route Guidance
Navigation Simulating route guidance The TravelPilot also allows you to simulate route guidance. The system demon- strates route guidance with visual driving recommendations and voice output in real time. If you want to start a navigation simulation, Enter a destination, Switch to the DSC menu for navigation, and Select the menu item NAVI SIMULATION . -
Page 60: Cd Changer Operation
CD changer operation You can operate the following Blaupunkt CD changers with the TravelPilot: CDC - A06 CDC - A072 CDC - A08 IDC - A09 For information on how to install the CD changer in your vehicle and connect it to the TravelPilot, refer to the installation and connection instructions enclosed with the CD changer. -
Page 61: Switching Between The Main Menu And The Function Menu
CD changer operation The numbers or names of the first five CDs in the changer will appear in the functional display area in the centre of the display. In addition, there is a menu field which you can use to access the second page of the main menu. -
Page 62: Selecting Cds
CD changer operation Selecting CDs To select a CD, Press the softkey allocated to the CD. If the CD you want to play is not displayed in the functional area of the display, switch to the second page of the main menu. Press the softkey marked CD6-CD10 or CD1-CD5 . -
Page 63: Random Play (Mix)
CD changer operation Random play (MIX) You can have the tracks on a CD or on all of the CDs in the changer played in random order. Press CD.C ? to switch to the function menu and Press the softkey marked MIX . The first, randomly selected track will begin to play. -
Page 64: Scanning Tracks (Scan)
CD changer operation Scanning tracks (SCAN) If you would like to scan all of the tracks on a CD or the tracks on all of the CDs in the changer, proceed as follows: Press CD.C ? to switch to the function menu and Press the softkey marked SCAN . -
Page 65: Repeating Tracks Or Cds (Repeat)
CD changer operation Repeating tracks or CDs (REPEAT) To repeat a track or a CD, activate the Repeat function. Starting the Repeat function Proceed as follows: Select the track or CD you want to repeat, Press CD.C ? to switch to the function menu and Press the softkey marked REPEAT . -
Page 66: Track Programming
CD changer operation Track programming You can also program the tracks you would like to listen to on a CD. This allows you to omit the tracks you do not want to play. Creating the track program To create the track program, Select the CD for which you want to program tracks, Press CD.C ? to switch to the function menu and Press the softkey marked PROGRAM . -
Page 67: Deleting Tracks From The Track Program
CD changer operation Deleting tracks from the track program To delete tracks from the track program, to select the track you want to delete, and Press the softkey marked SKIP . Starting/stopping the track program Once you have programmed all of the tracks you want to have played, Press the softkey marked RUN . -
Page 68: Naming Cds
CD changer operation Naming CDs The TravelPilot also allows you to name your CDs. The name can consist of up to seven characters. The name you give to the CD will not be deleted when you remove the CD from the CD changer. When it is inserted again at a later date, the name will appear in the display. -
Page 69: Deleting Characters
CD changer operation Deleting characters If you want to delete a letter, Mark the symbol, and Press OK 8. Deleting the current name To delete the name of the current CD, Switch to the CD Name menu and Press the softkey marked CLR NAME . The name will be deleted. -
Page 70: Switching The Playing Time Indicator On/Off
CD changer operation Switching the playing time indicator on/off During playback, either the track number and the playing time elapsed for the track or the number of the CD and the track number will appear in the top line of the main menu. -
Page 71: Rc06 Remote Control Unit
RC06 remote control unit With the help of the RC06 steering-wheel remote control, you can operate some of the basic TravelPilot functions conveniently without ever taking your hands from the steering wheel. Selecting the audio source Use the RC06 remote control to switch the active audio source. Press SRC 1 on the remote control. -
Page 72: Selecting The Waveband Or Memory Bank
RC06 remote control unit Selecting the waveband or memory bank To select a different waveband or a different memory bank for radio operation, 2 on the remote control. Press Starting station seek tuning If the RDS function is switched on, you can use << >> 2 to select RDS stations within reception range directly. -
Page 73: Set-Up/Basic Settings
Set-up/Basic settings The Set-up menu gives you the opportunity to adapt the basic system functions of the TravelPilot to your own personal requirements. In addition, you can also adjust special functions for the individual audio sources and for navigation in the DSC menus. -
Page 74: Adjusting The Day/Night Display, The Viewing Angle, Contrast And Brightness
Set-up/Basic settings Adjusting the day/night display, the viewing angle, contrast and brightness In the set-up for the display you can deactivate the automatic switch to night display and adjust the brightness separately for the day and night display. You can also adjust the viewing angle for the display. Automatic switch to night display If you want to deactivate the automatic switch to night display, Activate the Set-up menu,... -
Page 75: Altering The Display Brightness
Set-up/Basic settings Altering the display brightness If you want to alter the display brightness, on the rocker switch 7 to select the desired menu item and Repeat the steps as described in the section on “Adjusting the viewing angle”. Adjusting the power-on and announcement volume and GALA In the Set-up menu Volume you can adjust the power-on volume for the system, the minimum volume for traffic announcements (TA-MIN) , the minimum volume for voice output (NAV-MIN) and the setting for GALA, the speed-dependent vol-... -
Page 76: Programming The Hotkey
Set-up/Basic settings Press OK 8 or << >> on the rocker switch 7. The menu item selected will appear in a frame. Now you can adjust the setting. Use << >> on the rocker switch 7 to adjust the setting. To help you select the right setting, the volume will increase and decrease as you make the setting. - Page 77 Set-up/Basic settings If you are currently using a main or function menu, Press DSC ; twice. The system will switch to the Set-up menu. If the DSC menu for an audio source or navigation is active, Press DSC ; once, Press the softkey marked SETUP .
-
Page 78: Altering The Clock
Set-up/Basic settings Altering the clock Use the Set-up menu Time to activate or deactivate summer time as well as the time format (12/24 hours) and the time zone with respect to Central European Time (CET). These settings are required so that the TravelPilot is able to deter- mine the system time from the GPS time it receives. -
Page 79: Selecting The Language
Set-up/Basic settings Selecting the language Use this menu to select the language used for the displays and for route guid- ance by the navigation system. Nine languages are available. For English you can select between Metric (distances in kilometres) and Imperial (distance in miles). - Page 80 Set-up/Basic settings Follow the instructions given to you by the system and Press OK 8. You can cancel the process at any time. If you want to end the installation, Use << >> on the rocker switch 7 to select CANCEL and Press OK 8.
-
Page 81: Calibrating The System After A Tyre Change
Set-up/Basic settings Calibrating the system after a tyre change After a tyre change it might be necessary to calibrate the TravelPilot again. Select CALIBRATION from the Set-up menu Install. Mark and confirm the menu item TYRE CHANGE . Follow the instructions given to you by the system. Calibrating the system manually You can also calibrate the system manually. -
Page 82: Performing A System Test
Set-up/Basic settings Performing a system test You can also perform a system test. This test will check the GPS antenna and determine whether the back-up signal and the vehicle ignition are connected to the system correctly. Select the menu item SYSTEM TEST in the Set-up menu Install, Follow the instructions given to you by the system and Press OK 8. -
Page 83: Activating/Deactivating The System Coding
Set-up/Basic settings Activating/deactivating the system coding Activating/deactivating the coding In the Security Set-up you can activate the coding for your TravelPilot. If the coding is active, it will not be possible to start the system after it has been dis- connected from the vehicle battery unless the correct code number is entered (refer to “Switching on coded systems after they have been disconnected from the vehicle battery”). -
Page 84: Reset To Factory Settings
Set-up/Basic settings Reset to factory settings You can reset the TravelPilot to its original factory settings. This will affect all of the settings made for navigation and the audio sources. Select RESET from the Set-up menu. Step 1: If a navigation CD is inserted in the system, you will be asked whether or not you want to reset the settings for navigation. - Page 86 Blaupunkt-Werke GmbH Bosch Gruppe 06/99 Kn K7/VKD 8 622 401 665 GB/S/DK...
Need help?
Do you have a question about the TravelPilot RNS 149 and is the answer not in the manual?
Questions and answers